4
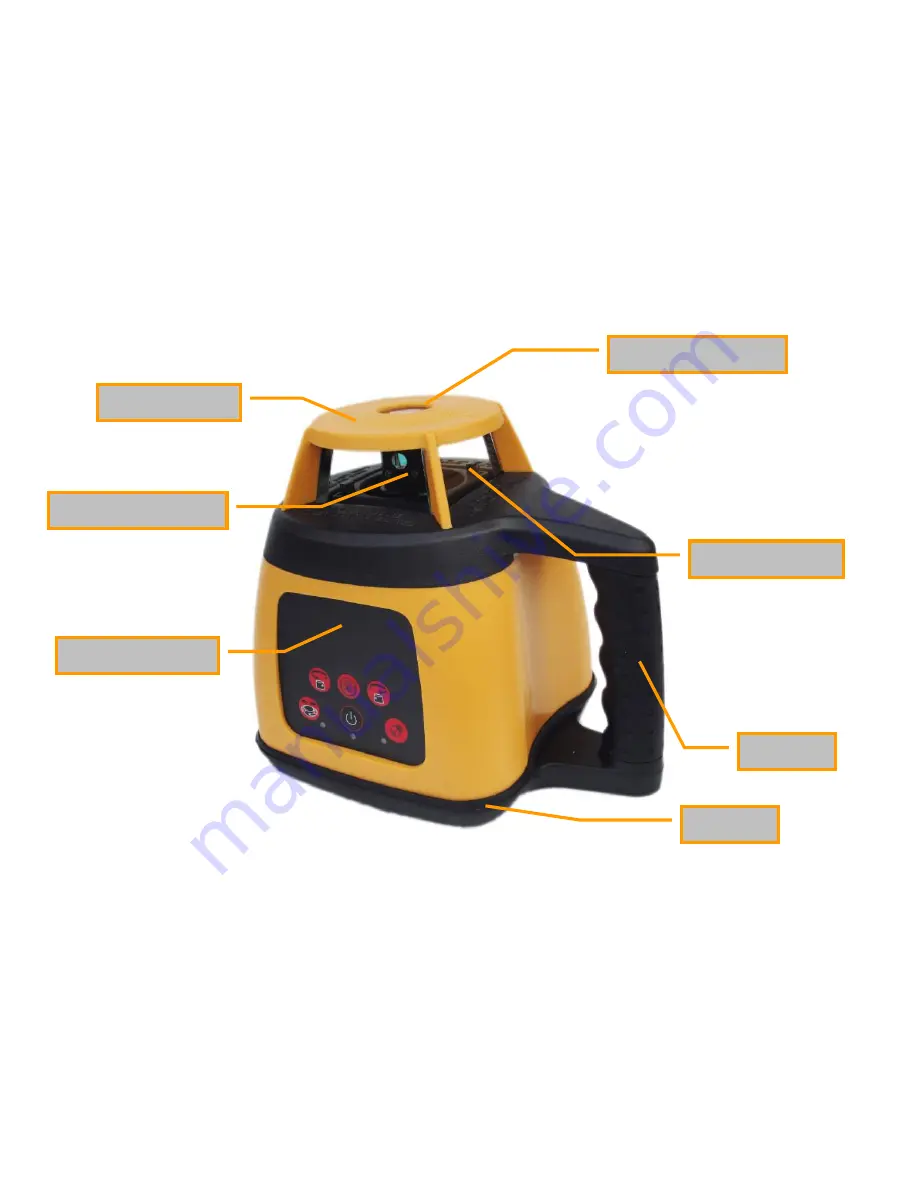
2. Find your way around the HV/HVG
Handle
Optical Glass
Light House
Control Panel
Base
Rotating Head
Plumb Up Beam
Страница 1: ...SRL300R G Spot On Rotary Laser 300 Red Green Operating Instructions Self levelling Automatic Horizontal and Vertical Rotary Laser...
Страница 2: ...The tripod leg clamps should be securely fastened If not securely fastened or tightened the main unit could fall off or the tripod could fall over The laser should not be stored or used in extreme tem...
Страница 3: ...2 1 What is included with your SRL300R...
Страница 4: ...Rotary Laser SRL300R Receiver FRD300 and Staff Clamp Remote Control FRR200 Charger FC100 UK Magnetic Laser Target Red Laser Enhancemant Glasses Red Hard CarryCase with Foam Insert Please contact your...
Страница 5: ...4 2 Find your way around the HV HVG Handle Optical Glass Light House Control Panel Base Rotating Head Plumb Up Beam...
Страница 6: ...5 2 1 Control Panel Switch ON OFF Left Spin Right Spin Direction Scan H I Alert Head Speed...
Страница 7: ...from 0 600rpm 5 Tilt H I alert Enabling this mode warns the user if the laser level has been jolted 6 Tilt indicator When the light is blinking slowly the laser is in H I alert mode When the light is...
Страница 8: ...g time for the SRL300 with a new battery pack that is at full charge is approximately 50 hours however this will decrease over time as the battery pack ages and due to the number of charges discharges...
Страница 9: ...the instrument recharging will be finished within 8 hours 4x5000mAh Ni Mh batteries 2 Power required for the charger Frequency 50 60HZ Voltage 85 265V 3 Charging and using of the instrument can progr...
Страница 10: ...n its leveling process The Power indicator light will be shown indicating that the unit is on and operating 3 Once the SRL300 has completed its self leveling process the laser will begin to rotate Ple...
Страница 11: ...be shown indicating that the unit is on and operating 3 Once the SRL300 has completed its self leveling process the laser will begin to rotate Please note that the leveling time can vary based on the...
Страница 12: ...light becomes constant the tilt alarm has been set 3 2 4 Directional scanning 1 Press the Speed key until it is at 0 r p m the laser module will stop spinning Press the Key Directional scanning the l...
Страница 13: ...panel includes 5 keys the indicator on the RC will wink to show the operating signal has been sent out once pressing any key Operation 1 Speed Control Button press once to increase speed press again...
Страница 14: ...ff To change between coarse and fine detection modes simply press the detection mode button on the control panel As the laser strikes the FRD300 REceiver sensor the speaker will beep and the LCD scree...
Страница 15: ...acy 7 1 Horizontal surface Checking 1 Place the instrument at the point of 50m in front of wall or set a scale plate at the point of 50m away from the instrument and then adjust the level of the base...
Страница 16: ...e mark the beam position on the wall or scale plate as H2 The difference between the value of H1 and H2 should be less than 10 mm 4 Repeat the same process to check your Y axis beam Again the differen...
Страница 17: ...he instrument on tripod between A wall and B wall Tripod near Wall A Distance should follow the instructions on illustration Switch the instrument on After leveling direct the laser beam onto the clos...
Страница 18: ...g the height after leveling direct the laser beam onto Wall B Mark the centre point of the laser beam on the opposite wall B Point II Without turning the instrument Position it close to wall B by movi...
Страница 19: ...ling align the height of the instrument by using tripod or by underlaying if necessary In such a manner that the centre point of the laser beam is projected exactly located the previously marked point...
Страница 20: ...d mark the centre point of the laser beam on wall A point III Tare care that point III is as vertical as possible above or below point I The difference D of both marked points I and III on wall A amou...
Страница 21: ...50m radius 300m diameter Four head speeds 600 300 R P M Four scan widths 10 45 90 180 Bright visible beam Wavelength 635nm Class II IR Remote control Available distance 20 m Operation temperature 20 C...