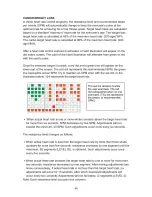
SportsArt Fitness G872 Скачать руководство пользователя страница 45

VARI-STRIDE

This workout program automatically adjusts stride length over 40 segments. Unlike 
other workout programs, the goal of the VARI-STRIDE program is always one of 
three time lengths.

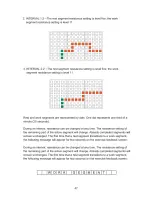
After you press the VARI-STRIDE key, the TIME LED will light up. Follow prompts on 
the display to enter your age and weight values. The message screen will then 
prompt you to select one of three workout time lengths.

˙

1-20 is a 20-minute workout, each segment of which lasts 30 seconds.

˙

1-30 is a 30-minute workout, each segment of which lasts 45 seconds.

˙

1-40 is a 40-minute workout, each segment of which lasts 60 seconds.

At this time, the workout goal percentage complete and setting screens will not be lit. 
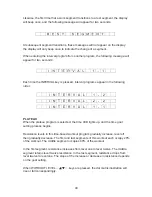
If you do not press any number key within six seconds, the following prompt will 
appear for two seconds on the message screen:

At this time, either press numerical keys (1, 2, 3) to select one of the three workout 
durations, or press the ENTER key to directly select the default 20-minute workout.

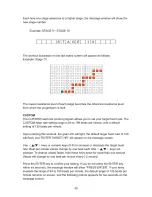
After establishing the workout duration, maximum stride length must be selected. 
Stride length range is 25 to 29 inches or 630 to 730 mm, depending on the units of 
measure activated in User Preference Settings. The default stride setting is either 25 
inches (imperial units) or 630 mm (metric units).

In the setting window, the default stride setting (either 25 inches or 630 mm) will 
flash. The message screen will show one of the following messages, depending on 
the unit setting:

1

-

2

0


2

-

3

0


3

-

4

0

P R E S S       1        2       O R     

3

M A X     

S

T

R

I

D

E  -   M M

M A X     

S

T

R

I

D

E  -   I

N C H

42

Содержание G872

Страница 1: ......

Страница 2: ...o Set the Number of Fitness Products per Pod 5 UNDERSTANDING THE G872 DISPLAY CONSOLE DISPLAY Specifications DISPLAY Overview DISPLAY Windows DISPLAY Keys DISPLAY Screens 6 OPERATING WORKOUT SETTINGS...

Страница 3: ...aning MAINTENANCE Disconnecting the Boost Converter Box MAINTENANCE Schedule MAINTENANCE Task List Elliptical Trainers MAINTENANCE One Year Maintenance Log 10 BLOCK DIAGRAM 11 GREEN SYSTEM SETUP INSPE...

Страница 4: ......

Страница 5: ......

Страница 6: ......

Страница 7: ......

Страница 8: ......

Страница 9: ......

Страница 10: ...1 1 1 1 1 2 2 3 LIST OF PARTS Main frame and body Stationary handlebar Pedestal covers left and right Joint cover left Joint cover right Right roller cover Left roller cover Support tube left Support...

Страница 11: ...L15 M5 0 8 L12 M5 L16 M6 P1 0 L10 Mushroom top inner hex screw Spring washer Washer Stride adjustment linkage Hex nut Stopper Phillips screw L shaped Allen wrench L shaped Allen wrench T shaped Allen...

Страница 12: ......

Страница 13: ......

Страница 14: ......

Страница 15: ......

Страница 16: ......

Страница 17: ......

Страница 18: ...or use Be careful to avoid pinching fingers when setting the product down b For two people Have one person grip the front base of the product while the other person grips the support tubes A8 A9 With...

Страница 19: ......

Страница 20: ...orth American safety standards To avoid electric shock and current leakage this product has an exterior ground wire For your safety connect this ground wire to the unit and to the building ground Inst...

Страница 21: ......

Страница 22: ......

Страница 23: ......

Страница 24: ...he line on the side that is not connected do not remove the protective cover on the boost converter For instructions on connecting boost converters to their associated fitness products please refer to...

Страница 25: ......

Страница 26: ......

Страница 27: ......

Страница 28: ......

Страница 29: ...ting Such power output maximums are calculated automatically once the number of units in the pod has been established At setup follow the steps below to enter into each fitness product the number of u...

Страница 30: ...eric keys 0 through 9 to input the number of products in the pod b If desired press the CLEAR key to reset all values to zero c After the correct number of units in the pod has been entered press the...

Страница 31: ......

Страница 32: ......

Страница 33: ......

Страница 34: ...K START key to resume to Workout mode or press STOP PAUSE HOLD TO RESET key to enter the COOL DOWN MODE While in COOL DOWN MODE press the STOP PAUSE HOLD TO RESET key will end the program and display...

Страница 35: ......

Страница 36: ...active row of workout feedback changes every six seconds If no one exercises for six seconds the following message will appear in the workout feedback screen GREEN ENERGY OUTPUT RATIO This screen sho...

Страница 37: ...ept that manual mode requires you to establish a workout goal and user age and weight If you activate the elliptical trainer by pressing the QUICK START key and then select a workout program original...

Страница 38: ......

Страница 39: ...or six seconds the following appears on the message screen for two seconds When keys in the setting area are pressed briefly distance values change by 0 25 mile or 0 4 kilometers depending on the dist...

Страница 40: ......

Страница 41: ......

Страница 42: ......

Страница 43: ......

Страница 44: ......

Страница 45: ...eens will not be lit If you do not press any number key within six seconds the following prompt will appear for two seconds on the message screen At this time either press numerical keys 1 2 3 to sele...

Страница 46: ...program will operate slightly differently On the message screen the following message will appear for two minutes Each time the VARI STRIDE key is pressed the message screen information changes as fo...

Страница 47: ...maximum stride length is changed stride lengths of subsequent segments also change For example change the maximum stride length from 25 to 27 inches the maximum stride length of each subsequent segme...

Страница 48: ......

Страница 49: ......

Страница 50: ......

Страница 51: ...selected the time LED lights up and the time goal setting process begins Resistance levels in this time based workout program gradually increase level off then gradually decrease The first and last se...

Страница 52: ......

Страница 53: ......

Страница 54: ......

Страница 55: ......

Страница 56: ...the screen hold the ENTER key for three seconds User preference mode will be activated UNITS The display will show UNIT MILE or UNIT KM depending on the original speed unit setting Press keys to togg...

Страница 57: ...he CLEAR key for three seconds TIME 0 HOUR will appear indicating that time memory has been erased To exit the user preference mode press the STOP key The startup banner screen will appear WATT HOURS...

Страница 58: ...ing the heart rate value from an exerciser on one product appear on another product 5 Heart rate values are for comparison only Do not use them for medical treatment or other purposes Space fitness pr...

Страница 59: ...astic on the handlebars CAUTION Heart rate detection and signal transmission devices have been known to interfere with the operation of pacemakers possibly endangering human life If you have a pacemak...

Страница 60: ......

Страница 61: ......

Страница 62: ......

Страница 63: ...mode power is not sent to the inverter The alternator in the product supplies a maximum of 100 watts of resistance If the large resistor gets too hot resistance output is limited to 50 watts When the...

Страница 64: ......

Страница 65: ......

Страница 66: ......

Страница 67: ...rpose cleaner and water Apply a small amount of silicone lubricant onto the rollers Yearly tasks 1 Apply grease to the stride mechanism 2 Apply SportsArt 66A lubricant to the cushion Caution Please fo...

Страница 68: ......

Страница 69: ......

Страница 70: ......

Страница 71: ......

Страница 72: ......

Страница 73: ...for the number of fitness products in the pod Enter the procedure to establish the number of products in the pod Inspect whether this setting matches the actual number of products in the pod Item 6 Is...

Страница 74: ......

Отзывы: