background image

PCS 580 User Manual


PCS 580 Administration 

58 


PCS 580 User Manual V1.2/0411/1a 


PCS 580 Administration 

Hot Desking/Log In 

If you are a hot desking User, in other words a User who has been given the ability to log in to any phone 
on the system because, for example, you need to move around the building or you are rarely in the office 
and do not need a permanent telephone, you can log on to a PCS 580. 
 
The benefit of logging in as yourself rather than using someone else’s phone is that all your User settings 
follow you.  This means that when you make a call the recipient will know the call is from you; you will 
have access to your User configuration and can set features such as DND, Follow Me etc; all your Speed 
Dials will be accessible to you; you will be informed when you receive a new voicemail message and you 
will be able to easily listen to these messages. 
 
You will need to know your extension number and Login Access Code, please refer to your System 
Administrator for these details. 
 
Please note that a phone can be configured to be permanently assigned to a colleague or not.  A handset 
with an assigned User will always default back to this User.  Whereas a handset without an assigned User 
will default to the Login screen. 
 

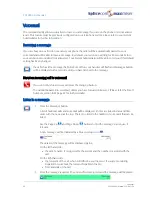
Log On 

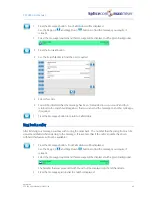
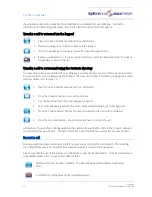
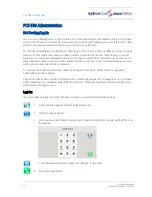
If a User is already logged on to the handset you wish to use perform the following steps: 


From your Idle page press the Settings button once. 


Press the Logout button 


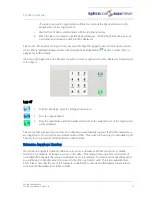
Enter your extension number, an asterisk (*) and your Login Access Code, eg 2040*1234, on 
the keypad 


Use the Backspace button to make any changes, if necessary. 


Select the Login button 

Содержание PCS 580G

Страница 1: ...P C S 5 8 0 GU s e r Ma n u a l V e r s i o n3 2 A p r i l 2 0 1 1 P a r t N o D O C MN P C S 5 8 0 G 0 0 ...

Страница 2: ...PCS 580 User Manual Document No 017 Version No V3 2 0411 1a Copyright SpliceCom Ltd SpliceCom Ltd The Hall Business Centre Berry Lane Chorleywood Herts WD3 5EX Tel 01923 287700 Website www splicecom com ...

Страница 3: ...5 Calls History 17 View the contents of your Calls History 17 Identifying the type of call 17 Missed Calls 18 Details of a call 18 Redial a number 19 Ring back a caller 19 Delete a call 20 Contacts Directory 21 View the Directory 21 Make a call via the Directory 23 Transfer a call via the Directory 23 Alternative method to view the directory 24 Working with the Contacts database 26 Departments 29 ...

Страница 4: ...a message 46 Message Handling 47 Ring back a caller 49 Record a Greeting 50 Using an Assistant telephone number 51 Leave a message for a colleague 52 Transfer a call to a colleague s voicemail 53 Record a call 54 Record a Memo 55 Voicemail for Departments 55 PCS 580 Administration 58 Hot Desking Log In 58 Extension Anywhere Number 59 Operator Console Mode 60 Phone Information 62 Index 63 ...

Страница 5: ...n the ability to log in to any phone on the system because for example you need to move around the building or you are rarely in the office and do not need a permanent telephone please refer to page 58 for further information Controls Toolbar These buttons will be available on the Controls Toolbar when your phone is idle and while you are using your PCS 580 The Home button will return you to your ...

Страница 6: ... by pressing the Home button Screen Saver Mode Your PCS 580 may be configured so that the context sensitive display will dim after your phone has been idle for a certain amount of time If this feature has been configured on your phone as soon as you use your PCS 580 again the display will return to full brightness Your PCS 580 may also be configured so that a screen saver blank screen will appear ...

Страница 7: ...calls to Your Favourites will also act as Busy Lamp Fields indicating when internal extensions are engaged or receiving calls and allow you to pick up a call ringing on a colleague s extension Call Recording Your PCS 580 gives you the ability to manually instigate personal call recording allowing you to record your calls as and when required Each call recording can be saved as a voicemail message ...

Страница 8: ...its delivered by maximiser SpliceCom s innovative and award winning portfolio of IP PBX Unified Communication Business Telephony platforms The top of the range PCS 580G is the latest version of the world s first keyless IP Phone featuring a wide screen full colour LCD touch display to provide context sensitive displays information web based content The IP 530 is SpliceCom s entry level IP Phone de...

Страница 9: ...you have dialled your name and number and length of time of the call If you have started to make a call have changed your mind and wish to stop the call press the Hang Up button or replace your handset If you are required to enter further digits once the call has been made for example when presented with an auto attendant press the Keypad button to enter the digits required via the key pad Answer ...

Страница 10: ...ng the handset and the distant end clears the call Call Status will remain allowing you to pick up a call or dial one of your speed dials Replace your handset if this is not required Dial Ahead The Dial Ahead facility allows you to enter a number on the keypad but the phone will not dial the number until instructed to do so This is useful when entering long international numbers for example or for...

Страница 11: ...ered on the keypad Press the Edit button to make changes to the Name Number and Company details stored for this Contact Please note that this option will only be available if you have the rights to edit a Contact entry Press the Save button to keep the changes made Press the Delete button to remove this Contact from the database Please note that this option will only be available if you have the r...

Страница 12: ...partments section from page 29 For further information on Auto URLs please refer to your system administrator Mute a call If you do not want your caller to hear a conversation that you are having with a colleague for example you can mute the call You will be able to hear the caller but they will not be able to hear you 1 Press the Mute button 2 The Mute button now has a red circle to indicate that...

Страница 13: ...nt beep 3 To retrieve the call press the Hang Up button For details of the music on hold configured on your system please refer to your System Administrator Transfer a call Announced Transfer 1 Place the call on hold by pressing the New Call button 2 Enter the number to be dialled internal or external number 3 Wait for the call to be answered and announce the caller 4 To transfer the call replace ...

Страница 14: ...from handset to hands free mode Unannounced Transfer Blind Transfer 1 Place the call on hold by pressing the New Call button 2 Enter the number to be dialled internal or external number 3 Once the ringing tone is heard replace your handset or if you are using hands free press the Speaker button or or Press the Transfer button You will no longer have control of the call Alternatively 2 Press the Tr...

Страница 15: ...l be automatically parked in the next available slot If a parked call is not picked up within 5 minutes the default Park Timeout the call will be represented to you and can be answered in the normal way If you are unable to pick up a call parked by a colleague you may be operating within a different Company to your colleague or your Park buttons may be configured to access different park slots Ple...

Страница 16: ...ss the Notes button the red circle indicates there are notes to view Please note If the originator of the note has added the note to the call only this text will disappear once the call has ended If the call is from or to an external number stored on the Contacts database and the originator of the note has saved the text to the database this information will always be available when a call is made...

Страница 17: ...conference call 1 Make a call to the first number required internal or external 2 Once the call has been answered place the call on hold by pressing the New Call button 3 Make a call to the second number required internal or external 4 Once the call has been answered press the Conference button 5 The Conference button will now contain a red circle and you are in a 3 way conference with your two ca...

Страница 18: ...ve a second call while still connected to another call By default this feature is disabled Please refer to your system administrator for details on how to turn this facility on or off on your extension Once enabled you can handled your calls as follows Handling a waiting call 1 When a second call is received you will hear an intermittent beep in your handset and the call waiting message will appea...

Страница 19: ... will connect the two calls together Switch to Hands Free You may wish to switch between hands free and handset operation without interrupting the call Handset to hands free 1 Press the Speaker button and replace the handset 2 The Speaker button will be displayed with a red circle to indicate you are using hands free Hands free to handset 1 The Speaker button will be displayed with a red circle to...

Страница 20: ... Volume Up or Down buttons as required The volume of your handset will increase or decrease appropriately Hands free volume If you have made or answered a call hands free Press the Volume Up or Down buttons as required The hands free volume will increase or decrease appropriately Ringing Volume While an incoming call is ringing Press the Volume Up or Down buttons as required The ringing volume wil...

Страница 21: ...listed unless configured otherwise Please refer to your System Administrator for further details Press the Page Down and Page Up buttons to display the entry required Press the Page Up button to go to the bottom of the list Please note If the Messages button is displayed with a tick Calls History will only be displaying your voicemail messages Press the Messages button to remove the tick and view ...

Страница 22: ...play the following information Incoming Call On the left hand side The name of the caller if the incoming number is known by the system The number presented with the call On the right hand side Your user name or the name of the colleague who has diverted their calls to you or the name of the Department called The time and date of the call If the call was received today just the time will be displa...

Страница 23: ... extension number or an external number stored within the Contacts database the list of numbers stored with this number eg a User s mobile number or a Contact s mobile number will be listed The number that you dialled will be displayed in bold at the top left hand side of the list 5 Press the Dial button beside the number you wish to dial Alternatively Press the Back button to return to the Calls ...

Страница 24: ...mber you wish to dial Alternatively Press the Back button to return to the Calls History Delete a call You can delete an entry from the Calls History if required to remove for example unnecessary entries such as misdialled numbers or incoming calls where the number was withheld 1 Press the Messages button 2 From the Calls History select the call required 3 Press the Delete button You will be asked...

Страница 25: ...ll to an external contact such as a customer supplier partner etc entered on the database If you do not wish the directory to display external contacts stored on the database please refer to the Defaults section from page 43 The directory will also enable you to call or transfer a call to an internal Department where the call can be answered by any one of a group of people such as Sales Support Ac...

Страница 26: ...can be pressed to reduce the search So if for example you were searching for Barry you would press 22779 or Use the Page Up and Page Down buttons to find the specific entry required or Press the Page Up button to go to the bottom of the list Press the Contacts button to return to your idle page or Press the Home Page button to return to your idle page Busy Lamp Field for Users An entry displayed f...

Страница 27: ...er that has voicemail enabled you will also be able to connect directly to their voicemail and leave a message 6 Press the Dial button beside the number you wish to dial The call will be made automatically Alternatively Press the Back button to return to the directory Transfer a call via the Directory 1 Place the call on hold by pressing the New Call button You will be presented with the keypad 2 ...

Страница 28: ... contact you wish to call 4 Press the Dial button if you wish to dial the number displayed with contact Alternatively press the Choose button and select a number from the list displayed 5 Your original call will be put on hold and the new call will be made 6 Wait for the call to be answered and announce the call 7 Transfer the call by replacing your handset or if you are using hands free by pressi...

Страница 29: ... finding the contact you require 3 Press the key on the keypad displaying the letter you need 4 The first letter on this key will be entered in the search box 5 Continue to press the key until the letter required has been entered 6 The directory entries commencing with this letter will be displayed Further letters can be entered to reduce the search So if for example you wanted to search for Barry...

Страница 30: ...lephone system therefore all entries must be business related Please refer to System Administrator for further details on the Contacts database Add a Contact entry 1 Press the Contacts button 2 Press the New button this will only be available if you have the necessary rights 3 Enter the Name of the contact using the keyboard displayed 4 Select the Number field and enter the contact s principle num...

Страница 31: ...le if you do not have the necessary rights If a caller s number or a number you have dialled are stored in the Contacts database when you select this entry within Calls History you will be able to amend or delete the entry on the database Please note that the Edit or Delete button described below will not be available if you do not have the necessary rights to be able to amend or delete an entry o...

Страница 32: ...it and make the changes required using the keyboard displayed 5 Press Save to store the changes or 5 Press Cancel if you do not wish to save the changes Delete a Contact entry via Calls History 1 Press the Messages button 2 Select the call required please refer to the View the contents of your Calls History section from page 17 for further details 3 Press the Edit button please note that this butt...

Страница 33: ...of the Group there may be situations when you may wish to temporarily remove yourself from the Group and therefore you will not receive Department calls Please refer to the Group Log In section from page 35 for further information Receiving a Department call When you receive a call for a Department instead of your details being displayed Call Status will display the Department name This allows you...

Страница 34: ...tton will flash to remind you that a call is in progress Press the Home button to return to Call Status For further information on Auto URLs please refer to your system administrator Make a call to a Department You may wish to ring a Department in order to talk to an available member of for example the Personnel department rather than ringing one specific member of that department only to find the...

Страница 35: ...will no longer have control of the call For further information please refer to the Transfer a call section from page 9 Calls History Your Calls History can also display the incoming answered and missed calls received for a Department Your System Administrator can configure this facility for you if not already available The name of the Department receiving the call is displayed on the right hand s...

Страница 36: ...utomatically passed to your Forward on Busy number if configured or to voicemail if enabled For further information on your Forward on Busy Number please refer to the Divert Numbers section from page 42 When a colleague enters your extension number using the Dial Ahead facility the blue DND icon will be displayed to indicate that you have Do Not Disturb set Your entry in the Contacts Directory wil...

Страница 37: ...ivert to as follows 1 From your Idle Page press the Settings button once 2 Press the Divert To button 3 If you have previously entered your personal Telephone Numbers press the Mobile or Home or Assistant button 4 You will be returned to the Telephony screen 5 The Divert To button will display the number you have set as your Divert To number eg Divert To Mobile or 3 Press the Number button 4 Using...

Страница 38: ...will display Divert None You do not need to change the Divert To number as you may wish to use this number again Receiving a Diverted Call When a colleague s calls have been diverted to your extension your colleague s details will be displayed in Call Status under the caller s details This information will enable you to identify and answer a diverted call correctly Out of Office Message When you a...

Страница 39: ...indicating that this facility has been disabled Group Log In If you are a member of a Group on your telephone system you may wish to have the ability to log yourself in and out of the group when required The use of this facility is controlled by your system administrator please refer to your system administrator for further information For further information on Groups and Departments please refer...

Страница 40: ... will be displayed in the Group button to indicate that you are logged into this Group Favourites Speed Dials Favourites allow you to set up your own personal list of regularly used telephone numbers internal or external These speed dials are displayed and accessed by selecting the Favourites button Speed dials set up for internal extensions will also act as Busy Lamp Fields BLF in other words the...

Страница 41: ...Dials list in alphabetical order 9 Repeat steps 2 to 7 to add additional Speed Dials if required Press the Cancel button at any time if you do not wish to save the new speed dial Please note The top four entries within the Speed Dial list relate to your Park buttons please refer to your System Administrator before making changes to these entries If you create a speed dial for a number also stored ...

Страница 42: ...en icon indicates that your colleague s extension is free An internal speed dial displayed with a red icon indicates that your colleague is currently on a call An internal speed dial flashing between a yellow and red icon indicates that either the User s extension is currently ringing or there are calls queuing for that Department The number of calls waiting to be answered will be displayed You ca...

Страница 43: ...ete a Speed Dial 1 From your Idle page press the Settings button twice Use the Page Up and Page Down buttons to find the speed dial you require if relevant 2 Select the speed dial to be deleted 3 Press the Delete button 4 You will be asked if you are sure you want to delete the speed dial 5 Press the Yes button to delete the speed dial or Press the No button to cancel Make a call using a Speed Dia...

Страница 44: ... if for example you wish to answer your colleague s phone when they are not at their desk or you wish to assist with answering calls to a Department You do not have to be a member of the Department to pick up a Department call 1 Press the Favourites button 2 A speed dial displaying a flashing yellow red icon has a call waiting to be answered 3 Press the speed dial required 4 The call will be answe...

Страница 45: ...r that you wish to use as your Assistant number These numbers are used 1 To identify you when you make a call from your home mobile or the additional telephone numbers Your name and details will appear in Call Status on your colleague s handset 2 By the Contacts Directory please refer to page 21 for further details 3 By voicemail a when accessing your messages from your mobile or home phone please...

Страница 46: ...s The Divert Numbers screen which is accessed by pressing the Settings button four times displays the numbers that your calls will forward to when you have Call Divert on Forward on Busy and Forward on No Answer set Follow Me To Number this will display the number entered when you configured Call Divert as described in the Call Divert Follow Me section from page 32 You can edit your Follow Me To N...

Страница 47: ...r Forward on No Answer To Number via this screen select this entry and you will be taken to the Edit screen Use the keyboard displayed to enter number required Press the Save button to store the changes or the Cancel button to return to the Divert Number screen without saving the changes Extension Anywhere Number please refer to the Extension Anywhere Number section from page 59 for further detail...

Страница 48: ...ll be able quickly dial or transfer calls to a group of Users for example Support Sales etc Contacts this option will enable or disable the display of the external contacts created on your telephone system within the directory If enabled you will be able to easily dial or transfer calls to external telephone numbers Speed Dials this option will enable or disable the display of your speed dials wit...

Страница 49: ...entered Detail Info this will determine the amount of information that will be displayed in your Speed Dials when your User account has been configured to use Operator Console Mode Please refer to the Operator Console Mode section from page 60 for further details By default each option except Detail Info is enabled indicated by the tick If you wish to disable a filter option press the relevant but...

Страница 50: ...ge Divert an incoming call to voicemail If you do not wish to answer a call press the Hang Up button The call will be passed to voicemail unless you have Forward on Busy set Please refer the Divert Numbers section from page 42 for further details Listen to a message 1 Press the Messages button A list of historical calls and voicemail will be displayed Entries are listed in date and time order with...

Страница 51: ...s will be required to listen to the message This facility must be previously set up on your telephone system please refer to your System Administrator for further information Forward send the message to a colleague s email account The message will appear as a sound file in an email and a PC with a sound card and speakers will be required to listen to the message This facility must be previously se...

Страница 52: ...und card and speakers will be required to listen to the message This facility must be previously set up on your telephone system please refer to your System Administrator for further information 1 Press the Messages button Your Calls History will be displayed Use the Page Up and Page Down button to find the message you require if relevant 2 Select the message required and this message will be disp...

Страница 53: ...nd the message to another colleague if required 7 Press the Messages button to return to Calls History Ring back a caller After listening to a message you may wish to ring the caller back The number that they rang from can be viewed and dialled while listening to the message Please note that if the caller s number has been withheld this feature will not be available 1 Press the Messages button You...

Страница 54: ...n beside the number you wish to dial Record a Greeting A default message will be played to a caller when transferred to your voicemail However you may wish to record your own personal message You can record two voicemail greetings Firstly you have a daily greeting that can be used to inform a caller of your whereabouts on a particular day for example You have reached Alice Barker s voicemail on Tu...

Страница 55: ...l be played 4 Listen to the instructions and when requested record your new greeting 5 Press the Stop button or hang up and your new greeting will be saved Using an Assistant telephone number You may wish to give your callers the option to be transferred to a colleague rather than leave a message this might be your assistant or another member of your team The Assistant telephone number feature can...

Страница 56: ...sistant telephone number You will need to re record your greeting to inform your callers that facility is available Please note the Assistant number is also used with the Call Forwarding feature please refer to page 32 for further details Leave a message for a colleague You will automatically transfer to your colleague s voicemail if they are busy or do not answer their phone However you can conne...

Страница 57: ...stored for this colleague will be displayed 4 Press the Voicemail button and you be connected directly to your colleague s voicemail Leave a message when requested Leave a message for a colleague after listening to their message If a message has been left by a colleague and you wish to leave them a message in return you can select this option by using the Choose button 1 Press the Messages button ...

Страница 58: ...he call on hold by pressing the New Call button 2 Press the Contacts button to access the directory 3 Use the Search facility to find the colleague required 4 Select the colleague required This entry will be displayed with a green background 5 Press the Choose button The list of numbers stored for this User will be displayed 6 Press the Voicemail button You will no longer have control of the call ...

Страница 59: ... voicemail service provided by the maximiser system If voicemail has been enabled a call to a Department will automatically pass to voicemail after the time specified by the Department s configuration on the system Please refer to your System Administrator for further details For further information please refer to the Departments section from page 29 Listen to a message for a Department Voicemail...

Страница 60: ... button 4 Press the Voicemail button You will be connected to the Department s voicemail If you start to call a Department and then decide to leave a message instead press the Leave Message button displayed within Call Status Leave a message for a Department using the Contacts directory You may wish to leave a message for Department but do not know the extension number You can search for the Depar...

Страница 61: ...nt s voicemail but do not know the extension number You can search for the Department via the Contacts directory For further information on using the Contact directory please refer to page 21 1 Place the call on hold by pressing the New Call button 2 Press the Contacts button to access the directory 3 Use the Search facility to find the Department required 4 Select the Department required This ent...

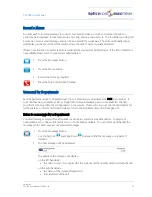
Страница 62: ... etc all your Speed Dials will be accessible to you you will be informed when you receive a new voicemail message and you will be able to easily listen to these messages You will need to know your extension number and Login Access Code please refer to your System Administrator for these details Please note that a phone can be configured to be permanently assigned to a colleague or not A handset wi...

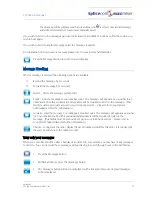
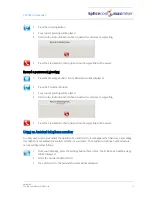
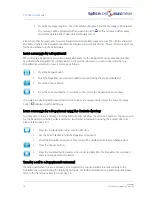
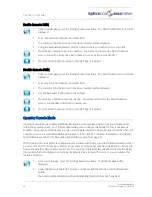
Страница 63: ... button once 2 Press the Logout button 3 Press the Login button and the handset will return to the assigned User or the Login screen will be displayed Please note that your User account may be configured to automatically log you off after the handset you are logged on to is not used for a specified amount of time This is useful if you forget to manually log off Please refer to your System Administ...

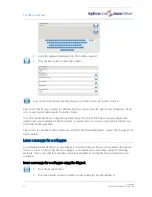
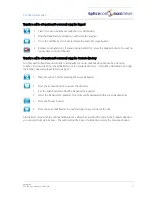
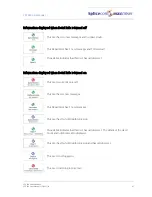
Страница 64: ...tton to return to the Idle Page if required Operator Console Mode Operator Console Mode enables additional information to be displayed within your Speed Dial buttons within the Favourites page Your System Administrator can configure this facility for you if not already available The purpose of this facility is to give you the data required to deal with calls efficiently when for example you are a ...

Страница 65: ... this User has call divert set Information displayed when Detail Info is turned on This User is currently on a call This User has six new messages This Department has 2 new messages This User has Do Not Disturb turned on The asterisk indicates that this User has call divert set The details of the divert mode and number are also displayed This User has Do Not Disturb turned on and has call divert s...

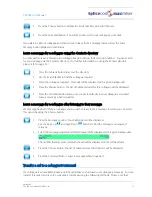
Страница 66: ...le page press the Settings button six times The Phone Information page will be displayed IP Address IP address of the PCS 580 Serial Number hardware address of the PCS 580 Registration IP address of the Call Server to which the PCS 580 is connected Home IP address of the Call Server providing the User s voicemail service User name of the User currently logged in Number extension number of the User...

Страница 67: ...er 44 transfer a call 23 users filter 44 view the directory 21 24 contacts filter 44 defaults 43 departments 29 calls history 31 groups 29 make a call to a department 30 receiving a department call 29 transfer a call to a department 30 voicemail 55 wrap up time 29 departments filter 44 Detail Info 45 60 dial ahead 6 directory search preferences 44 divert 32 divert numbers 42 do not disturb 32 Spli...

Страница 68: ... speed dials filter 44 SpliceCom LED 32 46 telephone numbers 41 transfer a call 9 to a department 30 to voicemail 53 using a speed dial 40 using the contacts directory 23 unannounced transfer 10 user account 1 user settings 32 call divert 32 defaults 43 Detail Info 45 directory search preferences 44 do not disturb 32 favourites 36 follow me 32 group membership 35 idle page 43 off hook page 44 out ...

Страница 69: ......
Страница 70: ... Hall Farm Business Centre Berry Lane Chorleywood Hertfordshire WD3 5EX Tel 01923 287700 Fax 01923 287722 Email info splicecom com Website www splicecom com SpliceCom Defining next generation communication ...

Отзывы: