Copyright ©2013 Mad Dogg Athletics, Inc. All rights reserved. SPIN®, Spinner®, Spinning® and the Spinning logo are registered trademarks of Mad Dogg Athletics, Inc.
12
BRAKE PAD REPLACEMENT
STEP 1:
REMOVAL
Remove tension from the brake pad by turning the Resistance
knob counterclockwise, until completely loose. Using the
multi-wrench, remove the two bolts supporting the brake pad
onto the frame. Remove the old brake pad.
STEP 2:
INSTALLATION
Position the new brake pad onto the frame. Carefully re-install the
two bolts through the brake pad bracket onto the frame. Using a
multi-wrench, tighten the bolts.
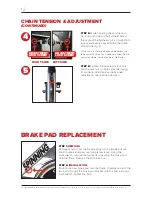
STEP 5:
While adjusting the chain tension,
work on both sides of the flywheel. Adjust
the angle of the flywheel so it is straight front
to rear and evenly spaced within the frame
side-to-side (fig. 4).
»If the chain is stretched beyond adjustment, the
replacement of the chain is recommended. Please
contact customer service for more information.
STEP 6:
Tighten the adjustment lock nuts
and the axle nuts on both sides alternating
from side-to-side. Replace the flywheel
adjustment cover before operation.
CHAIN TENSION & ADJUSTMENT
(CONTINUED)
5
4
RIGHT SIDE
LEFT SIDE
ADJUSTMENT
LOCK SCREW
ADJUSTMENT
LOCK SCREW
Содержание Spinner Ascent
Страница 1: ...OWNER S MANUAL...


