background image


Page 15 of 52                            

draft1.0 


1. 

Open the memory card slot cover on the bottom-left corner of the phone. 

2.  Push inwards the memory card with the finger tip and release, and the memory card will be 

ejected. 

3. 

Pull out the memory card. 

Tip: 

When any application of the phone or the  memory card is running, do not insert or pull out 

the memory card, otherwise, data may be lost or the memory card may be damaged!   


To insert the memory card 

1.  Push the  memory card in the direction indicated by the sign printed on the card into the card 

slot of the phone, with the metal contact of the card facing down. 

2. 

Replace the memory card slot cover. 


Tip:

 Some memory Cards have poor compatibility. Please buy and use tested and certified 

memory cards. 


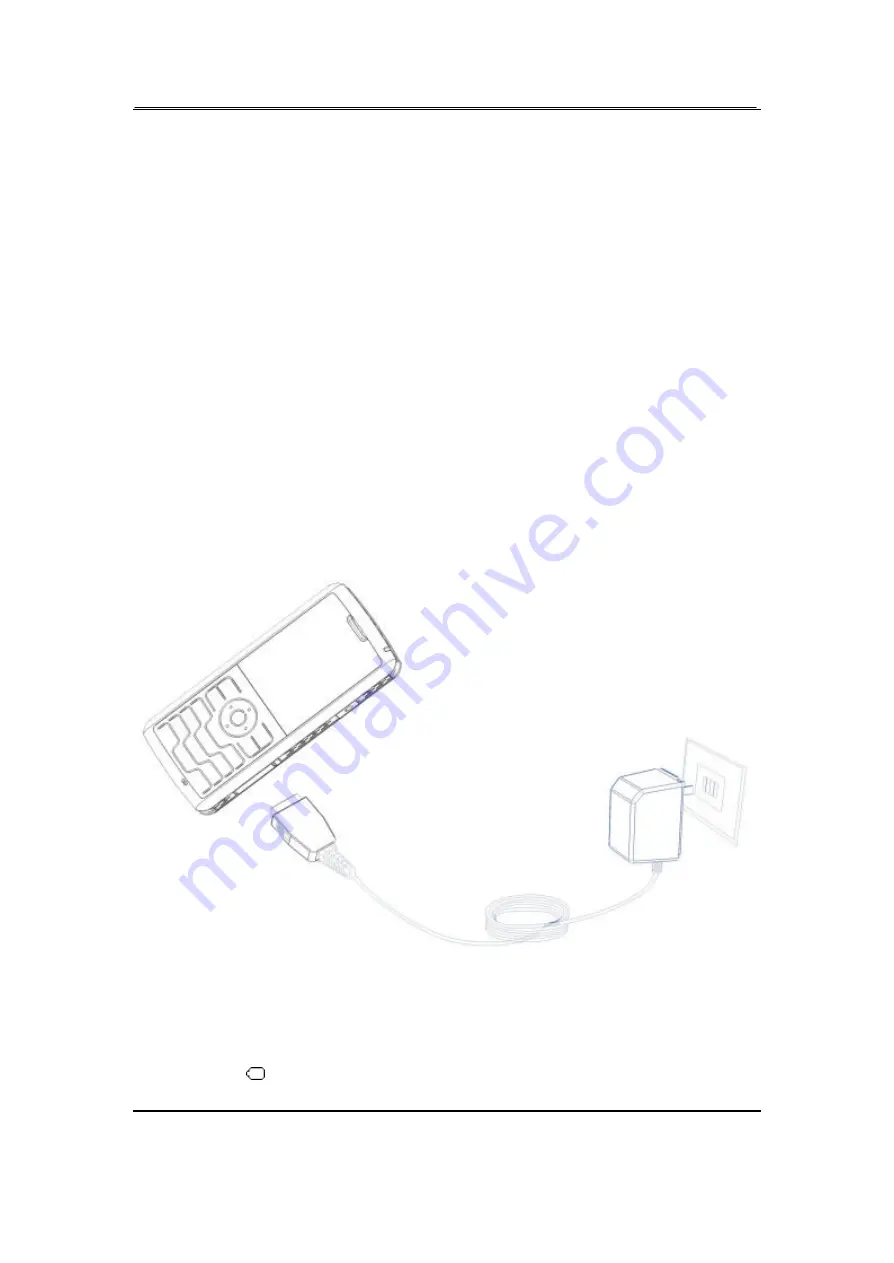
To charge the battery 

1.  Insert the plug of the charger into the interface of the phone, and insert the charger into the 

power socket carefully. The battery icon will blink. 


2.  The red light is lit during charging.  When the battery icon stops blinking or the green light is 

lit, it indicates that the charging is finished. 

3.  After the charging, unplug the charger from the socket, and press and hold the left and right 

buttons on the plug of the charger to pull out the plug from the phone.   

Tips: 

The battery icon 

 displayed on the screen indicates that the battery power is low. Please charge 

the battery following the steps above. 

Содержание D-88n

Страница 1: ......

Страница 2: ...e used as a modem Note In this user manual to press a key means to press shortly to long press a key means to press and hold for a while 2 seconds Please carefully read this manual before you use the...

Страница 3: ...and off 16 Standby Mode 16 Standby Operation 16 To make calls 17 Phone book 17 To add name cards 17 To search the phone book 17 To dial a number from the phone book 18 To view a name card 18 To modif...

Страница 4: ...ctivate deactivate handsfree earpiece 24 DTMF Dual Tone MultiFrequency Tone 24 An incoming call from another network during a call 24 Simultaneous incoming calls from two networks 24 Call Divert 24 GS...

Страница 5: ...ed Phone Setup 36 Profile Setup 38 Safety 39 Multimedia and Entertainment 40 Camera 40 Image Viewer 40 Video Recorder 41 Video Player 41 Audio Player 42 Sound Recorder 43 Java 43 Games 44 Bluetooth 44...

Страница 6: ...AP Setup 47 Bookmark 47 Organizer 48 Maintenance 49 Troubleshooting 50 After Services 51 Inputting Text 51 Keys and Characters Table 51 ABC abc Input Method 51 To input digits 52 To input symbols 52 E...

Страница 7: ...ronic device vulnerable to interference Otherwise malfunctions of electronic device may be caused Such electronic devices include medical electronic devices such as hearing aids and pacemaker fire ala...

Страница 8: ...he battery should be put in a cool ventilative and sunlight free place If the battery is in the exhausting status for a long time it can t be charged Therefore if you do not use the phone for long ple...

Страница 9: ...rom the socket l Do not dispose the used battery together with daily waste Please dispose the used battery in accordance with the regulations issued by the local authority I In nt tr ro od du uc ct ti...

Страница 10: ...ar rt ts s o of f t th he e P Ph ho on ne e Parts of the Phone Description of Functions 1 Volume key l To adjust the volume l To move the focus 2 Card slot 3 Receiver 4 Display 5 Left Right function...

Страница 11: ...successively l In the edit screen to open the list of symbols when there are no characters in the character selection section l To switch between camera and video recording modes 10 LED l 11 OK key l...

Страница 12: ...f the area where the phone set is located 3 It appears when the phone is in GSM roaming status The function needs the support from the network operator 4 It appears when the phone is in CDMA roaming s...

Страница 13: ...r ry y C Ca ar rd d a an nd d t th he e B Ba at tt te er ry y Please store the cards out of the reach of children The cards and the contacts are vulnerable to damages due to scratching or bending Ther...

Страница 14: ...original battery To remove the battery SIMcard and UIM card 1 Switch off the phone 2 Press down the battery cover button at the bottom of the phone raise the cover from bottom and slide with a finger...

Страница 15: ...52 draft1 0 3 Remove the battery 4 Push out the card from the slot with a finger in the direction indicated by the arrow Left the card slot for UIM card Right the card slot for SIM card To remove the...

Страница 16: ...facing down 2 Replace the memory card slot cover Tip Some memory Cards have poor compatibility Please buy and use tested and certified memory cards To charge the battery 1 Insert the plug of the char...

Страница 17: ...db by y M Mo od de e There are four standby modes l GSM CDMA dual mode Both GSM and CDMA can receive incoming calls or messages but GSM is prior to CDMA when you make calls If you want to make a call...

Страница 18: ...ook of the phone may store up to 1000 entries each of which contains name 4 phone numbers mobile home office and fax company name and e mail address You can set photo caller ID ringtone and groups for...

Страница 19: ...you may press Send key to dial the number of the contact T To o m mo od di if fy y a a n na am me e c ca ar rd d In the contact list of the phone book select the name card to be modified Option Edit...

Страница 20: ...SIM UIM card to the folder Contacts under File Manager Please delete the existing data from this folder before outporting Main Menu Phone book Import Outport Import from file You can import all the p...

Страница 21: ...book Settings Memory Status The screen will display the current memory status of the phone books of the SIM card the UIM card and the phone T To o s se et t s st to or ra ag ge e l lo oc ca at ti io...

Страница 22: ...from the number comes in Tip If you have inserted the earphones you need to long press the button on the earphones when a call comes in except when you have set to automatic answering To end a call y...

Страница 23: ...a al li in ng g You can set Fixed Dialing in the phone When the Fixed Dialing function is activated you can only see the entries of the phone UIM card From the Fixed Dialing List you can only see the...

Страница 24: ...one number 3 Send key dial the phone number T To o d di ia al l f fr ro om m t th he e p ph ho on ne e b bo oo ok k Enter the Phone book select an entry from the entry list and press Send key to dial...

Страница 25: ...nswer it only after you end the call from CDMAnetwork Tip If during a multiparty call through GSM network there is an incoming call from CDMA network you can answer it only after you end all the calls...

Страница 26: ...ct a three way calling containing up to five parties 1 Ask the other party of the current call not to end and select Option Hold to hold the current call 2 Dial a new number and talk with him after he...

Страница 27: ...y C You can input the phone number of C and press Send key If C answers the call with B will be held automatically During the call with C you may l Make a three way Conference calling Press Send key o...

Страница 28: ...enter the screen for writing GSM SMS Send MMS to enter the screen for writing MMS D De el le et te e C Ca al ll l L Lo og g Main Menu Call History Delete Call Log You may select to delete Missed Dial...

Страница 29: ...o enter the number edit screen You may input one or select from the phone book Tip The phone supports multiple sending If you input more than one numbers press key to input between the numbers for sep...

Страница 30: ...elete all the SMS from the Outbox Copy All To copy all the messages stored in the SIM card to the phone memory or copy all the messages stored in the phone memory to the SIM card Move All To move all...

Страница 31: ...to SIM Move the SMS stored in the phone memory to the SIM card Use Number To extract the number of the receiver and the number s contained in the SMS into a list and select to dial or save it them in...

Страница 32: ...umber To extract the number of the sender and the number s contained in the SMS into a list up to 6 numbers and select to dial or save it them in the phone book Tip When reading a SMS press Navigation...

Страница 33: ...S MMS which contains text picture image and ringtone is sent through the MMS center to another mobile phone or an e mail account The phone supports sending and receiving MMS by GPRS and multiple sendi...

Страница 34: ...hted MMS Multi Delete Use Left function key OK to select deselect entries and press Done to delete the selected ones Delete All To delete all the MMS from the Outbox When reading a MMS you can select...

Страница 35: ...will be received as common SMS Main Menu Message GSM Chat Select either chat room and enter the setup screen Edit My Nickname During the chat this nickname will be used and sent with the text to the p...

Страница 36: ...ast Message to On before you can use Broadcast Message Tip If you have opened and turned on Broadcast Message you can select Read Message to browse the broadcast messages received The phone will displ...

Страница 37: ...nd Time Select to display the Operator Name Main Menu Settings Phone Setup Display Characteristic Show Operator Name Turn ON OFF the Singal LED Main Menu Settings Phone Setup Misc Setting Singal LED I...

Страница 38: ...ime alert Main Menu Settings Call Setup Call Time Reminder You can select Single or Periodic Activate deactivate the call time display Main Menu Settings Call Setup Call Time Display On Off Select GSM...

Страница 39: ...ze Tone Setup GSM Incoming Call CDMA Incoming Call Set the ringtone for alarms Main Menu Profiles Desired Mode Option Customize Tone Setup Alarm Set the ringtone for Power On sound Main Menu Profiles...

Страница 40: ...ll not accept the numbers in the reject list when the Accept Only mode is activated the phone will only accept the numbers in the Accept Only List Tip For the relevant operations about Received Msg Fi...

Страница 41: ...the message on the screen However if Cont shot has been set the phone will save the photos automatically without prompting you l In the view finding screen press Navigation key Left Right to adjust th...

Страница 42: ...ation key Up Down to adjust the Optical Zoom Ratio 1 0 4 0 If you need to switch to the camera mode you can press key on the view finding screen Tip If you shoot in weak light such as night or indoor...

Страница 43: ...sic for the first time you need to create a play list Depending on your settings the play list can be a list of tracks or a list of folders You may create a play list with these two means Auto Update...

Страница 44: ...Recorder On the Sound Recorder list screen you can select Record To begin recording The recordings will be saved in the folder My Music under the File Manager automatically Play To play the highlighte...

Страница 45: ...tions Select Main Menu Multimedia Games Puzzle or Panda Game Help l For the game Puzzle you can select the difficulty level Start the games following the instructions When a game ends you can view the...

Страница 46: ...luetooth Setting FTP Setting Shared Folder You can share Folders stored in your device with other compatible devices Tip Please activate the Bluetooth first T To o u us se e R Ro om mo ot te e C Co on...

Страница 47: ...s STK UTK you may use the corresponding value added services Main Menu Services S Sp pi ic ce eG Ga an ng g Main Menu Services SpiceGang You need to make the relevant settings in WAP Setup before you...

Страница 48: ...efresh To refresh the web page Homepage To link the homepage Exit To exit the browser English Unicode To change the front Set Homepage To set the address of the current web page as the address of the...

Страница 49: ...d Clock Calculator Main Menu Organizer Calculator Stopwatch Main Menu Organizer Stopwatch Typical Stopwatch Split Timing Lap Timing View Record Press Start to start timing and press Split Lap continuo...

Страница 50: ...al dirt For a large amount of dirt use a soft towel soaked with neutral scour and twisted to gently wipe the dirt and use a dry soft cloth to wipe the phone Do not use a hard cloth benzene or thinner...

Страница 51: ...h the phone l Is the phone number correct l Check that the number is correct l Are you in a place with weak signal l Move to a place with strong signal l Is there any object around that obstructs sign...

Страница 52: ...ab bl le e Input Methods Keys Characters or Functions 1 To open the common symbol list _ _ 1 2 a b c 2 A B C 2 3 d e f 3 D E F 3 4 g h i 4 G H I 4 5 j k l 5 J K L 5 6 m n o 6 M N O 6 7 p q r s 7 P Q R...

Страница 53: ...ne has matched words the edit section will display the words normally and the left function key will be changed to Select for you to confirm inputting Use Navigation key Up Down to switch the various...

Страница 54: ......

Отзывы: