SpectraPure
®
SpectraPure
®
Inc.
480.894.5437 Call us toll-free 1.800.685.2783
2167 East Fifth St, Tempe, Arizona 85281
17
INSTALLING BALL VALVE ON TANK
1. If there is not Teflon tape applied to the nipple on the tank, wrap (7-12 turns)
around the pipe threads (MPT) on the Stainless Steel fitting.
2. Thread the Ball Valve (supplied in the parts bag) onto the stainless steel nipple on
top of the tank. Hand-tighten only.
3. The storage tank is pressurized with air at the factory to 7 psi with the tank totally
drained. Over a period of time, air may leak out causing the delivery rate of the
stored water to decrease. If this occurs, verify correct tank pressure using a low
pressure air gauge on the tire valve stem located on the bottom of the tank with
tank completely empty of water.
TANK INSTALLATION
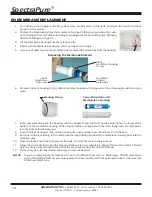
1. Position tank in desired location. Stand it upright (using the black plastic stand). Measure the Blue tube from the Tee
Fitting on the rear of the system (See pages ) to the tank and cut it to length.
2. Connect the Blue tube to the Right Angle Ball Valve that is attached to the top of the tank.
3. Connect the 3/8" Blue tube that is connected to the Quick connect plastic tubing adapter on the Threaded Shaft of
the faucet (Page 9), to the Carbon Post Filter (3rd filter on the right).
4. Connect the 3/8" Black tube to the Drain Saddle.
ICE MAKER HOOKUP (OPTIONAL)
Part No. IMK-UNIV
1. Turn off feed supply valve and the ball valve on tank. Open the faucet to relieve pressure.
2. Locate the Blue tube that leads to the faucet.
3. Cut the tube and reconnect the cut ends with a Tee.
4. Connect 1/4" Tubing to the third leg of the tee and route to refrigerator.
5. Close the faucet, turn on feed supply valve, and open the ball valve on tank.
6. Check for leaks.
STARTUP PROCEDURES
1. Slowly turn the cold water supply to full flow. Check for leaks.
2. Turn off the ball valve at the storage tank and open the faucet.
3. Watch the clear housings fill with water. When water comes out of the faucet, turn the faucet off. The system will
pressurize rapidly and should shut off with a “click”.
NOTE:
It is important that air is purged from system during initial operation. To do this, orient the RO unit with the
product (permeate) and reject (brine) water ports pointing upwards. (Round end of RO membrane housing
is up, prefilter housings are horizontal). Allow a minimum of 15 minutes operation with this orientation.
4.
Look for leaks and do not leave the system alone until you are sure there are no leaks.
Now, turn the valve on
the tank to the “OPEN” position.
5. Before using the system, allow three tank fillings to occur while flushing the contents between each filling by locking
the air gap faucet lever to the open position until drained.
6. Wait for an hour before drawing water from the faucet.
Note: NEVER RUN HOT WATER (>113°F/45°C) THROUGH THE SYSTEM.


