background image


 Spectra GmbH & Co. KG 

User Manual 


 [email protected]                      Spectra PowerBox 410                                39 

3.6


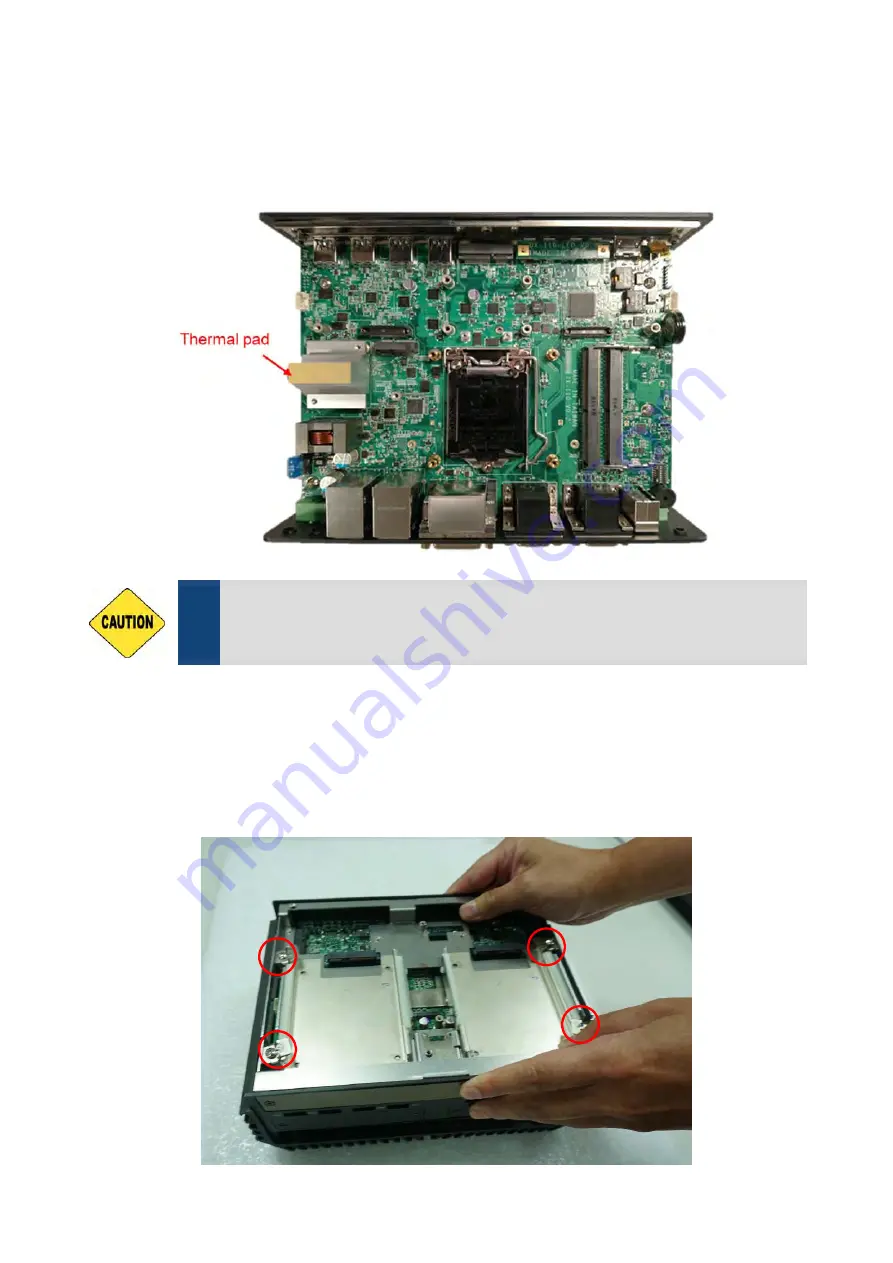
Installing Thermal Pad 

Note: The Spectra PowerBox 410 series don’t need to additional installation of the PCH thermal pad.   


3.7


Installing Top Cover 

1.  Hold front and rear panel and put the body of unit back to chassis and fasten the 4 screws as 

marked on photo. 


The  yellow  surface  is  part  of  the  thermal  pad.  Do  not  tear  it  off  as  it 
would affect the thermal conductivity. 

CA

UTIO

N


Содержание 158406

Страница 1: ...Spectra PowerBox 410 Serie USER MANUAL Version 1 47 November 2021...

Страница 2: ...ts 11 1 3 Product Pictures 12 1 4 Key Features 12 1 5 Hardware Specification 13 1 6 System I O 14 1 6 1 Front 14 1 6 2 Rear 15 1 7 Mechanical Dimension 16 Chapter 2 Switches and Connectors 2 1 Locatio...

Страница 3: ...ystem Time 58 4 3 Advanced Setup 59 4 3 1 CPU Configuration 59 4 3 2 SATA And RST Configuration 60 4 3 3 PCH FW Configuration 61 4 3 4 Trusted Computing Settings 61 4 3 5 ACPI Settings 62 4 3 6 F81866...

Страница 4: ...n For DIO Only 5 1 Digital I O DIO application 76 5 1 1 Digital I O Programming Guide 76 5 2 Digital I O DIO Hardware Specification 82 5 2 1 DIO Connector Definition 83 Chapter 6 Optional Modules 6 1...

Страница 5: ...ion provided in this manual are for reference only and remain subject to change without prior notice Acknowledgement All registered trademarks and product names mentioned herein are used for identific...

Страница 6: ...etc environmental and atmospheric disturbances other external forces such as power line disturbances plugging the board in under power or incorrect cabling and damage caused by misuse abuse and unauth...

Страница 7: ...Spectra is not responsible for the devices parts Repaired items will be shipped along with a Repair Report detailing the findings and actions taken Technical Support and Assistance 1 Visit the Spectra...

Страница 8: ...ting the equipment to the power outlet 8 Use a power cord that has been approved for using with the product and that it matches the voltage and current marked on the product s electrical range label T...

Страница 9: ...uipment intended only for use in a RESTRICTED ACCESS AREA Package Contents Before installation please ensure all the items listed in the following table are included in the package Item Description Q...

Страница 10: ...Spectra GmbH Co KG User Manual sales spectra de Spectra PowerBox 410 10 Chapter 1 Product Introductions...

Страница 11: ...transportation and mobile surveillance Featuring rugged construction fanless cable less jumper less design wide operating temperature 40 to 70 C wide range DC power input 9 48 VDC high tolerance to v...

Страница 12: ...K 2K UHD Resolution HDMI DP DVI I 2x 2 5 Hot Swap SATA HDD SSD Tray 3x mSATA Socket 2x USB 3 1 10Gb s for Ultimate Data transfer Speed 1x M 2 E Key Socket CNVi 3x Full size Mini PCIe Socket 1x SIM Car...

Страница 13: ...r CMOS Switch 1x Remote Power On Off Connector 2 pin Terminal Block 1x External FAN Connector 4 pin Terminal Block Supports Smart Fan by BIOS Storage 2x 2 5 Front Accessible SATA HDD SSD Bay SATA 3 0...

Страница 14: ...function Temperature LED Indicates the temperature of the system Universal I O Bracket Used to customized I O output with optional modules USB 3 1 Port Used to connect USB 3 1 3 0 2 0 1 1 device USB 3...

Страница 15: ...sed to connect USB 3 0 2 0 1 1 device DVI I Port Used to connect a DVI monitor or connect optional split cable for dual display mode Display Port Used to connect a monitor with DisplayPort interface C...

Страница 16: ...Spectra GmbH Co KG User Manual sales spectra de Spectra PowerBox 410 16 1 7 Mechanical Dimension Unit mm...

Страница 17: ...Spectra GmbH Co KG User Manual sales spectra de Spectra PowerBox 410 17 Chapter 2 Switches Connectors...

Страница 18: ...Spectra GmbH Co KG User Manual sales spectra de Spectra PowerBox 410 18 2 1 Location of Switches and Connectors 2 1 1 Top View...

Страница 19: ...Spectra GmbH Co KG User Manual sales spectra de Spectra PowerBox 410 19 2 1 2 Bottom View...

Страница 20: ...Socket mPCIE mSATA 4G Module CN4 CN6 Mini PCI Express Socket mPCIE mSATA CN5 M 2 Key E Socket M 2 PCIE Intel CNVi DC_IN1 3 pin DC 9 48V Power Input with Power Ignition Connector PWR_SW2 Remote Power o...

Страница 21: ...Push Power on System SW1 COM1 COM2 COM3 COM4 Power Select COM1 2 3 4 Voltage Function Setting via DIP Switch Location Function DIP1 DIP2 SW1 COM1 0V RI ON Default ON Default 5V ON OFF 12V OFF OFF Loca...

Страница 22: ...CAP Switch DIP Function ON OFF 1 Super CAP Enable Default Disable 2 N A N A N A Reset1 System Reset Button Button Definition Button Definition Push Reset System Push Reset System CLR_CMOS1 Clear CMOS...

Страница 23: ...20 3 3V 38 USB_D 3 NA 21 GND 39 3 3V 4 GND 22 PERST 40 GND 5 NA 23 PERXN SATARXP 41 3 3V 6 1 5V 24 3 3V 42 NA 7 NA 25 PERXP SATARXN 43 GND 8 SIM_PWR 26 GND 44 NA 9 GND 27 GND 45 CLINK_CLK 10 SIM_DATA...

Страница 24: ...D 2 3 3V 20 3 3V 38 USB_D 3 NA 21 GND 39 3 3V 4 GND 22 PERST 40 GND 5 NA 23 PERXN SATARXP 41 3 3V 6 1 5V 24 3 3V 42 NA 7 NA 25 PERXP SATARXN 43 GND 8 NA 26 GND 44 NA 9 GND 27 GND 45 NA 10 NA 28 1 5V 4...

Страница 25: ...K 9 WGR_D1N 35 PETP0 61 WTD1P PETN1 10 PCM_SYNC LPCRSTN 36 RBI_DT 62 NC 11 WGR_D1N 37 PETN0 63 GND 12 PCM_IN 38 CLINK_REST 64 REF_CLK 13 GND 39 GND 65 WTD0N PETP1 14 PCM_OUT 40 CLINK_DATA 66 NC 15 WGR...

Страница 26: ...king Yellow Data Activity Off No Activity Link LED Status Definition Steady Green 1Gbps Network Link Steady Orange 100Mbps Network Link Off 10Mbps Network Link FAN1 External PWM Fan Connector Connecto...

Страница 27: ...tor Connector Type 1x4 4 pin Wafer 2 0mm pitch Pin Definition 1 5V 2 GND 3 GND 4 12V LED_B1 PWR HDD IGN TEMP LED Status LED B1 Status LED Color Power LED Power ON Green Standby Blinking Green and Blue...

Страница 28: ...Spectra GmbH Co KG User Manual sales spectra de Spectra PowerBox 410 28 Chapter 3 System Setup...

Страница 29: ...s spectra de Spectra PowerBox 410 29 3 1 Removing the Top Cover 1 Turn over the unit to have the bottom side face up loosen the 6 screws on the bottom cover and place them aside for later use 2 Remove...

Страница 30: ...Spectra GmbH Co KG User Manual sales spectra de Spectra PowerBox 410 30 3 Loosen the 4 screws Pull out 4 latches as marked on photo 4 Hold front and rear panel and lift up the body of unit vertically...

Страница 31: ...Spectra GmbH Co KG User Manual sales spectra de Spectra PowerBox 410 31 5 Turn over the body of the unit and place it gently...

Страница 32: ...spectra de Spectra PowerBox 410 32 3 2 Installing the CPU 1 Locate the CPU socket remove the protection cover on it 2 Press the CPU socket lever and pull it aside away from the socket to unlock it Pu...

Страница 33: ...ctra de Spectra PowerBox 410 33 3 Align the notches on CPU with the alignment post on socket 4 The notches of socket provide the space for fingers while lowering the CPU hold the CPU by the edges towa...

Страница 34: ...heatsink and align mounting holes of heatsink with the four nut studs 7 Flip the corner of thermal pad and fasten the heatsink with provided 4 screws Thermal pad Before putting on the thermal block in...

Страница 35: ...Installing SO DIMM Memory 1 Locate the SODIMM socket on the top side of system 2 Insert a SO DIMM at a 45 degree angle until its edge connector is connected to SO DIMM socket firmly 3 Press down the m...

Страница 36: ...ATA Card 1 Locate the Mini PCIe socket on the top side of system 2 Insert the Mini PCIe card at a 45 degree angle until its edge connector is connected firmly into slot For 3G 4G Mini PCIe card please...

Страница 37: ...nd antenna 2 please penetrate the antenna jack through the hole at both sides as illustrated For antenna 3 please pull off the rear panel by loosening the 10 D Sub jack screws on rear panel firstly an...

Страница 38: ...Box 410 38 For antenna 3 put on rear panel back and fasten 10 D Sub jack screws on it and then put on washer and fasten the nut with antenna jack 4 Assemble the antenna and antenna jack together 5 Att...

Страница 39: ...410 series don t need to additional installation of the PCH thermal pad 3 7 Installing Top Cover 1 Hold front and rear panel and put the body of unit back to chassis and fasten the 4 screws as marked...

Страница 40: ...Spectra GmbH Co KG User Manual sales spectra de Spectra PowerBox 410 40 3 8 Installing Bottom Cover 1 Place the bottom cover back to system 2 Fasten the bottom cover with 6 screws...

Страница 41: ...Plate 1 Loosen 2 screws on front panel to remove cover plate 3 10 Installing a SATA Hard Drive at Front Side 1 Locate the removable HDD bay and loosen the screw It s advised to fasten the 2 screws man...

Страница 42: ...erBox 410 42 2 Pull the rotating arm and pull the HDD bracket out of system 3 Make the bottom side of the HDD face up place the HDD bracket on it Ensure the direction of bracket is correct and use 4 p...

Страница 43: ...a PowerBox 410 43 4 Align the HDD bracket assembly with the entrance of removable HDD bay Holding the rotating arm and insert the HDD bracket until the connector of HDD contact the SATA connector firm...

Страница 44: ...es spectra de Spectra PowerBox 410 44 3 11 Installing a SIM Card 1 Locate the SIM card slot at front side 2 Insert a SIM card into SIM slot with the gold contacts facing up Please pay attention to the...

Страница 45: ...Co KG User Manual sales spectra de Spectra PowerBox 410 45 3 12 Installing the CMOS Battery 1 Locate the removable CMOS Battery and loosen the screw 2 Pull out the CMOS battery bracket with assistance...

Страница 46: ...Spectra GmbH Co KG User Manual sales spectra de Spectra PowerBox 410 46 3 Insert a CMOS battery in the battery slot 4 Insert the battery bracket firmly and fasten the screw...

Страница 47: ...pectra de Spectra PowerBox 410 47 3 13 Fastening the Cover 1 Fasten the cover by using the two screws 3 14 Installing an External Fan 1 Prepare an external fan Loosen the 2 screws halfway on mounting...

Страница 48: ...s spectra de Spectra PowerBox 410 48 2 Slide the FAN into the middle groove of chassis as illustrated Tighten the 2 screws to fix it onto chassis 3 Move the fan to the center of chassis Tighten the 2...

Страница 49: ...Spectra GmbH Co KG User Manual sales spectra de Spectra PowerBox 410 49 4 Connect the FAN cable to external fan power connector at rear panel...

Страница 50: ...ies offers wall mount brackets that customers can install system on the wall in convenient and economical ways 1 The mounting holes are at the bottom side of system Use provided 8 screws to fasten the...

Страница 51: ...tra PowerBox 410 series offers DIN Rail Mount that customer can install system on the DIN Rail 1 Please refer to section 3 15 Wall Mount Brackets to install mounting bracket at both sides of system 2...

Страница 52: ...DIN rail 3 17 VESA Mount Spectra PowerBox 410 series supports VESA mounting that customer can mount system with panel complying with VESA 75mm and 100 mm standard for various usage The 75mm VESA uses...

Страница 53: ...Spectra GmbH Co KG User Manual sales spectra de Spectra PowerBox 410 53 2 Provided below is mounted with VESA stand...

Страница 54: ...de Mount Brackets Spectra PowerBox 410 series offers Side Mount that customer can install system to the right or left side of wall to create effective of space 1 The mounting holes are at the bottom o...

Страница 55: ...Spectra GmbH Co KG User Manual sales spectra de Spectra PowerBox 410 55 2 Fasten the screws through the bracket mounting hole to mount system on the wall...

Страница 56: ...Spectra GmbH Co KG User Manual sales spectra de Spectra PowerBox 410 56 Chapter 4 BIOS Setup...

Страница 57: ...t screen Move to select item Esc Quit the BIOS Setup Enter Select item Page Up Increases the numeric value or makes changes Page Down Decreases the numeric value or makes changes Tab Select setup fiel...

Страница 58: ...OS Setup Utility the Main Menu as shown below will appears on the screen Use arrow keys to move among the items and press Enter to accept or enter a sub menu 4 2 1 System Date Set the date Please use...

Страница 59: ...gy Enables or disables Intel Virtualization Technology which will allow a platform to run multiple operating systems and applications in independent partitions With virtualization one computer system...

Страница 60: ...elect which mode SATA controller will operates Configuration options AHCI RAID Serial ATA Port 0 Port 0 Enabled Enables or disables SATA Port 0 Serial ATA Port 1 Port 1 Enabled Enables or disables SAT...

Страница 61: ...Serial ATA Port 5 Port 1 Enabled Enables or disables SATA Port 5 4 3 3 PCH FW Configuration Firmware Update Configuration Configure Management Engine Parameters Me FW Image Re Flash Enables or disabl...

Страница 62: ...eration None Allows you to select which mode Pending Operation will operate Configuration options None TPM Clear Platform Hierarchy Enabled Enables or disables Platform Hierarchy function Storage Hier...

Страница 63: ...to RAM Allows users to select the highest Advanced Configuration Power Interface ACPI sleep state that system will enter when suspend button is pressed Suspend Disabled Disables entering suspend state...

Страница 64: ...you to select Serial Port Mode Configuration options RS232 RS422 RS485 Full Duplex RS485 Half Duplex Watch Dog Disabled Enables or disables watch dog function Watch Dog Mode Sec Allows to set watchdog...

Страница 65: ...d Enables or disables External Smart Fan function External Smart Fan Configuration Enabled Configure External Smart Fan Parameters Smart Fan Mode Auto Allows you to select Smart Fan Mode Configuration...

Страница 66: ...sables wake system from S5 Fixed Time Sets a fixed time HH MM SS to wake system from S5 Dynamic Time Sets an increase minute s from current time to wake system from S5 4 3 9 Serial Port Console Redire...

Страница 67: ...legacy USB support When set to Auto legacy USB support will be disabled automatically if no USB devices are connected XHCI Hand off Enabled Enables or disables XHCI USB3 0 hand off function Use this...

Страница 68: ...g from operating systems that support legacy option ROM or UEFI option ROM Legacy only Allows booting from operating systems that only support legacy option ROM UEFI only Allows booting from operating...

Страница 69: ...Disables option ROM execution UEFI Enables UEFI option ROM only Legacy Enables legacy option ROM only Other PCI devices Do not launch Allows users to determine option ROM execution policy for devise o...

Страница 70: ...detailed memory configuration in the system Graphics Configuration Internal Graphics Auto Allows users to enable or disable Internal Graphics Configuration options Auto Disabled Enabled VT d Enabled...

Страница 71: ...CN4 PCI Express Root Port Enabled Enables or disables PCI Express Root Port PCIe Speed Auto Allows you to select PCI Express interface speed Configuration options Auto Gen1 Gen2 Gen3 PCI Express Root...

Страница 72: ...SATA CN4 USB3 Function Switch Disabled Enables or disables CN4 USB3 Controller CN5 mSATA Function Switch CNV Allows you to change mPCIe CN5 as CNV or WiFi CN6 mSATA Function Switch Mini PCIe Allows yo...

Страница 73: ...Password User Password controls access to the system at boot and to the BIOS Setup utility 4 6 Boot Setup This section allows you to configure Boot settings 4 6 1 Setup Prompt Timeout Use this item to...

Страница 74: ...ows you to exit system setup without saving changes 4 7 3 Save Changes and Reset This item allows you to reset the system after saving changes 4 7 4 Discard Changes and Reset This item allows you to r...

Страница 75: ...Spectra GmbH Co KG User Manual sales spectra de Spectra PowerBox 410 75 Chapter 5 Product Application For DIO Only...

Страница 76: ...t are better understood and implemented by well experienced professionals or developers 5 1 1 Digital I O Programming Guide 5 1 1 1 Pins for Digital I O Item Standard GPIO70 Pin103 DI GPIO71 Pin104 GP...

Страница 77: ...ter use the index port to select the index and then write data port to alter the parameters The default index port and data port are 0x4E and 0x4F respectively Pull down the SOUT1 pin to change the de...

Страница 78: ...Spectra GmbH Co KG User Manual sales spectra de Spectra PowerBox 410 78...

Страница 79: ...e to enter Extended mode Select Logic Device WriteByte AddrPort 0x07 WriteByte dataPort 0x06 Select logic device 06h Output Input Mode Selection Set GP70 to GP77 input Mode WriteByte AddrPort 0x80 Sel...

Страница 80: ...ut mode Output Value WriteByte AddrPort 0x89 Select configuration register 89h WriteByte DataPort Value Set bit 0 7 0 1 to output GP 80 87 as Low or High Leave the Extended Function Mode WriteByte Add...

Страница 81: ...DI2 Base address 3 0xA03 DO2 Base address 2 0xA02 DI3 Base address 3 0xA03 DO3 Base address 2 0xA02 DI4 Base address 3 0xA03 DO4 Base address 2 0xA02 DI5 Base address 3 0xA03 DO5 Base address 2 0xA02...

Страница 82: ...tage 9 30V 8x Digital Input Source Type Input Signal Voltage Level Signal Logic 0 XCOM 9V Signal Low V 1V XCOM 9V V Signal Low 8V Signal Logic 1 XCOM 3V Input Driving Sink Current Minimal 1 mA Normal...

Страница 83: ...utput Connector Connector Type Terminal Block 2X10 10 pin 3 5mm pitch Location Pin Definition Location Pin Definition DIO1 1 DC INPUT XCOM DIO2 1 DC INPUT XCOM 2 DI1 2 DO1 3 DI2 3 DO2 4 DI3 4 DO3 5 DI...

Страница 84: ...Spectra GmbH Co KG User Manual sales spectra de Spectra PowerBox 410 84 Reference Input Circuit Reference Output Circuit...

Страница 85: ...Spectra GmbH Co KG User Manual sales spectra de Spectra PowerBox 410 85 Chapter 6 Optional Modules Pin Definitions and Settings...

Страница 86: ...COM6 RS232 RS422 RS485 Connector Connector Type 9 pin D Sub Pin RS232 Definition RS422 485 Full Duplex Definition RS485 Half Duplex Definition 1 DCD TX DATA 2 RXD TX DATA 3 TXD RX 4 DTR RX 5 GND 6 DSR...

Страница 87: ...Module Pin Definitions Connector Type M12 A coded 8pin connector Pin Definition Pin Definition 1 2_LAN1_0 2 2_LAN1_0 3 2_LAN1_1 4 2_LAN1_2 5 2_LAN1_2 6 2_LAN1_1 7 2_LAN1_3 8 2_LAN1_3 PB 400 410 LAN xM...

Страница 88: ...ting Switch Set shutdown delay timer when ACC is turned off Pin 1 Pin 2 Pin 3 Pin 4 Definition ON ON ON ON IGN enabled OFF IGN disabled 0 second ON ON OFF 1 minute ON OFF ON 5 minutes ON OFF OFF 10 mi...

Страница 89: ...CMI COM Module Model No Product Description PB 400 410 COM CMI Module with 2x RS232 422 485 Support 5V 12V 1x Universal Bracket with 2x DB9 Cutout for DX Series 1 Locate the connector of CMI module on...

Страница 90: ...ctra PowerBox 410 90 3 Insert the PB 400 410 COM module carefully into the CMI connector on main board Fix it with 2 screws 4 Loosen the 4 D Sub jack screws as marked on photo 5 Attach the COM bracket...

Страница 91: ...ng a CMI DIO Module Model No Product Description PB 400 410 DIO CMI Module with 16DIO 8in 8out 1xUniversal Bracket with DIO Cutout for DX Series 1 Locate the connector of PB 400 410 DIO module on the...

Страница 92: ...KG User Manual sales spectra de Spectra PowerBox 410 92 3 Insert the PB 400 410 DIO module carefully into the CMI connector on main board Fix it with 2 screws 4 Attach the DIO bracket and fasten 2 sc...

Страница 93: ...spectra de Spectra PowerBox 410 93 6 6 Installing a High Speed CMI Module The applicable high speed CMI modules for Spectra PowerBox 410 series are PB 400 410 LAN PB 400 410 LAN M12 and PB 400 410 LA...

Страница 94: ...x 410 94 1 Loosen the 2 screws on front bezel to remove the cover plate 2 Remove 4 rubber rings on M12 jacks Penetrate M12 jacks of CMI module through the accompanying M12 I O bracket then fasten 4 ri...

Страница 95: ...Spectra GmbH Co KG User Manual sales spectra de Spectra PowerBox 410 95 3 Locate the CMI connector on the top side of system 4 Exchange screw to copper pillar before insert the CMI module...

Страница 96: ...Manual sales spectra de Spectra PowerBox 410 96 5 Insert the CMI module vertically into the female connector on system s mainboard until it s connected firmly and fasten 4 screws to fix it 6 Fasten 2...

Страница 97: ...Box 410 97 6 6 2 PB 400 410 LAM XM12 Set 1 Assemble the hex rings M12 I O bracket and hex washers together as indicated below Penetrate hex rings through the M12 I O bracket holes and fix them with he...

Страница 98: ...Spectra GmbH Co KG User Manual sales spectra de Spectra PowerBox 410 98 2 Loosen the 2 screws on front bezel to remove the cover plate 3 Locate the CMI connector on the top side of system...

Страница 99: ...pectra de Spectra PowerBox 410 99 4 Exchange screw to copper pillar before insert the CMI module 5 Insert the CMI module vertically into the female connector on system s mainboard until it s connected...

Страница 100: ...GmbH Co KG User Manual sales spectra de Spectra PowerBox 410 100 6 Attach the assembled M12 I O bracket on to the system and fasten the two screws to fix it 7 Put on the rubber rings to the four M12 L...

Страница 101: ...LAN module please paste the shading tape to the place which was marked by red circle If you use PB 400 410 LAN M12 module please skip this step 2 Insert the PB 400 410 LAN module for Spectra PowerBox...

Страница 102: ...es spectra de Spectra PowerBox 410 102 3 Insert the CFM PoE module vertically into the female connector on the CMI module until it s connected firmly 4 Turn over the heatsink of CFM PoE and locate the...

Страница 103: ...ds for CFM PoE onto the heatsink carefully 6 Paste the heatsink onto the CFM PoE module carefully and connect the PoE module to the PB 400 410 LAN M12 module Before putting on the thermal block in the...

Страница 104: ...spectra de Spectra PowerBox 410 104 7 Fasten 4 screws to fix it 8 Paste the last thermal pad onto the heatsink carefully The yellow surface is part of the thermal pad Do not tear it off as it would af...

Страница 105: ...Co KG User Manual sales spectra de Spectra PowerBox 410 105 6 8 Installing a CFM IGN Power Ignition Module 1 Locate the IGN connector on the bottom side of system 2 Fasten 1 copper pillar before inser...

Страница 106: ...Spectra GmbH Co KG User Manual sales spectra de Spectra PowerBox 410 106 3 Insert IGN module vertically to the female connector on the system s mainboard and fasten 2 screws to fix it...

Страница 107: ...de Spectra GmbH Co KG Gewerbepark Ost 1 4621 Sipbachzell Wels Austria Phone 43 0 7240 20190 E Mail info spectra austria at Web www spectra austria at Sales teams E Mail sales spectra austria at Spect...

Отзывы: