background image

43

5 Using the NAStape 

This chapter covers the following information:

Powering On and Off

Checking Connection Status

Upgrading Firmware

Purchasing Media and Cleaning Cartridges

Powering On and Off

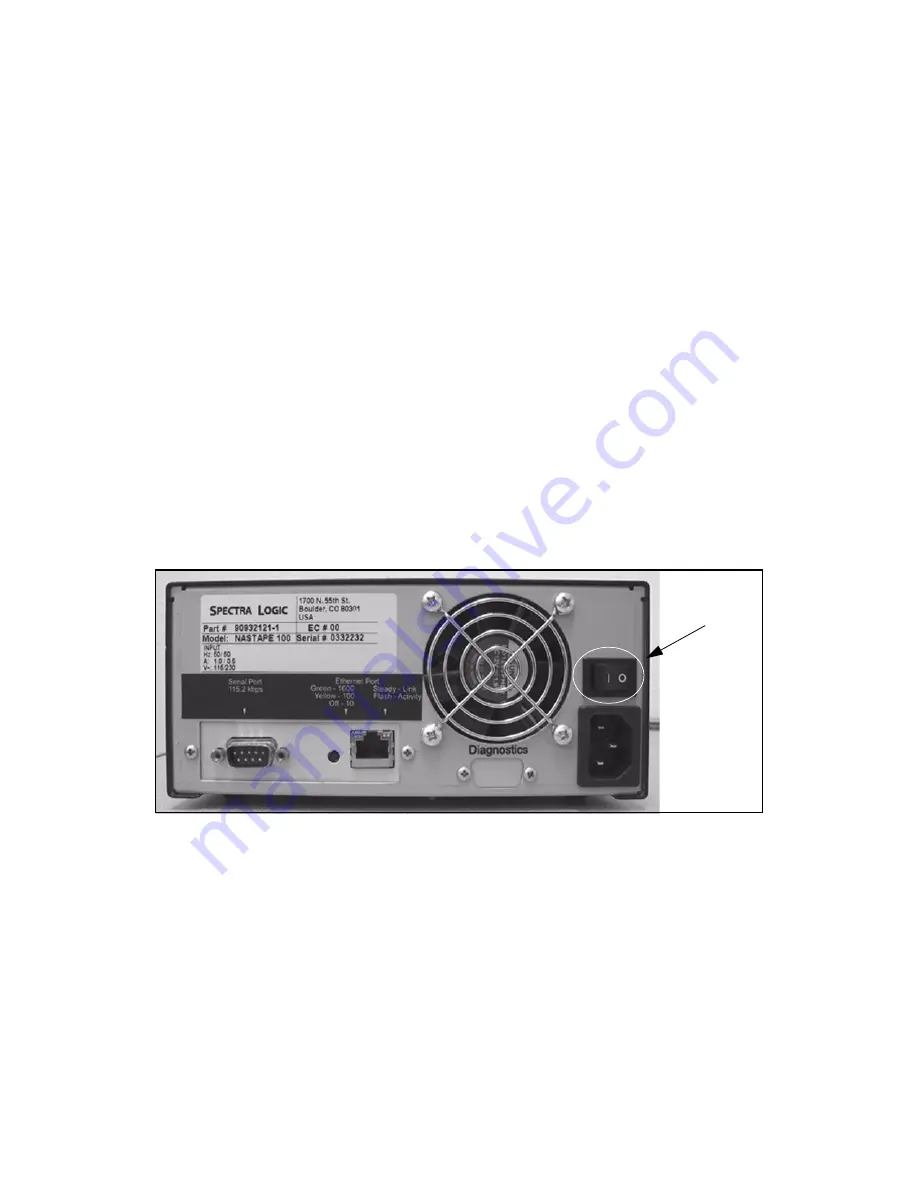
The NAStape unit power switch is located on the NAStape’s rear panel, just to the right 
of the fan (Figure 5-1).

Checking Connection Status

To review the status of NAStape unit connections, use the configuration tools described 
in 

Configuration

.

Figure 5-1

The NAStape power switch (NAStape 100 shown).

Power switch

Содержание NAStape 100

Страница 1: ...P N 90930054 Revision A NAStape User Guide Spe c t ra Lo g i c...

Страница 2: ...lication from time to time without notice and reserves the right to change any product specification at any time without notice Some products or services mentioned in this manual are provided by compa...

Страница 3: ...failure of Java technology could lead directly to death personal injury or severe physical or environmental damage No liability for certain damages Except as prohibited by law Software Suppliers shall...

Страница 4: ...arts within the unit High Voltage Warning The NAStape unit contains high voltage components that can cause injury or death Only qualified electricians should replace or install high voltage components...

Страница 5: ...ion 9 About NAStape 9 Flexible Connectivity 9 About This Guide 12 Chapter 2 Installing NAStape 13 Preparing for Installation 13 Unpacking the NAStape 14 Connecting the NAStape 16 Chapter 3 Using the H...

Страница 6: ...g the NAStape 43 Powering On and Off 43 Checking Connection Status 43 Upgrading Firmware 44 Purchasing Media and Cleaning Cartridges 44 Chapter 6 NAStape 100 Tape Drives and Media 45 AIT Tape Drives 4...

Страница 7: ...Specifications 73 Sony AIT Specifications 74 HP LTO Ultrium Generation 1 Specifications 75 IBM LTO Ultrium Generation 2 Specifications 76 Quantum SDLT 320 Specifications 77 Appendix B Regulatory and...

Страница 8: ...8...

Страница 9: ...y AIT 2 drive or Sony AIT 3 drive and the NAStape 200 supports a single Quantum SDLT 320 HP LTO Ultrium or IBM LTO 2 tape drive Both the NAStape 100 and NAStape 200 provide the interconnectivity requi...

Страница 10: ...multiple requests are not being sent to the same tape drive at the same time With NDMP there is typically a backup application server that manages access to the tape drives Even though multiple NAS d...

Страница 11: ...ed no other host can gain access to the drive until it is unlocked In any case if multiple hosts will be accessing the NAStape some access management scheme must be implemented to prevent stored data...

Страница 12: ...d warnings Note Read Notes for additional information or suggestions about the topic or procedure being discussed Caution Read Cautions to learn ways to avoid damaging NAStape tape drives or other equ...

Страница 13: ...you may need to obtain an available IP address for the NAStape NAStape comes with DHCP and WINS enabled however you will need to manually configure the IP address if there is no DHCP server on the lo...

Страница 14: ...ide One media cartridge and one cleaning cartridge only for the NAStape 200 configured with and SDLT 320 drive AC power cord Serial cable Note There is no Ethernet cable included Removing the NAStape...

Страница 15: ...he first end before removing the foam from the second end 4 Move the NAStape to the installation site when you are ready to connect it Note Keep NAStape s packing materials in a safe place for moving...

Страница 16: ...for the low voltage sensor in the unit There are two interfaces available to configure and set up your options HTTP and serial port Select the appropriate method based on your environment DHCP Environ...

Страница 17: ...he rear panel of the NAStape This hostname may be changed to avoid duplicate hostnames Note If you are having trouble bringing up the Web page with Internet Explorer be sure to check your HTTP proxy s...

Страница 18: ...not enter any password If this is the first time using your NAStape the default super user setting is username SU with no password How to Proceed If you would like to view the NAStape status go to St...

Страница 19: ...Status screen will be the first screen to display after you have logged in Use the tabs on the left to navigate sections use the large icons to navigate screens within that section Figure 3 2 TheGene...

Страница 20: ...speed Click on Ethernet Port to configure For more information on configuring the ethernet interface go to Ethernet on page 22 Tape Drive This section of the screen identifies the tape drive type the...

Страница 21: ...This section identifies the hardware ID that you will need to be able to receive an option key Once you have an option key you can enter it in this section Enter the number and select Add Key You can...

Страница 22: ...until purchased and activated with a key code Licensed Disabled The option has been purchased but is currently inactive Licensed Enabled The option is currently licensed and active Note Ethernet stor...

Страница 23: ...less than 12 characters to support DHCP and DNS naming conventions IP Address Static IP address This field is not available while in DHCP mode IP Subnet Mask IP network mask standard IP parameter Gate...

Страница 24: ...Control iSCSI Port The default iSCSI listen port number is 3260 This is the IANA assigned port for iSCSI and should not be modified under normal conditions Authentication Select None if you do not wis...

Страница 25: ...cify the IP address of the iSNS server iSNS IP Address Enter the IP address of the iSNS server This must be a valid server IP whenever iSNS is enabled iSNS Port The default port 3205 is assigned by IA...

Страница 26: ...ce 26 NDMP Configure the NDMP port and add a username and password You can also select to allow plain text passwords Select Change to save the information The NDMP Device Names are also listed Figure...

Страница 27: ...evice To view the information select the appropriate icon for the device type select the specific device from the drop down menu and then select GO Selecting the Restart icon will save all configured...

Страница 28: ...level and then select Add User Edit User Select a current user to edit update their information and then select Change Delete User Select the user to be deleted and the select Delete Note You cannot...

Страница 29: ...the diagnostic port located by the serial number tag with a serial port terminal emulation application like HyperTerminal running on a host computer 2 The serial port settings should be set as follow...

Страница 30: ...elect to configure the Ethernet settings 4 TAOS ITP Not available in NAStape 5 TAOS NDMP Select to configure the NDMP settings 6 TAOS iSCSI Select to set configure the iSCSI settings 7 Enable Device o...

Страница 31: ...Proceed If you need create or reset a password go to Password Configuration on page 32 If you would like to configure your Ethernet ports iSCSI or NDMP go to Ethernet Configuration on page 33 If you n...

Страница 32: ...enter your password then to re enter it Note This password is also used to validate firmware updates using FTP Help Displays help for this menu ESC Return to previous menu Returns you to the TAOS Conf...

Страница 33: ...the NAStape to your network these values should be set as appropriate for your site 1 To launch the Ethernet Configuration Menu select 3 from the TAOS Configuration Menu The Ethernet Configuration Men...

Страница 34: ...r iSCSI and NDMP protocols Type 8 then type a new username 9 Password Select or change the password If changing the password you will be prompted to enter your password then to re enter it Help Displa...

Страница 35: ...ed port for iSCSI and should not be modified under normal conditions 5 Enable iSNS Choose to enable or disable iSNS When iSNS is enabled it is necessary to specify the IP address of the iSNS server 6...

Страница 36: ...Serial Port Interface 36 4 Select 9 to save the changes 5 Select y when prompted to reboot Note You must reboot the NAStape in order for the new iSCSI parameters to take effect Check Release Notes for...

Страница 37: ...ugh the Options Enablement Menu verify that NDMP is licensed and enabled Figure 4 6 If NDMP Network Backup is not licensed obtain and enter the activation key from Spectra Logic If NDMP is not enabled...

Страница 38: ...ds Select 1 to either enable or disable cleartext passwords 2 NDMP Port Select 2 to set the NDMP port 2 Press Esc to return to the TAOS Configuration Menu There will be an asterisk next to the menu op...

Страница 39: ...on has been purchased but is currently inactive Note Ethernet storage devices may have only one protocol active at any given time Enabling one Ethernet protocol will automatically disable all other Et...

Страница 40: ...nu option indicating that an unsaved change has been made 4 Select 9 to save the changes 5 Select y when prompted to reboot Note You must reboot the NAStape in order for the new options to take effect...

Страница 41: ...NIC on the unit and on Network Appliance You can do this through the ifconfig command on Solaris and Network Appliance systems On Windows NT and Windows 2000 systems the MTU size is configured in the...

Страница 42: ...n will also need to know the user name and password that it should use for the tape server device This is the same user name and password assigned to the NAStape in NDMP Setup on page 37 The recommend...

Страница 43: ...ia and Cleaning Cartridges Powering On and Off The NAStape unit power switch is located on the NAStape s rear panel just to the right of the fan Figure 5 1 Checking Connection Status To review the sta...

Страница 44: ...hased directly from Spectra Logic s Web site or by calling your sales representative Contacting Spectra Logic Information WebSite http www spectralogic com Supplies and Accessories Sales United States...

Страница 45: ...Sony AIT drive uses a built in head cleaner designed to last for the life of the drive This built in cleaner works well but it should not be relied upon as the only drive cleaning mechanism particula...

Страница 46: ...e as shown in Figure 6 1 Busy Indicates drive read and write activity Tape Indicates tape load unload activity and error rate information Status Indicates the status of the tape drive including whethe...

Страница 47: ...loaded N A Onb b On green and not blinking SCSI Active Loaded Write protected Fast Blinkc c Fast blink blinks green for 1 4 second and off for 1 4 second Drive active Loading Unloading Cleaning tape a...

Страница 48: ...dge should be performed in the following situations Every 100 hours of drive use or less in the following situations When the NAStape has been installed in areas having high amounts of airborne partic...

Страница 49: ...ge to reach room temperature slowly Handling of Tape Cartridges Proper handing of tape cartridges is essential to insuring data integrity Tape cartridges must be kept in a clean dust free environment...

Страница 50: ...Chapter 6 NAStape 100 Tape Drives and Media 50...

Страница 51: ...e Open LTO 1 Ultrium IBM Second Generation Linear Tape Open LTO 2 Ultrium Quantum Super Digital Linear Tape SDLT 320 The following sections provide detailed information about the care and use of the t...

Страница 52: ...amber LED indicates an error in the tape cartridge Use Cleaning Cartridge This amber LED indicates when a cleaning cartridge should be used Getting Information from the LEDs The following table summar...

Страница 53: ...tridges 1 Power on the NAStape 2 Carefully insert the cleaning tape into the drive with the window facing the top of the drive The cleaning tape performs automatic cleaning this takes approximately fi...

Страница 54: ...g Media Use only LTO Ultrium cartridges Compatible media is recognizable by the Ultrium logo which is the same as the logo on the front of the drive Caring for HP Ultrium Media In optimal environments...

Страница 55: ...ridges in direct sunlight Do not leave the cartridges in places where magnetic fields are present such as under telephones next to monitors or near transformers Do not drop the cartridges or handle th...

Страница 56: ...ges Diagnostic or maintenance functions while in maintenance mode only Status light This LED provides information about the state of the drive The light can be green or amber and when lit solid or fla...

Страница 57: ...e completes the recovery and is ready for a read or write operation One of the followingapplies If thelight flashes oncepersecond an error occurred andthetapedriveormediamayrequireservice Note the cod...

Страница 58: ...ns tests and determines whether the drive can properly load and unload cartridges andread andwrite data 1 Update Tape Drive Firmware from FMR Tape Load updated firmware from a field microcode replacem...

Страница 59: ...unload button once Note During a rewind and eject operation the drive will not accept SCSI com mands from the server Place the tape drive in mainte nance mode Ensure that the tape driveis unloaded The...

Страница 60: ...on page 44 Cleaning the Drive Head Clean the drive head whenever C displays on the single character display and the status light is solid green IBM does not recommend that you clean the drive head on...

Страница 61: ...pen only the cartridge door Do not open any other part of the cartridge case The upper and lower parts of the case are held together with screws separating them destroys the usefulness of the cartridg...

Страница 62: ...rive status Cleaning LED This yellow LED indicates cleaning requirements and functions Eject This button ejects the tape cartridge from the drive When the button is pressed the drive completes any wri...

Страница 63: ...icates that cleaning is necessary Once illuminated the yellow LED stays lit until one of the following occurs The drive is cleaned successfully The drive is reset due to a firmware failure or firmware...

Страница 64: ...re to track cleaning cartridge usage Load Time for Cleaning Cartridge Load cycle times for SDLT cleaning cartridges are as follows these times are accurate to 20 seconds Shortest load time first pass...

Страница 65: ...handling of media cartridges Refer to the environmental specifications provided in the plastic cartridge case or in Appendix A Specifications on page 71 for detailed media information Handling SDLT Ta...

Страница 66: ...a 66 Conditioning Cartridges Before use the cartridge should be conditioned by exposure to the operating environment for a time at least equal to the period during which it has been out of the operati...

Страница 67: ...t Disaster misuse and abuse Non Spectra Logic modification of the product including but not limited to product expansion through plug in additions except as provided by Spectra Logic Removal of serial...

Страница 68: ...ed item back to the purchaser International warranty repairs must be accompanied by a commercial invoice a packing slip and a carrier waybill The following must be written on the invoice GOODS OF U S...

Страница 69: ...day not including evenings weekends or holidays from 8 00 a m to 5 00 p m Mountain Time MT Upon verification that the product has malfunctioned the replacement part or unit will be shipped to the cust...

Страница 70: ...ralogic com Technical Assistance Technical Support Phone United States 800 227 4637 or 303 449 60160 Europe 44 0 870 112 2185 Technical Support E Mail support spectralogic com KnowledgeBase http www s...

Страница 71: ...marized in the table below Power Cable The power cable included with NAStape is a standard three conductor 18 AWG power cord safe for 120 volt use in the United States and Canada The cable has a molde...

Страница 72: ...200 240 volt AC power cord are as follows Power cord must have an attachment plug of the proper type rating and safety approval for the intended country Power cord must have a molded IEC 60320 type fe...

Страница 73: ...its listed in the table below To allow for proper cooling and to maintain the proper temperature of the NAStape leave at least six 6 inches of open space behind the unit Condition Minimum Maximum Ambi...

Страница 74: ...6 MB sec native 15 MB sec compressed 12 MB secnative 31 MB seccompressed Burst transfer ratec c The actual burst data transfer rate is limited by the performance of the SCSI host bus adapter the SCSI...

Страница 75: ...nd capacity depends on the type of data 7 5 MB sec native 15 MB sec compressed Burst transfer ratec c The actual burst data transfer rate is limited by the performance of the SCSI host bus adapter the...

Страница 76: ...ctual burst data transfer rate is limited by the performance of the SCSI host bus adapter the SCSI bus interface controller and the buffer control hardware of the drive 80 MB sec Synchronous maximum T...

Страница 77: ...6 MB sec native 32 MB sec compressed Burst transfer ratec c The actual burst data transfer rate is limited by the performance of the SCSI host bus adapter the SCSI bus interface controller and the buf...

Страница 78: ...Appendix A Specifications 78...

Страница 79: ...igital device pursuant to Part 15 of the FCC rules These limits are designed to provide reasonable protection against harmful interference when the equipment is operated in a commercial environment Th...

Страница 80: ...Appendix B Regulatory and Safety Notices 80 Japan VCCI A...

Страница 81: ...including electrical machines EN 61000 4 2 1995 Electrostatic discharge requirements for industrial process measurement and control equipment EN 61000 4 3 1996 ENV 50204 1995 Radiatedelectromagneticf...

Страница 82: ...afety relevant provisions referring to Protection against electrical hazards Protection against hazards such as Mechanical hazards Fire hazards Noise Vibration The CE marking has been affixed on the d...

Страница 83: ...ves about 45 cleaning 48 LEDs 46 47 specifications 74 using 45 B backup application notes NDMP 42 C cautions as conventions 12 media 4 NAStape 4 cleaning AIT tape drives 48 LTO 1 tape drives 53 LTO 2...

Страница 84: ...ce 42 H hardware environment 13 high voltage warning 4 HP LTO 1 see LTO 1 HTTP interface connecting 17 device information 27 security 28 using 17 I IBM LTO 2 see LTO 2 installation 13 environment 13 i...

Страница 85: ...edia 65 media AIT specifications 74 caution 4 LTO 1 specifications 75 LTO 2 specifications 76 purchasing 44 SDLT specifications 77 N NAStape about 9 accessories included 14 purchasing additional 44 ca...

Страница 86: ...art NAStape 27 RMA numbers contacting technical support 70 S SDLT cleaning cartridges ordering 44 using 63 SDLT media maintenance 65 purchasing 44 specifications 77 SDLT tape drives about 62 cleaning...

Страница 87: ...edge Base 70 U unpacking the NAStape 14 user guide intent 12 using 59 AIT tape drives 45 HTTP interface 17 LTO 1 tape drive 52 LTO 2 tape drives 56 NAStape 43 serial port 29 Web interface 17 V voltage...

Отзывы: