Speco D16VX Скачать руководство пользователя страница 100

100 


3.


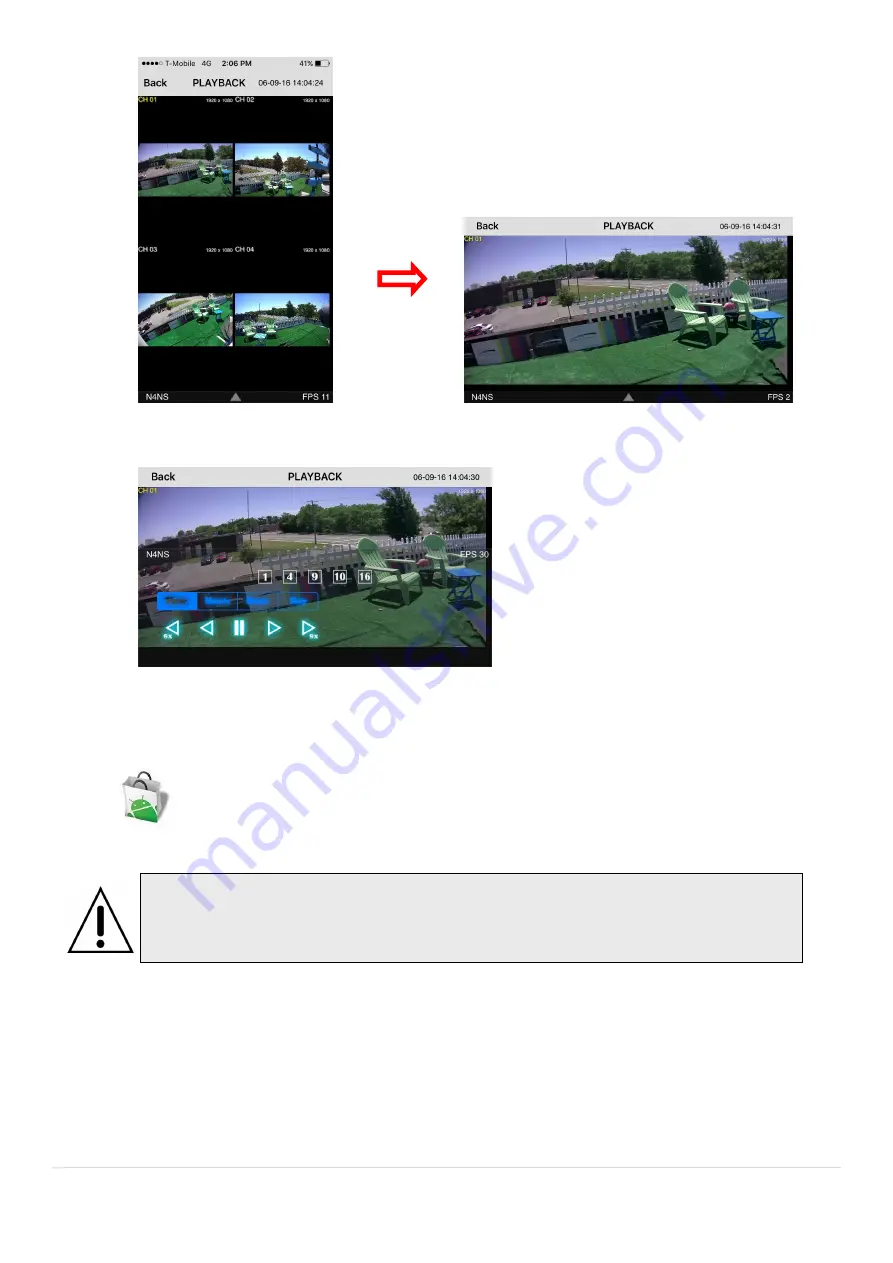
Tap the menu button. Then Playback menu icons will display. 


9-2.  App  Viewer  for  Android  Phone 

1.  Enter the Android Play Store. 


2.  Search “Speco Player” in the Android Market and install the “Speco Player” app. 


9-2-1.  Live 

1.


Open the installed “Speco Player” App and select the “Live view / Playback”. Then click the menu button of 

the phone to add a remote device. 

2.


Select the registered device and select ‘Live view’ and select up to 4 channels to monitor. Then click ‘Start’ 

button.   

Notice 

SPECO Player is for the 

VX

, VT, HT, NS, HS, DS, RS, WRS and HD series DVRs. 

SPECO VIEWER is not compatible with the T Series DVR’s (TH, TN or TL) or the PC 

Содержание D16VX

Страница 1: ...Guide Ver 1 1 Model D4VX D8VX D16VX 4 8 16 Channel HD TVI Digital Video Recorder About the User s Guide Before operating the unit please read this user s guide thoroughly and retain it for future refe...

Страница 2: ...r explosion Replace only with the same or equivalent type battery recommended by the manufacturer Discard used batteries according to manufacturer s instructions This symbol indicates the presence of...

Страница 3: ...ing so can damage the unit Only qualified and experienced personnel should perform installation and servicing Turn off the power of the DVR when connecting Cameras Audio or Sensor Cables The manufactu...

Страница 4: ...nts Please make sure the following components are included as specified below DVR Unit Remote Control Battery1 5V AAA x 2EA Quick Start Guide Quick User Guide Mouse Software Manual CD Adaptor DC12V 3A...

Страница 5: ...rding Compression H 264 Local Resolution Frame Rate 2688x1520 4M 10fps Ch 10fps Ch 12fps Ch 2304x1296 3M 13fps Ch 13fps Ch 15fps Ch 1920x1080 2M 15fps Ch 15fps Ch 15fps Ch Recording Quality Grade 5 Le...

Страница 6: ...obile Viewer Speco Player iPad iPhone Android PC Web Viewer Windows IE Chrome Firefox Safari PC Client SecureGuard CMS and SpecoTech Multi Client Viewer Remote Setup and Upgrade Yes Power Power Supply...

Страница 7: ...3 1 Recording Schedules 29 4 4 Setup Device Mode 29 4 4 1 Digital Deterrent 31 4 4 2 Keyboard Controller PTZ Setup 32 4 5 Setup Display Mode 36 4 6 Setup Network Mode 37 4 6 1 Network Types 38 4 6 2...

Страница 8: ...twork Access Using the Multi Sites Network Viewer 65 7 1 Overview 65 7 2 PC Requirements 65 7 3 Installation of the Program 66 7 4 Live Window 67 7 4 1 Main User Interface 67 7 4 2 Control Buttons 68...

Страница 9: ...kup during Playback 93 8 Network Access Using the Web Browser Viewer 95 9 Network Access Using the Smart Phone Viewer 97 9 1 App Viewer for iPhone 97 9 1 1 Live 97 9 1 2 PTZ Control 99 9 1 3 Playback...

Страница 10: ...ling Simple and Easy Graphic User Interface HDMI Output Password to secure access Network software supports 10 100 1000Mbps USB 2 0 port for video clip exporting and easy firmware upgrade via USB Flas...

Страница 11: ...an not use 1111 when the initial boot up password set But user can set 1111 as a password through Setup User Management Password Setup 2 DVR will not proceed when user put the password 1111 EZ Setup P...

Страница 12: ...12 2 Go to Setup System Date Time Setup...

Страница 13: ...13 3 Select ok from the Daylight Saving dropdown menu 2 3 Setting NTP Network Time Protocol 1 Setup System NTP Setup On Select 2 Select the proper GMT Time Zone...

Страница 14: ...T 5 GA Georgia GMT 5 GMT 4 HI Hawaii GMT 10 NA ID Idaho N GMT 8 GMT 7 ID Idaho S GMT 7 GMT 6 IL Illinois GMT 6 GMT 5 IN Indiana GMT 5 GMT 4 IN Indiana SW NW GMT 6 GMT 5 IA Iowa GMT 6 GMT 5 KS Kansas G...

Страница 15: ...ode Island GMT 5 GMT 4 SC South Carolina GMT 5 GMT 4 SD South Dakota E GMT 6 GMT 5 SD South Dakota W GMT 7 GMT 6 TN Tennessee E GMT 5 GMT 4 TN Tennessee W GMT 6 GMT 5 TX Texas GMT 6 GMT 5 TX Texas W G...

Страница 16: ...rd Setup Procedure Select EZ Record for Date Time and Recording Setup click next to proceed When the description of EZ Record Setup is displayed click next to proceed Set up the Date Time settings and...

Страница 17: ...ally checking the network and configuration by scanning in few seconds DVR will show the DDNS host name when configuration is finished automatically If you need to edit the host name please select edi...

Страница 18: ...ER LED light is on when power is applied to the system HDD LED light is on when the system is recording video data USB Port This USB port for archiving footage into a USB device USB 2 0 connector 3 2...

Страница 19: ...alarm out terminal RS 485 for PTZ Camera control POWER DC12V input Ground Use for ground port 3 3 Remote Control ID To set the remote control ID REC To start and stop manual recording SEARCH To go to...

Страница 20: ...ystem when pressing ESC button for 5 seconds SETUP To open the SETUP menu Direction buttons To move menu items or select a channel SEQ To start auto sequencing the screen in full screen mode Toggle BA...

Страница 21: ...Quick Operation Window When the DVR prompts the Login window the default User ID is admin and enter the password set on the initial boot up procedure by a virtual keyboard or a remote control It is hi...

Страница 22: ...Select the display language using the mouse or the remote control Once a language is selected the display language will change Date Display Format Select the date display format using the mouse or the...

Страница 23: ...N and END is the same Client Access Enable Disable remote access through the network NTP Setup NTP Network Time Protocol which synchronizes the time of the computer systems over variable latency data...

Страница 24: ...iate mail server information Mail Port Assign Mail Port number Secure Option Select the secure mail server connection method SSL or TLS Mail ID Enter the appropriate mail server ID Password Enter the...

Страница 25: ...t Notification On or Off Health Check Restart Shutdown Panic Record Enable Email Notification in the event a problem occurs with the VX Alarm In Enable Email Notification when the camera detects senso...

Страница 26: ...ave to have a Google Drive Account Save video clip on the Google Drive and playback though Mobile device 1 How to set Setup System System Event Notification Cloud 1 1 Click icon 1 2 Enter Google Drive...

Страница 27: ...ems or change the settings using the mouse or the remote control Figure 4 3 1 Record Setup Screen Table 4 3 1 Menu Items in Record Setup Screen Menu Item Description Site Select a channel for applying...

Страница 28: ...Mode Assign the recording mode for the selected channel Options are Continuous Motion Sensor Schedule Disable and Smart Recording c m continuous motion c s continuous sensor When Motion Recording is s...

Страница 29: ...a schedule to a different channel select the channel from the Copy Schedule menu then click the Copy button Figure 4 3 2 Schedule Recording Setup Screen none Disable recording continuous Continuous r...

Страница 30: ...tput or Spot Out depending on the Sub Monitor Out of Display setup menu Spot On Event on off Spot Event Dwell Time Sequence On off Sequence Dwell Time Spot Channel The last image will keep on the scre...

Страница 31: ...ger Remote trigger channels User can set the channels that want to make a sensor recording through remotely with Software record mode 4 4 1 Digital Deterrent Trigger audio message via motion detection...

Страница 32: ...d Controller PTZ Setup To control the PTZ functions of the camera connect the PTZ controller to the RS 485 port on the back of the chassis with CAT5 or equivalent cable Connect the RS 485 cables of PT...

Страница 33: ...led through an RS 232C interface use an RS 232C to RS 485 to RS 232C signal converter Use the PTZ setup screen to select the following options for the camera PTZ controller Channel Channel connected t...

Страница 34: ...C feature UTC Up The Coax allows for control of the camera s OSD menu via the coax cable User does not need extra connection via RS 485 to control the camera s OSD menu How to set Setup Device PTZ Con...

Страница 35: ...ouse or the remote control and press ok button 4 4 4 Motion Zone Setup Select Motion Zone using the mouse or the remote control and select either Partial Zone or Full Zone using the mouse control The...

Страница 36: ...nu Items in Display Setup Screen Item Description OSD Enable Disable displaying Channel Name Video Loss Status Bar Icon Camera Type and Record Mode OSD Contrast Set the visibility level of the On Scre...

Страница 37: ...ugh BNC port CVBS or Spot 4 6 Setup Network Mode Select the Network tab Then the network menu is displayed as pictured below Navigate through the menu items or change the settings using the mouse or t...

Страница 38: ...LAN 1 Connect USB WIFI Dongle to USB connector on DVR 2 Load the application on your smart phone or PC and enter the WIFI IP Address 3 Find the WIFI SSID and enter the password Image is below 4 Then...

Страница 39: ...tem Description Enable DDNS Enable disable the Dynamic Domain Name Service Host Name This item allows the user to setup a domain name manually using virtual keyboard displays as shown Subnet Update Wh...

Страница 40: ...Network Video Port number 1 o For web viewer downloading and remote firmware upgrading Open the port number on Network Web Port menu The default port number is 80 4 6 4 Network Stream User can set the...

Страница 41: ...Only the Admin will have access to the menu Password Check Select the Checkbox to enable the functions or leave the Checkbox blank to disable the functions Setup Enable Disable of access to Setup PB...

Страница 42: ...ADMIN USER1 USER2 USER3 USER4 USER5 USER6 USER7 USER8 and USER9 Select User Password using the mouse or the remote control Select User ID and enter the current password And enter a new password and en...

Страница 43: ...ports information to the control center Debug Port Open or Close the ports for remote checking Network Connection Status Shows the current network connection status User IP Address Date Time And do d...

Страница 44: ...nu Items in Storage Setup Screen Item Description Overwrite When enabled the DVR will continue recording and overwrite the oldest existing recorded data once the hard drive is full When disabled recor...

Страница 45: ...HDD is full and overwrite older data When Overwrite is off DVR will stop recording when the HDD is full Recording Limit Days Set the recording limit days 1 90 days If the Recording Limit Days are set...

Страница 46: ...ettings Network settings HDD overwrite Limit recording HDD serial number and HDD ERROR time will not be included Load Factory Default Press the button to reset the system to the factory default settin...

Страница 47: ...47 Figure 4 9 2 Figure 4 9 3 Figure 4 9 4 Figure 4 9 5 NOTICE If selecting Restart Now when the USB flash drive is plugged the following message will pop up with beep sound...

Страница 48: ...re configured in the Display Setup screen When the mouse is right clicked and the quick operation window will be displayed as below Figure 5 1 1 Live Screen and Quick Operation Window On the bottom of...

Страница 49: ...e ID is not set the message ALL is displayed When Overwrite is not enabled this displays the percent of the hard disk usage from 0 99 When Overwrite is enabled the Bar will indicate with Overwrite Con...

Страница 50: ...he PTZ user interface will appear Enabel Main Monitor Sequence Select this option to enable disable sequence function Disable Alarm Out Click this button to enable disable Alarm outputs Manual Digital...

Страница 51: ...n to return to the previous menu Press the PTZ button to close the OSD menu AUTOSCAN Press the right key to start auto scan Press the left key to stop auto scan PRESET Select PRESET then press the lef...

Страница 52: ...e and drag to make rectangular shape 5 3 Search Screen To enter the search screen menu select Search menu on the screen using the mouse or press Search icon on live screen Figure 5 3 1 Search Screen T...

Страница 53: ...2 minutes and 30 seconds Figure 5 3 4 Second Thumbnail Screen When the EZSearch menu is selected a calendar is displayed that highlights dates with recorded data 1 Select a specific date on the calen...

Страница 54: ...area quickly User can search need to know area Figure 5 3 4 Calendar Screen Figure 5 3 5 Channel Selection Screen 1 Select the start time and End time that user want to search 2 Set Zone as Partial o...

Страница 55: ...r selection as Partial then user can drag the area 5 Click right mouse button when the area selection was finished 6 Select search then show the detected motion lists at the right blank 7 Click the li...

Страница 56: ...When the Timeline menu is selected the user can see a calendar which displays recorded dates with highlights Select a specific date and time Click and drag the red time indicator bar to the desired ho...

Страница 57: ...rch Screen 5 3 5 Go To First Time You can access the oldest recorded data on the DVR hard drive by selecting Go To First Time on the Search window Press the prev to return to the Search window 5 3 6 G...

Страница 58: ...can export the selected data 5 3 9 Log List You can access the LOG list search screen by selecting LOG on the SEARCH window Figure 5 3 12 Log List Screen When the Log menu is selected the user can see...

Страница 59: ...ep backward The playback position moves 60 seconds backward Press to play or pause recorded video Jump Step forward Playback position moves 60 seconds forward 2x 4x 8x 16x 32x for D4VX 2x 4x 8x 16x fo...

Страница 60: ...e mode or while playing back recorded video 1 Select a specific channel which wants to backup on live screen 2 When you press Snapshot button on Quick operation window the media selection window scree...

Страница 61: ...Export button on the selected channel or all channels the DVR will ask whether to archive a Still Image NSF AVI or EXE and select the proper media type 2 Select USB Drive Flash Drive to back up less...

Страница 62: ...g EZCopy feature Video can be easily archived onto the USB flash drive or a hard drive In playback mode press the EZCopy button to launch the backup function 1 Press EZCopy button on the selected chan...

Страница 63: ...t 1 Select the date to begin searching and navigate through the days using the mouse or the remote control 2 Once you have selected the date press the NEXT button to open the list of stored data 3 Use...

Страница 64: ...USB drive 2 Otherwise the video and time stamp over video can t be properly played back and wont be displayed on Window Media Player Timestamp On AVI The subtitle is embedded to the video clip file Th...

Страница 65: ...k 7 2 PC Requirements Minimum PC Requirements Recommended PC Requirements Before installing the program check the PC specifications The DVR remote software may not perform correctly if the PC does not...

Страница 66: ...d double click SpecoTech Multi Client XXXX exe 2 Select a destination folder and click Next 3 Select the program folder and click Next 4 The installation status screen is displayed 5 After the install...

Страница 67: ...67 7 4 Live Window When installation is completed double click the SpecoTech Multi Client icon on your desktop to start the program 7 4 1 Main User Interface...

Страница 68: ...the selected site sites DISCONNECT Click this icon to disconnect the selected site sites SETUP Click this icon to setup configuration of SpecoTech Multi Client CAPTURE Click this icon to capture a sti...

Страница 69: ...69 7 5 Search and Playback Window 7 5 1 Main User Interface You can access to search window by clicking the search icon Local Playback Remote Playback on the upper right of the Live Window...

Страница 70: ...still image EVENT LIST Opens list of events logged by the SpecoTech Multi Client EZCopy Start Click this icon to set the beginning time for backup of the recorded video in AVI format EZCopy End Click...

Страница 71: ...click the play icon to display the recorded video Playback buttons EZSEARCH Thumbnail search over the network Shows 24 thumbnail images one for each hour from 00 00 to 23 00 Each hour is further brok...

Страница 72: ...h selected area 2 Click right mouse button when playback 3 Smart Search will search in the selected area only 4 Smart Search checking the motion and event from the selected area 5 User can set Sensiti...

Страница 73: ...73 6 Select any of search Thumbnail then selected event will playing...

Страница 74: ...ord You can also set the save path for capturing and backup Save Path Specify the location to save captured still image for Capture and Backup data Miscellaneous Automatic Reconnection If enabled the...

Страница 75: ...75 7 6 2 Event Event log can be archived and searched Event Log Specify the location to save event logs and select event to archive Event Search Event log can be searched from the selected time...

Страница 76: ...annels When you set the recording condition to event you can set event for motion or alarm with duration Record Local Storage Setup You can select the local disk to record and the amount of disk space...

Страница 77: ...77 7 6 4 Display You can select the OSD On Screen Display to be displayed 7 6 5 Language English French and Spanish is selectable...

Страница 78: ...78 7 6 6 About About provides network client version information...

Страница 79: ...w is displayed as below Select the REMOTE SETUP Then the setup window is displayed The specified menu screen is displayed on the upper left of the screen Enter the password of the DVR when prompted NO...

Страница 80: ...the time zone o Connection Mode Select the connection mode to NTP time server SEND E Mail SETUP Sets whether to enable disable e mail sending function o SEVER TYPE Select GMAIL HOTMAIL AOL YAHOO or MA...

Страница 81: ...fication in the event a problem occurs with the VX o ALARM IN Enable Email Notification when the camera detects sensor o MOTION DETECTION Enable Email Notification when the camera detects motion o VID...

Страница 82: ...EDULE MOTION SENSOR o PRE RECORD Sets whether to perform or not prerecording o POST EVENT RECORD Sets the duration of the event recording o AUDIO Sets whether to perform or not audio recording o SECHD...

Страница 83: ...r baud rate and ID PTZ Set the PTZ baud rate protocol and ID SPOT Enable Disable the SPOT OUT and SEQUENCE MOTION Setup the motion detection area and the sensitivity o SITE Select the channel o MOTION...

Страница 84: ...to the specified channel only 7 7 5 Network NETWORK TYPE o STATIC The address setting mode is manual Input IP Gateway Subnet Mask and DNS IP o DHCP The address setting mode is automatic DDNS Set wheth...

Страница 85: ...e recording data OVERWRITE Continues recording by writing over previous recordings when HDD is full DISK INFO Shows the information of HDD installed in DVR RECORDING LIMIT Sets whether to limit or not...

Страница 86: ...lic IP address of a router that DVR is connected or Domain name o Port Number Default Port Number is 5445 o ID Input ID of DVR Default ID is admin o Password Input network password of DVR that is same...

Страница 87: ...es 1 Select the site sites to modify from the directory window 2 Click NET FINDER button And then the following window will be displayed as below 3 Click MODIFY button And then the modified informatio...

Страница 88: ...sites to connect from the directory window 2 Click CONNECT button and then site sites displays display as connected 7 8 2 2 Disconnect 1 Select site sites to disconnect from the directory window 2 Cli...

Страница 89: ...capture from the display screen Otherwise all channels will be captured 2 Click CAPTURE button And then a Capture window will be displayed as below 3 Set Save Path File Name and File Format And then...

Страница 90: ...dow will be displayed as below 2 Select Record and set the values 3 Select Disk and set the values 4 Click RECORD ON button And the color of button is changed 5 Live video data is recorded as set in R...

Страница 91: ...ct site sites to connect from the directory window 3 Click CONNECT button And then Green bar displays on Search calendar and timeline scale window 6 Move the marker on the timeline scale to where ther...

Страница 92: ...e displayed 2 Select the site to connect from the directory window 3 Click CONNECT And then Green bar displays on Search calendar and timeline scale 4 Move the marker on the timeline scale to where th...

Страница 93: ...line scale to select the beginning point of the backup 4 Click EZCOPY END button on the timeline scale to select the ending point of the backup Then the selected starting point and the ending point on...

Страница 94: ...94 7 AVI video data is recorded as selected in AVI Backup window AVI format video can be played back by using Window Media Player or other media player that is compatible with AVI format video...

Страница 95: ...VR from SETUP SYSTEM DESCRIPTION IP ADDRESS or 2 Input the IP address or Domain name address that you pre registered 3 Click this bar Then the dialog box is displayed 4 Click Install to download and i...

Страница 96: ...connected or Domain name Port Number Default Port Number is 5445 ID Input ID of DVR Default ID is admin 7 Password Input network password of DVR that is same with DVR setup password 8 Then the cameras...

Страница 97: ...default 5445 ID default admin and Password that is same with DVR setup password Then click Save button Note Network Port and Web Port must be forwarded before adding a new site 3 Select a registered...

Страница 98: ...n 6 Drag and drop channels Touch and drag one channel to the other channel to swap the channel location To swap the channel drag a channel to another channel 7 Digital Zoom In Out Double tap on the de...

Страница 99: ...e PTZ icon on the screen can control PTZF functions 9 1 3 Playback 1 Select mode as Playback and click Connect button Then select Date Time and click Connect button 2 The app will display the selected...

Страница 100: ...1 Live 1 Open the installed Speco Player App and select the Live view Playback Then click the menu button of the phone to add a remote device 2 Select the registered device and select Live view and se...

Страница 101: ...screen to switch 1 channel display to 4 channels split display 9 2 2 Playback 1 Select the registered device and select Play back and select up to 4 channels to search Then click Start button As soon...

Страница 102: ...hannel screen to switch 1 channel display to 4 channels split display 9 2 3 PTZ Control To control the PTZ function of the camera tap the channel screen and then the channel name will be highlighted i...

Страница 103: ...e 4 Input Site Name Site Address IP address Port Number and Password on the connect window Site Name Input a name that properly describes a site IP Address Input IP address Port Number Default Port Nu...

Страница 104: ...104...

Страница 105: ...NETWORK DDNS HOST NAME Manually enter a domain name using the virtual keyboard and click ENTER button 3 When a manual host name is completed Go to SETUP NETWORK DDNS SUBMIT UPDATE and select ON to sub...

Страница 106: ...SYSTEM INFORMATION or SETUP SYSTEM DESCRIPTION DDNS STATUS 7 Check the NETWORK PORT Default 5445 WEB PORT Default 80 and the IP Address of the DVR from SETUP NETWORK 8 Port forward the NETWORK PORT De...

Страница 107: ...e that properly describes a site IP Address Domain name or Public IP address of a router that DVR is connected Port Number Default Port Number is 5445 ID Input ID of DVR Default ID is admin Password I...

Отзывы: