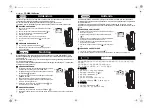
MODE Free
Wall Dock and Back Box
Installation Guide
Wall Dock Pack includes:
· (1) Wall Dock
· (2) Wall Dock Mounting Screws
· (1) Back Box
· (1) Grounding Screw (Installed)
· (4) Position Tabs (Installed)
· (4) Position Tab Screws (Installed)
· (4) Mounting Clips
· (2) Drywall Screws
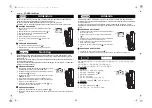
1.
For a Pre-Construction installation, make
sure to remove the retro mounting tabs
from the top and bottom of the back
box.
2.
Place the Back Box against a wall stud
(up arrow pointing up), use the metal
tabs on either the right or left side of the
enclosure. This will help place the enclo-
sure against the stub evenly. Tabs are set
for ½” dry wall. If thicker drywall is used,
make sure to accommodate for the dif-
ference.
3.
Use the drywall screws provided to secure
the back box to the stud as shown.
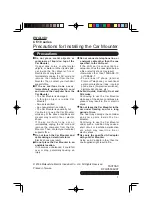
2.
Using a drywall saw, cut the drywall,
keeping the drywall blade on the out-
side of the line you have marked out in
step 1. Do not cut the hole too big or
the mounting tabs will not function cor-
rectly.
3.
The back box will come pre-configured
for an Retro installation; correctly orien-
tate the back box by making sure the
up arrow faces up. Place the Back Box
flush into the hole.
PRE-CONSTRUCTION INSTALLATION TIPS
5.
Finished Product
4.
While holding the Back Box in place, install the mounting clip(s) in as shown, do this for the top
and bottom.
1. Using a level with a straight edge mark
out the cut lines for the back box. Cut out
is W 4
7
⁄
8
” x H 4
1
⁄
8
”
(
124 mm x 105 mm).
RETRO INSTALLATION TIPS
Back Box Bulk Pack includes:
(10) Back Boxes each containing:
· (1) Grounding Screw (Installed)
· (4) Position Tabs (Installed)
· (4) Position Tab Screws (Installed)
· (4) Mounting Clips
· (2) Drywall Screws