SpeakerCraft MODE 3.1 Скачать руководство пользователя страница 24

MODE 3.1 Installation Instructions   


                Page 24

EZ-Pad icon under: 

Project Content/Zone Setup

. The virtual EZ-Pad for Zone 1 will appear. Left click the 

iPod Source 

Button

 to select the iPod ‘bank’ of commands. The iPod Source Button will highlight blue and all commands pro-

grammed to that button will appear in the 

Button Properties Window

.

15. Right click any commands in the 

Button Properties Command List

 that were programmed for the Cable Box (or other  

now replaced source) then highlight and left click 

Delete Command 

in the pop-up. The command will be deleted.

16. Double left click any desired command(s) in the CMD Library/SpeakerCraft/MODE/MODE Base Command Library for EZ-

Pad iPod control programming.

17. Repeat steps 15-16 for all buttons within the iPod ‘bank’.

18. If all zones are identical in keypad confi guration, (all use MKP-8.1 or the same double or triple-gang confi guration), the 

new programming for the EZ-Pad in Zone 1 can be ‘cloned’ to the other EZ-Pads. Right click the 

Zone 1 EZ-Pad iPod 

Source Button

. Highlight and left click 

Copy All Source Bank Commands

 in the pop-up. Left click the EZ-Pad icon 

in any other zone with an identical EZ-Pad setup to Zone 1. 

Right click

 the 

iPod Source Button

. Highlight and left 

click 

Paste Source Bank Commands

 to duplicate the EZ-Pad programming for iPod to the selected zone. Repeat for 

all Zones with identical EZ-Pad confi guration. Zones with different EZ-Pad confi gurations will need to be programmed 
individually.

Download and Test

19. At this point it is suggested that the project be downloaded to the MZC to confi rm the changes to the EZ-Pads and 

communication with the iPod/Base/Adapter. With the PC running EZ-Tools connected to the MZC with a SpeakerCraft 

3.5mm Plug Transfer Cable

 or 

Transfer Cable with USB/Serial Adapter

, either select 

MZC-66/88

 from the 

Menu 

Bar

, then highlight and left click 

Download

 or left click the 

Download Icon

 in the 

Tool Bar

 to transfer the updated 

project to the MZC.

20. When Download is complete check EZ-Pads for proper iPod control. Make programming changes as needed by repeat-

ing previous steps.

21. At this point, existing system functionality for EZ-Pads is updated and complete and MODE 3.1 programming begins.

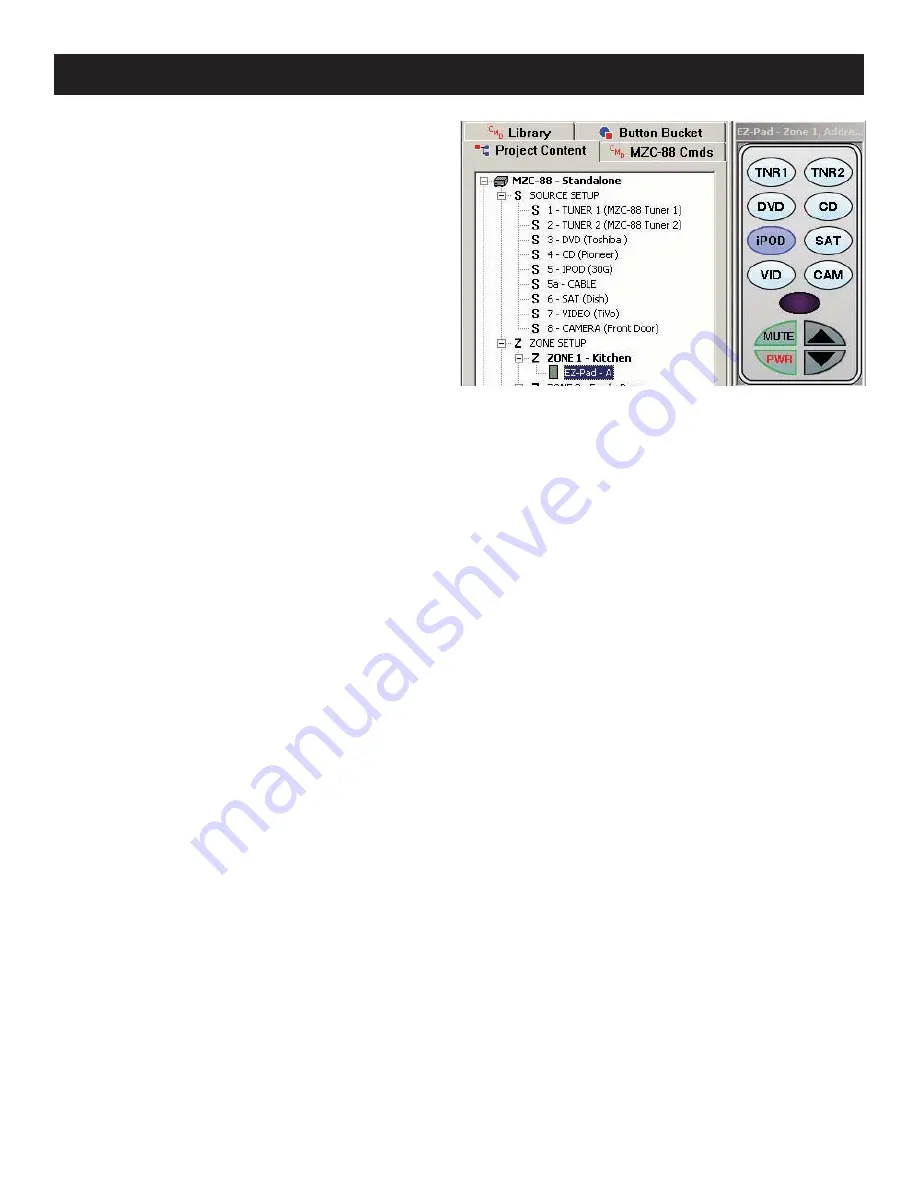
13. At this point the EZ-Pad Source Buttons will have also 

changed to indicate the new source confi guration. In the 
example, the Cable Button has now changed to iPod as 
shown in 

Figure 18

. All programming associated with 

Source 5 will need to be changed from Cable commands 
to iPod commands for all keypads in all zones. Left click 
the 

CMD Library Tab

 to open the IR Command Library. 

Left click the pull-down arrow next to the 

Brands

 block 

and scroll the list until 

SpeakerCraft

 appears. Highlight 

and left click 

SpeakerCraft

. Expand the 

MODE Folder


by left clicking the ‘+’ sign or double left clicking the folder 
icon. Next, expand the 

MODE Base Folder

 by left click-

ing the ‘+’ sign or double left clicking the folder icon.

Zone Setup

14. Select the EZ-Pad in Zone 1 by left clicking the green 

Figure 18
Updated Source Setup and EZ-Pad Confi guration

Содержание MODE 3.1

Страница 1: ...INSTALLATION INSTRUCTIONS MODE 3 1 Keypad IPOD 1 30G VIDEO IPOD 2 NANO DVD CHANGER CD CHANGER TUNER 1 TUNER 2 TUNER 1 IPOD 1 30G VIDEO IPOD 2 NANO DVD CHANGER CD CHANGER TUNER 2 REV 1...

Страница 2: ...kely to be walked on or pinched by items placed upon or against them paying particular attention to cords at plugs convenience receptacles and at the point where they exit from the appliance 13 Cleani...

Страница 3: ...DAPTER 13 MODE BASE 13 MODE 3 1 KEYPAD 14 CONNECTIONS 16 MODE ADAPTER Single 16 MODE ADAPTER Stacked 17 MODE BASE 18 MODE 3 1 KEYPAD 18 PROGRAMMING WITH EZ TOOLS 21 DOWNLOAD EZ TOOLS 21 QUICK START GU...

Страница 4: ...h SpeakerCraft EZ Pad Keypads and run on the same CAT5 or 5 conductor wire used for EZ Pads The MODE 3 1 includes a J box Mounting Bracket that allows installation in most standard 2 gang low voltage...

Страница 5: ...for added flexibility NOTE The Arrow Up or Menu Button is not configurable or programmable It only provides Menu navigation to return to the MODE Main Menu when using non iPod Sources and functions t...

Страница 6: ...C 88 4 KEYPAD ANGLE TAB Fits into the channeled lower Mounting Bracket Tab Slots to allow flush installation flat to wall surface or with the lower portion of the keypad sloping away from the wall at...

Страница 7: ...onnect cable When stacking multiple Adapters each Adapter must be connected to a dedicated Source Input on the MZC 8 EXPANSION PORT RJ45 Jack connects to the Expansion Port on the MZC Rear Panel to Rx...

Страница 8: ...MZC amplifier and zone speakers Switching to and controlling the sources connected to this input must be configured during setup in EZ Tools 5 USB PORT USB mini B jack allows connection directly to a...

Страница 9: ...ust be set for each MODE Base within a given system The switch provides up to 16 addresses 0 to F IMPORTANT NOTICE REGARDING ESD Electrostatic Discharge The MODE Base can be susceptible to ESD Under c...

Страница 10: ...UIDE SEL MODE 3 1 Keypad MODE Base Adapter Up to 6 PS 3 0 Cat 5 DB9 RS232 Null Modem Interface Cable DB9 J1 ASW1 D4 D5 J4 J5 J6 J2 J3 U2 U5 U1 U7 SW1 U6 U3 RSA 1 0 RS232 Interface Adapter CONTROL PORT...

Страница 11: ...minate with a proper wall plate MAXIMUM LENGTH 100 NOTE When stacking Adapters only one run of CAT5 is required between the Adapters and the MZC See section Connections MODE Adapter Stacked for additi...

Страница 12: ...the keypad to remove Do not touch pinch poke or otherwise contact the flex board circuit connected to the top of the LCD Damage to the flex board will disable the LCD 3 With the faceplate fully remov...

Страница 13: ...r of Adapters being mounted A single Adapter can be mounted on a rail as short as 3 inches A stack of six Adapters would require a rail approximately 10 12 inches long 1 Hold DIN Rail in mounting posi...

Страница 14: ...he wall board has been installed Retro fit Although use of retro boxes is not recommended they can be used in some cases If using a retro box it will probably be necessary to hone out part of the box...

Страница 15: ...o the forward channel of the Keypad Angle Tab Slots 2 Carefully press the upper corners of the keypad with both thumbs until the Keypad Locking Tabs slide into place The keypad will lift slightly in t...

Страница 16: ...rough configuration 4 Aux Input optional Using a Stereo mini to RCA interconnect cable connect the L R line level audio output of a source to be added as an additional input such as a video game XM or...

Страница 17: ...MODE Adapters to the Expansion Port on a MZC 66 88 The 12 pin interconnects create a bus for power control and metadata to the additional units 3 Using the included Stereo mini to RCA interconnect cab...

Страница 18: ...create difficulty when installing the keypad into the Mounting Bracket and will probably cause wires to become disconnected CAT5 NOTE When connecting GND IR IN and 12V connect both of the same color...

Страница 19: ...d attach the included Wire Retainer to the back of the MODE 3 1 as shown in Figure 15 Remove the adhesive backing from the wire retainer and attach with the wire tie oriented vertically as shown with...

Страница 20: ...EAKERS L L R R OUTPUTS from the MZC 88 or an external amplifier to the EPR 1 0 AMPLI FIER Terminal L L R R INPUTS 2 Strip approximately 1 4 inch of each lead and twist the stripped ends so there are n...

Страница 21: ...is going to be added to 3 In the Zone Setup Window left click Name Sources If the Available Sources are checked and not going to change left click Apply Check or uncheck any boxes to make changes as...

Страница 22: ...ibrary Tab select a Brand and Device from the pull downs and double left click the appropriate commands for the Virtual Buttons being programmed Repeat for all sources 19 Download the project to the M...

Страница 23: ...d control of the cable box Source 5a which will appear in the MODE 3 1 Main Menu as a regular Source Further as an option the cable box can be unchecked in Zone Setup for any zones other than the Fami...

Страница 24: ...s will need to be programmed individually Download and Test 19 At this point it is suggested that the project be downloaded to the MZC to confirm the changes to the EZ Pads and communication with the...

Страница 25: ...ration for the system under Source Setup If the source configuration is correct proceed to step 3 If not return to section Adding An iPod Mode Base And Mode Adapter To An Existing Project and follow a...

Страница 26: ...there is more than one keypad in a zone each of the keypads within that zone must be set to a different Address Right click the EZ Pad or MODE 3 1 icon in a par ticular zone Left click the EZ Pad or M...

Страница 27: ...a press of the Menu Key returns the display to the previous iPod Main Menu level In any iPod mode a press hold of the Menu Button will return the display to MODE Main Menu Virtual Button List Window W...

Страница 28: ...ommand or macro It is recommended that the Knob press function be used for Zone Mute For this ex ample MZC pre amp zone mute will be used Right click the inside section of the Volume Knob In the pop u...

Страница 29: ...rial and error may be necessary to determine which code group is correct Typically testing commands such as power play and stop will indicate the proper code group Sometimes a visual inspection of the...

Страница 30: ...ties Window Refer to Figure 30 Repeat for all Virtual Buttons Macros 13 Virtual Buttons can be programmed to execute macros using standard EZ Tools programming method Left click the Virtual Button to...

Страница 31: ...the Power Off Key for longer than 2 seconds All zones and sources will turn off unless This Zone Ignores Other Zone Initiations is selected under Zone Setup Whole House Mute in EZ Tools for a given z...

Страница 32: ...Play Pause Skip etc 3 Roll the Scroll Wheel to highlight Virtual Button functions as programmed 4 Press the Click Button to execute the Virtual Button function highlighted in step 3 MZC Tuners All MZ...

Страница 33: ...ted parameter will appear at the top of the LCD 5 Roll the Scroll Wheel to adjust Treble or Bass Up Down 6 When the desired change has been made press the Click Button to Save the setting 7 Press the...

Страница 34: ...l appear at the top of the LCD 4 Using the Scroll Wheel adjust the selected setting to the desired value 5 Press the Click Button to set 6 Repeat steps 2 5 for all settings and values 7 When finished...

Страница 35: ...r Mute Relay 12VDC 17mA to drive EPR 1 0 Power Requirement 12 VDC MODE Adapter Dimensions 5 3 8 W x 1 1 4 H x 3 D Audio Out Stereo 3 5mm Mini Jack MZC Expansion Connection RJ45 Jack Aux Audio In Stere...

Страница 36: ...rchaser within a reasonable time freight prepaid This Warranty does not include service or parts to repair damage caused by accident disaster misuse abuse negligence inadequate packing or shipping pro...

Страница 37: ...MODE 3 1 Installation Instructions Page 37 940 Columbia Avenue Riverside CA 92507 800 448 0976 Fax 951 787 8747 www speakercraft com NOTES...

Отзывы: