background image

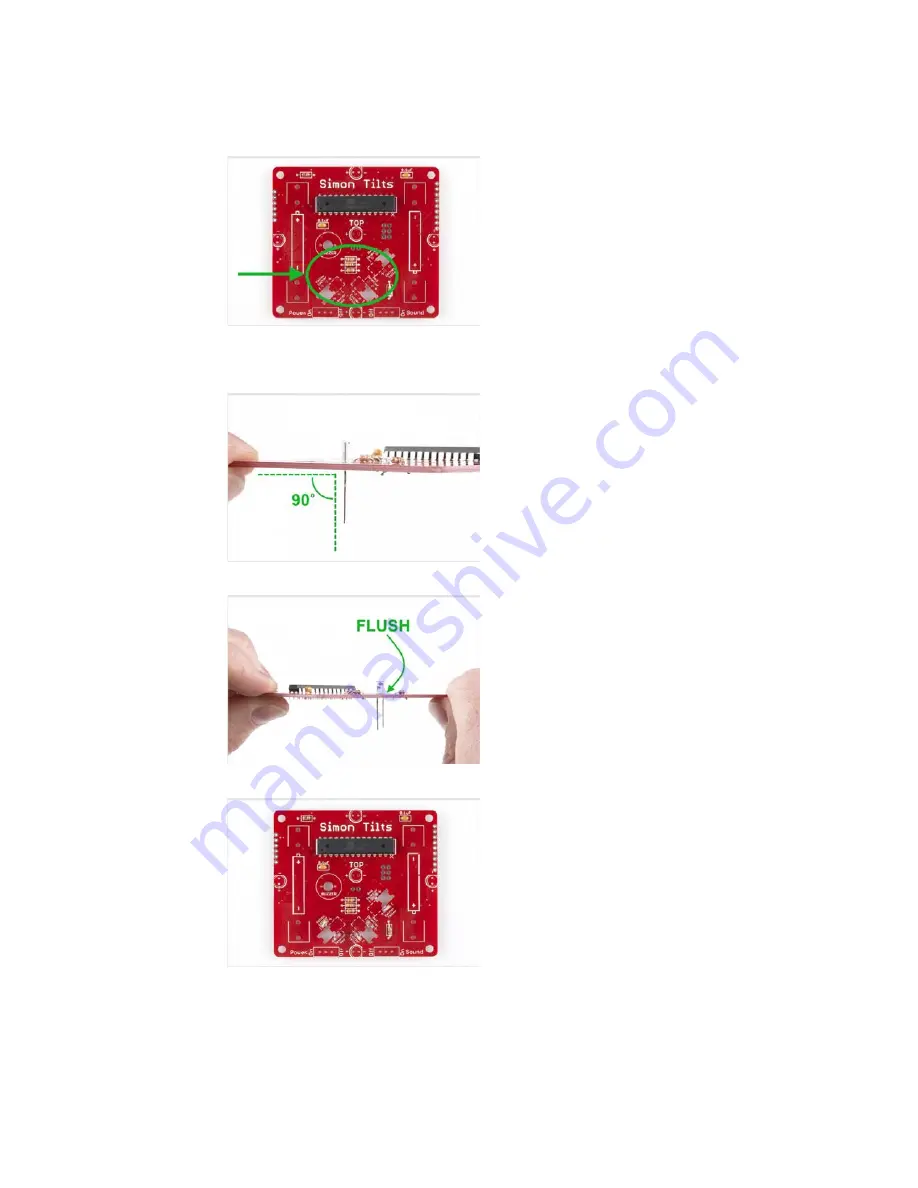
Locate the positions on the board. Notice that there are “Yellow Emittor” 
and “Red Detector” labels printed on the PCB. Also note that there are “-” 
and “+” marks for each leg. Be careful here to ensure correct placement 
and polarity.

When soldering these into place, make sure they are positioned straight up 
(vertically). Check that your legs are forming a 90 degree angle with the 
PCB like so:

Also ensure that they are flush to the PCB:

When you’re done soldering all 6 into place, your PCB should look like this:

To learn more about how IR emitters and detectors work, check out this 
video: SparkFun Infrared Sensor Overview

Buzzer and Switches

Locate the buzzer and slide switches:

Page 9 of 20

Содержание KIT-12634

Страница 1: ...This assembly guide will take you through each component in the kit and show you how to solder it into place The assembled Simon Tilts PTH Kit Suggested Reading If you d like more general knowledge a...

Страница 2: ...markings please check out the following tutorial Decoding Resistor Markings Bend the legs downward Locate the 10K Resistor position on the board Insert the resistor into the PCB Note this component i...

Страница 3: ...hold it in place Flip the board over Hold the soldering iron s Sweet Spot so it touches both the leg and the metal ring Hold for 2 seconds Feed solder into the joint First pull away the solder Second...

Страница 4: ...istor you re ready to begin soldering in in the remaining resistors Note before soldering in each resistor double check you have the correct value by ensuring that the color markings are correct Locat...

Страница 5: ...rs x3 They each have this pattern of strips on them ORANGE ORANGE BROWN GOLD A 330 resistor looks like this There should be three of them Locate the position on the PCB Using the same methods as befor...

Страница 6: ...hey have the markings 104 on them also note the bottom side may have some other letters like K5M They look like this Locate their positions on the PCB Ensure that they are flush with the surface of th...

Страница 7: ...ion on the PCB Again notice a similar notch symbol in the PCB white ink Taking care to align the notch properly place the ATmega328 into the PCB While soldering the first leg it can be any leg you cho...

Страница 8: ...CB properly To learn more about polarization please check out this other tutorial Diode and LED Polarity Locate the IR emitter and detector pairs There should be 6 total pieces Three with red dots and...

Страница 9: ...se into place make sure they are positioned straight up vertically Check that your legs are forming a 90 degree angle with the PCB like so Also ensure that they are flush to the PCB When you re done s...

Страница 10: ...on the PCB Place your components in the PCB Flip it over and solder into place When you are done you re PCB should look like this Battery Clips Locate the 4 Battery Clips Locate the 4 positions on th...

Страница 11: ...board should look like this 6 Leds Careful these next 6 parts are polarized and need to be placed into the PCB properly To learn more about polarization please check out this other tutorial Diode and...

Страница 12: ...in the middle of the PCB When soldering the outside LEDs do not solder them flush to the board Leave a inch gap This will enable you to bend the LEDs outward like so When you solder in the two center...

Страница 13: ...e suggest cleaning it to avoid getting flux on your fingers during game play To clean your Simon Tilts first ensure that you do not have the batteries installed You can clean your board using an old t...

Страница 14: ...is You re very close now Just snap the batteries in and turn it on Ensure you correctly align the and sides of each battery How to Play the Game Before you begin playing with your Simon Tilts it is im...

Страница 15: ...h higher level so essentially it goes to INFINITY All six positions are possible even upside down It can get pretty tricky when you get into a couple of full rotations In addition to the LEDs blinking...

Страница 16: ...between the middle pad and the other outside pad The polarity of the traces running to that LED should now be swapped and your LED should be lighting up Prototyping the Tilt Arm Sensors Pictured belo...

Страница 17: ...as that it was much more expensive and would require sourcing tubing and or getting a custom molded cylinder part made Both of these approaches had one more down side they required the user to precise...

Страница 18: ...the BB is resting at the upper end of the tilt arm then the look through hole is unobstructed and the IR detector can sense the emitter In order to make using this part easier we created a device in o...

Страница 19: ...or turn it into a completely different project For more information about how to re program using Arduino check out this following tutorial What is an Arduino If it s more soldering that you re after...

Страница 20: ...sed in the RedBoard SIK This means that if you wanted to you could use the skills learned in the SIK to modify your Simon Tilts For example you could change the way the game plays or use it for an ent...

Отзывы: