background image

SY-6BA+ IV 

Quick Start Guide

7

Hardware Installation

Step 2. 

Make Connections to the Motherboard

This section tells how to connect internal peripherals and power supply to the Motherboard.

Internal peripherals include IDE devices (HDD, CD-ROM), Floppy Disk Drive, Chassis Fan,
Front Panel Devices (Turbo LED, Internal Speaker, Reset Button, IDE LED, and KeyLock
Switch.), Wake-On-LAN card, VGA card, Sound Card, and other devices.

For more details on how to connect internal and external peripherals to your new SY-6BA+
IV Motherboard, please refer to 

SY-6BA+ IV Motherboard User's Guide and Technical

Reference

 online manual on CD-ROM.

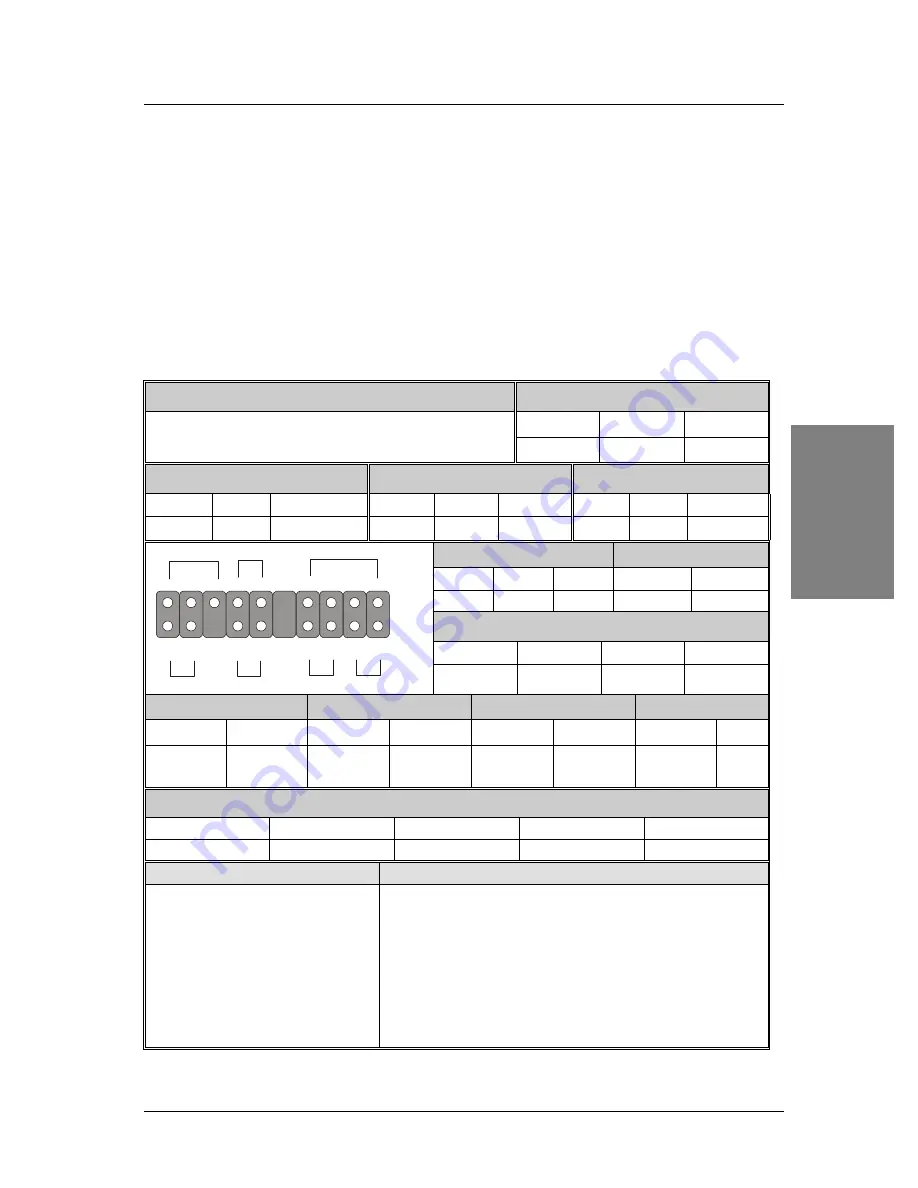
Connectors and Plug-ins

PCI Audio Card Header: SB-Link ™(PC-PCI)

Wake-On-LAN Header: JP44

Pin1

Pin2

Pin3

Connect the SB-Link ™

 (PC-PCI) cable from your

PCI audio card to this header.

5VSB

GND

MP-Wakeup

CPU Cooling Fan: CPUFAN

Power Fan: PWRFAN

Chassis Fan: CHAFAN

Pin1

Pin2

Pin3

Pin1

Pin2

Pin3

Pin1

Pin2

Pin3

GND

12V

SENSOR

GND

12V

SENSOR

GND

12V

SENSOR

Power LED

Keylock

Pin1

Pin2

Pin3

Pin1

Pin2

5V

NC

GND Control Pin

GND

Speaker

Pin1

Pin2

Pin3

Pin4

5V

NC

NC

Speaker out

HDD LED

Turbo LED

PWRBT

RESET

Pin1

Pin2

Pin1

Pin2

Pin1

Pin2

Pin1

Pin2

LED Anode

LED

Cathode

LED

Cathode

GND

Power

On/Off

GND

Power Good GND

IrDA (Infrared Device Header): IR1

Pin1

Pin2

Pin3

Pin4

Pin5

VCC

None

IRRX

GND

IRTX

ATX Power On/Off: PWRBT

ATX Power Supply: ATX PW

Connect your power switch to
this header (momentary switch
type).

To turn off the system,
please press this switch and
hold down for longer than
4 seconds.

Attach the ATX Power cable to this connector. (

This

motherboard requires an ATX power supply, an AT power supply
can NOT be used.)

Note: Please make sure the ATX power supply is able to

provide at least 720mA of current on the +5VSB lead if you

want to enable the advanced power management functions,

like power failure resume, Power-On by keyboard, etc.

Power LED Key Lock

Speaker

Reset

PWRBT

Turbo LED HDD LED

+

+

+

+

 _

 _

 _

 _

1

1

1

Содержание Motherboard SY-6BA+ IV

Страница 1: ...rboard Quick Start Guide FC C Tested To Comply With FCC Standards FOR HOME OR OFFICE USE POST CONSUMER RECYCLED PAPER 100 Hardware Installation Quick BIOS Setup Introduction The SOYO CD The ATA 66 Driver Installation ...

Страница 2: ... without notice and without obligation to notify any person of such revision or change The information contained in this manual is provided for general use by our customers Our customers should be aware that the personal computer field is the subject of many patents Our customers should ensure that their use of our products does not infringe upon any patents It is the policy of Soyo Computer Inc t...

Страница 3: ... further information please refer to SY 6BA IV Motherboard User s Guide and Technical Reference online manual included on the CD ROM packed with your Motherboard Unpacking When unpacking the Motherboard check for the following items u The SY 6BA IV 82440 BX AGP PCI Motherboard u The Quick Start Guide u The Installation CD ROM u SOYO 3 in 1 Bonus Pack CD ROM Norton AntIVirus Ghost and Virtual Drive...

Страница 4: ...GP slot Ø 5 x 32 bit bus master PCI slots Ø 2 x USB ports onboard Ø 1 x IrDA port Ø Supports multiple boot function Ø Y2K Compliant Ø Supports Power Failure Resume COM 1 COM 2 PRT USB 1 USB 2 PS 2 KB Connector PS 2 Mouse Connector JP10 PCI Slot 1 PCI Slot 2 PCI Slot 3 PCI Slot 4 PCI Slot 5 ISA Slot 1 ISA Slot 2 JP1 JP8 LED1 3V Lithium Battery SB LINK PC PCI IR1 1 5 CPUFAN PWRFAN ITE 8671 I O Chips...

Страница 5: ... you through a quick and correct installation of your new SY 6BA IV Motherboard For detailed information please refer to SY 6BA IV Motherboard User s guide and Technical Reference online manual included on the CD ROM packed with your Motherboard PREPARATIONS Gather and prepare all the necessary hardware equipment to complete the installation successfully u Slot 1 processor with built in CPU coolin...

Страница 6: ... 100x6 5 750MHz 100x7 5 400MHz 100x4 0 500MHz 100x5 0 600MHz 100x6 0 700MHz 100x7 0 800MHz 100x8 0 CPU Mount Procedure To mount the processor that you have purchased separately follow these instructions Retention Module Step 1 Open the two sides by folding them up Step 2 Insert the CPU into the retention module The CPU fits in the CPU slot in only ONE way do not try to force it in Step 3 After com...

Страница 7: ...ower Fan PWRFAN Chassis Fan CHAFAN Pin1 Pin2 Pin3 Pin1 Pin2 Pin3 Pin1 Pin2 Pin3 GND 12V SENSOR GND 12V SENSOR GND 12V SENSOR Power LED Keylock Pin1 Pin2 Pin3 Pin1 Pin2 5V NC GND ControlPin GND Speaker Pin1 Pin2 Pin3 Pin4 5V NC NC Speakerout HDD LED Turbo LED PWRBT RESET Pin1 Pin2 Pin1 Pin2 Pin1 Pin2 Pin1 Pin2 LEDAnode LED Cathode LED Cathode GND Power On Off GND PowerGood GND IrDA Infrared Device ...

Страница 8: ...l DIMM modules as outlined in the table above in order to preserve signal integrity on 100MHz front side bus systems Step 4 CPU multiplier release Jumper JP8 Closing JP8 can make higher multiplier settings available on some INTEL CPUs For technical details read the following Your Pentium CPU has an input pin B21 100 66 signal to tell it at what Front Side Bus FSB Frequency it is running JP8 is con...

Страница 9: ...d CPU settings are changed through the BIOS SOYO COMBO SETUP Please refer to Chapter 3 Quick BIOS Setup for details on how to set the Slot 1 processor frequency Step 6 External Suspend Button JP1 Some cases come with a suspend button insert the plug into JP1 In addition to this button the system can also enter the suspend mode through your OS Note SuspendmodeonlyfunctionsifyourPowerManagementmodei...

Страница 10: ... memory 1 Clear the CMOS memory by momentarily shorting pin 2 3 on jumper JP5 This jumper can be easily identified by its white colored cap 2 Then put the jumper back to 1 2 to allow writing new of data into the CMOS memory CMOS Clearing Clear CMOS Data Retain CMOS Data JP5 Setting Short pin 2 3 for at least 5 seconds to clear the CMOS Short pin 1 2 to retain the new settings Note You must unplug ...

Страница 11: ...P8 to short if you use a FSB 66MHz CPU 3 Press and hold down the Insert key while turning on the system power Keep holding down the Insert key until you see the message of the CPU type and frequency shown on the screen 4 Press the Del key during the system diagnostic checks to enter the Award BIOS Setup program 5 Select SOYO COMBO SETUP and move the cursor to the CPU Frequency field to set the pro...

Страница 12: ...nu and type Y at the prompt to load the BIOS optimal setup Step 3 Select SOYO COMBO SETUP Move the cursor to the CPU Frequency field to set the CPU frequency Available CPU Frequency settings on your SY 6BA IV Motherboard are detailed in the following table CPU Frequency MHz Manual 350MHz 100 x 3 5 233MHz 66 x 3 5 400MHz 100 x 4 266MHz 66 x 4 450MHz 100 x 4 5 300MHz 66 x 4 5 500MHz 100 x 5 333MHz 6...

Страница 13: ... Ratio After you have selected the CPU Host PCI Clock choose the right multiplier for the CPU CPU Ratio options are o x 2 o x 2 5 o x 3 o x 3 5 o x 4 o x 4 5 o x 5 o x 5 5 o x 6 o x 6 5 o x 7 o x 7 5 o x 8 The CPU frequency is then defined as host clock freq x multiplier and should the working frequency of your CPUs processor 3 AGP Clock This option allows you to manually adjust the AGP host bus c...

Страница 14: ...is selected the Vcore will be that percentage higher than the VID code specifies For instance the CPU VID code specifies 2 0V and the Vcore Voltage adjust is set to 10 0 the actual CPU Voltage will be 2 2V This function should only be used if the CPU is running on FSB Frequencies beyond the CPU specifications note that SOYO does not guarantee system stability if this item is not set to normal o No...

Страница 15: ...cts Step 1 Insert the SOYO CD into the CD ROM drive The SOYO CD will auto run and the SOYO CD Start Up Menu will be as shown If you use Windows NT the SOYO CD will not detect your motherboard type In that case the following dialog will pop up please choose your motherboard and press OK Now the SOYO CD Start Up Menu will be shown SOYO CD Start Up Program Menu If you use Windows 95 or 98 the SOYO CD...

Страница 16: ...u on whether or not you want to install it You must install the Acrobat Reader utility to be able to read the user s manual file Follow the instructions on your screen during installation then once the installation is completed restart your system and re run the SOYO CD Step 2 Install Drivers Utility Click the Install Drivers button to display the list of drivers software that can be installed wit...

Страница 17: ... hardware doctor for 95 98 Your motherboard comes with a hardware monitoring IC By installing this utility Temperature Fan speed and Voltages can be monitored It is also possible to set alarms when current system values exceed or fall below pre set values This utility comes with a preset monitoring rage for the CPU voltage However the core voltage of the processor you purchased may fall out of thi...

Страница 18: ...p 4 Enter the SOYO CD Click the Enter SOYO CD button to enter the SOYO HTML database The Start Up program will activate the default HTML browser installed on your system for example Internet Explorer or Netscape to display the contents of the SOYO CD The SOYO CD contains useful information about your Motherboard and other SOYO products available For your convenience this information is available i...

Страница 19: ...e Next button 7 Whenasked DoyouwantWindowstosearchforyournewhardware choose No thenclick onthe Next button 8 Whenaskedtoselectthehardwaretype selectthe SCSIcontrollers andclickonthe Next button 9 MakesurethattheSOYO CDisinyourCD ROMdriveandclickonthe HaveDisk button 10 SelecttheD drivers hp ata66 Win9Xdirectory WhereDisyourCD ROMdriverletter andclick onthe OK button 11 Clickonthe Next button 12 If...

Страница 20: ...6hostadaptermustbepartitionedandformattedbeforeyou canaccessit PleaseseePartitioningYourHardDisktoknowhowtopartitionandformataharddisk drive 2 CheckingtheInstallation IfyouwanttocheckiftheHPT366hostadapteranditsdevicedriverarecorrectlyinstalled youcan 1 OpenMyComputer 2 OpenControlPanel 3 DoubleclickiconSCSIAdapters 4 YoushouldseetheitemHPT366UltraDMAController started listed 3 PartitioningYourHar...

Страница 21: ...perlyinstalled andthedeviceiscorrectlyconnectedtothe adapter Doublecheckthatthecablebetweentheadapterandthedevicesiscorrectly attached Alsocheckifthejumpersettingonthedriveiscorrect 2 MakesurethatapowercableisproperlyattachedtoeachdriveattachedtotheHPT366 hostadapter IfthedriverhasstartedandyoustillcannotaccesstheharddiskdriveattachedtotheHPT366host adapter theharddiskdrivemighthavenotbeenpartitio...

Страница 22: ...therboard on the table to isolate it from the case with the CPU and speaker only and give it one more try I hear a series of beeps and I do not get anything from my monitor What could be wrong The following lists some basic beep codes and their possible meanings One long beep and 3 very short beeps The video card is not detected by the motherboard Please re seat your video card If you are using an...

Страница 23: ...o find the latest BIOS revision Hard disk floppy drive CD ROM etc When I boot up my new computer I got floppy boot failure and the LED on the floppy stays on Make sure the red wire of floppy ribbon cable goes to Pin1 on the floppy drive side don t trust the key lock or notch and use the end connector of the cable don t use middle one Modem issues I get an I O Conflict message when I turn on my sys...

Страница 24: ...rd takes IRQ5 then set IRQ5 to Legacy ISA Next install the south bridge driver for the motherboard The sound and everything else works fine except that the recorder and microphone do not work What is wrong This is because the recorder and microphone in the Windows are not enabled Please go to sound properties and enable them Lock up freeze When I boot up my system everything works fine It sees my ...

Страница 25: ...support mail soyo com tw SOYO Europe BV Signaalrood 19 2718 SH Zoetermeer The Netherlands Region Covered Europe except Germany Web Site www soyo nl www soyo europe com Sales Tel 31 69 3637500 Fax 31 79 3637575 Email sales soyo nl Technical Support Tel 31 79 3637500 Fax 31 79 3637575 Email support soyo nl SOYO USA 41484 Christy Street Fremont CA 94538 Region Covered US and Canada Web Site www soyou...

Страница 26: ...l Support tel 82 2 717 4392 fax 82 2 712 5853 e mail soyok chollian net SOYO Hong Kong Region Covered Hong Kong Web Site www soyo com hk Sales tel 852 27109810 fax 852 27109078 E mail soyo hkstar com Technical Support tel 852 27109810 fax 852 27109078 E mail soyo hkstar com SOYO China Gin Mei Jei Region Covered All of China Sales Tel 86 10 62510089 fax 86 10 62510388 E mail soyo public bta net cn ...

Страница 27: ......

Страница 28: ...Edition April 2000 Version 1 3 SY 6BA IV SERIAL ...

Отзывы: