


Operation
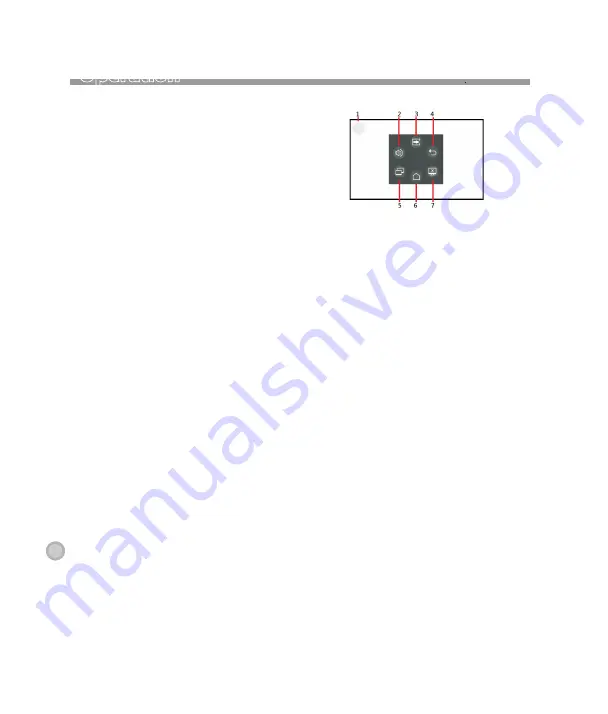
2. Touch to connect with the mobile phone.
3. Touch to shift to USB DEBUG MENU and follow
the information to have USB debug on the
mobile phone before connecting again.
4. Touch to return to SETUP MENU.
5. Touch to exit mobile phone linking operation
and shift to previouse operation mode.
6. Touch to shifr screen to
MAIN MENU.
7. This
Bluetooth
icon will light up if the unit has
connected to a mobile phone.
Touch to access Bluetooth operaion.
8. Touch to activate
AUDIO & VISUAL MENU
for
various audio & visual settings.
9. Touch to activate
AUDIO & VISUAL MENU
for
various audio & visual settings.
1. Touch to activate FLOATING DOCK MENU on screen
for various functions and controls of the unit. Hold
& slide can move this icon to other desired position
on the screen.
2. Touch to activate volume & sound mute control of
the car unit.
3. Touch to shift screen to the MAIN MENU of the car
unit.
4. Touch to shift screen to previous page of the
connected phone.
5. Touch to shift horizontal / vertical viewing of the
connected phone.
6. Touch to shift screen to the main menu of the
connected phone.
7. Touch to turn off the screen. When the screen
turned off, touch any portion of the screen to
turn the screen on
.
Important notice on mobile phone linking
operation on Android mobile phone:
1. This head unit supports Android phone 6.0 or
above with USB mirror linking function.
2. USB cable should be used to connect the
phone to the front USB slot of the head unit.
3. In case connection failed, SETUP MENU will
remain on screen.
4. Phone set up may be varied from different
phones and USB debug may be necessary.
Refer to the operation method of the mobile
phone for details (usually at setting mode
>
developer options >USB debugging).
5. Depends on the connected smart phone,
operation & setting may varied.
FLOATING DOCK OPERATION UNDER
PHONELINK:
FLOATING DOCK OPERATION UNDER
PHONELINK:
FLOATING DOCK
FLOATING DOCK
At
PHONELINK
operation and when this
floating dock icon appeared on screen,
touch to activate
FLOATING DOCK MENU
on screen for various functions and controls
of the unit.
This menu will be closed when no operation
for a while.
Touch any blank portion on screen will also
close this menu.
20


