EVCS_Control Panel_ENGCP18001 5.16
1.800.338.7337 / www.soundoffsignal.com
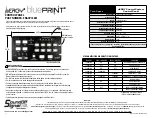
AUxILIARY SWITCH SETTINGS:
Refer to Figure at bottom center for Button and LED locations and
terminology
1. Press and Hold Auxiliary Button #1 and #8 until slide switch #1 LED
flashes.
2. Press the button which setting is going to be viewed/changed 1 time.
3. Monitor the 5 LED’s for the arrow controller to determine setting
- *Arrow Controller (Left, Right, Center, OFF), Dual Output; 1 & 9
- Alternate Action Switch (Press ON / Press OFF)
- Momentary Action Switch (ON only when depressed)
- 8 Second ON Time (ON for 8 seconds when depressed)
- Level 1 Disable (Turns OFF Level 1 Output)
- Level 2 Disable (Turns OFF Level 2 Output)
- Left Arrow, Single Output
- Right Arrow, Single Output
- Center Arrow, Single Output
- Warning Bar Output
4. Press and release button until desired mode is selected.
5. Continue steps 2-3 for any other buttons that need to be programmed.
Denotes Factory Default Setting
*Can only be programmed to one button
and will disable Left, Right and Center
Arrow Single Outputs if they are used.
Default Settings:
Button #1: Arrow Controller
Button #2-7: Alternate Action Switch
Button #8: 8 Second ON Time
4
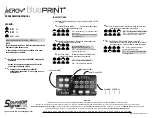
Auxiliary Push-button to Slide switch mapping programming:
Allows the operator to have the siren automatically turn on
auxiliary push-buttons based on the position of the slide
switch.
If an auxiliary push-button is programmed to turn ON when the
slide switch position is selected, the auxiliary push-button will
turn OFF when the programmed slide switch position is no
longer selected.
The operator can override the automatic activation of the auxiliary
push-button by momentarily pressing the auxiliary push-
button.
To program:
1. Press auxiliary push-buttons ‘4’ and ‘5’ for 2 seconds until
Radio Rebroadcast indicator LED flashes.
2. Move slide switch to desired position.
3. Press auxiliary push-buttons ‘1’ – ‘8’ as required.
4. Repeat steps 2 and 3 for other slide switch positions as
required.
5. Place appropriate button legend over activity indicator for each
programmed button.
LED ON
Auxiliary push-button will automatically turn
ON when level switch position is activated.
LED OFF
Auxiliary push-button will not automatically
turn ON when level switch position is
activated.
*
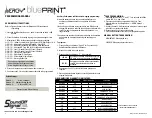
TONE PROGRAMMING:
1. Press and hold “buttons” “2” and “7” for 2 seconds until Slide
switch LED’S 1,2, and 3 flash
2. Press tone button to be programmed (Wail, Yelp, Tone,
Manual, or Horn). Auxiliary button 1 = HORN, button 2 =
MANUAL
3. Auxiliary buttons 5-8 will determine which tone is to be played
when the user presses the button.
4. Repeat steps 2 and 3 for each tone button
5. Press Radio Rebroadcast button to exit programming mode
MANUAL BUTTON TONE DURATION
MOMENTARY: When played solo
LATCHED: When played over other tones.
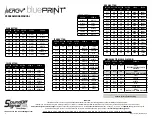
STANDBY
SPKR 1 INDICATOR
SPKR 2 INDICATOR
CONDITION
FLASHING
ON
ON
OVER-TEMPERATURE, (380R ONLY)
FLASHING
OFF
ON
UNDER-VOLTAGE
FLASHING
ON
OFF
OVER-VOLTAGE
FLASHING
FLASHING
-
COMM FAULT - RELAY
FLASHING
-
FLASHING
COMM FAULT - AMP
FLASHING
FLASHING
FLASHING
COMM FAULT -RELAY AND AMP
ON
-
-
STANDBY MODE
*OFF
ON
-
SPKR 1 IS ACTIVE
*OFF
-
ON
SPKR 2 IS ACTIVE
*OFF
OFF
-
SPKR 1 IS NON-FUNCTIONING
*OFF
-
OFF
SPKR 2 IS NON-FUNCTIONING
SIREN AMPLIFIER DIAGNOSTIC INDICATORS:
* SIREN AUDIO BUTTON ACTIVATED
(EXCEPT RADIO REBROADCAST)
PROGRAMMING MANUAL


