2
GETTING STARTED
If you do not yet have a power supply for the Volcano, you will need to choose one. See "POWERING THE VOLCANO" in
the appendix for details on this.
If you plan on using the Volcano with MIDI (and will not be using a locally attached expression pedal), then follow the
steps in "QUICK START (MIDI)". If you will not be using MIDI and want to use only an expression pedal connected
directly to the Volcano, then follow "QUICK START (EXPRESSION PEDAL ONLY)". If you plan on using both, then follow
the steps in "QUICK START (MIDI)" but also calibrate the expression pedal as directed in the appendix.
QUICK START (MIDI)
(Note: The Volcano is factory set to MIDI channel 1 and instrument level and will power up in mute awaiting MIDI
commands)
1.
Attach your MIDI controller to the MIDI in port of the Volcano
2.
Set a program switch on your controller to transmit Program Change message #53 (for controllers that start their
Program numbers at 0) or #54 (for controllers that start at 1) over MIDI channel #1
3.
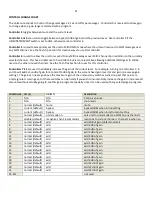
Assign your movable MIDI controller (which we will refer to in the future as the
CC pedal
) to Control Change #0 over
channel #1. (again, if you controller starts its controller numbers at 1 instead of zero, use controller 1 instead).
4.
Connect your instrument to the IN jack and your amp to the OUT jack of the Volcano.
5.
Press the program switch on the MIDI controller, the DATA LED will blink indicating is has gotten a program
message.
6.
Move the controller pedal to sweep the gain from OFF to +18dB of gain. The Status LED will shine red when the
pedal is full back and green when it is full forward.
7.
If the unit does not blink when it sees the MIDI Program Message, then unit may be set to the wrong MIDI channel
(the unit is factory set to channel 1). See the appendix to instructions on how to set the MIDI channel.
QUICK START (EXPRESSION PEDAL ONLY)
When using an expression or volume pedal with the Volcano for the very first time, the Volcano must be calibrated to
the pedal to get the full range out of the pedal. Follow the instructions CALIBRATING THE EXPRESSION PEDAL in the
appendix to calibrate your pedal and go to step 2 before closing the unit.
1.
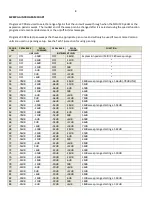
Check that the remaining switches are set as follows. Switches 1-4 to OFF,OFF,ON,ON (local program for full pedal
range), the LOCAL/MIDI switch to LOCAL, and the LINE/INSTRUMENT switch to INSTRUMENT.
2.
Connect your instrument to the IN jack and your amp to the OUT jack of the Volcano.
3.
Move the expression pedal to sweep the gain from OFF to +18dB of gain. The Status LED will shine red when the
pedal is back and green when it is forward.
GENERAL THEORY OF OPERATION
The Volcano operates in two user selected modes,
local mode
and
MIDI mode
.
Your intended application will
determine what mode the unit operates in. The mode is determined by the position of the LOCAL/MIDI switch inside
the unit.
Local mode
is selected when you wish to operate the unit with just an expression pedal attached. No MIDI controller is
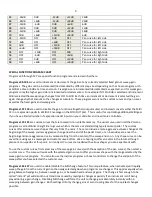
required to operate the unit in this mode. A bank of 4 switches inside the unit are set to select one of 16 different
programs. These programs are used to select a specific gain range when the pedal is moved. There are also 4 special
programs: a pan program, a custom curve program, a program to force the unit to output a CC message when the pedal
is moved and a program to force the unit to go into a "slave" mode where is will perfectly track any Volcano connected
to its MIDI input. This last program is useful if you wish to have several Volcanoes connected together and want to
control them all with just a single expression pedal attached to the first "master" unit.
Содержание Volcan
Страница 1: ...Volcano MIDI and Expression Pedal Controlled Volume ...
Страница 16: ...15 ...


