background image


www.sotm-audio.com 

sCLK-EX12 + tX-USBhubIN


installation guide


1.


Put 0Ω  on R331 and R329. Put 249Ω  on R328 and remove R327 on the tX-USBhubIN by soldering.(The resistor is 1608 size.) 

Caution : The above no.1 process is required to solder very carefully, otherwise the product would be damaged. If you are 
not proficient in soldering or doing this process, please ask SOtM or the seller to do it. 
If you purchase the sCLK-EX12 + tX-USBhubIN combo package, please skip this process.. 

2.


Power off the PC and disconnect the AC power cable. 

3.


Install the sCLK-EX12 using the supplied 3.5”bay bracket to the inside of PC case. 

4.


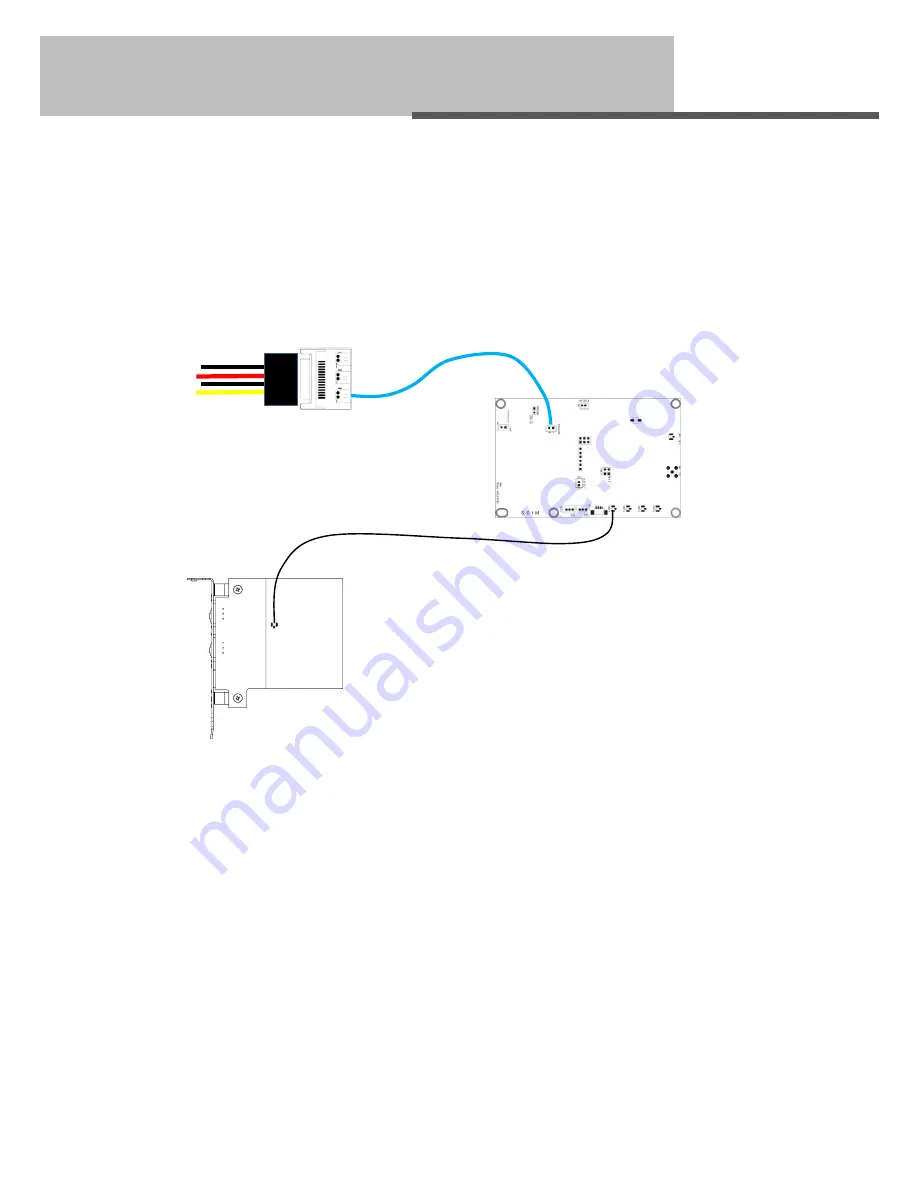
Connect the PC’s SATA power cable to the supplied SATA power PCB. And connect it to the sCLK-EX12 by the supplied sCLK-EX DC power cable. 

5.


By the supplied RF cable, connect the RF connector on tX-USBhubIN to the Clock output 1 on the sCLK-EX12. 

6.


Refer to the tX-USBhubIN instllation guide(manual) and install the tX-USBhubIN into the PC.. 


Precautions   


I.


If there is any damage occurred while sodering the board by yourself, you are responsible for the damage or malfunction. If 
you are not proficient in soldering or doing the process, please ask SOtM or the seller. 

II.


sCLK-EX12 is capable to synchronize an external clock as like 10MHz Master clock if you order the Master clock option. 

III.


The sticker on the back side of the sCLK-EX shouldn’t be torn or damaged because the serial number is essentially needed if 
you want to add the master clock options, change the current frequency to the other frequency or enable the additional clock 
output to your current sCLK-EX. 


SATA power PCB 

SATA power cable   

sCLK-EX12 

sCLK-EX DC power cable   

RF cable 

Содержание sCLK-EX

Страница 1: ...SATA power PCB A 3 5 bay bracket A operating instruction Specification Internal reference clock Custom designed ultra low phase noise oscillation circuit Isolated differential clock signal distributio...

Страница 2: ...utput connector of the internal Ultra Low Noise Regulator Use when needs 5Vdc from another board Clock connect PCB Install to the other boards which needed to replace the clock and connect by the supp...

Страница 3: ...n the tX USBexp to the Clock output 1 on the sCLK EX48 Caution If you purchase the sCLK EX48 tX USBexp combo package connect the RF connector J301 on the back side of tX USBexp to the Clock output 1 o...

Страница 4: ...K EX DC power cable 5 By the supplied RF cable connect the RF connector on tX USBhubIN to the Clock output 1 on the sCLK EX12 6 Refer to the tX USBhubIN instllation guide manual and install the tX USB...

Страница 5: ...t 2 the clock connect PCB soldered where the crystal oscillator on the tX USBexp to the Clock output 3 on the sCLK EX142548 Caution If you purchase the sCLK EX48 tX USBexp combo package connect the RF...

Страница 6: ...the requested main board while processing the upgrade the repair cost would be charged to SOtM the seller and the client who requested this upgrade equally and the repair cost is calculated depreciat...

Страница 7: ...name sCLK EX sCLK EX12M5075 means enabled 12Mhz frequency for Clock output 1 and add 50 Master Clock Option and 75 Master Clock Option I The sCLK EX master clock option offers 50 Master Clock Option...

Отзывы: