background image

Came

ra

 Co

nt

rol 

Comman

d

s

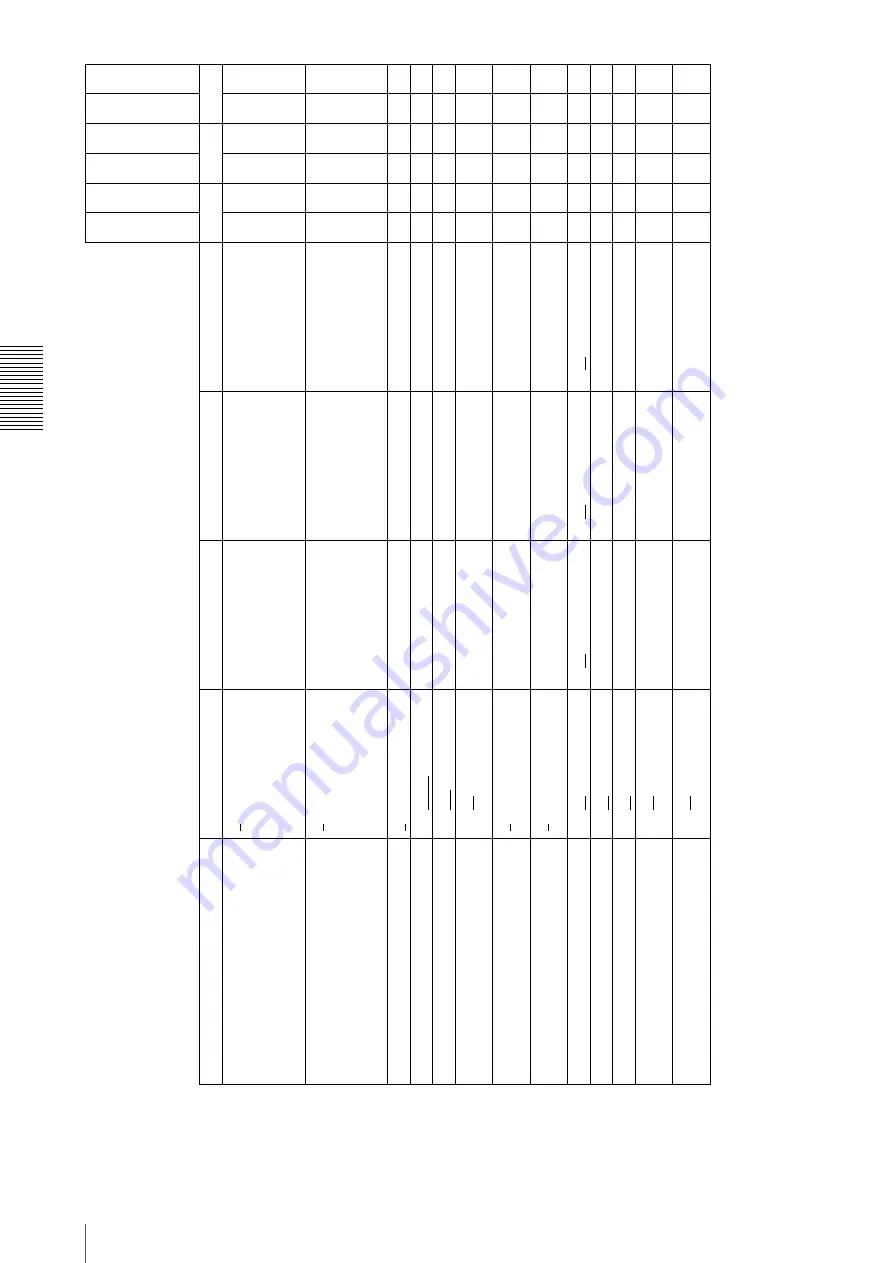
Command List

44

GA

IN

G

A

IN-T

AP1

G

A

IN-T

AP2

G

A

IN-T

AP3

G

A

IN-T

AP4

0

 ~

 1

8

–––

aaa

a

G

A

IN-F

INE

G

A

IN-F

INE-T

A

P

1

G

A

IN-F

INE-T

A

P

2

G

A

IN-F

INE-T

A

P

3

G

A

IN-F

INE-T

A

P

4

0

 ~

 5

0

2

–––

aaa

a

G

A

IN-A

UT

O / 

A

G

C

0

 / 1 / 

2

a

a

a

G

A

IN-A

UT

O-LEVE

L

 / 

A

G

C-

LEVEL

0

 ~

 1

1

2

6

4

 ~

 16

38

3

a

a

a

G

A

IN

-A

U

T

O

-SP

EED

 /

 A

G

C-SPE

ED

1

 ~

 2

5

6

–––

a

a

a

G

A

IN-A

UT

O-UPP

E

RLIM

IT 

/ A

G

C-UPP

E

R

0 ~ 18

–––

a

a

a

G

A

IN-A

UT

O-LO

WERL

IMIT

/ A

G

C-LO

WER

0

 ~

 1

8

–––

a

a

a

G

A

IN-A

UT

O-F

R

AM

E-HIGHLIGHT

/ A

G

C-F

R

AM

E-HIGHLIGHT

0

 /

 1

––

––

aa

G

A

IN-A

UT

O-F

R

AM

E / 

A

G

C-F

R

AM

E

1

 ~

 50

 ~ 10

0 :

 W

idt

h

1

~5

0

~1

00

 : 

H

eig

h

t

0~

25

~

99 :

 Of

fs

et

X

0

~

2

5

~9

9 :

 O

ff

set

Y

a

a

a

G

A

IN-A

UT

O-WIDTH 

/ A

G

C-WIDT

H

1

 ~

 50

 ~

 1

0

0

–––

a

a

a

G

A

IN-A

UT

O-HEIGHT 

/ A

G

C-HEIGHT

1 ~

 50

 ~

 1

0

0

–––

a

a

a

G

A

IN-A

UT

O-OF

F

S

ETX / 

A

G

C-

O

F

FS

ETX

0 ~ 25

 ~

 9

9

–––

a

a

a

G

A

IN-A

UT

O-OF

F

S

ETY / 

A

G

C-

O

F

FS

ETY

0 ~ 25

 ~

 9

9

–––

a

a

a

C

o

mm

and

P

ar

am

ete

1

P

ar

a

m

ete

r 2

P

a

ra

m

e

ter

 3

P

a

rame

ter

 4

S

a

v

e

Loa

d

R

ese

t

Cam

era

Use

rSe

t

Spec

ialT

rigg

er

Use

rSe

t

Res

et

Fa

cto

ry

Def

au

lt

Содержание XCL-S600

Страница 1: ...Technical Manual A EHZ 100 11 1 Digital Video Camera Module 2013 Sony Corporation XCL S600 S600C S900 S900C ...

Страница 2: ...0 Trigger source 21 Trigger inhibition 21 Trigger shift 22 Trigger delay 23 Trigger counter 23 Frame counter 23 Trigger range limit 23 Trigger control 24 Frame Rate 24 Auto frame rate 24 Specifying frame rate 25 Displaying frame rate 25 Fastest frame rate for partial scanning 26 Timing Chart 28 Horizontal timing 28 Vertical timing 28 Trigger latency 29 Sensor Readout Sensor Output 30 White Balance...

Страница 3: ...nce plane Installing the camera module on the front panel minimizes deviation of the optical axis LUT Look Up Table You can switch to OFF or ON When set to OFF you can select from five preset values such as inversion binarization any of five point approximation etc Switching an Output Bit Length You can select 8 bit output 10 bit output or 12 bit output For color models you can also select an RGB ...

Страница 4: ...lfunctioning sensor element will cause a single pixel blemish in the picture This is generally not a problem White speckles While CCD image pickup device is made by an accurate technique imperceptible speckless may rarely come up on the screen due to cosmic rays and so on This is connected to the principle of CCD image pickup device not a malfunction And the white speckless are easy to come up in ...

Страница 5: ...at the highest speed use a board corresponding to PCI Express Performance may also be dependent on the host device e g Computer so consult the dealer if images are not displayed properly This cable connects to the DIGITAL IF connector on the rear panel of the camera module Image control signals are transmitted via this cable Select a proper cable as the maximum usable length of a cable differs due...

Страница 6: ...appropriate for the LED light as required d Guide screw holes Tripod screw holes Bottom These precision screw holes are for locking the camera module Locking the camera module into these holes secures the optical axis alignment When using a tripod use these four screw holes to attach a VCT ST70I tripod adaptor Note Refer to Demensions in page 53 for about the position size of the Guide hole and th...

Страница 7: ... for GPO GPO1 pin 4 and Ground pin 1 are used GPO3 pin 7 and Ground pin 1 are used The initial value of pins 4 and 7 is GPI Switch to GPO output by external command f DIGITAL IF Interface connector 26 pin You can connect a Camera Link cable to this connector to control a camera module from a host device utilizing the serial communication protocol while outputting a video signal from the camera mod...

Страница 8: ...details on how to send a command the commands and their parameters Note Make sure to supply power to the camera module and confirm that the camera module is operating before inputting a trigger signal If you input trigger signal to a camera module without the power supplied this may cause a malfunction of the camera module Image at partial scan Depending on the image input board of the camera you ...

Страница 9: ...as follows Lowering the output clock frequency improves the tolerance to video signal attenuation which allows the camera link cable length to be extended Thus it is recommended to use with 2tap unless there are board restrictions Only the selection of sensor tap1 or 2 or camera link tap1 is available for RGB24 bit output The output of sensor tap4 is only available for the selection of camera link...

Страница 10: ... Order Figures below show the data order when an image of M N pixels is transmitted in camera link tap1 and camera link tap2 1tap 2tap when sensor tap is 1 or 2 1tap STROBE Video output 2tap STROBE Video output M N pixels M N pixels ...

Страница 11: ... 11 2tap when sensor tap is 4 The order of the lines output is as follows For D1 upper half of the screen the order is from Line 1 to Line N 2 For D2 lower half of the screen the order is from Line N to Line N 2 1 M N pixels ...

Страница 12: ...R 0 D1 0 D1 0 D1 0 Port A1 D1 1 D1 1 D1 1 DR 1 D1 1 D1 1 D1 1 Port A2 D1 2 D1 2 D1 2 DR 2 D1 2 D1 2 D1 2 Port A3 D1 3 D1 3 D1 3 DR 3 D1 3 D1 3 D1 3 Port A4 D1 4 D1 4 D1 4 DR 4 D1 4 D1 4 D1 4 Port A5 D1 5 D1 5 D1 5 DR 5 D1 5 D1 5 D1 5 Port A6 D1 6 D1 6 D1 6 DR 6 D1 6 D1 6 D1 6 Port A7 D1 7 D1 7 D1 7 DR 7 D1 7 D1 7 D1 7 Port B0 D1 8 D1 8 DG 0 D2 0 D1 8 D1 8 Port B1 D1 9 D1 9 DG 1 D2 1 D1 9 D1 9 Port...

Страница 13: ...that when Positive of DC IN connector 11th pin is selected as a trigger input when the terminal is open the trigger will be activated Use the 4th or 7th pin to input a trigger signal When input is via the 11th pin the high level value varies between 2 V to 24 V and 3 5 V to 5 5 V Low level value is 0 V to 0 4 V Use the 10th ISO or 8th ISO pin to input a trigger signal When input is via the 11th pi...

Страница 14: ...nnector the 6th and 9th pins are for the GPO connector the 4th and 7th pins are for the GPIO switching connector The trigger reset connector is the DC IN connector 11th pin If you are connecting an external device to each connector refer to the circuit specifications below GPI circuit specifications GPO circuit specifications 2 0µs or less 10µs to 2s 2 0µs or less 100µs or more 2 to 24V 0 to 0 4V ...

Страница 15: ... RT ns 5 0 167 297 192 358 Supply voltage of the output V Pull up resistor Use1 16 W Current mA TDF µs FT µs TDR µs RT µs Output voltage V Normal temperature 3 3 470 Ω 5 07 0 75 0 49 24 35 0 916 5 0 820 Ω 4 98 0 73 0 63 28 46 0 909 12 0 Two 2200 Ω resistors in parallel 9 87 0 71 1 05 36 64 1 112 24 0 Eight 8200 Ω resistors in parallel 21 85 0 73 1 45 45 76 1 571 5V 0V 3 3V 0V TDF FT TDR RT 90 50 1...

Страница 16: ... OFFSET is set automatically by HEIGHT and the maximum number of lines the command to change OFFSETY is not available Example of XCL S900 SENSOR TAP 4 HEIGHT 480 t HEIGHT is 480 OFFSETY is set to 1116 2712 480 2 OFFSETY 0 t OFFSETY change not available Note Since the shutter setting has priority use a shutter speed high enough to enable partial scan at a higher frame rate Configurable range Config...

Страница 17: ...ordingly since the optimal value differs depending on the environment such as an object and light source and camera settings such as gain and shutter Output Bit Depth Monochrome cameras can switch between 8 bits 10 bits and 12 bits Color cameras can switch between Raw output 8 bits 10 bits 12 bits and RGB output 24 bits Gain Analog gain The analog gain can be set finely in 1 dB unit or bit level u...

Страница 18: ...r is released AGC starts to work command param Setting GAIN AUTO AGC 0 Manual gain 1 One push AGC 2 Continuous AGC AGC LEVEL 0 to 11264 to 16383 AGC target level 14 bit AGC SPEED 1 to 256 AGC convergence speed AGC UPPER 0 to 18 AGC upper limit dB AGC LOWER 0 to 18 AGC lower limit dB AGC FRAME HIGHLIGHT 0 AGC detection frame is hidden 1 AGC detection frame is displayed command param1 param2 param3 ...

Страница 19: ... signal When EXP MODE is 0 exposure is started by detecting the rising or falling edge of the trigger signal and the trigger edge detection exposure is performed based on the set shutter value is performed When EXP MODE is 1 the trigger width detection exposed for the period of the trigger signal width is performed For trigger mode TRG MODE 1 Trigger edge detection The figure shows the trigger sig...

Страница 20: ...the device cannot be entered to the trigger mode The source and polarity of the special trigger signal should be defined separately from the trigger mode Each setting should be saved in the user set For the items reflected refer to Command List page 41 Note During special trigger operation defect correction cannot be used DC IN connector 4th pin and 7th pin are available only when the GPIO input o...

Страница 21: ... be disabled This function is effective when disabling the trigger signal to a specific camera in the environment where multiple cameras are connected by the same trigger signal and when preventing false operations caused by noise contamination to the trigger signal line due to the installed environment command param Setting TRG INH 0 Trigger is accepted 1 Trigger is not accepted Trigger signal Ex...

Страница 22: ...refore the exposure time setting in the trigger edge operation the effective period of the trigger signal width to be input in the trigger width operation or the trigger interval should be sufficiently long When the next image can be output Since video output is completed after the exposure is finished the next video output can be started When the next image cannot be output double exposure Since ...

Страница 23: ...upper limit 2147483647 is reached Trigger range limit Only signals in the set trigger width can be accepted as the trigger signal This functions as a noise filter which removes chattering or disturbance noise in the trigger signal line This also functions as a trigger selector whereby only a specific camera can be operated by the trigger when multiple cameras share one trigger signal line When the...

Страница 24: ...at the same time Refer to Trigger latency page 29 for details Frame Rate Auto frame rate The reading cycle is set to allow the frame rate to be the maximum value automatically according to the current shutter setting and the partial scan setting in the free run operation Shutter has priority The next exposure is performed while outputting a video and the next video output is started immediately af...

Страница 25: ...ps 1 000 000 should be entered The frame rate faster than the fastest frame rate cannot be set The upper limit varies depending on the partial scan setting Example for setting 15 fps FRAMERATE 15000000 Displaying frame rate The current frame rate during the auto frame rate operation is displayed command param FRAMERATE 62500 to command FRAMERATE ACTUAL ...

Страница 26: ...pending on HEIGHT for partial scanning XCL S600 C sensor tap 4 XCL S600 C sensor tap 2 XCL S600 C sensor tap 1 200 0 150 0 100 0 50 0 0 0 500 1500 2000 Height Rate fps 1000 0 100 0 75 0 50 0 25 0 0 0 Height Rate fps 500 1500 1000 2000 0 50 0 37 5 25 0 12 5 0 0 Height Rate fps 500 1500 1000 2000 0 ...

Страница 27: ...or tap 4 XCL S900 C sensor tap 2 XCL S900 C sensor tap 1 150 0 100 0 50 0 0 0 500 1500 2000 Height Rate fps 1000 0 2500 75 0 50 0 25 0 0 0 Height Rate fps 500 1500 2000 1000 0 2500 37 5 25 0 12 5 0 0 Height Rate fps 500 1500 2000 1000 0 2500 ...

Страница 28: ...g on the EXP OFFSETY value or trigger latency sensor tap STROBE A B XCL S600 C 1 54 MHz 3184 WIDTH 2 84 MHz 2772 WIDTH 4 84 MHz 2772 WIDTH XCL S900 C 1 54 MHz 3872 WIDTH 2 84 MHz 3402 WIDTH 4 84 MHz 3402 WIDTH sensor tap C D n XCL S600 C 1 24 OFFSETX 3184 WIDTH C HEIGHT 2 13 OFFSETX 2772 WIDTH C HEIGHT 4 13 OFFSETX 2772 WIDTH C HEIGHT 2 XCL S900 C 1 24 OFFSETX 3872 WIDTH C HEIGHT 2 13 OFFSETX 3402...

Страница 29: ...s EXP MODE TRG CTRL TRG SHIFT Trigger latency Exposure time 0 edge detection 0 Approx 1 5 µs EXP 1 Approx 1 5 µs to 60 4 µs EXP 1 width detection 0 0 Approx 10 6 µs EXP 1 Cannot be set 1 0 Approx 1 6 µs EXP 9 1 µs 1 Approx 1 6 µs to 60 5 µs EXP 9 1 µs EXP MODE TRG CTRL TRG SHIFT Trigger latency Exposure time 0 edge detection 0 Approx 1 2 µs EXP 1 Approx 1 2 µs to 41 7 µs EXP 1 width detection 0 0 ...

Страница 30: ...me required for the CCD to start OB optical black and effective pixel output after sensor readout signal assertion is shown below Moreover when the CCD starts picture signal output picture signals such as FVAL take at least as much time as is required for 4 to 4 5 lines OB is not output from a camera When OFFSETX 0 OFFSETY 0 shortest value sensor tap F G XCL S600 C 1 Approx 172 µs Approx 254 µs 2 ...

Страница 31: ...ify using a 12 bit value Binarization 5 point interpolation and arbitrary setting can be changed Binarization The binarization threshold can be changed 5 point interpolation The values of output points 1 through 5 that correspond to input points 1 through 5 can be changed Linear interpolation is performed between interpolation points Setting example LINEAR INTERPOLATION 1 240 200 LINEAR INTERPOLAT...

Страница 32: ...tral pixels Specify using values between 8191 and 8191 The parameter 256 is 1 Test Chart Output For monochrome model monochrome chart can be set For color model monochrome chart or color chart can be set command param1 param2 LUT 0 to 4095 0 to 4095 command LUT SAVE command param Setting CR TF 0 Conversion off 1 Conversion on command param1 param2 Setting CR TF VAL 00 8191 to 256 to 8191 Gain00 01...

Страница 33: ...g is switched to input Setting example LVAL signal is output to GPO2 DC IN connector 6th pin Hi active setting Hi is enabled GPO SRC 6 2 GPO INVERTER 6 0 command param Setting TESTCHAR T 0 Off 1 Monochrome chart 2 Color chart Monochrome Color Raw Mono R G B 1 0xF30 0x3FF 0x3FF 0x3FF 2 0xDC0 0x3FF 0x3FF 0 3 0xC80 0 0x3FF 0x3FF 4 0xA00 0 0x3FF 0 5 0x7A0 0x3FF 0 0x3FF 6 0x550 0x3FF 0 0 7 0x340 0 0 0x...

Страница 34: ... defined 1 is also set to the other GPO connectors Hi output Trigger signal Exposure Sensor output Trigger through signal Exposure signal Sensor readout signal LVAL FVAL Pulse train generator Strobe control signal USER OUTPUT 1 USER OUTPUT 2 USER OUTPUT 3 GPO SRC 9 GPO INVERTER 9 DC IN connector 9 USER OUTPUT 4 USER OUTPUT 1 0 GPO SRC 9 7 GPO INVERTER 9 1 DC IN connector 9 ...

Страница 35: ...elow is an example in which gain is 18 dB and the shutter is 1 second Prevent as much light as possible from entering such as by blocking light GAIN 18 EXP 1000000 2 Set the threshold in units of 14 bits Points are detected as clear defect points when this level is exceeded Below is an example for 3200 step 14bit Pixels that indicate 3200 to 16383 are detected DEFECT THRESHOLD 3200 3 Execute clear...

Страница 36: ...CTION RESULT If the upper limit is exceeded defect detection will fail or abnormal defect detection will occur and RESULT will be 1 Shading Correction Depending on the characteristics of the lens shadings caused by a drop in the amount of light around the lens or light source variation are corrected For XCL S600 S600C six individual user settings can be saved For XCL S900 S900C ten individual user...

Страница 37: ...TION 1 running 2 finished Return to 0 when finished 4 Determine the effect of shading correction SHADING CORRECTION 1 SHADING PATTERN LOAD 10 for XCL S600 S600C SHADING PATTERN LOAD 6 for XCL S900 S900C Parameters 10 and 6 are available only after detecting an operation and will not be available when the power is off 5 Save the shading data SHADING PATTERN SAVE 0 6 Readout the saved pattern SHADIN...

Страница 38: ...ms Gain 3 dB FVAL signal is output to GPO3 connector This setting is saved to the channel 1 EXPOSURE 3000 GAIN 3 GPO 9 3 USERSET SAVE 1 Setting example 2 The user set saved in the channel 2 is loaded USERSET LOAD 2 User set name Strings that are 31 characters long can be assigned to channels 0 to 16 For example you can assign names such as setting1 and setting2 in accordance with the settings User...

Страница 39: ...a Information The model name of a camera or its firmware information can be read out Help Command To display the command list execute HELP To display the details of a command add HELP in front of the command and execute Setting example Check about GAIN HELP GAIN GAIN Controls the analog gain in dB This can take the value in following range min 0 max 18 step 1 OK Echo off Echo back of the command i...

Страница 40: ...ic space backspace and Enter otherwise other invalid characters are ignored When a command is successfully completed the status will be echoed Input Gain 6 CR Output OK CR Status Explanation Example OK Successfully completed ERROR Invalid argument number The argument number of the parameter is invalid Width 100 100 ERROR Invalid parameter The parameter is invalid Width abc ERROR Not implemented Th...

Страница 41: ...oryDefault This item is initialized if a Factory Default command is executed Command Parameter 1 Parameter 2 Parameter 3 Parameter 4 Save Load Reset VENDOR MODEL MANUFACTURER VERSION ID USER ID 15 characters a a USER ID DELETE RESET TEMPERATURE BAUDRATE 9600 14400 19200 38400 57600 115200 a a LED MODE 0 1 2 3 4 5 6 7 a a VSUB EXTERNAL MODE 1 0 1 a a a VSUB EXTERNAL 1 0 127 a a a SENSOR WIDTH SENSO...

Страница 42: ...IAL TRIGGER SOURCE SP TRG SRC 0 7 10 11 20 101 102 103 104 a a a SPECIAL TRIGGER POLARITY SP TRG POL 0 1 a a a TRIGGER MODE TRG MODE 0 1 a a a TRIGGER SOURCE TRG SRC 0 7 10 11 20 101 102 103 104 a a a TRIGGER INHIBIT TRG INH 0 1 a a a TRIGGER POLARITY TRG POL 0 1 a a a TRIGGER SHIFT TRG SHIFT 0 1 a a a TRIGGER CONTROL TRG CTRL 0 1 a a a TRIGGER DELAY TRG DLY 0 4000000 a a a TRIGGER SOFTWARE TRG SO...

Страница 43: ...XPOSURE AUTO LOWERLIMIT AE LOWER 10 2000000 a a a GPIO MODE 4 7 0 1 a a a a GPO INVERTER GPO INV 3 4 6 7 9 0 1 a a a a GPI 3 4 7 10 11 GPO SOURCE GPO SRC 4 6 7 9 0 1 2 3 4 5 6 7 8 9 a a a a STROBE TIME STRB TIME 4 6 9 1 256 4000 a a a a STROBE DELAY STRB DLY 4 6 9 0 100 4000 a a a a USER OUTPUT 1 2 3 0 1 a a a a PULSE CYCLE 10 1000000 2000000 a a a a PULSE DUTY 1 500000 2000000 a a a a TRIGGER COU...

Страница 44: ...AGC UPPER 0 18 a a a GAIN AUTO LOWERLIMIT AGC LOWER 0 18 a a a GAIN AUTO FRAME HIGHLIGHT AGC FRAME HIGHLIGHT 0 1 a a GAIN AUTO FRAME AGC FRAME 1 50 100 Width 1 50 100 Height 0 25 99 OffsetX 0 25 99 OffsetY a a a GAIN AUTO WIDTH AGC WIDTH 1 50 100 a a a GAIN AUTO HEIGHT AGC HEIGHT 1 50 100 a a a GAIN AUTO OFFSETX AGC OFFSETX 0 25 99 a a a GAIN AUTO OFFSETY AGC OFFSETY 0 25 99 a a a Command Paramete...

Страница 45: ...E TAP4 256 2 4095 a a a a GAIN BLUE FINE BGAIN FINE GAIN BLUE FINE TAP1 BGAIN FINE TAP1 GAIN BLUE FINE TAP2 BGAIN FINE TAP2 GAIN BLUE FINE TAP3 BGAIN FINE TAP3 GAIN BLUE FINE TAP4 BGAIN FINE TAP4 256 2 4095 a a a a WHITEBALANCE AUTO AWB 0 Off 1 On a a WHITEBALANCE FRAME HIGHLIGHT AWB FRAME HIGHLIGHT 0 Off 1 On a a WHITEBALANCE FRAME AWB FRAME 1 50 100 Width 1 50 100 Height 0 25 99 OffsetX 0 25 99 ...

Страница 46: ...CKLEVEL AUTO BALANCE LIMIT BL AB LIMIT 1 512 16383 a a a LUT FORMAT 0 1 2 3 4 a a a a LINEAR INTERPOLATION 1 5 point 0 4095 In Value 0 4095 OutValue a a LINEAR INTERPOLATION BUILD LUT 0 4095 Index 0 4095 Value a a LUT SAVE BINARIZATION 0 2047 4095 a a a a USERSET LOAD 0 16 USERSET SAVE 1 16 FACTORY DEFAULT USERSET DEFAULT 0 16 USERSET NAME 31 characters a a a a USERSET NAME DELETE USERSET MEMORY 0...

Страница 47: ...00 01 02 10 11 12 20 21 22 8191 8191 a a a a SHADING CORRECTION 0 1 a a a a SHADING DETECTION 0 1 2 SHADING PATTERN LOAD 0 1 2 3 4 a a a a SHADING PATTERN SAVE 0 1 2 3 DEFECT CORRECTION 0 1 a a a a DEFECT DETECTION 0 1 2 DEFECT PATTERN LOAD 0 1 2 a a a a DEFECT PATTERN SAVE DEFECT THRESHOLD 0 8192 16383 a a a DEFECT DETECTION RESULT 1 0 2047 FREE MEMORY 0 32Kbyte 4 Index 0 Value a a FREE MEMORY RE...

Страница 48: ... 4 4ch 1 1ch 2 2ch 4 4ch ROI Width 16 2752 2758 16 3384 3388 Height 4 2200 2208 4 2704 2712 OffsetX 0 4 2758 Width 0 4 3388 Width OffsetY 0 4 2208 Height 0 4 2712 Height Width 16 2752 2758 16 3384 3388 Height 2 2200 2208 480 2704 2712 OffsetX 0 4 2758 Width 0 4 3388 Width OffsetY 0 4 2208 Height 0 4 2712 Height FRAMERATE 62500 27000000 2 62500 180000000 2 EXP 10 37000 2000000 10 55000 2000000 AE U...

Страница 49: ...s for 8 bit 3 760 steps for 12 bit Reference pedestal level 15 steps for 8 bit 240 steps for 12 bit Camera function Readout mode Normal binning 2 1 1 2 2 2 partial scan Readout function LUT binarization gamma variable setting test pattern black and white chart 3 3 filter Synchronization inside outside hardware trigger software trigger Trigger mode OFF free run ON edge detection trigger pulse width...

Страница 50: ...structions 1 XCL S600 XCL S900 XCL S600C XCL S900C Camera Picture size 6 megabytes 9 megabytes Video output 1 1 type PS IT CCD 1 1 type PS IT CCD Valid pixels H V 2 758 2 208 3 388 2 712 Cell size H V 4 54 µm 4 54 µm 3 69 µm 3 69 µm Standard video output pixels H V 2 752 2 200 3 384 2 704 Color filter Original color mosaic Standard frame rate 27 fps for 4 channel sensor output 13 fps for 2 channel...

Страница 51: ...e readout sensor tap switching Interface Video output digital Raw 8 10 12 bit factory setting 8 bit RGB 24 bit Digital interface LVDS Camera standard Base Configuration CameraLink Version 1 2 standard Output data clock Sensor tap 1ch 54 MHz 1tap 27 MHz 2tap 2ch 84 MHz 1tap 42 MHz 2tap 4ch 84 MHz 2tap Digital I O TTL IN 2 TTL OUT 2 General Lens mount C mount Flange focal length 17 526 mm 23 32 inch...

Страница 52: ...CL S600C excluding lens and light source characteristics XCL S900C excluding lens and light source characteristics 1 0 400 0 8 0 6 0 4 0 2 0 0 700 600 500 800 900 1000 Wave Length nm Relative Response 1 0 400 0 8 0 6 0 4 0 2 0 0 700 600 500 800 900 1000 Wave Length nm Relative Response 1 0 400 0 8 0 6 0 4 0 2 0 0 550 500 450 600 650 700 Wave Length nm Relative Response R G B 1 0 0 8 0 6 0 4 0 2 0 ...

Страница 53: ...Specifications Dimensions 53 Dimensions Unit mm inches ...

Страница 54: ... information contained herein is for reference only and does not convey any license by any implication or otherwise under any intellectual property right or other right of Sony or third parties Sony cannot assume responsibility for any right infringements arising out of the use of this information Sony Corporation ...

Отзывы: