background image

– 23 –

XS1

RM-Y1010

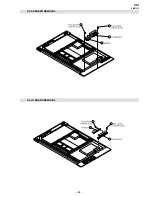
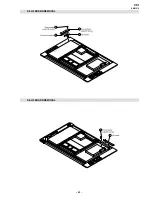
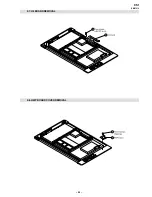
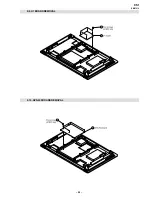
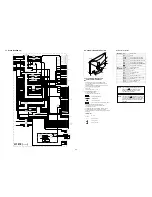
2-5. H2 BOARD REMOVAL

2-6. H3 BOARD REMOVAL

4

1

3

2

2

1

Содержание Wega KE-P37XS1

Страница 1: ... 1 XS1 RM Y1010 SERVICEMANUAL XS1 CHASSIS MODEL COMMANDER DEST KE P37XS1 RM Y1010 AEP MODEL COMMANDER DEST KE P42XS1 RM Y1010 AEP RM Y1010 FLAT PANEL COLORTV KE P37 42XS1 ...

Страница 2: ...ams 2 32 4 2 Circuit Board Location 32 4 3 Schematic Diagrams and Printed Wiring Boards 32 H1 Board Schematic Diagram 33 H1 Printed Wiring Board 34 H2 Board Schematic Diagram 33 H2 Printed Wiring Board 34 H3 Board Schematic Diagram 35 H3 Printed Wiring Board 36 H4 Board Schematic Diagram 35 H4 Printed Wiring Board 36 U1 Schematic Diagram 37 U1 Printed Wiring Board 43 4 4 Semiconductors 45 4 5 IC B...

Страница 3: ... order to guarantee optimal quality of new solder joints Lead Free Solder is available under the following part numbers Due to the higher melting point of Lead Free Solder the soldering iron tip temperature needs to be set to 370 degrees centigrade This requires soldering equipment capable of accurate temperature control coupled with a good heat recovery characteristics For more information on the...

Страница 4: ... p A r o t c e n n o c o r u E n i p 1 2 2 d r a d n a t s C E L E N E C s l a n g i s o e d i V d n a o i d u A r o f s t u p n I B G R r o f s t u p n I d n a o e d i V e l b a t c e l e S r o f s t u p t u O e c a f r e t n I k n i l t r a m S s l a n g i s o i d u A s n o i s n e m i D 1 S X 7 3 P E K m m 6 8 2 x 2 9 6 x 5 3 1 1 x o r p p A 1 S X 2 4 P E K m m 6 8 2 x 3 5 7 x 9 2 2 1 x o r p p...

Страница 5: ...e 12 Open 13 Ground red 14 Ground blanking 15 _ _ Red input 0 7 3dB 75 ohms positive _ S signal Chroma input 0 3 3dB 75 ohms positive 16 Blanking input Ys signal High state 1 3V Low state 0 0 4V Input impedence 75 ohms 17 Ground video output 18 Ground video input 19 Video output 1V 3dB 75ohms positive sync 0 3V 3 10dB 20 _ _ Video input 1V 3dB 75ohms positive sync 0 3V 3 10dB _ Video input Y S sig...

Страница 6: ... a t i H 6 0 r o r r E k c o l C e m i T l a e R 7 0 r o r r E h c t i w S V A 8 0 r o r r E h c t i w S V U Y 9 0 r o r r E r e d o c e D a m o r h C n i a M 0 1 9 1 0 2 A X C r e d o c e D a m o r h C r e t l i F b m o C D 3 1 1 r o r r E r e t l i F b m o C D 3 2 1 r o r r E r e n u T 3 1 r o r r E F I 4 1 r o r r E P S M 5 1 3 6 1 2 A X C r o r r E r e d o c e d a m o r h C b u S 6 1 0 8 3 1 A...

Страница 7: ...pears automatically on the TV screen 3 Press the V v B or b buttons on the remote control to select your language then press the OK button to confirm your selection From now on all the menus will appear in your chosen language 4 The Country menu appears automatically Press the v or V button to select the country in which you are using the TV Press the OK button to confirm your selection If the cou...

Страница 8: ... you wish to store the channels in a different order 1 Press the v or V button to select the programme number with the channel TV Broadcast you wish to move Press the b button 2 Press the v or V button to select the new programme number position for your selected channel TV Broadcast Press the OK button to store 3 Repeat steps b 1 and b 2 if you wish to change the order of the other channels 9 Pre...

Страница 9: ...set Noise Reduction Auto Colour Tone Cold Select Enter OK Exit MENU Picture Adjustment Select Back Enter OK Picture Mode Live Contrast Reset Noise Reduction Auto Colour Tone Cold MENU continued Reset Press OK to reset the picture to the factory preset levels Noise This option is set to Auto to automatically reduce the snowy picture visible in the weak broadcast Reduction signal However it can be m...

Страница 10: ...ce Reset Dual Sound Stereo Auto Volume Off TV Speakers Main Audio Output Fix Select Enter OK Exit MENU Picture Adjustment Picture Mode Live Contrast Reset Noise Reduction Auto Colour Tone Cold Select Enter OK Exit MENU Sound Adjustment Sound Effect Dolby Virtual Treble Bass Balance Reset Dual Sound Stereo Auto Volume Off TV Speakers Main Audio Output Fix Select Back Enter OK MENU TV Speakers This ...

Страница 11: ...nected to the Scart connector 1 2 and 3 or side connectors 5 or 5 and 5 If your VCR or DVD recorder supports SmartLink this procedure is not necessary To do this Once you have entered into the Features menu as it is explained in the previous page and after selecting the option press OK Then press v or V to select the desired output signal TV to output the aerial source AV1 to output sources connec...

Страница 12: ... on the front of the TV To do this Once you have entered the Features menu as it is explained on page 22 and after selecting the option press OK Next press v or V to select Yes if you want to illuminate the Sony logo in blue Finally press OK to store The Set Up Menu The Set Up menu allows you to alter various options on this TV To do this Press the MENU button and press v four times to select then...

Страница 13: ... VCR channel one by one to the programme order of your choice To do this 1 Once you have entered the Set Up menu as it is explained on page 26 and after selecting the Manual Programme Preset option press OK Next with Programme option highlighted press OK Press v or V to select which programme number you want to preset the channel on for VCR select programme number 0 Then press B 2 The following op...

Страница 14: ...as DV camcorders etc It is supported by Sony and other manufacturers Inserting a Memory Stick Insert a Memory Stick into the MEMORY STICK slot until it clicks into the connector see picture Insert the Memory Stick with the mark v facing up and pointing towards the MEMORY STICK slot The red light of the Memory Stick flashes indicating that the Memory Stick contents are being read Inserting a Memory...

Страница 15: ... see page 26 and select the same language as the NexTView is broadcasted Displaying NexTView 1 Select a broadcast channel providing a NexTView service In this case the indication NexTView is displayed as soon as data is available 2 To see NexTView service you have two different types of NexTView interface These depend on the of available data a Programme List interface Whilst you are watching TV a...

Страница 16: ...rder to the Scart connector 2 J Connecting a DVD recorder with 576p signal format Some DVD recorder may have 576p signal format In this case connect the DVD recorder to the Scart connector 2 J to the audio input jacks 4 G and to the video component jacks Y P B C B P R C R 4 H Using this connection the TV will record from the AV2 input Scart connector 2 J To watch the input signal you can chose fro...

Страница 17: ...the remote control for latest code set A small label is provided inside the battery door to allow you to record your brand codes 1 Press and hold the T button on the remote control for approximately 6 seconds until the green DVD and VCR light of the Media Selector starts flashing see fig 1 2 While the VCR and DVD lights are flashing enter all three digits of the code for your brand of VCR or DVD s...

Страница 18: ...etection Dolby Virtual BBE Digital ACI Auto Channel Installation Auto Format DRC Digital Reality Creation Remote Control with learning functions Memory Stick reader S S Design and specifications are subject to change without notice This instruction manual has been printed on Ecological Paper Totally Chlorine Free Troubleshooting Here are some simple solutions to problems which may affect the pictu...

Страница 19: ...re that the aerial is connected using the supplied coaxial cable Keep the aerial cable away from other connecting cords Do not use 300 ohm twin lead cables as interference may occur Communication problems may occur if the infrared communication equipment e g infrared cordless headphones is used near the TV Please use headphones other than infrared cordless headphones move the infrared transceiver ...

Страница 20: ...age appears on the TV screen The Memory Stick is not facing in the correct direction Insert the Memory Stick with the b mark facing up into the Memory Stick slot page 30 This is not a malfunction of the TV This is because you are using a non Sony brand Memory Stick media Cannot delete a file or all materials The write protect switch on the Memory Stick is set to LOCK Release the lock The image fil...

Страница 21: ... 21 XS1 RM Y1010 SECTION 2 DISASSEMBLY 10 11 5 1 2 4 9 3 6 8 7 12 2 1 2 2 SPEAKER COVER REMOVAL 2 1 REAR COVER REMOVAL ...

Страница 22: ... 22 XS1 RM Y1010 2 3 SPEAKER REMOVAL 2 4 H1 BOARD REMOVAL 1 2 3 4 1 3 2 4 ...

Страница 23: ... 23 XS1 RM Y1010 2 5 H2 BOARD REMOVAL 2 6 H3 BOARD REMOVAL 4 1 3 2 2 1 ...

Страница 24: ... 24 XS1 RM Y1010 2 7 H4 BOARD REMOVAL 2 8 HMP BOARD COVER REMOVAL 2 1 2 1 ...

Страница 25: ... 25 XS1 RM Y1010 2 9 U1 BOARD REMOVAL 2 10 APS 202 BOARD REMOVAL 2 1 2 1 ...

Страница 26: ...ard Color Bar 0 525V ȑ62 BLUE output 0 000V 0ȑ6 one line A B C D SECTION 3 SET UP ADJUSTMENTS 3 1 CVBS PAL System Adjustment CVBS YC PAL SECAM NTSC RGB YUV 15K System adjustment CVBS PAL System adjustment White bar RED 216 3 A White bar BLUE 216 3 A 1 Input CVBS PAL Color Bar signal into AV1 as shown on Figure 1 Black bar RED 16 3 D EBU Standard Color Bar 100 Luma 75 Chroma Black bar BLUE 16 3 D V...

Страница 27: ...BU Standard Color Bar 0 525V ȑ62 BLUE output 0 000V 0ȑ6 one line A B C D CVBS YC PAL SECAM NTSC RGB YUV 15K System adjustment CVBS SECAM System adjustment White bar RED 216 3 A White bar BLUE 216 3 A 1 Input CVBS SECAM Color Bar signal into AV1 as shown on Figure 1 Black bar RED 16 3 D EBU Standard Color Bar 100 Luma 75 Chroma Black bar BLUE 16 3 D VG828 ASTRO Pattern No XXX OPT 2 No F Red bar RED...

Страница 28: ... SECAM EBU Standard Color Bar 0 525V ȑ62 BLUE output 0 000V 0ȑ6 one line A B C D CVBS YC PAL SECAM NTSC RGB YUV 15K System adjustment YC NTSC System adjustment White bar RED 216 3 A White bar BLUE 216 3 A 1 Input YC NTSC Color Bar signal into AV3 as shown on Figure 1 Black bar RED 16 3 D EBU Standard Color Bar 100 Luma 75 Chroma Black bar BLUE 16 3 D VG828 ASTRO Pattern No XXX OPT 2 No F Red bar R...

Страница 29: ...igure 1 YUV EBU Standard Color Bar 0 525V ȑ62 BLUE output 0 000V 0ȑ6 one line A B C D CVBS YC PAL SECAM NTSC RGB YUV 15K System adjustment RGB System adjustment White bar RED 216 3 A White bar BLUE 216 3 A 1 Input RGB Color Bar signal into AV1 as shown on Figure 1 Black bar RED 16 3 D EBU Standard Color Bar 100 Luma 75 Chroma Black bar BLUE 16 3 D VG828 ASTRO Pattern No XXX OPT 2 No F Red bar RED ...

Страница 30: ...ite Balance Adjustment Adjustment of W B With internal white signal Tool Measuring Instrument Component 1 Turn on the main power of XS1 CS 1000 Minolta 2 Execute the MID_H8_ServiceControl xls 3 H8_INIT SVC_FLAG RGBD 3 4 Adjust W B of warm Standard 8400k 27MPCD Color tone set to warm X 0 2943 0 003 H8_INIT SVC_WB RRTO warm set to FF Y 0 2840 0 003 1 H8_INIT SVC_WB GRTO warm 1 H8_INIT SVC_WB BRTO wa...

Страница 31: ...A7 A8 A9 A10 A11 A12 A13 A14 A15 A16 NOE I00 I01 I03 I02 I04 I05 I06 I07 12 MSP CL 12 MSP WS 12 MSP OUT 12 MSP IN AKM CLK SYS RST RQ SCLK SI DSP SO DSP RESET DSP DSP RDY FAN 1 ERR FAN 2 ERR FAN 1 DRIVE FAN 2 DRIVE FAN 3 DRIVE FAN 4 DRIVE 1 4 2 8 11 5 CN6004 9 14 15 10 FAN CONTROL 1 5 4 3 4 2 3 1 IC6001 OP AMP IC6016 VOLTAGE REG 2 6 COINCIDENCE RESET MSP 5 13 11 IC6030 OP AMP 7 15 3 16 2 5 1 LINE L...

Страница 32: ...T 2 R IN L IN L OUT MODE V OUT V IN R OUT R IN L IN L OUT MODE AVL C IN R OUT R IN L IN L OUT MODE V OUT V IN V OUT Y V IN AVL V OUT 2 L OUT L OUT 2 R OUT 2 V OUT 3 L OUT 3 R OUT 3 CVBS TUN L TUN R TUN V IN 3 Y IN 3 C IN 3 L IN 3 R IN 3 MODE 3 AV LINK_SC2 AV LINK_SC3 V IN 1 MODE 1 L IN 1 R IN 1 U SEL CVBS MAIN Y SEL V SEL FSW SEL H SEL V SEL Y MAIN C MAIN CB SEL Y SEL CR SEL FSW OUT H SEL V SEL RE...

Страница 33: ...06 100 R9601 1 10W 100 R9600 1 10W 100 R9602 CHIP 0 R9605 JR9601 XX JR9602 XX JR9603 XX JR9604 XX CHIP 0 R9604 CHIP 0 R9603 H2 XS1 COMPONENTS MARKED AS XX ARE NOT FITTED TO THIS MODEL TO U1 BOARD CN6003 H2 INPUT TERMINAL H2 Board Schematic Diagram InputTerminal 1 2 3 4 5 6 7 7P CN9501 GND STBY5V P SW P ON KEY1 GND KEY2 S9506 S9501 1 10W 100 R9501 UDZS TE17 12B D9501 16V 0 1 C9501 XX R9509 R9516 XX...

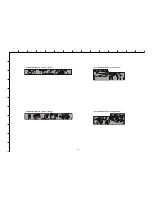
Страница 34: ... F G H I J K L M N 1 2 3 4 5 6 7 8 9 10 11 O 34 H1 Printed Wiring Board Conductor Side A H1 Printed Wiring Board Conductor Side B H2 Printed Wiring Board Conductor Side A H2 Printed Wiring Board Conductor Side B ...

Страница 35: ...ER 470 CN4601 TO A3 BOARD 1 2 3 GRY 3P CN9801 5V LOGO GND XX C9801 NSPW515BSA0 D9801 NSPW515BSA0 D9802 NSPW515BSA0 D9803 NSPW515BSA0 D9804 DTC114EUA T106 Q9801 DTC114EUA T106 Q9802 DTC114EUA T106 Q9803 DTC114EUA T106 Q9804 R9801 1 10W 100 R9802 1 10W 100 R9803 1 10W 100 R9804 1 10W 100 D9805 XX D9806 XX D9807 XX D9808 XX H4 XS1 COMPONENTS MARKED AS XX ARE NOT FITTED TO THIS MODEL H4 LED TO A3 BOAR...

Страница 36: ... F G H I J K L M N 1 2 3 4 5 6 7 8 9 10 11 O 36 H4 Printed Wiring Board Conductor Side A H4 Printed Wiring Board Conductor Side B H3 Printed Wiring Board Conductor Side A H3 Printed Wiring Board Conductor Side B ...

Страница 37: ...D E F G H I J K L M N 1 2 3 4 5 6 7 8 9 10 11 O 37 U1 Board Schematic Diagram Input Terminal AV SW Audio Page 1 6 COMPONENTS MARKED AS XX ARE NOT FITTED ON THIS MODEL INPUT TERMINAL AV SW AUDIO U1 XS1 U1 1 6 ...

Страница 38: ... 7 8 9 10 11 O 38 U1 Board Schematic Diagram Input Terminal AV SW Audio Page 2 6 C6176 0 22 16V COMPONENTS MARKED AS XX ARE NOT FITTED ON THIS MODEL U1 XS1 U1 2 6 TP1 TP2 50us div 50us div U1 2 6 Board Waveforms 420mVp p H 235mVp p H TP1 TP2 ...

Страница 39: ...A B C D E F G H I J K L M N 1 2 3 4 5 6 7 8 9 10 11 O 39 COMPONENTS MARKED AS XX ARE NOT FITTED ON THIS MODEL U1 XS1 U1 3 6 U1 Board Schematic Diagram Input Terminal AV SW Audio Page 3 6 ...

Страница 40: ... D E F G H I J K L M N 1 2 3 4 5 6 7 8 9 10 11 O 40 COMPONENTS MARKED AS XX ARE NOT FITTED ON THIS MODEL TO H2 BOARD CN9601 JR6004 U1 XS1 U1 4 6 U1 Board Schematic Diagram Input Terminal AV SW Audio Page 4 6 ...

Страница 41: ... 7 8 9 10 11 O 41 U1 Board Schematic Diagram Input Terminal AV SW Audio Page 5 6 0UH FB6037 C6042 2 2 50V 0UH AR5 E COMPONENTS MARKED AS XX ARE NOT FITTED ON THIS MODEL NJM2123M U1 XS1 U1 5 6 TP1 100ns div U1 5 6 Board Waveform 2 9Vp p H TP1 ...

Страница 42: ...A B C D E F G H I J K L M N 1 2 3 4 5 6 7 8 9 10 11 O 42 COMPONENTS MARKED AS XX ARE NOT FITTED ON THIS MODEL U1 XS1 U1 6 6 U1 Board Schematic Diagram Input Terminal AV SW Audio Page 6 6 ...

Страница 43: ...0 7 5 0 9 5 8 5 0 5 3 0 2 1 4 1 8 5 3 4 0 6 1 5 7 3 6 3 8 3 3 1 3 2 9 5 5 4 9 6 1 6 0 8 3 0 7 4 1 0 3 0 6 4 4 1 7 0 7 1 5 1 7 0 7 1 5 1 0 0 6 C I 1 9 3 4 6 1 6 5 4 8 7 0 9 3 9 7 2 0 8 0 0 6 C I 3 1 5 4 1 8 0 0 4 0 7 3 9 3 4 0 3 8 2 8 5 2 4 4 3 4 0 4 9 3 7 5 5 4 4 8 0 8 4 5 4 8 3 5 7 9 8 1 9 6 8 5 8 5 2 9 4 0 4 0 0 6 C I 3 1 9 2 2 1 0 6 C I 4 2 1 5 9 8 7 8 0 1 5 0 5 8 3 5 4 1 1 5 0 1 9 0 9 1 5 2 5 ...

Страница 44: ...1 0 6 D 9 B 4 3 0 6 D 7 B 0 6 0 6 D 9 C 1 0 5 6 D 8 F 6 3 0 6 Q 6 D 2 1 0 6 D 9 B 7 3 0 6 D 8 B 1 6 0 6 D 9 C 2 0 5 6 D 9 F 9 3 0 6 Q 9 G 3 1 0 6 D 9 B 8 3 0 6 D 8 D 2 6 0 6 D 8 D 3 0 5 6 D 4 F 0 4 0 6 Q 8 G 4 1 0 6 D 8 D 9 3 0 6 D 6 B 4 6 0 6 D 9 B 1 0 6 6 D 7 F 1 4 0 6 Q 8 G 5 1 0 6 D 9 D 0 4 0 6 D 7 D 5 6 0 6 D 9 B 2 0 6 6 D 8 G 2 7 0 6 Q 5 C 6 1 0 6 D 8 D 1 4 0 6 D 8 D 6 6 0 6 D 8 G 3 0 6 6 D ...

Страница 45: ...TE85R1 IC TC7SZ08FU TE85R IC NJM2374AM TE2 IC TC7WH00FU TE12R IC TC7WHU04FU TE12R IC PQ20RX11J00H IC TAR5S30 TE85R IC TDA7490L IC UPC1093J 1 T 1 TOP VIEW 68 61 60 1 52 44 43 35 27 26 18 10 9 TOP VIEW REF ANODE CATHODE 1 16 17 32 1 100 25 26 50 51 75 76 TOP VIEW 1 8 16 9 5 6 7 1 2 3 4 IN GND OUT 2SA1037AK T146 R 2SA1162 G 2SC1623 L5L6 DTC144EE MSB709 RT1 E B C MA111 TX MM3Z12VT1 MM3Z3V9T1 MM3Z6V8T1...

Страница 46: ...LECTOR YPbPr YCbCr BTA RGB YCbCr 41 IN2_1 42 IN2_2 43 IN2_3 44 IN2_H L1 45 IN2_V L2 46 IN2_L3 47 IN2_SW 1 IN3_1 2 IN3_2 3 IN3_3 4 IN3_H 5 IN3_V 7 IN4_1 8 IN4_2 9 IN4_3 10 IN4_H 11 15 16 13 14 IN4_V IN1 IN4 SELECTOR INPUT_SEL 2 SELSTB_1 1 SELSTB_2 1 DECL1_1 2 DECL2_1 2 DECL3_1 2 DECSW_1 1 DECL1_2 2 DECL2_2 2 DECL3_2 2 DECSW_2 1 EH 1 EV 1 HD_TC 1 HSEP_SEL 1 V_TC 2 MAT_OUT 2 3 STATE 1 YGAIN 4 CBGAIN ...

Страница 47: ... NO DESCRIPTION REMARK 47 1 X 2021 896 2 COVER REAR 37 ASSY KE P37XS1 2 X 2021 895 2 COVER REAR 42 ASSY KE P42XS1 2 2 4 102 644 01 COVER 42 STAND BASE PAINTED 3 4 098 263 01 CAP 42 STAND 4 4 098 260 01 FRAME 42A STAND BASE 5 4 098 262 03 BRACKET 42 STAND BASE 6 4 098 259 02 PLATE 42 STAND BASE 7 4 098 261 01 FRAME 42B STAND BASE 8 4 098 264 01 CUSHION A 9 7 682 000 07 SCREW PSW M5X12 10 7 682 973 ...

Страница 48: ... 4042 973 1 BUTTON MULTI ASSY 62 4 098 110 01 GUIDE LIGHT MS 63 A 1606 623 A SPEAKER 37R ASSY KE P37XS1 64 65 A 1606 608 A SPEAKER 42R ASSY KE P42XS1 64 65 64 1 825 610 12 LOUDSPEAKER 5CM 65 1 825 609 11 LOUDSPEAKER 5 5X12CM 66 X 4042 983 1 FILTER GLASS BRACKET 37 ASSY KE P37XS1 X 4042 968 1 FILTER GLASS BRACKET 42 ASSY KE P42XS1 67 X 4042 760 3 BAR BOTTOM 37 ASSY KE P37XS1 X 4042 754 3 BAR BOTTOM...

Страница 49: ...37 REAR L PAINTED KE P37XS1 4 102 214 01 BOX SPEAKER 42 REAR L PAINTED KE P42XS1 81 X 4042 986 1 SPEAKER COVER 37L ASSY KE P37XS1 X 4042 971 1 SPEAKER COVER 42L ASSY KE P42XS1 82 A 1606 622 A SPEAKER 37L ASSY KE P37XS1 64 65 A 1606 607 A SPEAKER 42L ASSY KE P42XS1 64 65 83 4 098 215 02 MAIN FRM 37 ASSY KE P37XS1 4 098 145 02 MAIN FRM 42 ASSY KE P42XS1 84 4 098 094 03 LID CONNECTOR PANEL 85 4 102 2...

Страница 50: ...d when ordering these items Parts indicated XX on the Schematic Diagram are not used in this model and therefore do not appear in the Parts List H1 BOARD COMPLETE Parts List 51 H2 BOARD COMPLETE Parts List 51 U1 BOARD COMPLETE Parts List 51 H3 BOARD COMPLETE Parts List 62 H4 BOARD COMPLETE Parts List 62 MISCELLANEOUS 63 ACCESSORIES AND PACKAGING MATERIALS 63 REMOTE COMMANDER 63 Page ...

Страница 51: ... 82 DIODE UDZS TE17 12B D9607 8 719 083 82 DIODE UDZS TE17 12B D9608 8 719 083 82 DIODE UDZS TE17 12B D9609 8 719 083 82 DIODE UDZS TE17 12B D9610 8 719 083 82 DIODE UDZS TE17 12B D9611 8 719 083 82 DIODE UDZS TE17 12B D9612 8 719 083 82 DIODE UDZS TE17 12B SOCKET J9600 1 568 267 11 JACK J9601 1 565 666 12 TERMINAL S 4P J9602 1 580 443 11 JACK PIN 3P RESISTOR R9600 1 216 809 11 METAL CHIP 100 5 1 ...

Страница 52: ...26 206 11 ELECT CHIP 100UF 20 00 6 3V C6137 1 127 715 91 CERAMIC CHIP 0 22UF 10 16V C6138 1 127 715 91 CERAMIC CHIP 0 22UF 10 16V C6139 1 127 715 91 CERAMIC CHIP 0 22UF 10 16V C6140 1 127 715 91 CERAMIC CHIP 0 22UF 10 16V C6141 1 127 715 91 CERAMIC CHIP 0 22UF 10 16V C6142 1 127 715 91 CERAMIC CHIP 0 22UF 10 16V C6143 1 127 715 91 CERAMIC CHIP 0 22UF 10 16V C6144 1 127 715 91 CERAMIC CHIP 0 22UF 1...

Страница 53: ...UF 16V C6285 1 164 505 11 CERAMIC CHIP 2 2UF 16V C6286 1 164 505 11 CERAMIC CHIP 2 2UF 16V C6287 1 164 505 11 CERAMIC CHIP 2 2UF 16V D1 U1 C6288 1 125 891 11 CERAMIC CHIP 0 47UF 10 00 10V C6289 1 127 715 91 CERAMIC CHIP 0 22UF 10 16V C6290 1 125 889 91 CERAMIC CHIP 2 2UF 10 10V C6291 1 127 715 91 CERAMIC CHIP 0 22UF 10 16V C6292 1 164 392 11 CERAMIC CHIP 390PF 5 00 50V C6293 1 164 392 11 CERAMIC C...

Страница 54: ...V C6490 1 127 715 91 CERAMIC CHIP 0 22UF 10 16V C6491 1 127 715 91 CERAMIC CHIP 0 22UF 10 16V C6492 1 127 715 91 CERAMIC CHIP 0 22UF 10 16V C6493 1 128 992 21 ELECT CHIP 47UF 20 25V C6494 1 127 715 91 CERAMIC CHIP 0 22UF 10 16V C6495 1 107 826 11 CERAMIC CHIP 0 1UF 10 00 16V C6496 1 128 934 91 CERAMIC CHIP 0 33UF 20 10V C6497 1 128 934 91 CERAMIC CHIP 0 33UF 20 10V C6498 1 126 205 11 ELECT CHIP 47...

Страница 55: ...DE MMDL914T1 D6076 8 719 056 85 DIODE UDZ TE 17 8 2B D6077 8 719 056 85 DIODE UDZ TE 17 8 2B D6080 8 719 404 50 DIODE MA111 TX D6082 8 719 081 98 DIODE MM3Z6V8T1 D6084 8 719 080 69 DIODE M1FS4 4063 D6086 8 719 404 50 DIODE MA111 TX D6087 8 719 404 50 DIODE MA111 TX D6093 8 719 312 92 DIODE RK14V1 D6094 8 719 312 92 DIODE RK14V1 D6095 8 719 081 97 DIODE MMDL914T1 D6096 8 719 081 97 DIODE MMDL914T1 ...

Страница 56: ...4 8 729 038 96 TRANSISTOR IMZ1A T109 Q6035 8 729 927 99 TRANSISTOR 2SC4617R Q6036 8 729 120 28 TRANSISTOR 2SC1623 L5L6 Q6037 8 729 927 99 TRANSISTOR 2SC4617R IC6005 8 759 481 08 IC TC7SET02FU TE85R IC6006 8 752 089 33 IC CXA2069Q TL IC6007 6 701 173 01 IC MC74LVXT4053DTR2 IC6008 8 759 278 58 IC NJM4558V TE2 IC6010 6 703 850 01 IC TC7SET04FU TE85R1 IC6012 6 704 809 01 IC AK7716VT IC6013 6 704 950 0...

Страница 57: ...1 216 803 11 METAL CHIP 33 5 1 10W R6040 1 216 841 11 METAL CHIP 47K 5 1 10W R6041 1 216 841 11 METAL CHIP 47K 5 1 10W R6042 1 216 864 11 SHORT CHIP 0 Q6038 8 729 928 19 TRANSISTOR 2SA1774R Q6039 8 729 141 73 TRANSISTOR 2SC3624A T1L15L16 Q6040 8 729 141 73 TRANSISTOR 2SC3624A T1L15L16 Q6041 8 729 141 73 TRANSISTOR 2SC3624A T1L15L16 Q6042 8 729 928 19 TRANSISTOR 2SA1774R Q6043 8 729 120 28 TRANSIST...

Страница 58: ...220 5 1 10W R6131 1 216 813 11 METAL CHIP 220 5 1 10W R6132 1 216 813 11 METAL CHIP 220 5 1 10W R6133 1 216 795 11 METAL CHIP 6 8 5 1 10W R6134 1 216 833 11 METAL CHIP 10K 5 1 10W R6135 1 216 833 11 METAL CHIP 10K 5 1 10W R6136 1 216 805 11 METAL CHIP 47 5 1 10W R6137 1 216 805 11 METAL CHIP 47 5 1 10W R6138 1 216 809 11 METAL CHIP 100 5 1 10W R6139 1 216 809 11 METAL CHIP 100 5 1 10W R6140 1 216 ...

Страница 59: ...216 813 11 METAL CHIP 220 5 1 10W R6256 1 216 813 11 METAL CHIP 220 5 1 10W R6263 1 216 864 11 SHORT CHIP 0 R6266 1 216 864 11 SHORT CHIP 0 R6296 1 216 809 11 METAL CHIP 100 5 1 10W R6297 1 216 809 11 METAL CHIP 100 5 1 10W R6298 1 216 809 11 METAL CHIP 100 5 1 10W R6299 1 216 864 11 SHORT CHIP 0 R6300 1 216 864 11 SHORT CHIP 0 R6301 1 218 990 11 SHORT CHIP 0 R6302 1 216 864 11 SHORT CHIP 0 R6303 ...

Страница 60: ... 1 216 839 11 METAL CHIP 33K 5 1 10W R6617 1 216 839 11 METAL CHIP 33K 5 1 10W R6620 1 216 023 00 RES CHIP 82 5 1 10W R6353 1 216 853 11 METAL CHIP 470K 5 1 10W R6354 1 216 841 11 METAL CHIP 47K 5 1 10W R6355 1 216 809 11 METAL CHIP 100 5 1 10W R6356 1 216 853 11 METAL CHIP 470K 5 1 10W R6357 1 216 853 11 METAL CHIP 470K 5 1 10W R6358 1 216 809 11 METAL CHIP 100 5 1 10W R6359 1 216 022 00 RES CHIP...

Страница 61: ...33 11 METAL CHIP 10K 5 1 10W R6679 1 216 829 11 METAL CHIP 4 7K 5 1 10W R6680 1 216 825 11 METAL CHIP 2 2K 5 1 10W R6681 1 216 821 11 METAL CHIP 1K 5 1 10W R6682 1 216 821 11 METAL CHIP 1K 5 1 10W U1 R6683 1 216 821 11 METAL CHIP 1K 5 1 10W R6684 1 216 864 11 SHORT CHIP 0 R6685 1 216 864 11 SHORT CHIP 0 R6686 1 164 004 11 CERAMIC CHIP 0 1UF 10 25V R6688 1 216 821 11 METAL CHIP 1K 5 1 10W R6689 1 2...

Страница 62: ...00 425 01 DIODE SELU1E50CM D9705 8 719 421 59 DIODE MA3130WA TX IC IC9701 6 600 117 01 IC GP1UM27SRK IC9702 8 752 072 94 IC CXA1875AM T4 TRANSISTOR Q9700 8 729 120 28 TRANSISTOR 2SC1623 L5L6 Q9701 8 729 120 28 TRANSISTOR 2SC1623 L5L6 Q9702 8 729 120 28 TRANSISTOR 2SC1623 L5L6 Q9703 8 729 216 22 TRANSISTOR 2SA1162 G Q9704 8 729 120 28 TRANSISTOR 2SC1623 L5L6 Q9705 8 729 928 81 TRANSISTOR DTC144EE R...

Страница 63: ...G 1 763 659 11 FAN DC 1 828 864 11 CABLE COAXIAL ACCESSORIES AND PACKAGING MATERIALS 1 769 175 21 CABLE ANTENNA WITH FILTER 1 824 338 11 POWER SUPPLY CORD FERRITE CORE 4 087 863 02 BAG PROTECTION 4 087 938 01 JOINT 4 102 278 01 INDIVIDUAL CARTON KE P37XS1 4 102 279 01 CUSHION UP KE P37XS1 4 102 280 01 CUSHION BT KE P37XS1 4 102 281 01 BOARD TOP KE P37XS1 4 102 856 01 TRAY KE P37XS1 4 102 225 01 CU...

Страница 64: ...re modules Please contact your local Sony Service organisation for the latest information Read restore and compare NVM contents via the I2C bus Acknowledge check of all I2C devices in the TV set Read Error Codes emulation of the Error Reader tool Remote Commander emulation User programmable Functional Check through Infrared Fast and documented Test Mode setting of all Sony TV chassis Partnumbers T...

Отзывы: