


2-12
VPL-CX70/CX75
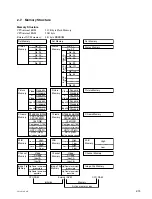
2-6. Automatic Focus (AF) Adjustment
Turn on the cooling fan and the lamp.
Set Tilt to 0, Side shot 0, and Keystone correction MANUAL.
1) Wide end adjustment
Set the zoom position to the wide end, and then set the screen size to 60”. (Bring the unit to the front
projection.)
1.
On “MENU”, select “INSTALL SETTING”, and set “Test Pattern” to “ON”.
2.
Adjust the focus to the optimum position while observing the test pattern at the center of the project-
ed image. (If “Test Pattern” is set to “ON” in step 1, a cross-shaped test pattern appears when the
Focus key is pressed.)
3.
Press the AF adjustment switch (
1
) in the following figure and hold it for about two seconds. (When
the holding action is recognized, the focus starts functioning automatically.)
n
While holding down the key, ensure that no object that may interrupt the projected image exists in
front of the AF module (
2
) , or between the VPL-CX75 and the screen.
2) Tele end adjustment
After completing the above adjustment, set the zoom position to the tele end at the same position.
Then, repeat the adjustment steps 1 through 3 described above.
3) Check
At both the wide end and the tele end, blur the focus by using the Focus key. Then activate AF, and check
that the focus is correctly adjusted.
1
AF adjustment switch
2


