background image

Help Guide

Data Projector

VPL-CWZ10/CXZ10

Installing a CA Certificate to Your Computer

Depending on the type of certificate installed to the projector, it may not be possible to connect to a network because the
browser (Internet Explorer) does not display a dialog where you can decide whether or not to accept the certificate. In
this case, follow the procedure below and install a CA certificate to your computer. (The following screens are examples
when the OS is set to English.)

Save the signed CA certificate that is to be installed to the projector to your computer.

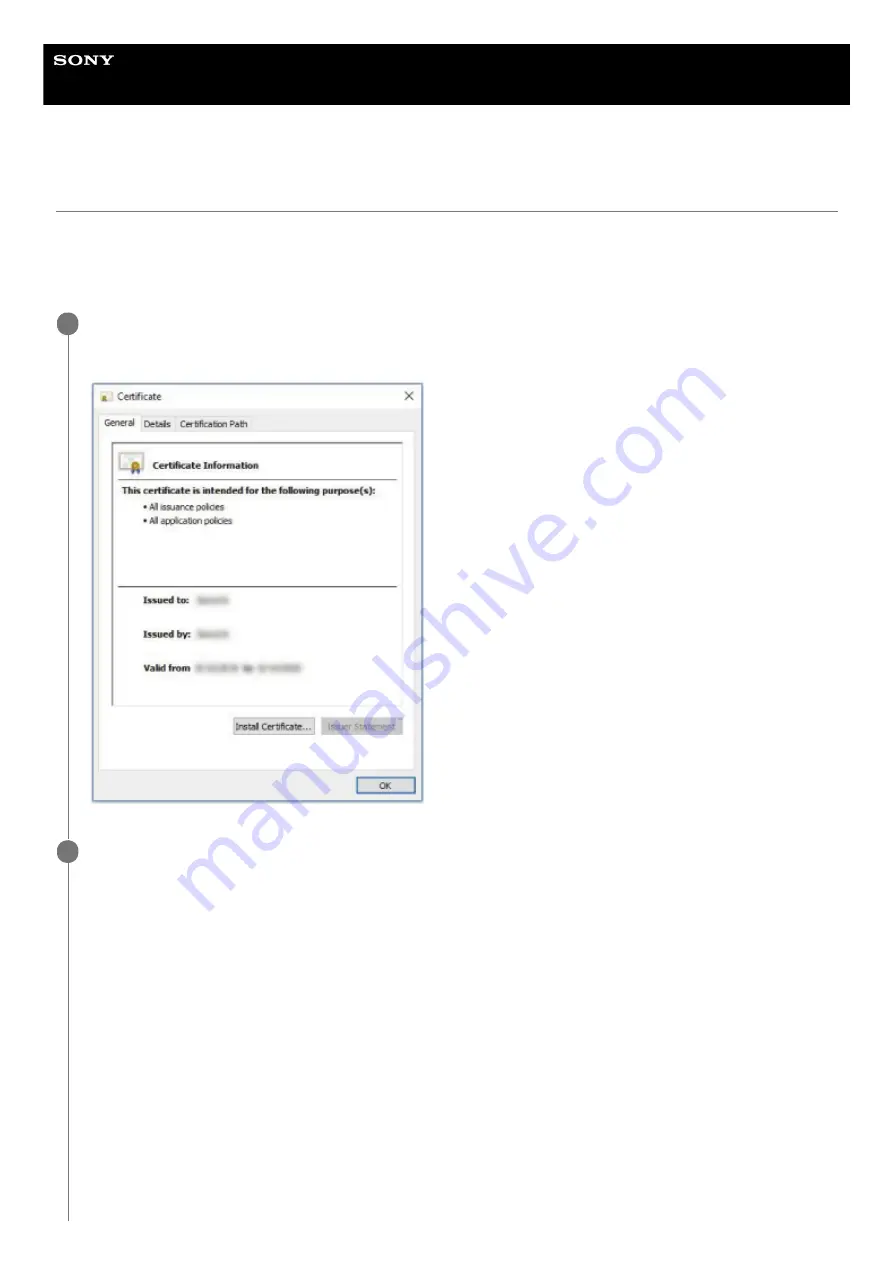
The standard certificate file extension is “.cer.” Double-click this file to display the certificate dialog.

1

Click [Install Certificate].

[Welcome to the Certificate Import Wizard] will be displayed.

2

112

Содержание VPL-CWZ10

Страница 1: ...Authorized Dealer Before Use Checking the Supplied Accessories Inserting the Battery into the Remote Commander Attaching the Air Filter For the Customers in India only Parts and Controls Parts and Controls Main Unit Parts and Controls Connection Terminals Parts and Controls Remote Commander and Control Panel Connecting Precautions When Connecting Connecting to a Computer Connecting to a Computer w...

Страница 2: ...ble to the Projector Projecting Turning Power On Off Selecting the Menu Language Projecting Images Adjusting Adjusting the Screen Focus Adjusting the Screen Size Adjusting the Screen Position Changing the Screen Aspect Ratio Correcting a Trapezoidal Screen Correcting a Vertical Trapezoid Correcting a Horizontal Trapezoid Correcting Screen Distortion Displaying Patterns Using the Auto Adjustment Fu...

Страница 3: ...tings Menu Operation Expert Setting Screen Menu Menu Operation Aspect Aspect Ratio Menu Operation Adjust Signal Function Menu Menu Operation Presentation timer Menu Operation Volume Menu Operation Speaker Menu Operation Speaker Setting Menu Operation Smart APA Menu Operation CC Display Menu Operation Start Up Image Operation Menu Menu Operation Language Menu Operation Status Menu Operation Securit...

Страница 4: ...u Operation V Keystone Menu Operation H Keystone Menu Operation Corner Keystone Menu Operation Digital Shrink Menu Operation Image Flip Menu Operation High Altitude Mode Information Menu Viewing the Projector Information Using Network Features Uses for Network Features Displaying the Control Window of the Projector with a Web Browser Operating the Control Panel Using the E mail Report Function Con...

Страница 5: ...A Certificate Installed to Your Computer Precautions Precautions On Installation On Cleaning the Lens and the Cabinet On Illumination On Heat Dissipation On Screen On Fan On Inspection of Light Source Related Parts On Disposing Used Products On LCD Projector On condensation Notes on Security Do not place this product close to medical devices Disclaimer Cleaning the Air Filter Cleaning the Air Filt...

Страница 6: ...nce Projection Distance Projection Distance Formula VPL CWZ10 Projection Distance Projection Distance Formula VPL CXZ10 Error Handling Reading the Indicator Message List Troubleshooting No Power No Image is Displayed Cannot Connect to Computer No On screen Display Screen Aspect Ratio is Strange Screen Display is Small Part of Image Not Displayed Trapezoidal Screen Screen Distortion Screen is Too D...

Страница 7: ...5 014 280 13 1 Copyright 2020 Sony Corporation Others Notice on the Software Notifications Related to GNU GPL LGPL applicable Software Other Software Trademarks 7 ...

Страница 8: ... Remote Commander RM PJ8 1 Lithium battery CR2025 1 The battery is already installed Before using the Remote Commander remove the insulation film AC power cord 1 Mini D sub 15 pin cable 1 8 m 1 1 970 584 11 Sony Extension studs 4 Air filter cover 1 1 Dust cover assembly 1 1 Setup Guide 1 5 014 280 13 1 Copyright 2020 Sony Corporation For the customers in India only 1 8 ...

Страница 9: ...m If the Remote Commander can no longer be operated exchange the lithium battery for a new one by the following procedure 5 014 280 13 1 Copyright 2020 Sony Corporation Pull out the lithium battery compartment Pull the battery compartment toward you while releasing the lock 1 Insert a lithium battery The lithium battery should be placed in the compartment with the plus side facing up 2 Close the l...

Страница 10: ...n it The product is pre fitted with a dust cover assembly when shipped Remove the air filter B from the dust cover assembly A and then attach the air filter to the air filter cover C Pull the pull stick D upwards when removing the air filter from the dust cover assembly When attaching the air filter to the air filter cover make sure the correct side is being attached so that the pull stick is prot...

Страница 11: ...ok of the air filter cover If the air filter is attached to the air filter cover incorrectly malfunction may occur When installing to the ceiling securely attach the dust cover assembly to the unit Incorrect attachment of the dust cover assembly may cause a malfunction 5 014 280 13 1 Copyright 2020 Sony Corporation 11 ...

Страница 12: ...ntrols Main Unit Top Front Right Rear Bottom ON STANDBY indicator 1 WARNING indicator 2 Control panel 3 Zoom lever 4 Focus lever 5 Projection lens 6 Ventilation holes intake 7 Remote control receiver 8 Ventilation holes exhaust 9 Speaker 10 Top cover 11 12 ...

Страница 13: ...ated Topic Parts and Controls Connection Terminals Parts and Controls Remote Commander and Control Panel Cleaning the Air Filter Reading the Indicator 5 014 280 13 1 Copyright 2020 Sony Corporation Antitheft bar For attaching theft prevention chains wires and such sold commercially 1 Front feet adjustable 2 Air filter cover 3 Ventilation holes intake 4 Antitheft lock For attaching theft prevention...

Страница 14: ...014 280 13 1 Copyright 2020 Sony Corporation Input A INPUT A Video RGB Y PB PR input terminal RGB Y PB PR 1 Input B INPUT B Video HDMI input terminal HDMI Audio HDMI input terminal HDMI 2 Input B INPUT C Video HDMI input terminal HDMI Audio HDMI input terminal HDMI 3 Video VIDEO IN Video Video input terminal 4 Audio AUDIO IN Audio Audio input terminal 5 Audio AUDIO OUT Audio Audio output terminal ...

Страница 15: ...Pattern key Adjust the projected image APA Auto Pixel Alignment key Adjust the input signal to fit to the screen automatically when there is a computer signal being input from the RGB input terminal Input A 4 D ZOOM Digital zoom key Zoom in or out on a part of the projected image This can be used when there is a computer signal being input However depending on the input signal resolution it may no...

Страница 16: ...ote control receiver on the projector the projector may not be able to receive signals from the Remote Commander Related Topic Turning Power On Off Projecting Images Using the Digital Zoom Function Using Eco Mode Navigating Menus 5 014 280 13 1 Copyright 2020 Sony Corporation Adjust the sound volume FREEZE Freeze key Temporarily freeze the image Press again to release This can be used when there i...

Страница 17: ...ion Firmly insert the cable plugs Loose connections may reduce the performance of picture signals or cause a malfunction When unplugging a cable be sure to grip the plug not the cable itself For more information refer also to the instruction manual of the device to be connected Use a no resistance audio cable 5 014 280 13 1 Copyright 2020 Sony Corporation 17 ...

Страница 18: ...io output terminal A Audio cable stereo mini plug not supplied B Mini D sub 15 pin cable supplied Hint For the screen settings of your computer it is recommended that you set the resolution of an external monitor as below VPL CWZ10 1 280 800 pixels VPL CXZ10 1 024 768 pixels Related Topic Parts and Controls Connection Terminals Precautions When Connecting 5 014 280 13 1 Copyright 2020 Sony Corpora...

Страница 19: ... an HDMI compatible device with the HDMI Logo Use a high speed HDMI cable s on which the cable type logo is specified Sony products are recommended The HDMI terminal of this projector is not compatible with DSD Direct Stream Digital signals and CEC Consumer Electronics Control signals Related Topic Parts and Controls Connection Terminals Precautions When Connecting 5 014 280 13 1 Copyright 2020 So...

Страница 20: ...l the access from the internet such as LAN If the projector is connected directly to the internet the security risk is increased When you monitor and control the projector via the network display the control window of the projector with a web browser and enable the desired control protocol Related Topic Parts and Controls Connection Terminals Precautions When Connecting Setting Advertisement Setti...

Страница 21: ...al to a video device s video output terminal and the AUDIO IN terminal to a video device s audio output terminal A Audio cable Pin plug x 2 Stereo mini plug not supplied B Video cable not supplied Related Topic Parts and Controls Connection Terminals Precautions When Connecting 5 014 280 13 1 Copyright 2020 Sony Corporation 21 ...

Страница 22: ...eo device s Y PB PR output terminal and the AUDIO IN terminal to a video device s audio output terminal A Audio cable Pin plug x 2 Stereo mini plug not supplied B Component Mini D sub 15 pin cable not supplied Related Topic Parts and Controls Connection Terminals Precautions When Connecting 5 014 280 13 1 Copyright 2020 Sony Corporation 22 ...

Страница 23: ... Use an HDMI compatible device with the HDMI Logo Use a high speed HDMI cable s on which the cable type logo is specified Sony products are recommended The HDMI terminal of this projector is not compatible with DSD Direct Stream Digital signals and CEC Consumer Electronics Control signals Related Topic Parts and Controls Connection Terminals Precautions When Connecting 5 014 280 13 1 Copyright 202...

Страница 24: ...her such devices you can output the audio fed into the projector through the audio device When Speaker Setting is set to Always On and the light is off Input A becomes active A Audio cable Stereo mini plug not supplied Related Topic Parts and Controls Connection Terminals Precautions When Connecting Menu Operation Speaker Setting 5 014 280 13 1 Copyright 2020 Sony Corporation 24 ...

Страница 25: ...f you wish to fix the HDMI cable to the projector attach a commercially available cable tie or similar item B to the antitheft bar A on the bottom surface and secure it as shown in the image Related Topic Parts and Controls Main Unit 5 014 280 13 1 Copyright 2020 Sony Corporation 25 ...

Страница 26: ...13 1 Copyright 2020 Sony Corporation Plug the AC power cord into a wall outlet 1 Turn on the projector Press the On Standby key on the main unit or the Remote Commander 2 Press the On Standby key on the main unit or the Remote Commander The projector starts shutdown and turns off For long term use turn off the projector when not in use 1 Unplug the AC power cord from the wall outlet 2 26 ...

Страница 27: ...Corporation Press the MENU key to display the menu screen If the display cannot be properly seen adjust the focus size and position of the projected image 1 Select the menu language 2 Press the Up or Down key to select Operation Operation then press the ENTER key 1 Press the Up or Down key to select Language Language then press the ENTER key 2 Press the Up Down Left Right key to select a language ...

Страница 28: ... 5 014 280 13 1 Copyright 2020 Sony Corporation Press the On Standby key and turn on the projector 1 Turn on the connected device 2 Select the input source Press the INPUT key on the main unit or the Remote Commander to display the input select window Press the INPUT key repeatedly or press the Up Down key to select the image to be projected 3 Change the computer screen output destination to an ex...

Страница 29: ...Help Guide Data Projector VPL CWZ10 CXZ10 Adjusting the Screen Focus Turn the focus lever to adjust the focus Related Topic Parts and Controls Main Unit 5 014 280 13 1 Copyright 2020 Sony Corporation 29 ...

Страница 30: ...Help Guide Data Projector VPL CWZ10 CXZ10 Adjusting the Screen Size Turn the zoom lever to adjust the size Related Topic Parts and Controls Main Unit 5 014 280 13 1 Copyright 2020 Sony Corporation 30 ...

Страница 31: ...the projector using the front feet adjustable Note When adjusting the front feet adjustable be careful not to get your fingers caught Do not forcefully press down on the projector with the front feet adjustable extended This may result in malfunction Related Topic Parts and Controls Main Unit 5 014 280 13 1 Copyright 2020 Sony Corporation 31 ...

Страница 32: ...T key on the Remote Commander switches the aspect ratio of the projected screen Hint The screen aspect ratio can also be set from Aspect in the Screen menu Related Topic Parts and Controls Remote Commander and Control Panel Menu Operation Aspect 5 014 280 13 1 Copyright 2020 Sony Corporation 32 ...

Страница 33: ...STONE key on the Remote Commander and switched between keystone correction and corner keystone correction the adjustment menu value and the screen state may not match until the adjustment begins Related Topic Parts and Controls Remote Commander and Control Panel Menu Operation V Keystone Press the KEYSTONE key on the Remote Commander once The adjustment menu will be displayed You can also display ...

Страница 34: ...5 014 280 13 1 Copyright 2020 Sony Corporation 34 ...

Страница 35: ...Commander and switched between keystone correction and corner keystone correction the adjustment menu value and the screen state may not match until the adjustment begins Related Topic Parts and Controls Remote Commander and Control Panel Menu Operation H Keystone 5 014 280 13 1 Copyright 2020 Sony Corporation Press the KEYSTONE key on the Remote Commander twice The adjustment menu will be display...

Страница 36: ...Commander three times The guide will be displayed You can also display the guide menu from Corner Keystone Adjust in the Installation menu 1 Select the corner you wish to correct using the Up Down Left Right keys 2 Press the ENTER key The selected corner becomes a cursor display Cursor display example Adjustable in all directions Only adjustable horizontally or downward 3 36 ...

Страница 37: ...c Parts and Controls Remote Commander and Control Panel Menu Operation Corner Keystone 5 014 280 13 1 Copyright 2020 Sony Corporation Adjust the corner position with the Up Down Left Right keys When a distortion adjustment reaches the limit the cursor will disappear 4 37 ...

Страница 38: ...the PATTERN key to return to the original screen Hint The ruled line pattern and lattice pattern can be used as auxiliary lines when drawing text and figures on a whiteboard or blackboard without using a computer There are 2 types of color for the lines of the ruled line pattern and lattice pattern so you can select a line that is easier to see according to the color of the projected screen Relate...

Страница 39: ...ally adjusted Pressing the APA key once more during adjustment will cancel the adjustment Hint APA can also be performed from Adjust Signal in the Screen menu Selecting On from Smart APA in the Function menu will automatically perform APA when a computer signal is fed from the RGB input terminal Input A Related Topic Parts and Controls Remote Commander and Control Panel Menu Operation Adjust Signa...

Страница 40: ...the menu screen 1 Set Intelligent Setting in the Projection Setting menu to On and press the Right key 2 Select the location the projector is being used Meeting Class Room Optimizes the text and graphic quality so that they are displayed clearly This is suitable for use in meeting rooms and classrooms Museum Optimizes the color quality so that colors are reproduced accurately This is suitable for ...

Страница 41: ...y Related Topic Parts and Controls Remote Commander and Control Panel 5 014 280 13 1 Copyright 2020 Sony Corporation Press the D ZOOM key to display the digital zoom icon on the projected screen 1 Press the D ZOOM key to enlarge an image 2 Adjust the image position with the Up Down Left Right keys 3 Repeatedly press the D ZOOM key or the D ZOOM key to change the magnification ratio The magnificati...

Страница 42: ...s and so on either do not select ECO or do not set Standby Mode for User to Low Related Topic Parts and Controls Remote Commander and Control Panel Menu Operation ECO 5 014 280 13 1 Copyright 2020 Sony Corporation Press the ECO MODE key to display the ECO Mode menu 1 Press the Up Down key or the ECO MODE key then select either ECO or User mode ECO Set each setting to the value that saves the most ...

Страница 43: ... Up Down key to select an item then press either the Right key or the ENTER key To return to the configuration menu selection press the Left key or the RETURN key 3 Configure and adjust the items The configuration method differs depending on the item If a further tier is displayed select the item you wish to configure in accordance with Step 3 then press the ENTER key to confirm the configuration ...

Страница 44: ...firm the settings and return to the previous screen Navigating Adjustment Menus When increasing a value press the Up or Right key When decreasing a value press the Down or Left key Press the ENTER key to confirm the settings and return to the previous screen Press the MENU key to exit the menu screen If an operation has not been performed for some time the menu screen will automatically disappear ...

Страница 45: ...urately This is suitable for use in quiet places such as galleries and museums Entertainment Optimizes the image quality to achieve balance This is suitable for use at theme parks public entertainment facilities conference rooms in the exhibition hall and so on Note If Intelligent Setting is On Picture Mode in the Projection Setting menu cannot be configured If there is no usage environment that c...

Страница 46: ...Sets the image quality to achieve smooth and natural tones Presentation Bright image quality suitable for presentations Note If Intelligent Setting in the Projection Setting menu is On Picture Mode cannot be configured Related Topic Menu Operation Intelligent Setting 5 014 280 13 1 Copyright 2020 Sony Corporation Press the MENU key 1 Select Projection Setting Picture Mode The desired setting 2 46 ...

Страница 47: ...default values Note The Intelligent Setting and Picture Mode values in the Projection Setting menu will not return to default Related Topic Menu Operation Intelligent Setting Menu Operation Picture Mode 5 014 280 13 1 Copyright 2020 Sony Corporation Press the MENU key 1 Select Projection Setting Reset 2 47 ...

Страница 48: ...on Contrast Adjust the image contrast 5 014 280 13 1 Copyright 2020 Sony Corporation Press the MENU key 1 Select Projection Setting Contrast Adjust the values The higher the setting the greater the contrast The lower the setting the lower the contrast 2 48 ...

Страница 49: ...ghtness Adjust the image brightness luminance 5 014 280 13 1 Copyright 2020 Sony Corporation Press the MENU key 1 Select Projection Setting Brightness Adjust the values The higher the setting the brighter the image The lower the setting the darker the image 2 49 ...

Страница 50: ... Color Adjust the image color intensity 5 014 280 13 1 Copyright 2020 Sony Corporation Press the MENU key 1 Select Projection Setting Color Adjust the values The higher the setting the greater the intensity The lower the setting the lower the intensity 2 50 ...

Страница 51: ...djust the image color tone 5 014 280 13 1 Copyright 2020 Sony Corporation Press the MENU key 1 Select Projection Setting Hue Adjust the values The higher the setting the more greenish the image becomes The lower the setting the more reddish the image becomes 2 51 ...

Страница 52: ...500K 6500K The higher the temperature the bluer the image tones become and the lower the temperature the redder the tones become Brightness Priority Allows for the brightest projection image 5 014 280 13 1 Copyright 2020 Sony Corporation Press the MENU key 1 Select Projection Setting Color Temp The desired setting 2 52 ...

Страница 53: ... Sharpness Adjust the outlines of the image 5 014 280 13 1 Copyright 2020 Sony Corporation Press the MENU key 1 Select Projection Setting Sharpness Adjust the values The higher the setting the sharper the image The lower the setting the softer the image 2 53 ...

Страница 54: ... save energy Conversely for bright images the image brightness is not adjusted and the image remains bright Light Output Mode Adjust the light source brightness Standard The image becomes bright and energy consumption increases Middle Energy consumption decreases but the image becomes dark Extended The image becomes dark but projection becomes possible for long periods of time 5 014 280 13 1 Copyr...

Страница 55: ... for projecting photos and vibrant images in bright locations 2 4 This is gamma correction for reproducing halftone more faithfully This will project photos and other vibrant images with natural tones Gamma 3 This is gamma correction for emphasizing bright portions of the image Creates a balanced image 5 014 280 13 1 Copyright 2020 Sony Corporation Press the MENU key 1 Select Projection Setting Ex...

Страница 56: ... CXZ10 For Computer Signal Input 4 3 Fix the aspect ratio to 4 3 and project onto the entire screen 16 9 Fix the aspect ratio to 16 9 and project onto the entire screen Full 1 Maintain the aspect ratio and project onto the entire screen Normal Project the original resolution onto the center of the screen without enlargement processing For Video Signal Input 4 3 Fix the aspect ratio to 4 3 and proj...

Страница 57: ...Related Topic Aspect Ratio 5 014 280 13 1 Copyright 2020 Sony Corporation 57 ...

Страница 58: ...1 3 Selecting Normal will project the image with the image signal resolution as is without enlargement processing 1 Selecting Full 2 will project the image onto the entire screen with the aspect ratio ignored 2 When the screen display position is adjusted for a 16 9 signal inputting a 4 3 signal may result in the image not fitting on the screen vertically If this occurs select Full 3 3 58 ...

Страница 59: ...ng values 4 3 4 3 1 2 16 9 16 9 Depending on the input signal images may be displayed as follows In this case select 16 9 1 Depending on the input signal images may be displayed as follows In this case select Zoom 2 Input signal Image projected using recommended setting values 4 3 Full 1 1 59 ...

Страница 60: ...age with the image signal resolution as is without enlargement processing 1 Selecting 4 3 will project the image onto the entire screen with the aspect ratio ignored 2 Input signal Image projected using recommended setting values 4 3 4 3 1 16 9 16 9 2 Depending on the input signal images may be displayed as follows In this case select 16 9 1 60 ...

Страница 61: ...Related Topic Menu Operation Aspect 5 014 280 13 1 Copyright 2020 Sony Corporation Depending on the input signal images may be displayed as follows In this case select Zoom 2 61 ...

Страница 62: ...al is supplied from the RGB input terminal Input A Shift H Increasing the value will make the screen move to the right and decreasing the value will make it move to the left V Increasing the value will make the screen move up and decreasing the value will make it move down This item can be selected when a computer input signal is supplied from input terminal RGB Y PB PR Input A Note APA may not be...

Страница 63: ...t size If Auto is selected the timer text will be displayed larger for 3 seconds by the minute This is convenient for alerting the presenter to how much time has elapsed Position Bottom Right Bottom Left Top Right Select the timer display position Count UP Down Up Down Select whether to count up toward the set time or count down 5 014 280 13 1 Copyright 2020 Sony Corporation Press the MENU key 1 S...

Страница 64: ... Menu Operation Volume Adjust the volume 5 014 280 13 1 Copyright 2020 Sony Corporation Press the MENU key 1 Select Function Volume Adjust the values Increasing the value will increase the volume and decreasing it will decrease the volume 2 64 ...

Страница 65: ... is output from the projector speakers 5 014 280 13 1 Copyright 2020 Sony Corporation Press the MENU key 1 Select Function Speaker On or Off Selecting On causes sound to be output from the projector speakers If you do not wish for sound to be output from the speakers select Off 2 65 ...

Страница 66: ...ys On and the light is off Input A becomes active Note Selecting Always On for the Speaker Setting will also set Standby Mode to Standard Related Topic Using Eco Mode 5 014 280 13 1 Copyright 2020 Sony Corporation Press the MENU key 1 Select Function Speaker Setting Sync with Power or Always On Selecting Always On allows the projector speakers to be used even when the light is off 2 66 ...

Страница 67: ... Input A APA is activated automatically and the screen is adjusted into its optimal state Related Topic Menu Operation Adjust Signal 5 014 280 13 1 Copyright 2020 Sony Corporation Press the MENU key 1 Select Function Smart APA On or Off Selecting On allows APA to be activated automatically when a computer signal is supplied 2 67 ...

Страница 68: ...ning setting Settings CC1 CC2 CC3 CC4 Text1 Text2 Text3 Text4 Select the CC Closed Captioning service subtitles or textual information that is displayed Off CC Closed Captioning is not displayed 5 014 280 13 1 Copyright 2020 Sony Corporation Press the MENU key 1 Select Function CC Display The desired setting 2 68 ...

Страница 69: ...tart Up Image Set whether the startup image is displayed during startup 5 014 280 13 1 Copyright 2020 Sony Corporation Press the MENU key 1 Select Function Start Up Image On or Off Selecting On will enable the startup image to be displayed during startup 2 69 ...

Страница 70: ...10 Menu Operation Language Set the language used in the menu messages and so on Related Topic Selecting the Menu Language 5 014 280 13 1 Copyright 2020 Sony Corporation Press the MENU key 1 Select Operation Language The desired language 2 70 ...

Страница 71: ...sages and so on are displayed Settings On All screen displays become active Off All screens except for the menu display warning messages notifications and so on will not be displayed 5 014 280 13 1 Copyright 2020 Sony Corporation Press the MENU key 1 Select Operation Status On or Off 2 71 ...

Страница 72: ...ration is not allowed In this case press the On Standby key to put the projector on Standby then turn the device on again If you forget the password you will be unable to use the projector so exercise due caution If you forget the password contact qualified Sony personnel The confirmation method differs by country region Related Topic Menu Operation Set Password 5 014 280 13 1 Copyright 2020 Sony ...

Страница 73: ...nd hold the On Standby key for approximately 10 seconds The power will turn on With the power on press and hold the MENU key for approximately 10 seconds Control Key Lock will turn Off and the control panel will become operational Related Topic Parts and Controls Remote Commander and Control Panel 5 014 280 13 1 Copyright 2020 Sony Corporation Press the MENU key 1 Select Operation Control Key Lock...

Страница 74: ...urned off they will return to the originally locked settings Update Selecting Update when Startup has been selected saves the changed settings and keeps them the same Note When performing Menu Settings Lock operations the password must be entered Set the password in Set Password in the Operation menu Related Topic Menu Operation Set Password 5 014 280 13 1 Copyright 2020 Sony Corporation Press the...

Страница 75: ... Operation Menu Settings Lock 5 014 280 13 1 Copyright 2020 Sony Corporation Press the MENU key 1 Select Operation Set Password 2 Use the MENU Up Down Left Right and ENTER keys to enter the password The default factory setting password is ENTER ENTER ENTER ENTER 3 Use the MENU Up Down Left Right and ENTER keys to enter your new password 4 Enter the new password again for confirmation 5 75 ...

Страница 76: ...ned via the router or another device s DHCP server function Manual Configure the network manually Note When setting the IP address manually enter the IP address after changing to Manual once and selecting Apply 5 014 280 13 1 Copyright 2020 Sony Corporation Press the MENU key 1 Select Connection Power Network Setting IP Address Setup The desired setting 2 76 ...

Страница 77: ... Settings http Communicate with http only http and https Communicate with both http and https https Communicate with https only Related Topic Configuring https Communication 5 014 280 13 1 Copyright 2020 Sony Corporation Press the MENU key 1 Select Connection Power Communication Mode The desired setting 2 77 ...

Страница 78: ... the image input level is between 16 and 235 Full Set when the image input level is between 0 and 255 Note If the image output settings for the HDMI connection device are not correct the bright sections and dark sections of the image may become too bright or dark respectively 5 014 280 13 1 Copyright 2020 Sony Corporation Press the MENU key 1 Select Connection Power Dynamic Range The desired setti...

Страница 79: ...r when Input A is selected Computer Video GBR Component The selected image signal type will be applied Note Even if Auto is set the image may not be optimized depending on the input If this occurs configure manually in accordance with the connected device 5 014 280 13 1 Copyright 2020 Sony Corporation Press the MENU key 1 Select Connection Power Input A Signal Sel The desired setting 2 79 ...

Страница 80: ... Demo the light output will be automatically reduced to approximately 5 While the light output is being reduced the Light Dimming message will be displayed If Demo is selected the light will begin dimming after approximately 40 seconds When a signal change Remote Commander operation or control panel operation is detected it will revert to the original brightness Off Disable the With Static Signal ...

Страница 81: ... power to the projector using the Remote Start function it is necessary to send special commands from the computer Consult with qualified Sony personnel for details Setting Remote Start to On will increase standby power consumption during Standby Mode Related Topic Menu Operation Network Setting 5 014 280 13 1 Copyright 2020 Sony Corporation Press the MENU key 1 Select Connection Power Remote Star...

Страница 82: ...works and network control functions while in Standby Mode Hint Setting Remote Start to On will turn the projector on by sending special commands even when Standby Mode is set to Low 5 014 280 13 1 Copyright 2020 Sony Corporation Press the MENU key 1 Select Connection Power Standby Mode Standard or Low Selecting Standard will increase the power consumption during Standby Mode 2 82 ...

Страница 83: ...ou can disconnect the AC power cord without going into Standby Mode regardless of the Direct Power On settings Related Topic Turning Power On Off 5 014 280 13 1 Copyright 2020 Sony Corporation Press the MENU key 1 Select Connection Power Direct Power On On or Off When On is selected the projector is turned on and does not go into Standby Mode when the AC power cord is plugged into an outlet 2 83 ...

Страница 84: ...eration V Keystone Menu Operation H Keystone Menu Operation Corner Keystone 5 014 280 13 1 Copyright 2020 Sony Corporation Press the MENU key 1 Select Installation Screen Fitting HV Keystone or Corner Keystone When you wish to use trapezoidal correction select HV Keystone and when you wish to correct distortion select Corner Keystone 2 84 ...

Страница 85: ... an electronic form of correction the image quality may be reduced Related Topic Correcting a Vertical Trapezoid Menu Operation Screen Fitting 5 014 280 13 1 Copyright 2020 Sony Corporation Press the MENU key 1 Select Installation V Keystone 2 Adjust the value with the Up Down Left Right keys Increasing the value in the positive direction makes the upper side screen width smaller and increasing it...

Страница 86: ...an electronic form of correction the image quality may be reduced Related Topic Correcting a Horizontal Trapezoid Menu Operation Screen Fitting 5 014 280 13 1 Copyright 2020 Sony Corporation Press the MENU key 1 Select Installation H Keystone 2 Adjust the value with the Up Down Left Right keys Increasing the value in the positive direction makes the right side of the screen smaller and increasing ...

Страница 87: ...an unadjusted state Note Because keystone correction is an electronic form of correction the image quality may be reduced Related Topic Correcting Screen Distortion Menu Operation Screen Fitting 5 014 280 13 1 Copyright 2020 Sony Corporation Press the MENU key 1 Select Installation Corner Keystone Adjust 2 Select the corner you wish to correct using the Up Down Left Right keys and press the ENTER ...

Страница 88: ...size The shrinkage rate is 100 90 Shift Adjust the projection position The adjustable range changes depending on the shrinkage rate Note Because digital shrinkage is an electronic form of correction the image quality may be reduced While adjusting the digital shrinkage pressing the ENTER key will take you to a shift adjustment menu 5 014 280 13 1 Copyright 2020 Sony Corporation Press the MENU key ...

Страница 89: ...y depending on the installation method Settings HV Flip the image horizontally and vertically H Flip the image horizontally V Flip the image vertically Off Project the image without flipping it 5 014 280 13 1 Copyright 2020 Sony Corporation Press the MENU key 1 Select Installation Image Flip The desired setting 2 89 ...

Страница 90: ...tallation location Note Using the projector with improper settings may affect the reliability of the components 5 014 280 13 1 Copyright 2020 Sony Corporation Press the MENU key 1 Select Installation High Altitude Mode On or Off If using the projector in a high altitude location 1 500 m or more above sea level set to On 2 90 ...

Страница 91: ...l Name Displays the model name Serial No Displays the serial number fH fV Displays the horizontal vertical frequency and signal type resolution of the current input signal Light Timer Displays the light usage time thus far Note The horizontal vertical frequency may not be displayed properly due to the input signal 5 014 280 13 1 Copyright 2020 Sony Corporation Press the MENU key 1 Select Informati...

Страница 92: ...the projector upon connecting it to a network open the projector s control panel via a network and change the factory settings of the access control settings We also recommend that you change your password periodically Once you have finished configuration via the browser close the browser to log out Please note that the images used in the explanation are for reference only Some images may differ d...

Страница 93: ...necting to a Computer via a Hub or Router Menu Operation Network Setting Configuring https Communication 5 014 280 13 1 Copyright 2020 Sony Corporation Connect the projector and computer to a hub or router using LAN cables 1 Press the MENU key and configure the projector s network settings from Connection Power Network Setting 2 Start the web browser enter the following into the address field and ...

Страница 94: ...vileges will be required to access to the pages other than Information and Control Setting the Password Upon clicking Setting in the page toggle tab a login window will be displayed When accessing the Setting page for the first time enter the password Projector The administrator name is fixed to root When logging in for the first time a window prompting you to change your password will be displaye...

Страница 95: ...nfirming the Projector State Clicking the Information page toggle tab and opening the Information page allows you to confirm the projector s current state Operating the Projector Clicking the Control page toggle tab and opening the Control page allows you to operate the projector The button functions are the same as those of the keys on the Remote Commander 5 014 280 13 1 Copyright 2020 Sony Corpo...

Страница 96: ...ing Over Light usage time Send a report when the light usage time elapses the specified time Error Send a report when the projector detects an error E mail Account Click the E mail Report tab and display the E mail Report page 1 Select Enable in E mail Report 2 Configure Send to and CC 3 Configure the Report Timing items 4 Click Apply 5 Configure the E mail Account items 6 Check Send mail test and...

Страница 97: ...mail server SMTP address Note For networks performing Outbound Port25 Blocking the e mail report function cannot be used because the SMTP server cannot be connected to You cannot enter the following characters in the text box 5 014 280 13 1 Copyright 2020 Sony Corporation 97 ...

Страница 98: ...y and DNS Server Specify an IP address Configure the network manually IP Address Enter the IP address of the projector Subnet Mask Enter the subnet mask of the projector Default Gateway Enter the default gateway of the projector DNS Server Enter the primary DNS server of the projector Click the Setting tab and display the Setting page 1 Configure Location 2 Configure Host Name This host name must ...

Страница 99: ...Related Topic Configuring https Communication 5 014 280 13 1 Copyright 2020 Sony Corporation 99 ...

Страница 100: ...y setting community name is SONY To avoid unauthorized access to the projector from another computer we recommend changing the community name from the one in the factory setting Port No Enter the Advertisement transmission port The default factory setting Advertisement transmission port is 53862 Interval Enter the Advertisement transmission interval seconds The Advertisement transmission interval ...

Страница 101: ...ings related to PJ Link are applied only if it is on The function in the default factory setting is off Requires Authentication Turn the PJ Link authentication function on or off Password Enter the PJ Link authentication password Refer to the PJ Link specifications for the default password 5 014 280 13 1 Copyright 2020 Sony Corporation Click the Advertisement PJ Talk PJ Link tab and display the Ad...

Страница 102: ...ojector from another computer we recommend changing the community name from the one used in the factory setting Port No Enter the PJ Talk server port The default factory setting PJ Talk server port is 53484 Timeout Enter the time in seconds until the connection is cut when PJ Talk communication is interrupted The time in the default factory setting is 30 Host Address Enter the IP address allowed t...

Страница 103: ...r the ADCP server port The default factory setting ADCP server port is 53595 Timeout Enter the time in seconds until the connection is cut when ADCP communication is interrupted The time in the default factory setting is 60 Host Address Enter the IP address allowed to be received by the ADCP server If nothing is entered commands can be received from any IP address Once an IP address has been enter...

Страница 104: ... DDDP protocol specifications The default factory setting is off Crestron Control Start Crestron Service Turn the Crestron Control function on or off For details refer to the Crestron Corporation product catalog and so on IP Address Enter the Crestron system server IP ID Enter the CIP protocol IP ID Port No Enter the CIP protocol server port number 5 014 280 13 1 Copyright 2020 Sony Corporation Cl...

Страница 105: ...0 CXZ10 Resetting the Network Settings Return all items that can be configured via a web browser to their factory settings 5 014 280 13 1 Copyright 2020 Sony Corporation Click the Reset tab and display the Reset page 1 Click Reset 2 105 ...

Страница 106: ...ported Use NTP server Select this if you are retrieving the time via a network NTP server NTP Server Enter the NTP server Status Displays the status of the connection to the NTP server latest server data Displays the information most recently obtained from the NTP server Manual Local Select this if you will set the date and time manually Date yyyy mm dd Enter the date Time hh mm ss Enter the time ...

Страница 107: ...d via a network only when the projector is in Standby Mode Click the Setting tab and display the Setting page 1 Click Select in FW Upload to select the file to be updated then click Apply Update preparation starts A message will be displayed after preparation is complete 2 Click OK An update confirmation message will be displayed 3 Click OK Update starts The Setting page will be displayed again af...

Страница 108: ...Related Topic Updating Software 5 014 280 13 1 Copyright 2020 Sony Corporation 108 ...

Страница 109: ... projector is TLS 1 2 In addition the port number is set to 443 2 Set a certificate Upload Trusted CA Certificate The certificate issued by a CA will be installed Select a certificate saved in a folder on your computer Click Apply to install it Supported certificate Format PEM Extension CRT PEM Encryption RSA Hash SHA 256 SHA 384 Key length 512 1024 2048 4096 bit Common Name Network host name For ...

Страница 110: ...e is entered for the Distinguished Name Common Name etc A certificate has not been issued by a CA trusted by the user s system For security purposes we recommend using a self generating certificate in the case complete security such as operation tests is not necessary The last certificate becomes effective When using a self generating certificate Security Warning may be displayed when using a brow...

Страница 111: ...the computer cannot access the projector if the https connection fails In this case press the MENU button on the projector or Remote Commander to display the menu screen and then select Connection Power Communication Mode http to change the communication mode Related Topic Configuring https Communication 5 014 280 13 1 Copyright 2020 Sony Corporation Click Certificate and display the Certificate p...

Страница 112: ...ide whether or not to accept the certificate In this case follow the procedure below and install a CA certificate to your computer The following screens are examples when the OS is set to English Save the signed CA certificate that is to be installed to the projector to your computer The standard certificate file extension is cer Double click this file to display the certificate dialog 1 Click Ins...

Страница 113: ...Click Next 3 Select Automatically select the certificate store based on the type of certificate and click Next Completing the Certificate Import Wizard will be displayed 4 113 ...

Страница 114: ...5 014 280 13 1 Copyright 2020 Sony Corporation Confirm the content and click Finish The CA certificate will be installed 5 114 ...

Страница 115: ...enu select the Contents tab and Certificate then display the Certificate dialog Example of the screen when the OS is set to English 1 Select the certificate you wish to delete Normally CA certificates are saved under Trusted Root Certificate Authorities 2 Click Remove The Delete certificate confirmation dialog will appear 3 Click Yes The certificate will be deleted 4 Open Run from the Windows menu...

Страница 116: ...y Corporation Select Local Computer as the computer being managed for this snap in and click Finish The item managing the Certificate will be displayed in the console root window Confirm the certificate in question and delete it 5 116 ...

Страница 117: ...midity is very high or temperature is very low Avoid installing the projector in a location subject to direct cool or warm air from an air conditioner Installing in such a location may cause malfunction of the projector due to moisture condensation or rise in temperature Avoid installing the projector in a location near a heat or smoke sensor Installing in such a location may cause malfunction of ...

Страница 118: ...Mode in Installation menu to On Failing to set this mode when using the projector at high altitudes could have adverse effects such as reducing the reliability of certain components Related Topic Menu Operation High Altitude Mode 5 014 280 13 1 Copyright 2020 Sony Corporation 118 ...

Страница 119: ... hands On cleaning the lens surface Wipe the lens gently with a soft cloth such as a glass cleaning cloth Stubborn stains may be removed with a soft cloth lightly dampened with water Never use solvent such as alcohol benzene or thinner or acid alkaline or abrasive detergent or a chemical cleaning cloth On cleaning the cabinet Clean the cabinet gently with a soft cloth Stubborn stains may be remove...

Страница 120: ...Guide Data Projector VPL CWZ10 CXZ10 On Illumination To obtain the best picture the front of the screen should not be exposed to direct lighting or sunlight 5 014 280 13 1 Copyright 2020 Sony Corporation 120 ...

Страница 121: ... Projector VPL CWZ10 CXZ10 On Heat Dissipation The temperature of the projector cabinet may increase during or immediately after use however this is not a malfunction 5 014 280 13 1 Copyright 2020 Sony Corporation 121 ...

Страница 122: ... screen with an uneven surface stripes pattern may rarely appear on the screen depending on the distance between the screen and the projector or the zooming magnifications This is not a malfunction of the projector 5 014 280 13 1 Copyright 2020 Sony Corporation 122 ...

Страница 123: ... inside to prevent internal temperature from rising there may be some noise This is a normal result of the manufacturing process and does not indicate a malfunction If however in a case of abnormal noise consult with qualified Sony personnel 5 014 280 13 1 Copyright 2020 Sony Corporation 123 ...

Страница 124: ...elated Parts Since the projector uses a laser when performing maintenance or inspection of light source related parts particular attention and a safe environment are necessary Be sure to consult with qualified Sony personnel 5 014 280 13 1 Copyright 2020 Sony Corporation 124 ...

Страница 125: ...cts Do not dispose the used products and general garbage together Correctly dispose of used products to avoid harming the environment or the health of yourself and others Follow the disposal regulations of your area 5 014 280 13 1 Copyright 2020 Sony Corporation 125 ...

Страница 126: ...t continuously appear on the LCD projector This is a normal result of the manufacturing process and does not indicate a malfunction Also when you use multiple LCD projectors to project onto a screen even if they are of the same model the color reproduction among projectors may vary since color balance may be set differently from one projector to the next 5 014 280 13 1 Copyright 2020 Sony Corporat...

Страница 127: ... projector is moved suddenly from a cold to a warm place condensation in the projector may occur As the condensation may cause malfunction be careful in adjusting temperature settings of the air conditioner If condensation occurs leave the projector turned on for about two hours before use 5 014 280 13 1 Copyright 2020 Sony Corporation 127 ...

Страница 128: ...rk is protected securely From a safety standpoint when using the unit connected with the network it is strongly recommended to access the Control window via a Web browser and change the access limitation settings from the factory preset values Changing the password regularly is also recommended Do not browse any other website in the Web browser while making settings or after making settings Since ...

Страница 129: ...as magnet s which may interfere with pacemakers programmable shunt valves for hydrocephalus treatment or other medical devices Do not place this product close to persons who use such medical devices Consult your doctor before using this product if you use any such medical device 5 014 280 13 1 Copyright 2020 Sony Corporation 129 ...

Страница 130: ... OR PROSPECTIVE PROFITS DUE TO FAILURE OF THIS UNIT EITHER DURING THE WARRANTY PERIOD OR AFTER EXPIRATION OF THE WARRANTY OR FOR ANY OTHER REASON WHATSOEVER SONY WILL NOT BE LIABLE FOR CLAIMS OF ANY KIND MADE BY USERS OF THIS UNIT OR MADE BY THIRD PARTIES SONY WILL NOT BE LIABLE FOR THE TERMINATION OR DISCONTINUATION OF ANY SERVICES RELATED TO THIS UNIT THAT MAY RESULT DUE TO CIRCUMSTANCES OF ANY ...

Страница 131: ...Note If you remove the air filter cover while the power is turned on you may accidentally touch the fan inside the projector which may cause injury Pull the air filter pull stick upwards when removing the air filter from the air filter cover When attaching the air filter to the air filter cover make sure the correct side is being attached so that the pull stick is protruding from the air filter Tu...

Страница 132: ... air filter cover taking care not to hit the hook of the air filter cover If the air filter is attached to the air filter cover incorrectly malfunction may occur Related Topic Message List 5 014 280 13 1 Copyright 2020 Sony Corporation 132 ...

Страница 133: ...ualified Sony personnel Caution If you continue to use the projector even after the message is displayed dust may accumulate clogging it As a result the temperature may rise inside the projector leading to a possible malfunction or fire Turn off the projector and disconnect the AC power cord from a wall outlet 1 Remove the dust cover assembly by pressing the two levers and lifting it up 2 Push all...

Страница 134: ...er to the filter frame then attach the dust cover assembly to the unit Incorrect attachment of the dust cover assembly may cause a malfunction Do not use the unit on the floor when the dust cover is removed from the dust cover assembly Malfunction may occur Related Topic Message List 5 014 280 13 1 Copyright 2020 Sony Corporation Clean the air filters with a vacuum cleaner 5 Put the air filters an...

Страница 135: ...are Update Function Note This projector has been confirmed to be compatible with USB 2 0 drives with capacities of up to 8 GB However it is not guaranteed to work with all USB drives Copy the update file to the root folder of the USB drive 1 Turn off the projector and unplug the AC power cord 2 Insert the USB drive to the USB terminal of the projector 3 Plug the AC power cord to the wall outlet wh...

Страница 136: ...ystem will make the drive incompatible with the projector Some USB drives may be incompatible For details please check the aforementioned website Do not disconnect the AC power cord during the software update process Related Topic Using the Software Update Function 5 014 280 13 1 Copyright 2020 Sony Corporation 136 ...

Страница 137: ...ual 1 6 Light Source Laser diode Projection Image Size 40 in 300 in 1 02 m 7 62 m Effective Light Flux Brightness 5 000 lm Light Output Mode Standard Electric System Speaker 16 W 1 Monaural Supported Scan Frequency 1 Horizontal 15 kHz 92 kHz Vertical 48 Hz 92 Hz Displayable Resolution 1 For Computer Signal Input Maximum Display Resolution 1 920 1 200 pixels For Video Signal Input NTSC PAL SECAM 48...

Страница 138: ...45 10BASE T 100BASE TX USB Terminal Type A Power Supply Other Operating Temperature Operating Humidity 0 C to 40 C 32 F to 104 F 20 80 No condensation Storage Temperature Storage Humidity 10 C to 60 C 14 F to 140 F 20 80 No condensation Power Requirements VPL CWZ10 100 V to 240 V AC 3 4 A 1 5 A 50 60 Hz VPL CXZ10 100 V to 240 V AC 3 4 A 1 5 A 50 60 Hz Power Consumption AC 100 V to 120 V VPL CWZ10 ...

Страница 139: ...ass Approx 5 7 kg 13 lb Supplied Accessories Remote Commander RM PJ8 1 Lithium battery CR2025 1 AC power cord 1 Mini D sub 15 pin cable 1 8 m 1 1 970 584 11 Sony Extension studs 4 Air filter cover 1 1 Dust cover assembly 1 1 Setup Guide 1 Design and specifications of the unit including the optional accessories are subject to change without notice Related Topic Compatible Signal List Computer Signa...

Страница 140: ...rporation Pin Number Function 1 T M D S Data2 2 T M D S Data2 Shield 3 T M D S Data2 4 T M D S Data1 5 T M D S Data1 Shield 6 T M D S Data1 7 T M D S Data0 8 T M D S Data0 Shield 9 T M D S Data0 10 T M D S Clock 11 T M D S Clock Shield 12 T M D S Clock 13 N C 14 RESERVED N C 15 SCL 16 SDA 17 DDC GND 18 5V Power 19 Hot Plug Detect 140 ...

Страница 141: ...13 1 Copyright 2020 Sony Corporation Pin Number Function 1 Image Input Red R 2 Image Input Green G 3 Image Input Blue B 4 Ground 5 RESERVE 6 Ground For red 7 Ground For green 8 Ground For blue 9 Power input for DDC 10 Ground 11 Ground 12 DDC SDA 13 Horizontal synchronization signal 14 Vertical synchronization signal 15 DDC SCL 141 ...

Страница 142: ... Projector VPL CWZ10 CXZ10 Pin Assignment RS 232C Terminal RS 232C Terminal D Sub 9 pin Male 5 014 280 13 1 Copyright 2020 Sony Corporation Pin Number Function 1 NC 2 RXDA 3 TXDA 4 DTR 5 GND 6 NC 7 RTS 8 CTS 9 NC 142 ...

Страница 143: ... Guide Data Projector VPL CWZ10 CXZ10 Pin Assignment USB Terminal USB Terminal Type A Female 5 014 280 13 1 Copyright 2020 Sony Corporation Pin Number Function 1 V BUS 4 4 5 25 V 2 Data 3 Data 4 Ground 143 ...

Страница 144: ...atible 640 x 480 35 0 67 Compatible Not compatible 640 x 480 37 9 73 Compatible Not compatible 640 x 480 37 5 75 Compatible Not compatible 640 x 480 43 3 85 Compatible Not compatible 800 x 600 35 2 56 Compatible Not compatible 800 x 600 37 9 60 Compatible Compatible 800 x 600 48 1 72 Compatible Not compatible 800 x 600 46 9 75 Compatible Not compatible 800 x 600 53 7 85 Compatible Not compatible 8...

Страница 145: ...1280 x 768 47 8 60 Not compatible Compatible 1280 x 720 45 0 60 Compatible Compatible 1 1920 x 1080 67 5 60 Not compatible Compatible 2 1366 x 768 47 7 60 Compatible Compatible 1440 x 900 55 9 60 Compatible Compatible 1680 x 1050 65 3 60 Not compatible Compatible 1280 x 800 49 7 60 Compatible Compatible 1920 x 1200 74 0 60 Compatible 3 Compatible 3 Identified as a 720 60p video transmission signal...

Страница 146: ...UT B INPUT C NTSC 60 Compatible Not compatible Not compatible PAL SECAM 50 Compatible Not compatible Not compatible 480i 60 Not compatible Compatible Compatible 576i 50 Not compatible Compatible Compatible 480p 60 Not compatible Compatible Compatible 576p 50 Not compatible Compatible Compatible 1080i 60 Not compatible Compatible Compatible 1080i 50 Not compatible Compatible Compatible 720p 60 Not ...

Страница 147: ...e to the lower edge upper edge when installed to the ceiling of the projection screen For this projector the projection distance value for when the projector is installed to the floor and to the ceiling is the same When installed to the floor ceiling install so that the projector upper surface is parallel with the ceiling A The point of intersection of the line drawn perpendicular to the surface p...

Страница 148: ...Related Topic Projection Distance Projection Distance Formula VPL CWZ10 Projection Distance Projection Distance Formula VPL CXZ10 5 014 280 13 1 Copyright 2020 Sony Corporation 148 ...

Страница 149: ... m 8 in 150 inch screen size 3 81 m Horizontal 3 23 m Vertical 2 02 m Width 127 in Height 79 in Projection Distance L 4 17 m 6 68 m 164 in 263 in Projection screen height position H 0 26 m 10 in 200 inch screen size 5 08 m Horizontal 4 31 m Vertical 2 69 m Width 170 in Height 106 in Projection Distance L 5 57 m 8 91 m 219 in 351 in Projection screen height position H 0 35 m 14 in Projection Distan...

Страница 150: ...m 12 in 150 inch screen size 3 81 m Horizontal 3 05 m Vertical 2 29 m Width 120 in Height 90 in Projection Distance L 4 31 m 6 94 m 170 in 273 in Projection Screen Height Position H 0 38 m 15 in 200 inch screen size 5 08 m Horizontal 4 06 m Vertical 3 05 m Width 160 in Height 120 in Projection Distance L 5 76 m 9 26 m 227 in 364 in Projection Screen Height Position H 0 51 m 20 in Projection Distan...

Страница 151: ...Indication and Remedies to resolve the issue Top of the main unit Status Indication WARNING Off ON STANDBY Lights in red Standby mode The power is supplied to the projector and the projector is in a standby mode according to the setting WARNING Off ON STANDBY Flashes in green Warm up state The projector is warming up after it is turned on WARNING Off ON STANDBY Lights in green Power on state The p...

Страница 152: ...the AC power cord into the wall outlet and turn on the projector WARNING Flashes in red ON STANDBY Flashes in red Both indicators flash Number of flashes Twice The temperature in the projector is abnormal Check if the air filter is clogged then clean or replace it Check if the ventilation holes intake exhaust are not blocked by the wall or an object and secure a sufficient gap Check the ambient te...

Страница 153: ...5 014 280 13 1 Copyright 2020 Sony Corporation 153 ...

Страница 154: ...ccordance with your usage environment Frequency is out of range Change the signal to one that is compatible with the projector from the playback device screen settings Please check Input A Signal Sel Set Input A Signal Sel to Auto or a setting appropriate for the input signal Not applicable An invalid key was pressed The control keys are locked The panel key lock has been set Startup Settings are ...

Страница 155: ...u Operation High Altitude Mode Menu Operation Set Password Menu Operation Menu Settings Lock Cleaning the Air Filter Compatible Signal List Computer Signal Compatible Signal List Video Signal On Installation 5 014 280 13 1 Copyright 2020 Sony Corporation 155 ...

Страница 156: ...AC power cord is firmly inserted If Control Key Lock is On power cannot be supplied via the On Standby key on the main unit Set Control Key Lock in the Operation menu to Off Related Topic Menu Operation Control Key Lock 5 014 280 13 1 Copyright 2020 Sony Corporation 156 ...

Страница 157: ... s LCD and the external monitor may cause the image to not be displayed correctly on the external monitor If this occurs configure the computer s settings so that it only outputs to the external monitor Confirm that the input is selected correctly Confirm that the BLANK key is not pressed and that the image is not being deleted Related Topic Parts and Controls Remote Commander and Control Panel Pr...

Страница 158: ...Help Guide Data Projector VPL CWZ10 CXZ10 Cannot Connect to Computer Check the network settings Related Topic Menu Operation Network Setting 5 014 280 13 1 Copyright 2020 Sony Corporation 158 ...

Страница 159: ...Help Guide Data Projector VPL CWZ10 CXZ10 No On screen Display Set Status in the Operation menu to On Related Topic Menu Operation Status 5 014 280 13 1 Copyright 2020 Sony Corporation 159 ...

Страница 160: ...lay is Small Part of Image Not Displayed The screen may not be displayed properly sometimes if the input signal is not properly determined If this occurs manually configure Aspect in the Screen menu Related Topic Menu Operation Aspect 5 014 280 13 1 Copyright 2020 Sony Corporation 160 ...

Страница 161: ...gonal relative to the projection surface the screen will appear trapezoidal If this occurs you can use the keystone correction function to correct the issue Related Topic Correcting a Vertical Trapezoid Correcting a Horizontal Trapezoid 5 014 280 13 1 Copyright 2020 Sony Corporation 161 ...

Страница 162: ...ctor VPL CWZ10 CXZ10 Screen Distortion The corner keystone setting is active Deactivate Corner Keystone in the Installation menu Related Topic Correcting Screen Distortion 5 014 280 13 1 Copyright 2020 Sony Corporation 162 ...

Страница 163: ...under ECO in the Connection Power menu is set to Light Dimming If there is no image signal power consumption is reduced and the light intensity decreases When using the projector in a location where the surrounding temperature is high the luminance is sometimes reduced to protect the projector Related Topic Menu Operation Contrast Menu Operation Brightness Menu Operation Light Settings Menu Operat...

Страница 164: ...focus The screen will blur if there is condensation on the lens If there is condensation keep the projector plugged in and let it sit for approximately two hours Related Topic Adjusting the Screen Focus On condensation 5 014 280 13 1 Copyright 2020 Sony Corporation 164 ...

Страница 165: ... Data Projector VPL CWZ10 CXZ10 Screen Noise Confirm that the cable connected to the playback device is firmly inserted Related Topic Precautions When Connecting 5 014 280 13 1 Copyright 2020 Sony Corporation 165 ...

Страница 166: ...is configured correctly If Speaker is set to Off there will be no sound output Set Speaker in the Function menu to On If the MUTING key was pressed and the sound is muted there will be no sound output Press the MUTING key one more time Confirm that the volume is not set to the minimum Related Topic Connecting to Audio Equipment Menu Operation Speaker 5 014 280 13 1 Copyright 2020 Sony Corporation ...

Страница 167: ... Remote Commander Does Not Function Confirm that the batteries are inserted correctly Confirm that the batteries are not depleted Related Topic Inserting the Battery into the Remote Commander 5 014 280 13 1 Copyright 2020 Sony Corporation 167 ...

Страница 168: ...d The projector is being used at a high altitude set High Altitude Mode in the Installation menu to On The projector is being used in a location where the surrounding temperature is high Confirm that the air filter is not blocked and either clean the filter or replace it Confirm that the ventilation holes are not blocked by a wall or other object and a secure sufficient gap Related Topic Cleaning ...

Страница 169: ...e programs and that you know you can do these things To protect your rights we need to make restrictions that forbid anyone to deny you these rights or to ask you to surrender the rights These restrictions translate to certain responsibilities for you if you distribute copies of the software or if you modify it For example if you distribute copies of such a program whether gratis or for a fee you ...

Страница 170: ... claim rights or contest your rights to work written entirely by you rather the intent is to exercise the right to control the distribution of derivative or collective works based on the Program In addition mere aggregation of another work not based on the Program with the Program or with a work based on the Program on a volume of a storage or distribution medium does not bring the other work unde...

Страница 171: ...s License 9 The Free Software Foundation may publish revised and or new versions of the General Public License from time to time Such new versions will be similar in spirit to the present version but may differ in detail to address new problems or concerns Each version is given a distinguishing version number If the Program specifies a version number of this License which applies to it and any lat...

Страница 172: ...he successor of the GNU Library Public License version 2 hence the version number 2 1 Preamble The licenses for most software are designed to take away your freedom to share and change it By contrast the GNU General Public Licenses are intended to guarantee your freedom to share and change free software to make sure the software is free for all its users This license the Lesser General Public Lice...

Страница 173: ...his Lesser General Public License also called this License Each licensee is addressed as you A library means a collection of software functions and or data prepared so as to be conveniently linked with application programs which use some of those functions and data to form executables The Library below refers to any such software library or work which has been distributed under these terms A work ...

Страница 174: ... of such executables When a work that uses the Library uses material from a header file that is part of the Library the object code for the work may be a derivative work of the Library even though the source code is not Whether this is true is especially significant if the work can be linked without the Library or if the work is itself a library The threshold for this to be true is not precisely d...

Страница 175: ...nse If you cannot distribute so as to satisfy simultaneously your obligations under this License and any other pertinent obligations then as a consequence you may not distribute the Library at all For example if a patent license would not permit royalty free redistribution of the Library by all those who receive copies directly or indirectly through you then the only way you could satisfy both it ...

Страница 176: ...ic License To apply these terms attach the following notices to the library It is safest to attach them to the start of each source file to most effectively convey the exclusion of warranty and each file should have at least the copyright line and a pointer to where the full notice is found one line to give the library s name and a brief idea of what it does Copyright year name of author This libr...

Страница 177: ...rce language processor THE SOFTWARE IS PROVIDED AS IS WITHOUT WARRANTY OF ANY KIND EXPRESS OR IMPLIED INCLUDING BUT NOT LIMITED TO THE WARRANTIES OF MERCHANTABILITY FITNESS FOR A PARTICULAR PURPOSE TITLE AND NON INFRINGEMENT IN NO EVENT SHALL THE COPYRIGHT HOLDERS OR ANYONE DISTRIBUTING THE SOFTWARE BE LIABLE FOR ANY DAMAGES OR OTHER LIABILITY WHETHER IN CONTRACT TORT OR OTHERWISE ARISING FROM OUT...

Страница 178: ...se copy modify merge publish distribute sublicense and or sell copies of the Software and to permit persons to whom the Software is furnished to do so subject to the following conditions The above copyright notice and this permission notice shall be included in all copies or substantial portions of the Software THE SOFTWARE IS PROVIDED AS IS WITHOUT WARRANTY OF ANY KIND EXPRESS OR IMPLIED INCLUDIN...

Страница 179: ... names without prior written permission of the OpenSSL Project 6 Redistributions of any form whatsoever must retain the following acknowledgment This product includes software developed by the OpenSSL Project for use in the OpenSSL Toolkit http www openssl org THIS SOFTWARE IS PROVIDED BY THE OpenSSL PROJECT AS IS AND ANY EXPRESSED OR IMPLIED WARRANTIES INCLUDING BUT NOT LIMITED TO THE IMPLIED WAR...

Страница 180: ... display the following acknowledgement This product includes cryptographic software written by Eric Young eay cryptsoft com The word cryptographic can be left out if the rouines from the library being used are not cryptographic related 4 If you include any Windows specific code or a derivative thereof from the apps directory application code you must include an acknowledgement This product include...

Страница 181: ...nal unRAR code has the following restriction The unRAR sources cannot be used to re create the RAR compression algorithm which is proprietary Distribution of modified unRAR sources in separate form or as a part of other software is permitted provided that it is clearly stated in the documentation and source comments that the code may not be used to develop a RAR WinRAR compatible archiver Igor Pav...

Страница 182: ...mpression A Perl interface to zlib written by Paul Marquess pmqs cpan org is available at CPAN Comprehensive Perl Archive Network sites including http search cpan org pmqs IO Compress Zlib A Python interface to zlib written by A M Kuchling amk amk ca is available in Python 1 5 and later versions see http docs python org library zlib html zlib is built into tcl http wiki tcl tk 4610 An experimental...

Страница 183: ...the original software If you use this software in a product an acknowledgment in the product documentation would be appreciated but is not required 2 Altered source versions must be plainly marked as such and must not be misrepresented as being the original software 3 This notice may not be removed or altered from any source distribution Jean loup Gailly Mark Adler jloup gzip org madler alumni cal...

Страница 184: ... in the United States and or other countries Safari is a registered trademark of Apple Corporation in the United States and or other countries Chrome is a trademark of Google LLC PJLink is a registered trademark of Japan Business Machine and Information System Industries Association AMX is a trademark of AMX Corporation Crestron RoomView is a trademark of Crestron Corporation All other trademarks ...

Отзывы: