Connecting a multimedia device
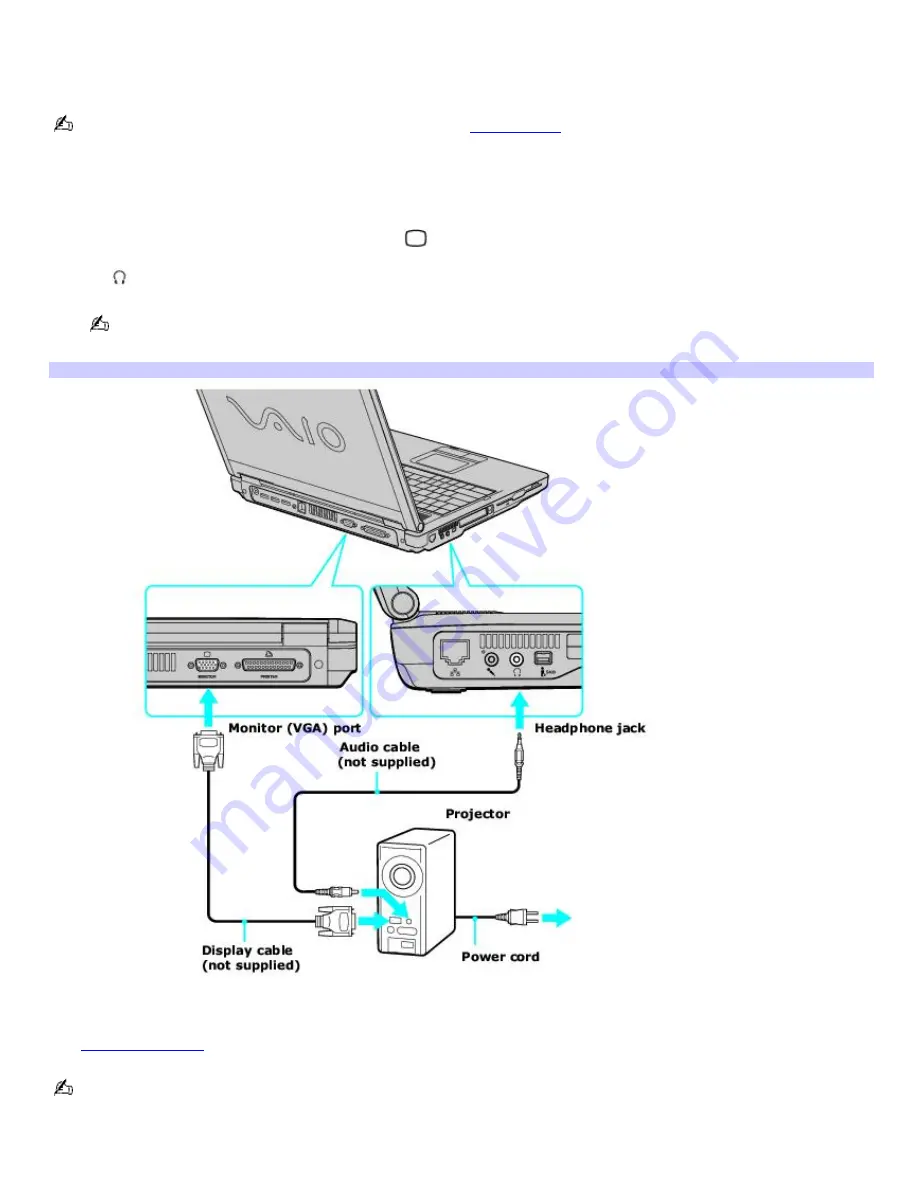
You can connect a multimedia device, such as a multimedia computer monitor or projector, to your computer. Connecting a
multimedia device enables you to display images on your computer screen (LCD), the multimedia device, or both.
For information on connecting a TV to your computer, see
Playing DVDs.
To connect a multimedia computer monitor or projector
1.
Plug the device into an AC outlet.
2.
Plug the video cable into the Monitor (VGA) port
on your computer. If you are using a multimedia computer
monitor, which has built-in speakers and a microphone, you and also plug the audio cable into the Headphone
jack
on your computer to hear sound.
To locate the Monitor port and Headphone jack, see "Locating Controls and Ports" in the "Setting Up" chapter of
your printed VAIO
®
Computer Quick Start.
Connecting a Projector
3.
Turn on the device (if it is not already on), and then turn on your computer.
4.
Press the
Fn
+
F7
key combination to toggle the display between your computer, the monitor, or both. See
Selecting a display
for more information.
See the guide that accompanied your projector for more information on its installation and use.
Page 97
Содержание VAIO PCG-FR130
Страница 21: ...5 Follow the on screen instructions Page 21 ...
Страница 38: ...Page 38 ...
Страница 41: ...CDs and DVDs Inserting and Ejecting CDs or DVDs Copying and Playing CDs Playing DVDs Page 41 ...
Страница 43: ...4 Lift the disc from the drive 5 Push the drive tray gently to close it Page 43 ...
Страница 46: ...Page 46 ...
Страница 57: ...Printer Connections Printing With Your Computer Page 57 ...
Страница 63: ...Computer Features Using the Touch Pad Changing the Window Design of Sony Programs Page 63 ...
Страница 69: ...Mice and Keyboards Using the Keyboard Connecting Mice and Keyboards Page 69 ...
Страница 72: ...Page 72 ...
Страница 80: ...Floppy Disk and PC Card Connections Using the Floppy Disk Drive Using PC Cards Page 80 ...
Страница 112: ...Preinstalled Programs Programs On Your Computer DVgate Program Notes Program Support Information Page 112 ...


