background image

69

Sonstiges

Näheres finden Sie auf den in Klammern angegebenen Seiten.

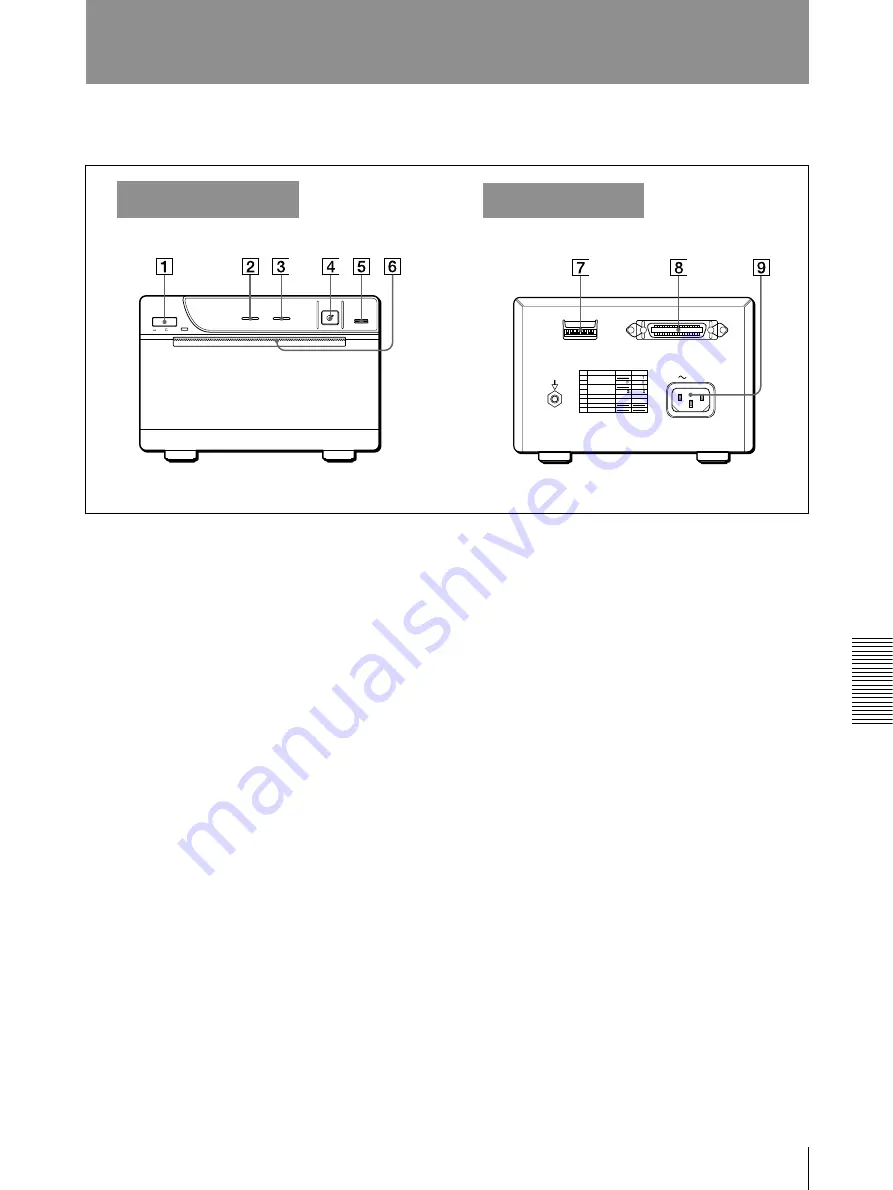
Lage und Funktion der Teile und Bedienelemente

Vorderseite

Rückseite

1

Netzschalter ON/OFF und Netzanzeige

Zum Ein-/Ausschalten des Geräts. Die
Anzeige leuchtet, während das Gerät
eingeschaltet ist.

2

Anzeige RECEIVING

Leuchtet, während am Drucker die zu
druckenden Daten von einem Computer
eingehen.
Erlischt, wenn der Druckvorgang beginnt.

3

Anzeige PAPER EMPTY

Leuchtet, wenn kein Papier mehr im Drucker
eingelegt ist.
Blinkt, wenn die Schutzschaltung für den
Thermodruckkopf aktiviert ist, um einen
Wärmestau zu verhindern.

4

Taste FEED (62)

Wenn Sie die Taste gedrückt halten, wird
Druckpapier eingezogen.

5

Taste OPEN/CLOSE (60)

Zum Öffnen oder Schließen des Deckels.
Dient auch zum Stoppen des Druckvorgangs.

6

Schneidevorrichtung

Zum Abschneiden des Druckpapiers.

7

DIP-Schalter (58)

Zum Einstellen des Papiertyps und weiterer
Druckermodi.

8

Anschluß (Amphenol, 36polig) (57)

Zum Anschließen eines Computers oder
anderer Peripheriegeräte mit einem
Centronics-kompatiblen Schnittstellenkabel.
Wenn Sie mit dem Drucker im
Hochgeschwindigkeitsübertragungsmodus
(ECP-Modus) arbeiten wollen, verwenden Sie
ein Schnittstellenkabel, das dem IEEE-
Standard 1284 entspricht (z. B. Hewlett
Packard C2951A).

9

Anschluß AC IN

(Wechselstromeingang) (57)

Zum Anschließen an eine Netzsteckdose über
das mitgelieferte Netzkabel.

ON/     OFF 

PAPER  EMPTY

FEED

OPEN / CLOSE

RECEIVING

DIP SW

OFF

ON

AC IN

DIP SW FUNCTION TABLE 

NO FUNCTION

SW-ON SW-OFF

1
2
3
4
5
6
7
8

PAPER

GAMMA

POSTFEED
COMMAND
RESERVED
RESERVED

TYPE

TYPE

TYPE
TONE

TONE

TONE

ON

OFF

D890

D880

Содержание UP-D890

Страница 1: ... future reference Mode d emploi Page 38 Avant la mise en service de cet appareil prière de lire attentivement ce mode d emploi que l on conservera pour toute référence ultérieure Gebrauchsanweisung Seite 54 Bevor Sie dieses Gerät verwenden lesen Sie diese Anleitung bitte sorgfältig durch und bewahren Sie sie für später zum Nachschlagen auf Istruzioni per l uso Pagina 70 Prima di usare l apparecchi...

Страница 2: ...スイッチを設定する 8 コンピューターにプリンタードライバーをインストールする 9 プリンター用紙を取り付ける 10 プリントする 12 使用上のご注意 13 お手入れ 14 プリンター用紙について 16 主な仕様 17 保証書とアフターサービス 18 故障とお考えになる前に 19 各部の名称と働き 20 安全のために 3 警告 4 注意 5 電気製品は安全のための注意事項を守らないと 火災や人身事故になることがあります 警告 この取扱説明書には 事故を防ぐための重要な注意事項と製品の 取り扱いかたを示しています この取扱説明書をよくお読みのう え 製品を安全にお使いください お読みになったあとは いつ でも見られるところに必ず保管してください お買い上げいただきありがとうございます 日本語 目次 ...

Страница 3: ...については お買い上げ店またはソニーのサービ ス窓口にご連絡く ださい 故障したら使わない すぐに お買い上げ店またはソニーのサービス窓口にご連絡く ださい 万一 異常が起きたら 警告表示の意味 この取扱説明書および製品で は 次のような表示をしていま す 表示の内容をよく理解して から本文をお読みください この表示の注意事項を守らない と 火災や感電などにより死亡 や大けがなど人身事故につなが ることがあります 警告 注意 この表示の注意事項を守らない と 感電やその他の事故により けがをしたり周辺の物品に損害 を与えたりすることがありま す 注意 感電 火災 注意を促す記号 禁止 分解禁止 強制 行為を禁止する記号 行為を指示する記号 煙が出たら 異常な音 においがし たら 内部に水 異物が入っ たら 製品を落としたり キャビネットを破損し たときは 1 電源を切り ます 2 電源コー...

Страница 4: ...ニーのサービス窓口に交換 をご依頼く ださい 油煙 湯気 湿気 ほこりの多い場所には設置しない 上記のよう な場所に設置する と 火災や感電の原因となる こ とがあ り ます 取扱説明書に記されている仕様条件以外の環境での使用は 火災や感電の原因 となる こ とがあ り ます 内部に水や異物を入れない 水や異物が入る と火災や感電の原因となる こ とがあ り ます 万一 水や異物が入ったと きは すぐに電源を切り 電源コー ドや接続コー ドを抜 いて お買い上げ店またはソニーのサービス窓口にご相談く ださい 内部を開けない 内部には電圧の高い部分があ り キャビネ ッ トや裏蓋などを開けたり改造したりす る と 火災や感電の原因となるこ とがあり ます 内部の調整や設定 点検 修理 は お買い上げ店またはソニーのサービス窓口にご依頼く ださい 本機は国内用です 交流100Vでお使いく ださ...

Страница 5: ...しないと 感電の原因となる こ とがあ り ます 安全アース を取り付ける こ とができない場合は お買い上げ店またはソニーのサー ビス窓口にご相談く ださい 不安定な場所に設置しない ぐらついた台の上や傾いたと ころなどに設置する と 倒れたり落ちたり してけがの 原因となる こ とがあ り ます また 設置 取り付け場所の強度を充分にお確かめく ださい 製品の上に乗らない 重いものを載せない 倒れたり 落ちたり 壊れたり して けがの原因となる こ とがあ り ます カッターの刃には触れない カ ッ ターの刃に触れる と けがをする こ とがあ り ます 本体内部に手を入れない ドアが開いている と きに 本体内部に手をいれる と 火傷および故障の原因となる こ とがあ り ます お手入れの際は 電源を切って電源プラグを抜く 電源を接続したままお手入れをする と 感電の原因となる こ ...

Страница 6: ...があります 詳しくは コンピューターの取扱説明書をご覧ください 画像用メモリーの増設が可能 市販のコンピューター用4Mbyte 72pin SIMM Single Inline Memory Module を増設すること により 最大5120 1024ドット 約500 100mm の画像を印画できるようになります SIMM は パリティ有り 無しどちらでも使えます SIMMの増設をご希望の場合は 本機をお求めになった販売店にご相談ください 本機は EDO Extended Data Output 仕様の72pin SIMMには対応しておりません 増設用に は下記の仕様のSIMMを推奨いたします 容量 4Mbyte 1M 32bit パリティーなし または1M 36bit パリティーあり 端子の処理 はんだコート品 金メッキ品ではコネクターとの接触が保証できません 推奨メーカー コンパック ...

Страница 7: ...カード社製C2951Aなど のIEEE STD 1284準拠の接続ケーブルをお使いください 接続するには 1 コンピューターとプリンターの電源が切れていることを確認します 2 1 プリンターの接続端子に 接続ケーブルのプラグを差し込みます 2 接続端子の両側 のツメを締め プラグを固定します 3 接続ケーブルをコンピューターに接続します 4 電源コードをプリンター裏面のAC IN端子に接続してから コンセントに接続します 必ず接地してください 裏面 インターフェースケーブル ヒューレットパッカード社 製C2951Aなど 電源端子 コンセントへ 準備 2 1 電源コード 付属 AC IN DIP SW OFF DIP SW FUNCTION TABLE NO FUNCTION SW ON SW OFF 1 2 3 4 5 6 7 8 PAPER GAMMA POSTFEED COMMAND ...

Страница 8: ...類に合わせて切り換えます 用紙については 13ページをご覧くださ い UPP 110Sの場合は 2 PAPERスイッチの設定はどちらでもかまいませんが なるべく 工場出荷時の設定 ON のままにしておいてください 用紙の種類 UPP 110S Normal 標準 UPP 110HD High Density 高濃度 UPP 110HA Enhanced 高画質 PAPERスイッチの位置 1 2 OFF TYPE I どちらでも可 ON OFF TYPEI I ON ON TYPE IV DIP SW OFF ON DIP SW FUNCTION TABLE GAMMA 準備 PAPER AC IN DIP SW OFF DIP SW FUNCTION TABLE NO FUNCTION SW ON SW OFF 1 2 3 4 5 6 7 8 PAPER GAMMA POSTFEED CO...

Страница 9: ...たりの余白が短 いので 用紙1巻あたりの印画枚数が多くとれます 6 COMMAND コマンド 切り換えスイッチ 本機をUP D860専用のアプリケーションソフトで使用する場合は OFF D860 にしま す この設定にすると 画素密度が上がるため プリント画の大きさが縦横とも約10 ず つ小さくなります 78 RESERVED リザーブド スイッチ 通常は出荷状態 ON のままにしておいてください 印画モード TONE I TONE II TONE III GAMMAスイッチの位置 3 4 OFF TONEI どちらでも可 ON OFF TONEII ON ON TONEIII 準備 コンピューターにプリンタードライバーをインス トールする 付属のプリンタードライバーをインストールします インストールのしかたについては プ リンタードライバーディスクの中の readmej txt をお読み...

Страница 10: ...感熱面には触れないでください 指紋や 汗 折り目がつくと プリント画の品質の低下につながります プリンター用紙を取り付けたら 始めの15 20cmを引き出してから印画してください 用紙は専用のUPP 110シリーズをご使用ください 16ページ お使いになる用紙に合わせて 必ずDIPスイッチを切り換えてください 8 9ページ 取り付けるには 1 電源ON OFFスイッチをONにし 電源を入れます 電源ランプが点灯します 2 OPEN CLOSEボタンを押して ドアパネルを開きます 準備 ...

Страница 11: ...11 3 プリンター用紙をトレー内に入れます 感熱面を上にして入れます 逆に入れるとプ リントされません 4 用紙を手前に15 20cm引き出します 5 OPEN CLOSEボタンを押して ドアパネルを閉めます ドアパネルは手で押して閉めることもできます 準備 ...

Страница 12: ...りますか 10 11ページ プリントするには 1 電源ON OFFスイッチをONにし 電源を入れます 電源ランプが点灯します 2 PAPER EMPTYランプが消灯していることを確認します 3 アプリケーションソフトでプリントの操作をします 画像データは セントロニクスインターフェースを通して伝送されます プリントを中断するには プリント中に OPEN CLOSEボタンを押します プリント動作は止まります プリント用紙を送るには FEEDボタンを押します 押している間 プリント用紙が送られます 操作 ON OFF PAPER EMPTY FEED OPEN CLOSE RECEIVING PAPER EMPTYランプ 操作 ...

Страница 13: ...ドを抜いておいてください 電源コードを抜くときは 電源プラグを持って抜いてください 安全のために キャビネットは絶対に開けないでください 内部に触れると危険です 内部にものを落とさないでください ペーパーカッターには触れないでください 置き場所について 水平な場所に置いてください 暑い所や湿気の多い所に置かないでください 湿気の低い冬場では 湿度35 以上の環境で使うことをおすすめします 持ち運びについて ぶつけたり 落としたりしないように気をつけてください 持ち運びの際は プリンター用紙を取り外してください プリンター用紙を取り付けたま ま持ち運ぶと故障の原因になることがあります その他 その他 アースにつなぐ ...

Страница 14: ...の汚れは 水または水で薄めた中性洗剤溶液で湿らせた布をかたくしぼってか ら 拭き取ってください シンナーやベンジン アルコールなどは表面の仕上げを傷めるこ とがありますので 使用しないでください ヘッドのクリーニング プリント画に白いスジが生じたら 付属のヘッドクリーニングシートでヘッドをきれいにし てください 1 電源ON OFFスイッチをONにし 電源を入れます 2 OPEN CLOSEボタンを押し ドアパネルを開きます その他 使用上のご注意 つづき ...

Страница 15: ...ニングシートの黒い面を下にして トレー内の溝に差し込みます 5 ヘッドクリーニングシートを引き出して 取り除きます 押し続ける ピッとブザーが鳴っ たら離す その他 m トレー内の溝に差し込む 付属のヘッドクリーニングシート 4 OPEN CLOSEボタンを押し そのまま押し続けます ドアパネルが閉じ クリーニングが始まります ブザーがピッと1回鳴り クリーニングシートが排出され始めたら OPEN CLOSEボタ ンを離します ...

Страница 16: ... 低湿 低温 30 以下 の場 所に保管してください プリントした用紙はポリプロピレンの袋 フォトアルバム等でキャ ビネット内に保管することをおすすめします 用紙がアルコールなどの揮発性有機溶剤に触れたり セロハンテープや塩化ビニールなど に密着すると プリントした画面が薄くなることがありますので 保管の際はご注意くだ さい 用紙を接着するときは 両面テープまたは水性のりをお使いください プリントした用紙をジアゾ式の湿式コピー 青焼 と重ねないでください 黒く変色するこ とがあります プリンター用紙について 用紙の種類 UPP 110S UPP 110HD UPP 110HA 印画特性 印画濃度 TYPE I Normal 標準 TYPE II High Density 高濃度 TYPE IV Enhanced 高画質 その他 ...

Страница 17: ...IEEE 1284 B コネクター アンフェノー ル36pin 入力 最大5V TTL 出力 最大5V TTL データ伝送方式 8ビット パラレル IEEE STD 1284 1994 Compatible Reverse Nibble ECP 準拠 ロジックレベル TTL V H パラレルインターフェースコネクターのピン配列 Pin番号 I O 信号 インターフェースのモード Compatible Nibble ECP 1 I nStrobe HostClk HostClk 2 I O Data1 LSB 3 I O Data2 4 I O Data3 5 I O Data4 6 I O Data5 7 I O Data6 8 I O Data7 9 I O Data8 MSB 10 O nACK PtrClk PeriphClk 11 O Busy PtrBusy PeriphAck ...

Страница 18: ...可能の期間とさせていただきます 保有期間が経過した後も 故障箇所によっては 修理 可能の場合がありますので お買い上げ店か サービス窓口にご相談ください 故障とお考えになる前に UP D890 お問い合わせ先 お問い合わせ ソニー株式会社 国内営業本部 ソニー株式会社 名 古 屋 北 陸 京 滋 大 阪 神 戸 中 国 四 国 九 州 北 海 道 東 北 関 東 新 潟 千 葉 東 京 多 摩 松 本 横 浜 静 岡 141 東京都品川区北品川6 7 35 営業所 011 231 8121 営業所 022 257 7830 営業所 048 645 6880 出張所 025 270 3253 営業所 043 297 8531 営業所 03 5448 6740 営業所 0425 75 0201 出張所 0263 25 4551 営業所 045 243 6711 営業所 054 253 8162...

Страница 19: ...く接続されていますか n用紙がたるんでいませんか アラームブザーが鳴った場合 nサーマルヘッドがヒートアップしていませんか n用紙は正しく取り付けてありますか 用紙は送られるがプリントされない場合 n用紙の感熱面を上にして取り付けましたか お使いのコンピューターはECPモードに対応していますか nパラレルポートの設定がECPモードと表示されていても 実際にはECP モードで動作しないコンピューターがあります 詳しくは コンピュー ターのメーカーサポート窓口にご相談ください OPEN CLOSEボタンを押してドアパネルを開け プリンター用紙を取り出 してから 詰まった紙を手でゆっくり引き出してください プリンターが結露していませんか n寒い所から急に暑い所にプリンターを移すと 内部に水滴がつくこと 結 露 があります 結露したら電源を切ったまま1 2時間放置してくださ い ヘッドが汚れていま...

Страница 20: ...ーパーカッター プリント画を出口でカットするための刃です 7 DIP SW ディップスイッチ 8 9 プリント用紙の種類や印画モードなどを設定しま す 8 接続端子 36ピンアンフェノール型 7 コンピューターやその他の周辺機器を接続します 接続にはセントロニクス準拠のインターフェース ケーブルをお使いください 高速転送モード ECPモード でお使いの場合は IEEE STD 1284準拠の接続ケーブル ヒューレット パッカード社製C2951Aなど をお使いください 9 AC IN 電源 端子 7 付属の電源コードを差し込みます 各部の名称と働き 内の数字は参照ページを示します 裏面 前面 ON OFF PAPER EMPTY FEED OPEN CLOSE RECEIVING DIP SW OFF ON AC IN DIP SW FUNCTION TABLE NO FUNCTION SW...

Страница 21: ...21 その他 ...

Страница 22: ...er cord from the unit try these measures Relocate the unit with respect to the susceptible equipment Plug this unit and the susceptible equipment into different branch circuits Consult your dealer Symbols on the products This symbol indicates the equipotential terminal which brings the various parts of a system to the same potential R 1 5m For the customers in the U S A This equipment has been tes...

Страница 23: ...Connection 25 Setting the DIP Switches 26 Installing the Printer Driver on the Computer 27 Loading Paper 28 Printing 30 Precautions 31 Maintenance 32 On the Print Paper 34 Specifications 35 Troubleshooting 36 Location and Function of Parts 37 Operation Others ...

Страница 24: ... A commercially available 4 Mbyte 72 pin SIMM Single Inline Memory Module can be installed which enables printing of maximum 5120 1024 dots about 500 100 mm image To install the 4 Mbyte 72 pin SIMM consult your dealer Note that the EDO Extended Data Output type 72 pin SIMM cannot be installed on this unit To extend memory use a 72 pin SIMM which satisfies the following specifications Memory 4 Mbyt...

Страница 25: ...se the printer in ECP mode use an interface cable in conformity to IEEE STD 1284 such as Hewlett Packard C2951A 1 Make sure that the computer and the printer are turned off 2 1 Insert the interface cable to the printer s connector 2 Fasten the clamps at both sides of the connector to secure the cable 3 Connect the cable to the computer 4 Connect the AC power cord to the AC IN connector of the prin...

Страница 26: ... paper see page 34 You can use the UPP 110S print paper with the 2 PAPER switch set to either position however we recommend leaving the switch at the factory set position ON Type of paper UPP 110S Normal UPP 110HD High density UPP 110HA Enhanced PAPER switch position 1 2 OFF TYPE I ON or OFF ON OFF TYPE II ON ON TYPE IV FUNCTION PAPER GAMMA POSTFEED COMMAND RESERVED RESERVED SW ON TYPEIV TONEIII O...

Страница 27: ...g only a short length of paper after printing 6 COMMAND switch If you use the printer on the application software for UP D860 set to OFF D860 In this setting the dot density increases and the printed picture becomes smaller by 10 horizontaly and verticaly 78RESERVED switch Keep this switch set to ON Installing the printer driver on the computer Install the supplied printer driver on the computer F...

Страница 28: ...t off the first 15 to 20 cm 6 to 7 7 8 inches to remove any slack Use only UPP 110 series paper p 34 Set the DIP switches according to the paper type p 26 Loading 1 Press the power ON OFF switch to turn on the printer The POWER lamp lights 2 Press the OPEN CLOSE button to open the paper lid 3 Place the paper roll in the paper tray Place the paper with the thermo sensitive side printing side up ...

Страница 29: ...aration 4 Pull out the first 15 to 20 cm 6 to 77 8 inches of the paper to remove any slack in the roll 5 Press the OPEN CLOSE button to close the paper lid You can also close the paper lid simply by pushing it ...

Страница 30: ...he printer The power indicator lights 2 Make sure that the PAPER EMPTY indicator is not lit If lit load paper 3 Send the image data to the printer by setting the application software The image data is transmitted via centronics interface Stopping printing on the way Press the OPEN CLOSE button while printing The printer stops printing Feeding the print paper Press the FEED button The paper is fed ...

Страница 31: ...ety ground should be properly established On operation Do not turn the power off while the printer is printing The thermal head may be damaged On printer carriage Do not carry and move the printer when the paper roll is placed in the printer Doing so may cause malfunction On installation Place the printer on a level and stable surface during operation Do not install the printer near heat sources A...

Страница 32: ...cleansers will damage the cabinet Cleaning the thermal head If the print out is dirty or white stripes appear on the print outs clean the thermal head using the supplied cleaning sheet 1 Press the power ON OFF switch to turn on the printer 2 Press the OPEN CLOSE button to open the paper lid Precautions continued ...

Страница 33: ...sheet supplied m Keep the button pressed When a beep sounds release the button 5 Remove the cleaning sheet 4 Press the OPEN CLOSE button and keep it pressed The paper lid closes and the printer starts cleaning the head When you hear one beep and the printer starts ejecting the cleaning sheet release the OPEN CLOSE button Others ...

Страница 34: ...loride to touch the printed paper Alcohol plastic tape or film will fade the print out To attach printed paper to another piece of paper use double sided adhesive tape or water based or solid glue Do not stack printed paper on or under a diazo copy sheet The print out may turn black Others Type of paper Use only the Sony UPP 110 series paper The use of other paper may result in poor print quality ...

Страница 35: ...mable anesthetics or oxygen Mode of operation Continuous Supplied accessories Paper roll UPP 110HA 1 AC power cord 1 Operating Instructions 1 Head cleaning sheet 1 Printer driver disk 1 Registration card English only 1 Software license agreement English only 1 Clamp filter 1 Valid in the U S A and Japan only Interface Control connector IEEE 1284 B connector amphenol 36 pin Input Max 5 V TTL Output...

Страница 36: ...ears ECP mode Consult the manufacturer of the computer for details Open the paper lid by pressing the OPEN CLOSE button then pull the jammed paper slowly and remove it There is condensation within the unit m Moving the unit suddenly from a cold place to a warm place often results in condensation forming In the event of condensation forming remove the paper turn off the power and leave the unit for...

Страница 37: ...pressed 5 OPEN CLOSE button 28 Opens or closes the door Also stops the printing 6 Paper cutter Cuts the print paper 7 DIP switches 26 Sets the paper type and other printer modes 8 Connector 36 pin amphenol 25 Connects a computer or other peripherals using a quasi centronics interface cable To use the unit in high speed transmission mode ECP mode use an interface cable in conformity to IEEE STD 128...

Страница 38: ... est utilisé conjointement avec d autres équipements à proximité d un patient ces équipements doivent être alimentés par un transformateur d isolement ou raccordés à la mise à la terre du système par une borne de terre de protection sauf s ils sont agréés suivant la norme IEC601 1 Proximité d un patient R 1 5m 3 Dans le cas d une connexion à d autres équipements le courant de fuite peut augmenter ...

Страница 39: ...microcommutateurs 42 Installation du pilote d imprimante dans l ordinateur 43 Chargement du papier 44 Impression 46 Précautions 47 Maintenance 48 A propos du papier d impression 50 Spécifications 51 Guide de dépannage 52 Emplacement et fonction des composants 53 Fonctionnement Divers ...

Страница 40: ...ne Memory Module à 72 broches de 4 Mo disponible dans le commerce peut être installé pour permettre l impression d une image de maximum 5120 1024 points environ 500 100 mm Pour installer le module SIMM à 72 broches de 4 Mo adressez vous à votre distributeur Attention que le module SIMM de sortie de données étendue EDO à 72 broches ne peut être installé sur cet appareil Pour étendre la mémoire util...

Страница 41: ...e Centronics Pour utiliser l imprimante en mode ECP utilisez un câble d interface conforme au standard IEEE STD 1284 tel que le câble Hewlett Packard C2951A 1 Assurez vous que l ordinateur et l imprimante sont hors tension 2 1 Insérez le câble d interface dans le connecteur de l imprimante 2 Serrez les attaches des deux côtés du connecteur pour fixer le câble 3 Branchez le câble à l ordinateur 4 B...

Страница 42: ...pier d impression UPP 110S avec le microcommutateur 2 PAPER réglé dans l une ou l autre position nous vous conseillons toutefois de laisser le microcommutateur sur la position de réglage par défaut ON DIP SW OFF ON NO 1 2 3 4 5 6 7 8 SW ON TYPEIV TONEIII ON D890 SW OFF TYPEI TYPEII TONEI TONEII OFF D860 DIP SW FUNCTION TABLE FUNCTION PAPER GAMMA POSTFEED COMMAND RESERVED RESERVED Type de papier UP...

Страница 43: ... 5 Microcommutateur POSTFEED Réglez la quantité de papier d impression à recharger après impression ON pour sortir une petite quantité de papier vierge après l impression OFF pour économiser le papier en ne rechargeant qu une petite quantité de papier après l impression 6 Microcommutateur COMMAND Si vous utilisez l imprimante avec le logiciel d application pour UP D860 mettez le sur OFF D860 Ce ré...

Страница 44: ...papier pour éliminer le mou Utilisez uniquement du papier de la série UPP 110 p 50 Réglez les microcommutateurs en fonction du type de papier p 42 Chargement 1 Appuyez sur l interrupteur ON OFF pour mettre l imprimante sous tension La lampe POWER s allume 2 Appuyez sur la touche OPEN CLOSE pour ouvrir le couvercle du compartiment à papier 3 Placez le rouleau de papier dans le compartiment à papier...

Страница 45: ...5 à 20 6 à 7 7 8 pouces cm de papier pour éliminer le mou du rouleau 5 Appuyez sur la touche OPEN CLOSE pour refermer le couvercle du compartiment à papier Vous pouvez également refermer le couvercle en le repoussant simplement ...

Страница 46: ...ion L indicateur d alimentation s éclaire 2 Assurez vous que l indicateur PAPER EMPTY n est pas allumé S il est allumé chargez le papier 3 Envoyez les données d image vers l imprimante en effectuant le réglage dans le logiciel d application Les données d image sont transmises via l interface Centronics Arrêter l impression en cours Appuyez sur la touche OPEN CLOSE pendant l impression L imprimante...

Страница 47: ...ée Fonctionnement Ne mettez pas l imprimante hors tension en cours d impression car cela pourrait endommager la tête thermique Chariot d imprimante Ne transportez pas et ne déplacez pas l imprimante lorsque le rouleau de papier est installé dans l imprimante Cette manoeuvre pourrait entraîner un dysfonctionnement de l appareil Installation Placez l imprimante sur une surface plane et stable pendan...

Страница 48: ...boîtier Nettoyage de la tête thermique Si l impression est sale ou que des bandes blanches apparaissent sur les impressions nettoyez la tête thermique à l aide de la feuille de nettoyage fournie 1 Appuyez sur l interrupteur ON OFF pour mettre l imprimante sous tension 2 Appuyez sur la touche OPEN CLOSE pour ouvrir le couvercle du compartiment à papier Précautions suite ...

Страница 49: ...nie 4 Appuyez sur la touche OPEN CLOSE et maintenez la enfoncée Le couvercle du compartiment à papier se referme et l imprimante commence à nettoyer la tête Lorsque vous entendez un bip et que l imprimante commence à éjecter la feuille de nettoyage relâchez la touche OPEN CLOSE m Maintenez la touche enfoncée Lorsqu un bip retentit relâchez la touche 5 Retirez la feuille de nettoyage ...

Страница 50: ...essous de 30 C Nous vous recommandons de conserver le papier imprimé dans une farde en polypropylène Ne conservez pas du papier inutilisé ou imprimé dans un endroit chaud et humide N abandonnez pas du papier inutilisé ou imprimé sous le rayonnement direct du soleil ou dans des endroits lumineux pendant de longues périodes Evitez de renverser des solvants organiques volatiles ou du chlorure de viny...

Страница 51: ...sthésiants inflammables ou d oxygène Mode de fonctionnement Continu Accessoires fournis Rouleau de papier UPP 110HA 1 Cordon d alimentation 1 Feuille de nettoyage de tête 1 Disquette de pilote d imprimante 1 Mode d emploi 1 Carte d enregistrement en anglais uniquement 1 Accord de licence pour le logiciel en anglais uniquement 1 Filtre d arrêt 1 Uniquement applicable aux Etats Unis et au Japon Inte...

Страница 52: ...t chargé avec la face thermosensible vers le bas Il se peut que l ordinateur ne supporte pas le mode ECP m Certains ordinateurs ne fonctionnent pas en mode ECP même si le port parallèle est réglé sur le mode ECP Pour plus de détails consultez le fabricant de l ordinateur Ouvrez le couvercle du compartiment à papier en appuyant sur la touche OPEN CLOSE puis tirez doucement le papier bloqué et sorte...

Страница 53: ...ession 5 Touche OPEN CLOSE 44 Ouvre ou referme la trappe De même interrompt l impression 6 Coupeur de papier Coupe le papier d impression 7 Microcommutateurs 42 Règle le type de papier et d autres modes d imprimante 8 Connecteur amphénol 36 broches 41 Raccorde un ordinateur ou d autres périphériques à l aide d un câble d interface Centronics ou similaire Pour utiliser l appareil en mode de transmi...

Страница 54: ...ansformator betrieben oder über einen zusätzlichen Schutzleitungsanschluß mit der Gehäusemasse verbunden werden es sei denn sie entsprechen dem Standard IEC601 1 Patientenumgebung R 1 5m 3 Der Ableitstrom kann sich beim Zusammenschluß mehrerer Geräte summieren und höhere Werte annehmen 4 Dieses Gerät erzeugt und verwendet Hochfrequenzenergie und kann diese auch abstrahlen Wenn das Gerät nicht ents...

Страница 55: ...ellen der DIP Schalter 58 Installieren des Druckertreibers auf dem Computer 59 Einlegen von Papier 60 Drucken 62 Sicherheitsmaßnahmen 63 Wartung 64 Hinweise zum Druckpapier 66 Technische Daten 67 Störungsbehebung 68 Lage und Funktion der Teile und Bedienelemente 69 Betrieb Sonstiges ...

Страница 56: ...liches 72poliges 4 MB SIMM Single Inline Memory Module installieren das den Ausdruck von Bildern mit maximal 5120 1024 Punkten etwa 500 100 mm ermöglicht Näheres zum Installieren des 72poligen 4 MB SIMM erfahren Sie bei Ihrem Händler Beachten Sie bitte daß ein 72poliges SIMM des Typs EDO Extended Data Output nicht in diesem Gerät installiert werden kann Verwenden Sie zur Speicherweiterung ein 72po...

Страница 57: ...len verwenden Sie ein Schnittstellenkabel das dem IEEE Standard 1284 entspricht z B Hewlett Packard C2951A 1 Überprüfen Sie ob Computer und Drucker ausgeschaltet sind 2 1 Stecken Sie das Schnittstellenkabel am Druckeranschluß ein 2 Befestigen Sie die Klammern an beiden Seiten des Anschlusses um das Kabel zu sichern 3 Schließen Sie das Kabel am Computer an 4 Schließen Sie das Netzkabel an den Ansch...

Страница 58: ...66 Sie können das Druckpapier UPP 110S zwar bei beiden Positionen des PAPER Schalters 2 benutzen sie sollten den Schalter aber in der werkseitig eingestellten Position ON lassen DIP SW OFF ON NO 1 2 3 4 5 6 7 8 SW ON TYPEIV TONEIII ON D890 SW OFF TYPEI TYPEII TONEI TONEII OFF D860 DIP SW FUNCTION TABLE FUNCTION PAPER GAMMA POSTFEED COMMAND RESERVED RESERVED Papiertyp UPP 110S Normal UPP 110HD Hohe...

Страница 59: ...ch dem Drucken nur ein kurzes Stück Papier eingezogen wird 6 Schalter COMMAND Wenn Sie den Drucker mit der Anwendungssoftware für den UP D860 steuern stellen Sie den Schalter auf OFF D860 In diesem Fall wird die Punktdichte erhöht und das gedruckte Bild wird horizontal und vertikal um 10 kleiner 78Schalter RESERVED Lassen Sie diesen Schalter auf ON Installieren des Druckertreibers auf dem Computer...

Страница 60: ...Papier heraus damit das Papier gespannt wird und schneiden Sie es ab Verwenden Sie nur Papier der Serie UPP 110 S 66 Stellen Sie die DIP Schalter je nach Papiertyp ein S 58 Einlegen des Papiers 1 Schalten Sie den Drucker mit dem Netzschalter ON OFF ein Die Netzanzeige POWER leuchtet 2 Öffnen Sie den Papierfachdeckel mit der Taste OPEN CLOSE 3 Legen Sie die Papierrolle in das Papierfach ein Legen S...

Страница 61: ...ehen Sie die ersten 15 bis 20 cm Papier heraus und spannen Sie damit das Papier auf der Rolle 5 Schließen Sie den Papierfachdeckel mit der Taste OPEN CLOSE Sie können den Deckel auch schließen indem Sie ihn einfach zudrücken ...

Страница 62: ... 2 Sehen Sie nach ob die Anzeige PAPER EMPTY leuchtet Ist dies der Fall legen Sie Papier ein 3 Senden Sie die Bilddaten über die Anwendungssoftware an den Drucker Die Bilddaten werden über die Centronics Schnittstelle übertragen Unterbrechen des Druckvorgangs Drücken Sie während des Druckens die Taste OPEN CLOSE Der Drucker stoppt den Druckvorgang Einziehen des Druckpapiers Drücken Sie die Taste F...

Страница 63: ...enommen sein Betrieb Schalten Sie das Gerät nicht aus während ein Druckvorgang läuft Andernfalls kann der Thermodruckkopf beschädigt werden Transport Tragen und bewegen Sie den Drucker nicht wenn eine Papierrolle eingelegt ist Andernfalls kann es zu Fehlfunktionen kommen Aufstellung Stellen Sie den Drucker während des Betriebs auf eine ebene und stabile Oberfläche Stellen Sie den Drucker nicht in ...

Страница 64: ...ifen die Gehäuseoberfläche an Reinigen des Thermodruckkopfs Wenn der Ausdruck verschmutzt ist oder weiße Streifen enthält reinigen Sie den Thermodruckkopf mit dem mitgelieferten Reinigungsblatt 1 Schalten Sie den Drucker mit dem Netzschalter ON OFF ein Sicherheitsmaßnahmen Fortsetzung 2 Öffnen Sie den Papierfachdeckel mit der Taste OPEN CLOSE ...

Страница 65: ... 4 Drücken Sie die Taste OPEN CLOSE und halten Sie sie gedrückt Der Papierfachdeckel schließt sich und der Drucker beginnt den Druckkopf zu reinigen Wenn ein Signalton zu hören ist und der Drucker das Reinigungsblatt ausgibt lassen Sie die Taste OPEN CLOSE los m Halten Sie die Taste gedrückt Lassen Sie die Taste beim Signalton los 5 Nehmen Sie das Reinigungsblatt heraus ...

Страница 66: ...ht an einem heißen oder feuchten Ort Lassen Sie nicht gebrauchtes oder bedrucktes Papier nicht längere Zeit in direktem Sonnenlicht oder an einem anderen sehr hellen Ort liegen Achten Sie darauf daß kein flüchtiges organisches Lösungsmittel und kein Vinylchlorid auf das bedruckte Papier gelangt Alkohol Plastikband oder Folien bleichen den Ausdruck aus Wenn Sie bedrucktes Papier auf anderem Papier ...

Страница 67: ...em Gemisch oder Sauerstoff Betriebsmodus Kontinuierlich Mitgeliefertes Zubehör Papierrolle UPP 110HA 1 Netzkabel 1 Druckkopfreinigungsblatt 1 Druckertreiberdiskette 1 Gebrauchsanweisung 1 Registrierkarte nur Englisch 1 Software Lizenzvereinbarung nur Englisch 1 Klemmfilter 1 Gilt nur für USA und Japan Schnittstelle Steueranschluß IEEE 1284 B Anschluß Amphenol 36polig Eingang max 5 V TTL Ausgang ma...

Страница 68: ...icht m Das Papier ist mit der Thermoseite nach unten eingelegt Der Computer unterstützt möglicherweise den ECP Modus nicht m Einige Computer unterstützen den ECP Modus nicht obwohl der parallele Anschluß scheinbar auf den ECP Modus eingestellt ist Näheres erfahren Sie beim Hersteller Ihres Computers Öffnen Sie mit der Taste OPEN CLOSE den Papierfachdeckel ziehen Sie dann das gestaute Papier langsa...

Страница 69: ... 60 Zum Öffnen oder Schließen des Deckels Dient auch zum Stoppen des Druckvorgangs 6 Schneidevorrichtung Zum Abschneiden des Druckpapiers 7 DIP Schalter 58 Zum Einstellen des Papiertyps und weiterer Druckermodi 8 Anschluß Amphenol 36polig 57 Zum Anschließen eines Computers oder anderer Peripheriegeräte mit einem Centronics kompatiblen Schnittstellenkabel Wenn Sie mit dem Drucker im Hochgeschwindig...

Страница 70: ...to insieme ad altre apparecchiature nell area del paziente è necessario che esso venga alimentato da un trasformatore isolato oppure che venga collegato per mezzo di un terminale di messa a terra aggiuntivo alla messa a terra del sistema a meno che esso non venga certificato conforme allo standard CE1601 1 Area del paziente 3 Se collegato ad altre apparecchiature la corrente di dispersione potrebb...

Страница 71: ...ri DIP 74 Installazione del driver della stampante nel computer 75 Caricamento della carta 76 Stampa 78 Precauzioni 79 Manutenzione 80 Informazioni sulla carta di stampa 82 Caratteristiche tecniche 83 Soluzione dei problemi 84 Posizione e funzione dei componenti 85 Funzionamento Altre informazioni ...

Страница 72: ...odulo di Memoria Singola in Linea da 4 Mb a 72 piedini disponibile sul mercato che consente la stampa di immagini con risoluzione 5120 1024 punti 500 100 mm circa Per installare un SIMM da 4 Mb a 72 piedini occorre rivolgersi al proprio rivenditore Osservare che il modulo SIMM a 72 piedini di tipo EDO Extended Data Output non può essere installato su questo apparecchio Per estendere la memoria uti...

Страница 73: ... utilizzare la stampante nel modo ECP occorre utilizzare un cavo di interfaccia conforme allo standard IEEE 1284 come per esempio il cavo C2951A di Hewlett Packard 1 Accertarsi che il computer e la stampante siano spenti 2 1 Inserire il cavo di interfaccia nel connettore della stampante 2 Fissare i morsetti ad entrambi i lati del connettore in modo da bloccare il cavo 3 Collegare il cavo al comput...

Страница 74: ...ezione a pagina 82 Mantenendo il selettore 2 PAPER impostato su una posizione qualsiasi si può utilizzare una carta tipo UPP 110S si raccomanda tuttavia di lasciare il selettore sulla posizione impostata in fabbrica ON DIP SW OFF ON NO 1 2 3 4 5 6 7 8 DIP SW FUNCTION TABLE FUNCTION PAPER GAMMA POSTFEED COMMAND RESERVED RESERVED SW ON TYPEIV TONEIII ON D890 SW OFF TYPEI TYPEII TONEI TONEII OFF D860...

Страница 75: ... facendone avanzare solo una quantità minima dopo la stampa 6 Selettore COMMAND Nel caso in cui si utilizzi la stampante con il software applicativo per UP D860 occorre spostare questo selettore su OFF D860 Con questa impostazione la densità dei punti aumenta e l immagine stampata viene ridotta del 10 orizzontalmente e verticalmente 78Selettore RESERVED Mantenere questo selettore impostato su ON I...

Страница 76: ...i primi 15 20 cm da 6 a 7 7 8 pollici di carta per evitare che possa allentarsi Utilizzare esclusivamente carta tipo UPP 110 p 82 Impostare gli interruttori DIP a seconda del tipo di carta utilizzato p 74 Caricamento 1 Premere il selettore ON OFF per accendere la stampante La lampadina POWER si accende 2 Premere il tasto OPEN CLOSE per aprire il coperchio del comparto carta 3 Mettere il rotolo di ...

Страница 77: ...m da 6 a 7 7 8 pollici di carta per evitare che si verifichi un allentamento nel rotolo 5 Premere il tasto OPEN CLOSE per chiudere il coperchio del comparto carta È anche possibile chiudere il coperchio del comparto carta solamente spingendolo ...

Страница 78: ... L indicatore dell alimentazione si illumina 2 Accertarsi che l indicatore PAPER EMPTY non sia acceso Nel caso in cui fosse acceso caricare la carta 3 Impostando il software applicativo mandare in stampa i dati d immagine I dati d immagine vengono trasmessi attraverso l interfaccia Centronics Fermare la stampa in corso Premendo il tasto OPEN CLOSE durante la stampa si ferma la stampa in corso Avan...

Страница 79: ...o che disponga dell opportuno terminale di terra La messa a terra dovrebbe essere stata effettuata in modo appropriato Informazioni utili sul funzionamento Non spegnere mai l apparecchio durante la stampa poiché questo può danneggiare la testina termica Informazioni utili sul trasporto della stampante Non trasportare e spostare la stampante quando il rotolo della carta è inserito poiché questo pot...

Страница 80: ...nneggiare l apparecchio Pulitura della testina termica Nel caso in cui la stampa risultasse sporca o con delle strisce bianche occorre pulire la testina termica utilizzando l apposito foglio di pulizia fornito 1 Premere il selettore ON OFF per accendere la stampante 2 Premere il tasto OPEN CLOSE per aprire il coperchio del comparto carta Precauzioni continua ...

Страница 81: ...mere il tasto OPEN CLOSE e mantenerlo premuto Il coperchio del comparto carta si chiude e la stampante inizia ad effettuare la pulizia della testina Non appena la stampante emette un segnale acustico ed incomincia ad espellere il foglio di pulizia rilasciare il tasto OPEN CLOSE Altre informazioni m Mantenere premuto il tasto Rilasciare il tasto al segnale acustico 5 Togliere il foglio di pulizia ...

Страница 82: ... utilizzata o stampata in un luogo caldo o umido Non lasciare la carta inutilizzata o stampata esposta alla luce diretta del sole o esposta ad altri luoghi luminosi per periodi di tempo prolungati Evitare che qualsiasi solvente organico volatile o che del cloruro di vinile venga a contatto con la carta stampata L alcool le pellicole o i nastri di plastica sbiadiscono la stampa Per fissare un fogli...

Страница 83: ...tetica infiammabile o ossigeno Modo di funzionamento Continuo Accessori forniti Rotolo di carta UPP 110HA 1 Cavo di alimentazione AC 1 Foglio di pulizia della testina 1 Dischetto con il driver della stampante 1 Istruzioni per l uso 1 Scheda di Registrazione solo in inglese 1 Contratto di licenza software solo in inglese 1 Filtro 1 Valida o solo negli U S A ed in Giappone Interfaccia Controllo conn...

Страница 84: ...puter Aprire il coperchio del comparto carta premendo il tasto OPEN CLOSE poi tirare lentamente la carta inceppata e toglierla All interno dell apparecchio c è della condensa m Spostando improvvisamente la stampante da un luogo freddo ad uno caldo si provoca la formazione di condensa Nel caso in cui si sia formata della condensa occorre togliere la carta disattivare l alimentazione e lasciare la s...

Страница 85: ...EN CLOSE 76 Serve per aprire e chiudere il portello della stampante Serve anche per fermare la stampa 6 Taglierina per la carta Serve per tagliare la carta di stampa 7 Interruttori DIP 74 Servono per impostare il tipo di carta ed altri modi di stampa 8 Connettore amphenol a 36 piedini 73 Collega un computer o altre unità periferiche utilizzando un cavo di interfaccia Centronics nullo Per utilizzar...

Страница 86: ...Sony Corporation Printed in Japan ...

Отзывы: