background image

Préparatifs

Préparatifs

49

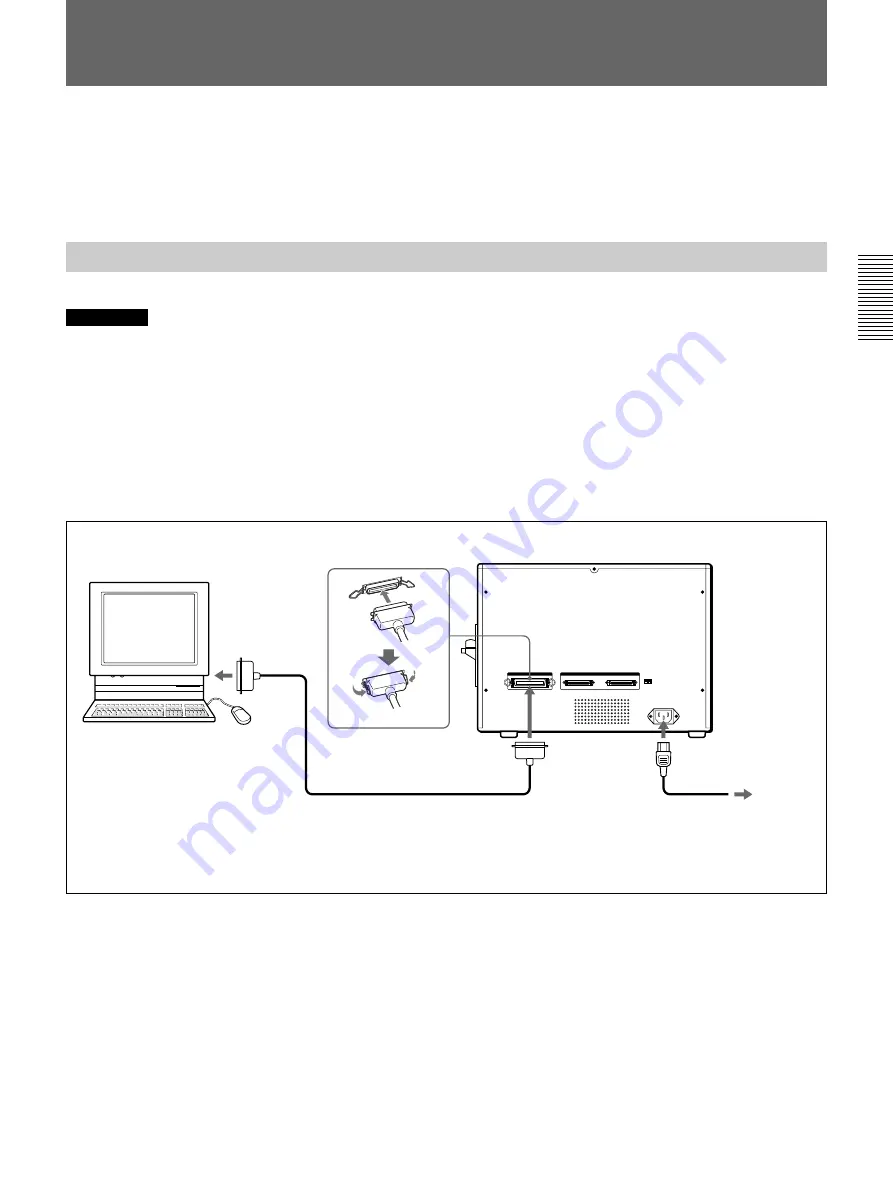
Connexions

parallèle. La D6500 est aussi équipée d’un connecteur
SCSI qui peut être utilisé avec le câble SCSI à la place
de la connexion parallèle.

Les exemples suivants montrent la connexion du
système pour imprimer des cartes. Les UP-D6500/
D6400 et D6300 sont équipées d’un connecteur
parallèle pour la connexion à l’ordinateur via un câble

Connexion du câble parallèle

Remarques

• Mettre tous les périphériques hors tension pour effectuer les connexions.
• Raccorder les cordons d’alimentation en dernier.
• Insérer fermement le connecteur du câble de données parallèles aussi loin que possible.
• Le câble parallèle ne doit pas dépasser 3 mètres et doit être conforme aux spécifications Centronics. Toutefois, le

type de connecteurs sur le câble parallèle dépend de l’ordinateur et des autres périphériques raccordés. Se
reporter au mode d’emploi de ces périphériques pour les détails.

• Pour utiliser le mode de lecteur à grande vitesse (mode ECP), le câble doit être conforme à IEEE 1284, comme le

modèle Hewlett Packard C2950A.

• Ne pas utiliser l’interface SCSI lorsque l’interface parallèle est utilisée.

1) Utiliser un câble parallèle conforme à IEEE-1284. Se reporter au mode d’emploi de l’ordinateur pour le type de câble

parallèle à utiliser.

* Les UP-D6300 et D6400 ne possèdent pas de connecteurs SCSI ou de commutateur SCSI ID.

Les clips se verrouillent des

deux côtés

UP-D6300/D6400/D6500

Au connecteur
parallèle

Parallel cable

1)

Au connecteur
parallèle

A la prise murale

A AC IN

Ordinateur personnel

Содержание UP-D6300

Страница 1: ...Digital Color Printer 3 864 593 11 1 UP D6500 UP D6400 UP D6300 Operating Instructions Page 2 Mode d emploi Page 34 Bedienungsanleitung Seite 66 GB FR DE 1998 by Sony Corporation ...

Страница 2: ... avoid electrical shock do not open the cabinet Refer servicing to qualified personnel only For the customers in the U S A This equipment has been tested and found to comply with the limits for a Class A digital device pursuant to Part 15 of the FCC Rules These limits are designed to provide reasonable protection against harmful interference when the equipment is operated in a commercial environme...

Страница 3: ...Ribbon Cassette 11 Installing the Cleaning Rollers 13 Installing the Card Tray 14 Using Optional Accessories 14 Installing the Auto Card Feeder 15 Installing the Auto Card Stacker 16 Connections 17 Parallel Cable Connection 17 SCSI Cable Connection UP D6500 18 Setting the SCSI ID 19 Setting the Terminator 19 Printing Before Printing 20 Feeding Method 20 Things to Know Before Printing 21 Manual Fee...

Страница 4: ...ntens 4 Table of contents Appendixes In Case of Problems 26 About Caution Indicator Lamps 26 If parts of the Image do not Print 27 Changing the Print Head 28 Specifications 31 Printer Specifications 31 Options 32 ...

Страница 5: ...rd stacker can be installed in combination with the supplied card tray This manual describes the common features of the three models Features specific to particular models are described on the applicable pages The software supplied with each model lets you easily combine images and text data to create large quantities of high resolution 300 dpi4 full color ID cards 256 level grayscale and 16 7 M c...

Страница 6: ...I ID switch SCSI Cable Connection The UP D6500 can be connected to the computer by a SCSI cable When using SCSI connections other SCSI devices such as an MO disk drive can be connected in between Product Features Personal Computer UP D6300 D6400 D6500 Parallel Cable Use an IEEE 1284 compatible parallel cable Amphenol 36 pin Personal Computer UP D6500 SCSI Cable Use a SCSI 2 compatible SCSI cable H...

Страница 7: ...rinter it passes between these rollers to remove any dust from the card so the rollers should always be installed Wash the rollers periodically with water page 27 3 Indicator Panel Lamps The panel lamps indicate the status of the printer f g h i j k POWER ON ALARM RIBBON CARD PRINT READY f POWER ON lamp green This lamp is lit when the power is on g ALARM lamp orange This lamp blinks when an error ...

Страница 8: ... UP D6500 can be used to connect this model to the controlling computer and other peripheral devices via a SCSI cable The second connector can be used to connect other SCSI devices with this printer However if one of the connectors is not used set the terminator switch leftmost SCSI ID switch 8 to the ON position 8 SCSI ID and SCSI Terminator switch UP D6500 only This switch sets the SCSI ID for t...

Страница 9: ...porting with accessories connected may result in damage About Card Stock Use cards that comply with ISO international standard ISO7810 ID 1 type or JIS standard JIS X6301 1979 Notes Use only clean cards with no debris dirt or other adhering matter Some card materials may not be suitable Contact your supplier for details Installation Precautions Do not install or store the printer in the following ...

Страница 10: ...rating Manual 1 Floppy Diskette 1 Notes The packing materials are needed when transporting the printer so we suggest you keep them Before printing be sure to remove the packing material that immobilizes the head for transport Card Tray 1 Cleaning Roller Holder 1 Ink Ribbon Holder 1 AC Power Plug Adapter 1 AC Power Cord 1 ...

Страница 11: ...he UPR 6025 ribbon package consists of one unit which prints black only About 1 000 single sided cards can be printed 1 Hold both sides of the front door and pull it down to open 2 To change the ink ribbon press on the part marked PUSH to remove the ink ribbon holder When installing an ink ribbon in the printer the first time skip this step and proceed to step 4 Note Do not touch the inside of the...

Страница 12: ...ons Do not touch the surface of a ribbon or store it in a dusty place Fingerprints and dust may cause degraded printing Storing Ink Ribbons Do not store ribbons in hot or humid places To preserve a partially used ribbon save it in the humidity resistant bag in which it was originally supplied If a Ribbon Breaks You can repair a broken ribbon with plastic tape so you can use the remaining unused po...

Страница 13: ... in the printer the first time skip this step and proceed to step 4 4 Insert the cleaning roller holder into the printer and push it until it stops Align the top and bottom guides with the rails when inserting 5 Install the cleaning roller cover removed in step 2 6 Close the front door Note After using the cleaning rollers for a long time their cleaning ability will be degraded causing colors to f...

Страница 14: ...include the UPA 6003 Auto Card Feeder to automatically feed cards to the printer when printing and the UPA 6002 Auto Card Stacker to receive printed cards from the printer One Auto Card Feeder can be installed on the UP D6400 D6300 and up to two Auto Card Feeders and one Auto Card Stacker can be installed on the UP D6500 The supplied card tray can also be installed when the Auto Card Stacker is in...

Страница 15: ...onnector and guide holes on the printer Remove the upper edge first then the lower edge Remove the upper edge first then the lower edge Align the connectors Align the guide holes 4 Push the Auto Card Feeder so the connectors mate firmly Installing a Second Feeder A second Auto Card Feeder can be installed on the UP D6500 The second feeder installs on the outer side of the first feeder using the sa...

Страница 16: ...nectors mate firmly Also Installing the Supplied Card Tray Install the supplied card tray after installing the Auto Card Stacker The card tray installs on the outside of the Auto Card Stacker using the same procedure as for installing it on the printer page 14 Removing the Stacker To remove the stacker open the stacker cover and push down on the locking level while separating the stacker from the ...

Страница 17: ...han 3 meters and conform to the Centronics specification However the type of connectors on the parallel cable depends on the computer and other peripheral devices being connected Refer to the operating manuals for the devices for details To use the high speed drive mode ECP mode the cable should comply with IEEE1284 such as the Hewlett Packard model C2950A Do not use the SCSI interface when using ...

Страница 18: ... when using the SCSI interface 1 Refer to the computer operating manual for the type of SCSI cable to use When connecting other SCSI devices refer also to the manuals supplied with those devices Use a cable compatible with the SCSI2 standard 2 The SCSI bus allows connection of other SCSI devices by daisy chain between the computer and printer and after the printer Refer to the operating manuals of...

Страница 19: ...RMINATOR 0 0 0 OFF 4 3 2 SCSI ID ID 0 ID 1 ID 2 ID 3 ID 4 ID 5 ID 6 ID 7 Switch 4 OFF ON OFF ON OFF ON OFF ON Switch 3 OFF OFF ON ON OFF OFF ON ON Switch 2 OFF OFF OFF OFF ON ON ON ON Note When setting the SCSI ID be careful not to duplicate the number of another device on the SCSI bus The ID must be unique for each device Setting the Terminator The leftmost switch of the SCSI ID switches is the t...

Страница 20: ... printer after sending the print command If a second Auto Card Feeder is installed on the UP D6500 cards in the first Auto Card Feeder are fed first followed by those in the second Feeder when the first is empty Cards can also be fed manually at the card insertion slot of the Auto Card Feeder However do not insert cards that are a different size from those in the Auto Card Feeder or a jam may resu...

Страница 21: ...d when handling large batches of cards If using the optional Auto Card Feeder fan the cards thoroughly to ensure they do not stick together before loading them into the Feeder Do not store cards in a dirty place Dirt on a card may cause dirty printing or poor ink bonding Insert cards with magnetic stripe so that the stripe faces down and toward the rear Note the following when printing Use an appl...

Страница 22: ...he guides on the card insertion slot to match the width of the cards to print 6 Put a card in the insertion slot and push it until your finger touches the hollow area at the center of the slot Insert cards with magnetic stripes so that the stripe faces down and toward the rear The card is pulled into the printer and printing starts After printing the printer returns to the standby condition 7 When...

Страница 23: ... pinch your finger beneath it 4 Put the cards on the platform inside the Auto Card Feeder Insert cards with magnetic stripe so that the stripe faces down and toward the rear We recommend using soft cotton gloves to handle cards to avoid fingerprints and dirt 5 Close the Auto Card Feeder cover 6 Send the image data from the computer The READY lamp blinks while the data is being sent to the printer ...

Страница 24: ...Stacker installed Always remove the Auto Card Feeder Auto Card Stack and card tray before moving the printer Printing cannot be aborted from the computer When the computer sends a command to stop printing the card being printed finishes before the printer enters the waiting condition To print the same image repeatedly Send the Print command again from the computer The image data stored in the prin...

Страница 25: ...the print quantity setting to its default value of 1 If a card is jammed The ALARM lamp blinks and one or two other lamps are lit when a card is jammed inside the printer Turning the printer off and back on should cause the jammed card to be transferred automatically to the Bad Card Stacker If the card is not moved to the Bad Card Stacker contact your supplier or nearest Sony Service Center Removi...

Страница 26: ...cards page 23 The internal Bad Card Stacker is full Remove the bad cards A card is jammed in the manual feeder Turn the power off and back on 1 A card is jammed in the printing mechanism Turn the power off and back on 1 A card is jammed in the card inverting mechanism Turn the power off and back on 1 A card is jammed in the bad card ejecting mechanism Turn the power off and back on 1 A card is jam...

Страница 27: ...lers as before and close the cleaning roller cover and the front door If the adhesive capabilities of the cleaning rollers is degraded so that dirt cannot be remove from a card non printing areas white spots may appear In such cases clean the cleaning rollers We recommend cleaning the cleaning rollers after printing about every 200 cards 1 Hold both sides of the front door and pull it towards you ...

Страница 28: ...nted often the print head may show signs of wear If the ALARM lamp blinks while the other four lamps RIBBON CARD PRINT and READY are all lit the print head must be replaced Use optional replacement print head model UPU D65H Notes Be sure to disconnect power from the printer before changing the print head The print head gets hot when printing so before changing the head allow time for it to cool su...

Страница 29: ...6 Connect the connectors on the new print head in place of those removed in step 5 7 Roll the print head in the direction shown in the figure so the holes in the print head align with the hooks in the head holder 8 Put the hooks in the head holder into the holes in the print head and move the print head back until it locks 9 Remove the protective cover sheet from the head ...

Страница 30: ...Appendixes 30 Appendixes 10Replace the print head holder 11Replace the top cover Insert the left side of the top cover first then close the right side Changing the Print Head ...

Страница 31: ... pin half pitch DIN type two Printing ribbon 5UPR 6040 color ink ribbon for 250 images 5 rolls 5UPR 6080 color ink ribbon for 200 images 5 rolls UPR 6025 black ink ribbon approx 1000 images Accessories Card tray 1 Cleaning roller holder set Ink ribbon holder 1 AC power cord plug adapter 1 Printer driver floppy disk AC power cord 1 Operating instructions 1 Parallel Interface Connector IEEE 1284 B c...

Страница 32: ...importnat to use dye sublimation compatible cards Use clean and flat card for the printing Please contact your Sony dealer for the acceptable cards Acceptable PVC Cards Specifications Length 85 47 to 93 00 mm Height 53 92 to 60 00 mm Thickness 0 3 to 1 5 mm Color Any color acceptable except transparent Surface Material Dye sublimation compatible PVC unlaminated Surface Smooth and polished finish O...

Страница 33: ......

Страница 34: ...éviter tout risque d incendie ou d électrocution ne pas exposer cet appareil à la pluie ou à l humidité Afin d écarter tout risque d électrocution garder le coffret fermé Ne confier l entretien de l appareil qu à un personnel qualifié ...

Страница 35: ... nettoyage 45 Installation du plateau de cartes 46 Utilisation des accessoires optionnels 46 Installation du chargeur de cartes automatique 47 Installation de l empileuse de cartes automatique 48 Connexions 49 Connexion du câble parallèle 49 Connexion du câble SCSI UP D6500 seulement 50 Réglage de SCSI ID 51 Réglage de la terminaison 51 Impression Avant d imprimer 52 Méthode d impression de charge...

Страница 36: ...res Appendice En cas de problème 58 Concernant les témoins indicateurs de précaution 58 Si des parties de l image ne sont pas imprimées 59 Changement de la tête d impression 60 Spécifications de l imprimante 63 Spécifications 63 Options 64 ...

Страница 37: ...être installés ensemble et une empileuse de cartes automatique peut être installée en combinaison avec le plateau à cartes fourni Ce manuel décrit les caractéristiques communes aux trois modèles Les caractéristiques spécifiques à un modèle particulier sont décrites dans les pages correspondantes Le logiciel fourni avec chaque modèle permet de combiner facilement des images et des données texte pou...

Страница 38: ...P D6300 et UP D6400 ne contiennent pas de connecteur SCSI et de commutateur SCSI ID Connexion du câble SCSI La UP D6500 peut être raccordée à l ordinateur par un câble SCSI Lorsque la connexion SCSI est utilisée d autres appareils SCSI tel qu un lecteur de disque MO peuvent être raccordés entre les deux Ordinateur personnel UP D6300 D6400 D6500 Câble parallèle Utiliser un câble parallèle compatibl...

Страница 39: ...in i Témoin CARD orange Ce témoin s allume lorsque le chargeur de carte automatique optionnel est installé Pendant l opération d alimentation manuelle ce témoin s allume lorsque l imprimante attend une carte j Témoin PRINT vert Ce témoin s allume pendant l impression Pendant l opération d alimentation manuelle ce témoin clignote lorsque l imprimante attend l insertion d une carte Vue de face 1 3 2...

Страница 40: ...parallèle 7 Connecteurs SCSI UP D6500 seulement Les connecteurs SCSI sur la UP D6500 peuvent être utilisés pour raccorder ce modèle à l ordinateur principal et à d autres périphériques via un câble SCSI Le deuxième connecteur peut être utilisé pour raccorder d autres périphériques SCSI à l imprimante Si toutefois l un des connecteurs n est pas utilisé régler le commutateur de terminaison le commut...

Страница 41: ...écifiée 120 ou 240 V CA 50 60 Hz Manipuler avec précaution le cordon d alimentation Ne pas plier le cordon ou déposer des objets lourds dessus Le cordon peut être endommagé et provoquer un incendie ou une électrocution Ne pas utiliser un cordon endommagé Eviter l infiltration de tout autre objet Ne pas renverser de liquide ou faire tomber d objet inflammable ou métallique dans l imprimante Si l im...

Страница 42: ...atériaux d emballage sont nécessaires pour transporter l imprimante nous vous suggérons de les conserver Avant d imprimer retirer les matériaux d emballage qui bloquent la tête d impression pour le transport Plateau à cartes 1 Support de rouleau de nettoyage 1 Support de ruban d encre 1 Adaptateur de prise d alimentation CA 1 Cordon d alimentation CA 1 ...

Страница 43: ...fié Ruban d encre noire UPR 6025 noir seulement Les rubans 5UPR 6040 6080 donnent une stratification avec l impression couleur L ensemble ruban d encre couleur consiste en un set comprenant cinq pièces Un rouleau de 5UPR 6040 peut imprimer environ 250 cartes à une face et un rouleau de 5UPR 6080 peut imprimer environ 200 cartes à une face L ensemble UPR 6025 est composé d une seule unité qui n imp...

Страница 44: ... toucher la surface du ruban ou le ranger dans un endroit poussiéreux Les traces de doigts et la poussière contribuent à dégrader la qualité d impression Rangement des rubans d encre Ne pas ranger les rubans d encre dans des endroits chauds ou humides Pour conserver un ruban utilisé en partie le ranger dans la pochette résistante à l humidité dans laquelle il a été fourni Si un ruban se casse Il e...

Страница 45: ...yer les rouleaux de nettoyage après avoir imprimé 200 cartes environ page 59 Cette procédure décrit comment installer les rouleaux de nettoyage dans l imprimante 1 Maintenir les deux côtés de la porte avant et la tirer vers le bas pour l ouvrir 2 Tirer le couvercle du rouleau de nettoyage marqué PULL OPEN pour le retirer 3 Installer deux rouleaux de nettoyage dans le support de rouleau de nettoyag...

Страница 46: ...ennent le chargeur de cartes automatique UPA 6003 qui permet de charger automatiquement les cartes dans l imprimante pendant l impression ainsi que l empileuse de cartes automatique UPA 6002 qui reçoit les cartes imprimées de l imprimante Il est possible d installer un chargeur de cartes automatique sur les UP D6400 D6300 et jusqu à deux sur la UP D6500 ainsi qu une empileuse de cartes automatique...

Страница 47: ... niveau de verrouillage tout en séparant le chargeur de l imprimante Remarque Mettre toujours l imprimante hors tension lors de l installation ou du retrait des options 1 Retirer le guide manuel pour la fente d insertion de carte tout en poussant sur le bouton 2 Pousser sur le bouton supérieur et retirer le couvercle du connecteur 3 Aligner et insérer les broches du guide et du connecteur sur le c...

Страница 48: ...de l empileuse Pour retirer l empileuse ouvrir son couvercle et pousser sur le niveau de verrouillage tout en séparant l empileuse de l imprimante 1 Pousser sur le bouton supérieur et retirer le couvercle du connecteur 2 Aligner et insérer les broches du guide et du connecteur sur l empileuse de cartes automatique dans les fentes correspondantes sur l imprimante 3 Pousser l empileuse de cartes aut...

Страница 49: ... 3 mètres et doit être conforme aux spécifications Centronics Toutefois le type de connecteurs sur le câble parallèle dépend de l ordinateur et des autres périphériques raccordés Se reporter au mode d emploi de ces périphériques pour les détails Pour utiliser le mode de lecteur à grande vitesse mode ECP le câble doit être conforme à IEEE 1284 comme le modèle Hewlett Packard C2950A Ne pas utiliser ...

Страница 50: ...ce parallèle lorsque l interface SCSI est utilisé 1 Se reporter au mode d emploi de l ordinateur pour le type de câble SCSI à utiliser Lorsque d autres périphériques sont raccordés se reporter à leurs modes d emploi respectifs Utiliser un câble compatible avec le standard SCSI2 2 Le bus SCSI permet la connexion d autres périphériques SCSI en chaîne bouclée entre l ordinateur et l imprimante Se rep...

Страница 51: ...CSI ID ID 0 ID 1 ID 2 ID 3 ID 4 ID 5 ID 6 ID 7 Commutateur 4 OFF ON OFF ON OFF ON OFF ON Commutateur 3 OFF OFF ON ON OFF OFF ON ON Commutateur 2 OFF OFF OFF OFF ON ON ON ON Remarque Lors du réglage du SCSI ID faire attention à ne pas dupliquer le numéro d un autre périphérique sur le bus SCSI L ID doit être unique pour chaque périphérique Réglage de la terminaison Le commutateur le plus à gauche d...

Страница 52: ...que les cartes sont chargées dans l imprimante dès que la commande d impression est lancée Si un deuxième chargeur de cartes automatique est installé dans la UP D6500 les cartes du premier chargeur sont chargées puis celles du deuxième chargeur lorsque le premier est vide Les cartes peuvent également être chargées manuellement par la fente d insertion de carte du chargeur automatique Toutefois ne ...

Страница 53: ... régler le SCSI ID page 51 Installer le ruban d encre page 43 les rouleaux de nettoyage page 45 et le plateau à cartes page 46 Si un chargeur de cartes automatique page 47 ou une empileuse de cartes automatique page 48 sont utilisés il faut les installer Noter les points suivant pour manipuler les cartes Tenir les cartes par les bords et éviter de toucher la surface Les traces de doigts sur une ca...

Страница 54: ... carte manuellement Les données d image enregistrées dans la mémoire image de l imprimante seront imprimées Cette procédure comment imprimer en chargeant manuellement les cartes dans l imprimante 1 Mettre l imprimante sous tension Le témoin READY clignote pendant quelques secondes puis s allume en continu lorsque l imprimante est prête pour l impression Remarque Lors de l utilisation de la connexi...

Страница 55: ... programme de l ordinateur A la fin de l impression l imprimante revient en mode d attente Cette procédure décrit l impression avec le chargeur de cartes automatique installé 1 Mettre l imprimante sous tension Le témoin READY clignote pendant quelques secondes puis s allume en continu lorsque l imprimante est prête pour l impression Remarque Lors de l utilisation de la connexion SCSI ne pas mettre...

Страница 56: ...nte avec le chargeur ou l empileuse de cartes automatiques installés Retirer toujours le chargeur l empileuse de cartes et le plateau à cartes avant de déplacer l imprimante L impression ne peut pas être suspendue à partir de l ordinateur Lorsqu une commande est envoyée de l ordinateur pour arrêter l impression l impression de la carte en cours est terminée puis l imprimante se met en mode d atten...

Страница 57: ...mpression revient à la valeur par défaut 1 Si une carte est coincée Le témoin ALARM clignote et un ou deux autres témoins s allument lorsqu une carte est coincée dans l imprimante Si l imprimante est mise hors puis sous tension de nouveau la carte coincée est automatiquement transférée dans l empileuse de cartes rejetées Si la carte n est pas déplacée dans l empileuse de cartes rejetées contacter ...

Страница 58: ...ur manuel Mettre l imprimante hors puis de nouveau sous tension 1 Une carte est coincée dans le mécanisme d impression Mettre l imprimante hors puis de nouveau sous tension 1 Une carte est coincée dans le mécanisme d inversion de carte Mettre l imprimante hors puis de nouveau sous tension 1 Une carte est coincée dans le mécanisme d éjection des mauvaises cartes Mettre l imprimante hors puis de nou...

Страница 59: ...rcle et la porte avant Si les performances d adhérence des rouleaux de nettoyage se sont dégradés et que les salissures ne sont plus nettoyées sur la carte des zones non imprimées zones blanches peuvent apparaître Dans ce cas il faut nettoyer les rouleaux de nettoyage Nous vous recommandons de nettoyer les rouleaux de nettoyage après l impression d environ 200 cartes 1 Maintenir les deux côtés de ...

Страница 60: ...es souvent la tête d impression peut s user Si le témoin ALARM clignote alors que les quatre autres témoins RIBBON CARD PRINT et READY sont tous allumés la tête d impression doit être remplacée Utiliser la tête d impression de remplacement optionnelle modèle UPU D65H Remarques S assurer de débrancher l imprimante avant de changer la tête d impression La tête d impression chauffe au moment de l imp...

Страница 61: ...sur la nouvelle tête d impression à la place de ceux retirés à l étape 5 7 Faire rouler la tête d impression dans la direction indiquée par la figure de façon à aligner les fentes de la tête d impression avec les crochets de support de tête 8 Mettre les crochets du support de tête dans les fentes de la tête d impression et pousser la tête jusqu à de qu elle soit verrouillée 9 Retirer la feuille de...

Страница 62: ...e 62 Appendice Changement de la tête d impression 10Remettre le support de tête d impression 11Remettre le couvercle supérieur Insérer le côté gauche du couvercle supérieur en premier puis fermer le côté droit ...

Страница 63: ...ax 82 50 mm Résolution d impression 256 gradations jaune magenta cyan Durée d impression Env 40 sec face avec le ruban CMYL Mémoire de données UP D6400 D6300 4 MB UP D6500 8 MB Interface UP D6500 D6400 D6300 Interface parallèle IEEE 1284 Amphénol 36 broches une UP D6500 Interface SCSI 2 Type DIN demi pas 50 broches deux Ruban d impression Ruban d encre couleur 5UPR 6040 pour 250 images 5 rouleaux ...

Страница 64: ...erminaison interne réglable ON OFF SCSI ID Commutateur réglable 0 à 7 La conception et les spécifications sont sujettes à modification sans préavis Remarque Il est très important d utiliser des cartes compatibles avec la sublimation tinctoriale Utiliser une carte propre et plate pour l impression Prière de contacter le fournisseur pour les cartes adéquates Spécifications des cartes PVC adéquates L...

Страница 65: ......

Страница 66: ...einen elektrischen Schlag zu vemeiden darf das Gehäuse nicht geöffnet werden Überlassen Sie Wartungsarbeiten stets nur einem Fachmann Für Kunden in Deutshland Dieses Produkt kann im kommerziellen und in begrenztem Maße auch im industriellen Bereich eingesetzt werden Dies ist eine Einrichtung welche die Funk Entstörung nach Klasse B besitzt Deutsch ...

Страница 67: ...kassette 75 Installation der Reinigungswalzen 77 Kartenauffang installieren 78 Gebrauch des Sonderzubehörs 78 Installation der automatischen Kartenzuführung 79 Installation der automatischen Kartenablage 80 Anschlüsse 81 Anschluß über paralleles Kabel 81 Anschluß über SCSI Kabel nur UP D6500 82 Einstellen der SCSI ID 83 Terminator einstellen 83 Drucken Vor dem Ausdruck 84 Druckmethode 84 Was Sie v...

Страница 68: ...ichnis 68 Inhaltsverzeichnis Anhang Bei Störungen 90 Bedeutung der Anzeigelampen 90 Bild wird nur teilweise gedruckt 91 Druckkopf auswechseln 92 Technische Daten 95 Technische Daten des Druckers 95 Sonderzubehör 96 ...

Страница 69: ...zubehör erhältliche automatische Kartenzuführungen können gleichzeitig installiert werden Außerdem kann zusätzlich zum mitgelieferten Kartenauffang eine als Sonderzubehör erhältliche automatische Kartenablage installiert werden Diese Bedienungsanleitung erklärt die Funktionen die allen drei Modellen gemeinsam sind Die nur von bestimmten Modellen unterstützten Funktionen werden gesondert behandelt ...

Страница 70: ...P D6400 besitzt keinen SCSI Anschluß und SCSI ID Wählschalter Anschluß über SCSI Kabel Der UP D6500 kann auch über ein SCSI Kabel mit dem Computer verbunden werden Bei Gebrauch des SCSI Anschlusses können auch andere SCSI Geräte wie ein MO Laufwerk zwischengeschaltet werden Personal Computer UP D6300 D6400 D6500 Paralleles Kabel Ein mit der IEEE 1284 Norm kompatibles Parallelkabel benutzen Ampheno...

Страница 71: ...nale Kartenzuführung installiert ist Bei manueller Kartenzuführung leuchtet diese Lampe wenn der Drucker auf die nächste Karte wartet j PRINT Lampe grün Leuchtet während dem Druckvorgang Bei manueller Kartenzuführung blinkt diese Lampe wenn der Drucker auf die nächste Karte wartet k READY Lampe grün Blinkt während sich der Drucker aufwärmt oder während er Daten empfängt Leuchtet ständig wenn der D...

Страница 72: ...n der Drucker mit einem SCSI Kabel an den Hostcomputer und andere Peripheriegeräte angeschlossen werden Über den zweiten Anschluß kann der Drucker mit anderen SCSI Geräten verbunden werden Wird einer der Anschlüsse nicht benutzt müssen Sie den Terminator Schalter SCSI ID Schalter 8 am linken Ende der Schalterreihe auf ON stellen 8 SCSI ID und SCSI Terminator Schalter nur UP D6500 Mit diesem Schalt...

Страница 73: ... eine Stromquelle mit der angegebenen Spannung anschließen 120 oder 240 V Wechselstrom 50 60 Hz Mit dem Netzkabel behutsam umgehen Das Netzkabel nicht stark krümmen und keine schweren Gegenstände darauf stellen da daraus resultierende Schäden Feuer oder einen elektrischen Schlag auslösen könnten Niemals ein beschädigtes Kabel benutzen Nichts ins Druckerinnere gelangen lassen Den Drucker vor Flüssi...

Страница 74: ... Hinweise Bewahren Sie das Verpackungsmaterial auf da es bei einem eventuellen späteren Transport des Druckers wieder benötigt wird Bevor Sie den Drucker benutzen müssen Sie unbedingt das Schutzmaterial entfernen das den Druckkopf zum Transport arretiert Kartenauffang 1 Halterung für Reinigungs walzen 1 Farbband halter 1 Netzstrom Steckeradapter 1 Netzkabel 1 ...

Страница 75: ...hwarzes Farbband UPR 6025 nur schwarz Mit den Farbbändern 5UPR 6040 6080 kann nicht nur farbig gedruckt sondern auch laminiert werden Ein Color Farbbandpaket enthält einen Satz von fünf Stück Mit einer Rolle 5UPR 6040 können etwa 250 Karten und mit einer Rolle 5UPR 6080 etwa 200 Karten einseitig bedruckt werden Das Farbbandpaket UPR 6025 enthält nur ein Stück mit dem nur in schwarzweiß gedruckt we...

Страница 76: ...auchte Farbbänder nicht wieder verwenden Die Oberfläche von Farbbändern nicht berühren Farbbänder nicht an staubigen Orten lagern Fingerabdrücke und Staub beeinträchtigen die Druckqualität Lagerung von Farbbändern Farbbänder nicht an heißen oder feuchten Orten lagern Lagern Sie teilweise verbrauchte Farbbänder in der feuchtigkeitsbeständigen Hülle in der sie ursprünglich verpackt waren Wenn ein Fa...

Страница 77: ...ucken von etwa 200 Karten gewaschen werden Seite 91 In diesem Abschnitt erfahren Sie wie die Reinigungswalzen im Drucker installiert werden 1 Fassen Sie beiden Seiten der vorderen Klappe an und ziehen Sie sie auf 2 Ziehen Sie an der mit PULL OPEN markierten Stelle der Walzenabdeckung und entfernen Sie die Abdeckung 3 Setzen Sie zwei Reinigungswalzen in die Walzenhalterung ein Vermeiden Sie es die ...

Страница 78: ...tenzuführung UPA 6003 die dem Drucker die Karten automatisch zuführt sowie die automatische Kartenablage UPA 6002 die die bedruckten Karten aus dem Drucker aufnimmt Am UP D6400 D6300 kann eine automatische Kartenzuführung installiert werden während am UP D6500 bis zu zwei automatische Kartenzuführungen und eine automatische Kartenablage installiert werden können Der mitgelieferte Kartenauffang kan...

Страница 79: ... ziehen dabei die Zuführung vom Drucker ab Hinweis Schalten Sie den Drucker immer aus bevor Sie irgendwelches Sonderzubehör installieren oder entfernen 1 Entfernen Sie die Führung von der Karteneinschuböffnung während Sie den Knopf hochdrücken 2 Drücken Sie auf den oberen Knopf und entfernen Sie die Anschlußabdeckung 3 Richten Sie den Anschluß und die Führungsstifte der automatischen Kartenzuführu...

Страница 80: ... der Ablage Zum Entfernen öffnen Sie die Ablagenabdeckung drücken auf den Trennhebel und ziehen dabei die Ablage vom Drucker ab 1 Drücken Sie auf den oberen Knopf und entfernen Sie die Anschlußabdeckung 2 Richten Sie den Anschluß und die Führungsstifte der automatischen Kartenablage am Anschluß und den Führungsöffnungen des Druckers aus und schieben Sie den Anschluß hinein 3 Drücken Sie auf die au...

Страница 81: ...sein und dem Centronics Standard entsprechen Welche Kabelstecker notwendig sind hängt vom Computer bzw den Peripheriegeräten ab zu denen eine Verbindung hergestellt wird Informationen dazu finden Sie in den Handbüchern der jeweiligen Geräte Wenn Sie zwecks schnellerer Datenübertragung den ECP Modus benutzen wollen muß das Kabel dem IEEE1284 Standard entsprechen wie beispielsweise das Hewlett Packa...

Страница 82: ...Schnittstelle nicht wenn Sie die SCSI Schnittstelle verwenden 1 Lesen Sie im Computer Handbuch nach welches SCSI Kabel geeignet ist Wenn Sie weitere SCSI Geräte anschließen lesen Sie außerdem die relevanten Abschnitte in deren Handbüchern durch Benutzen Sie ein dem SCSI2 Standard entsprechendes Kabel 2 Ein SCSI Bus ermöglicht den Anschluß anderer SCSI Geräte an die SCSI Kette vor und nach dem Druc...

Страница 83: ... 0 ID 1 ID 2 ID 3 ID 4 ID 5 ID 6 ID 7 Schalter 4 OFF ON OFF ON OFF ON OFF ON Schalter 3 OFF OFF ON ON OFF OFF ON ON Schalter 2 OFF OFF OFF OFF ON ON ON ON Hinweis Achten Sie darauf nicht eine Nummer zu wählen die bereits von einem anderen an den SCSI Bus angeschlossenen Gerät benutzt wird Jedes Gerät muß eine eindeutige ID benutzen Terminator einstellen Der Schalter am linken Ende der SCSI ID Wähl...

Страница 84: ...ehl in den Drucker eingezogen Ist eine zweite automatische Kartenzuführung am UP D6500 installiert werden zuerst die Karten aus der ersten Zuführung eingezogen und erst wenn diese leer ist die Karten aus der zweiten Zuführung Die Karten können auch manuell über die Karteneinschuböffnung der Kartenzuführung zugeführt werden Führen Sie aber keiner Karten zu die ein anderes Format als die in die Zufü...

Страница 85: ...eite 83 Farbband Seite 75 Reinigungswalzen Seite 77 und Kartenauffang installieren Seite 78 Falls Sie die optionale automatische Kartenzuführung Seite 79 oder die automatische Kartenablage Seite 80 besitzen dieses Sonderzubehör installieren Was bei der Handhabung der Karten zu beachten ist Karten immer an deren Kanten anfassen um nicht deren Oberfläche zu berühren Fingerabdrücke können zu unsauber...

Страница 86: ... Sie vom Computer aus einfach nochmals den Druckbefehl und schieben Sie die Karte manuell ein Die Daten im Bildspeicher des Druckers werden nochmals ausgedruckt Nachfolgend wird das Bedrucken von Karten bei manueller Zuführung erklärt 1 Schalten Sie den Drucker ein Die READY Lampe blinkt einige Sekunden Sobald sie dauernd leuchtet ist der Drucker einsatzbereit Hinweis Ist der Drucker über den SCSI...

Страница 87: ...handbuch Nach dem Ausdruck kehrt der Drucker in den Bereitschaftszustand zurück Nachfolgend wird gezeigt wie die Karten bei installierter automatischer Kartenzuführung bedruckt werden 1 Schalten Sie den Drucker ein Die READY Lampe blinkt einige Sekunden Sobald sie dauernd leuchtet ist der Drucker einsatzbereit Hinweis Ist der Drucker über den SCSI Anschluß angeschlossen schalten Sie den Drucker ni...

Страница 88: ...chen kann Den Drucker nicht verschieben oder heben wenn die automatische Kartenzuführung oder Kartenablage installiert ist Vor einem Transport der Druckers die automatische Kartenzuführung oder Kartenablage immer entfernen Der Ausdruck kann vom Computer aus nicht abgebrochen werden Wenn der Drucker einen Befehl zum Druckabbruch empfängt wird die aktuelle Karte fertiggedruckt bevor der Drucker in d...

Страница 89: ...ter für fehlerhafte Karten innerhalb der Druckers ansammeln sollten regelmäßig entfernt werden Sie können nicht drucken Wenn die ALARM Lampe blinkt kann nicht gedruckt werden Seite 90 Beim Ausschalten des Druckers wird der Inhalt des Druckerspeichers gelöscht Daher müssen die Druckdaten nochmals an den Drucker übertragen werden bevor ein Ausdruck fortgesetzt werden kann Vor dem Ausdruck müssen die...

Страница 90: ...eer Karten einlegen Seite 87 Der Auffangbehälter für fehlerhafte Karten ist voll Die fehlerhaften Karten herausnehmen Karte hat sich in der manuellen Zuführung gestaut Drucker aus und wieder einschalten 1 Karte hat sich im Druckmechanismus gestaut Drucker aus und wieder einschalten 1 Karte hat sich im Umkehrmechanismus gestaut Drucker aus und wieder einschalten 1 Karte hat sich im Auswurfmechanism...

Страница 91: ...pe öffnet sich 2 Ziehen Sie an der mit PULL OPEN beschrifteten Stelle der Walzenabdeckung und entfernen Sie die Abdeckung 3 Ziehen Sie den Knopf der Reinigungswalzenhalterung und entfernen Sie sie 4 Entfernen Sie die Reinigungswalzen aus deren Halterung 5 Waschen Sie die Reinigungswalzen mit Wasser und wischen Sie sie anschließend trocken damit kein Staub anhaftet Hinweise Geben Sie beim Trockenwi...

Страница 92: ...n Druckkopf hinweisen Wenn die ALARM Lampe blinkt während die anderen vier Lampen RIBBON CARD PRINT und READY leuchten muß der Druckkopf ausgewechselt werden Ersetzen Sie den Druckkopf mit dem Druckkopfmodell UPU D65H Hinweise Ziehen Sie vor dem Auswechseln des Druckkopfes unbedingt das Netzkabel vom Drucker ab Der Druckkopf wird beim Drucker heiß Lassen Sie dem Druckkopf ausreichend Zeit abzukühl...

Страница 93: ...Sie die beiden in Schritt 5 entfernten Anschlüsse an den neuen Druckkopf an 7 Drehen Sie den Druckkopf in die in der Abbildung gezeigten Richtung bis die Öffnungen im Druckkopf an den Haken im Druckkopfhalter ausgerichtet sind 8 Führen Sie die Haken des Druckkopfhalters in die Öffnungen im Druckkopf ein und schieben Sie den Druckkopf zurück bis er einrastet 9 Entfernen Sie die Schutzabdeckung vom ...

Страница 94: ...ang 94 Anhang Druckkopf auswechseln 10Setzen Sie den Druckkopfhalter wieder ein 11Schließen Sie die obere Abdeckung Zuerst die linke Seite der oberen Abdeckung einsetzen und dann die rechte Seite schließen ...

Страница 95: ...Druck punkteanzahl 965 590 Punkte Max Bildgröße 82 50 mm Druckauflösung 256 Gradation Gelb Magenta Cyan Druckgeschwindig keit etwa 40 Sek Seite mit CMYL Farbband Speicher UP D6400 D6300 4 MB UP D6500 8 MB Schnittstelle UP D6500 D6400 D6300 parallele IEEE 1284 Schnittstelle 36 Pin Amphenol eine UP D6500 SCSI 2 Schnittstelle 50 Pin Half Pitch DIN Typ zwei Farbbänder 5UPR 6040 Color Farbband für 250 ...

Страница 96: ...rner Terminator ON OFF schaltbar SCSI ID Über Schalter einstellbar 0 bis 7 Änderungen die dem technischen Fortschritt dienen bleiben vorbehalten Hinweis Es ist äußerst wichtig Karten zu benutzen die für das Thermosublimationsverfahren geeignet sind Bedrucken Sie nur saubere und flache Karten Mehr über geeignete Karten erfahren Sie von Ihrem Händler Spezifikationen für geeignete PVC Karten Länge 85...

Страница 97: ......

Страница 98: ......

Страница 99: ......

Страница 100: ...Sony Corporation Printed in Japan ...

Отзывы: