1-5
UP-895/(E)
26
Preparation
Preparation
Loading Paper
Notes
• Before loading paper, read “Paper” on page 25.
• Do not fold the paper or touch the printing surface.
Dust or finger prints are likely to cause poor print
quality.
• Use only UPP-110S/110HD/110HG paper as specified
for this printer. (page 25)
• Set the PAPER TYPE switch according to the paper
type. (page 23)
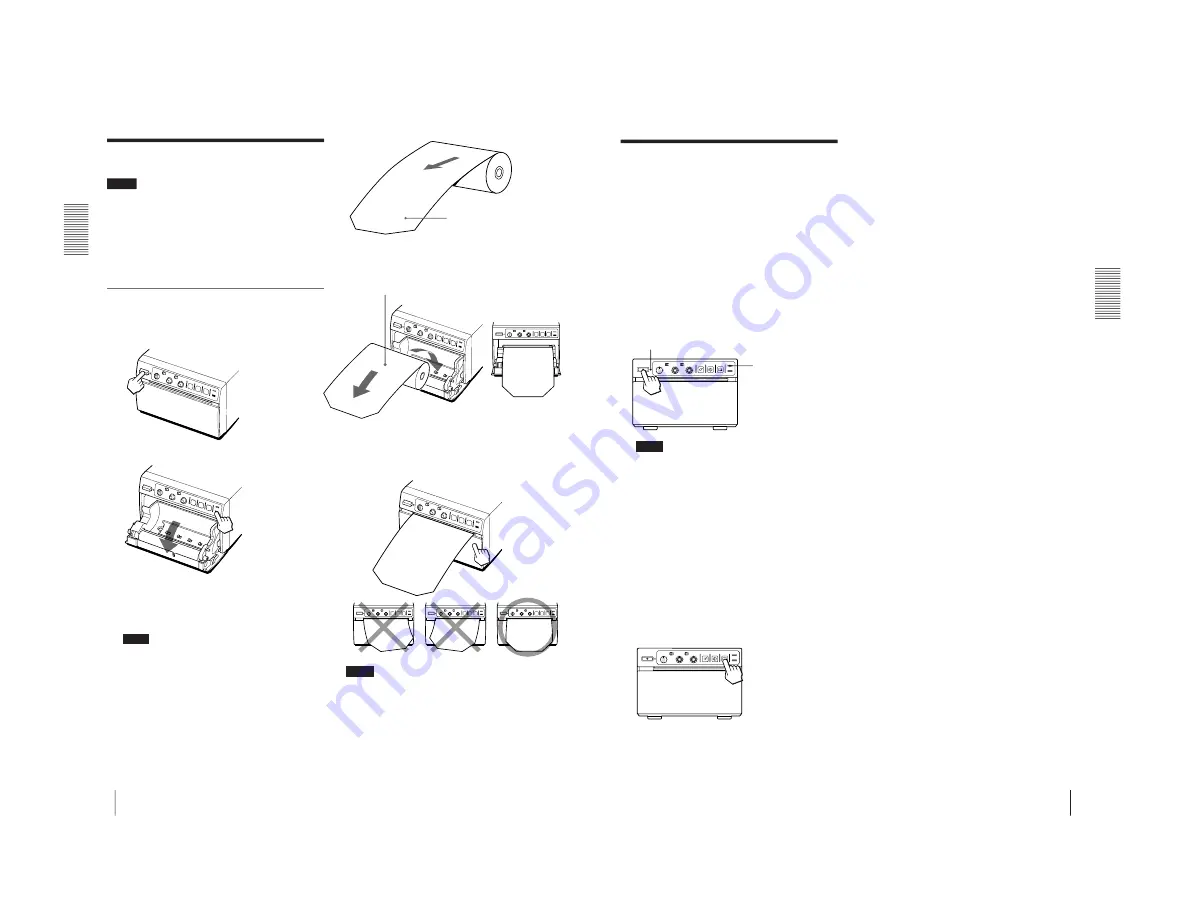
Loading
1
Press the power switch to turn on the printer.
The power lamp lights.
2
Press the OPEN button to open the door.
3
Remove the label attached at the top of the paper
roll, pull out the first 15 to 20 cm (6 to 8 inches) of
the paper, then place the paper roll in the paper
tray.
Note
When pulling out the top of the paper roll or placing
it in the paper tray, be careful not to drop the paper
roll. If dust has accumulated on the paper, you may
not be able to use this paper because dust or finger
prints are likely to cause poor print quality or
malfunction of the head.
4
Close the door by pushing it.
Remove the label and pull out the
first 15 to 20 cm (6 to 8 inches) of
the paper.
Place the paper with the thermo-sensitive
side (printing side) up. If you place the paper
with the printing side down by mistake, the
image will not be printed.
Place the paper roll so
that the paper comes
out from the paper tray
straight.
Loading Paper
Note
• If the paper roll is not placed properly and does not
come out from the paper tray straight, this may cause
paper jamming.
• If you did not pull out the paper enough in step 3, feed
the paper at least 15 to 20 cm by pressing and holding
down the FEED button. Do not pull out the paper
manually.
27
Operation
Operation
Printing
Before making printouts
Confirm the following:
• Are the connections correct? (page 22)
• Are the slide switches and DIP switches set correctly?
(pages 22 and 23)
• Is the paper type set correctly? (page 23)
• Is the paper roll loaded properly? (page 26)
• Is the video source being input?
Making Printouts
1
Press the power switch to turn on the printer.
The power lamp lights and the EMPTY lamp blinks
for a few seconds.
Note
Make sure that the EMPTY lamp turns out after
blinking for a few seconds. If lit, the paper has run
out. Load the paper. (“Loading Paper” on page 26)
2
Select the printing direction and image size.
See “Selecting the Printing Direction/Image Size” on
the next page.
3
Start the video source.
This operation is done using the controls of the video
equipment which you are using as a source.
4
When the image you want to print is on the video
monitor, press the PRINT button.
The image displayed at the instant you press the
PRINT button is captured into memory and is
printed out immediately.
To interrupt printing
Press either the OPEN or FEED button while printing.
The printer stops printing.
To stop printing and print another image
displayed on the video monitor
To do this, DIP Switch
1
(INTERRUPT) must be set to
ON (SW-DOWN). (See page 24.)
Press the PRINT button while printing or copying. The
printer stops printing, captures the new image, and starts
printing the new image.
In SMALL mode, the printer stops printing and captures
the first image.
If the printout image is blurred
A rapidly moving image may be blurred when printed.
Should this occur, change DIP Switch
4
(MEMORY)
to FIELD (SW-UP). (See page 24.) The printout quality
will be poorer, but less blurred.
To print in SMALL mode
You can print in SMALL mode, where two different
images can be captured and printed together on one
printout, by setting the image size selector on the front
panel to the SML position.
To print in SMALL mode: Press the PRINT button
twice in step 4. When you press the PRINT button once,
the buzzer sounds and the first image is captured. The
printer starts printing after the PRINT button is pressed
twice.
For detailed information on SMALL mode, see
“Selecting Printing Direction/Image Size” on the next
page.
To feed the paper
Press and hold down the FEED button to feed the paper.
Do not pull out the paper manually.
Storing printouts
• Avoid storing printouts in a location subject to the
following. Storage of your printouts in such a place
results in fading of printouts.
– Store printouts in a cool and dark place (below
30°C or 86°F). We recommend storing printouts in
a bag made of clay-free paper or polypropylene.
– Do not store printouts in a hot or humid place. Do
not leave printouts in direct sunlight or other bright
places.
– Do not allow any volatile organic solvent or vinyl
chloride to touch printouts. Alcohol, plastic tape or
film will cause the printout to fade.
• Do not stack your printouts on or under a diazo copy
sheet. Also do not attach the printed surface to another
printed surface. The printout may become discolored.
• To attach the printout to another piece of paper, use
double-sided adhesive tape or water-based glue.
EMPTY lamp
Printing
Power lamp
Содержание UP-895
Страница 1: ...VIDEO GRAPHIC PRINTER UP 895 UP 895CE UP 895MD SERVICE MANUAL 1st Edition ...
Страница 6: ......
Страница 26: ......
Страница 52: ......
Страница 71: ...10 1 UP 895 E 10 1 2 3 4 5 1 A B C D E F G H Section 10 Schematic Diagrams and Board Layouts ...
Страница 82: ......


