background image

9

First Time Operation - Basic Presetting

Selecting Language

Use this function to change the language of the menu screens.
The first time that you switch on your TV, the Language menu appears automatically.
However, if you need to change the language menu afterwards, select the menu LANGUAGE in the 

 (SET UP) menu

and proceed in the same way as described below.

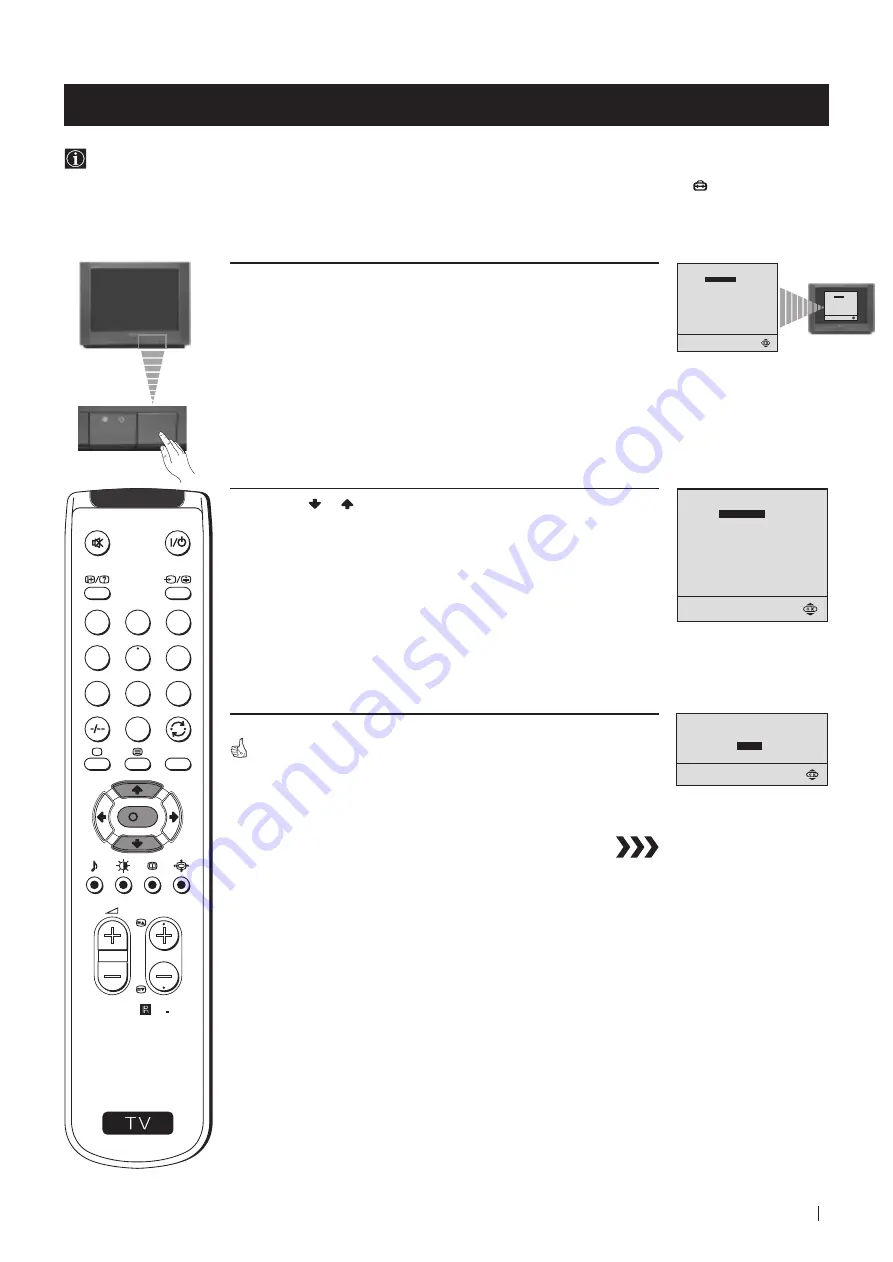
1

Press the 

on/off

 button on your TV set to switch on your TV. The

first time you press the 

on/off 

button on your TV set, the language

menu displays automatically on the TV screen.

2

Press the   or   button on the remote control to select the
language,  then press the 

OK

 button to confirm your selection.

The Auto Tuning menu appears on the TV screen in the selected language.


First Time Operation - Basic Presetting

LANGUAGE

Select language:

ENGLISH

DEUTSCH

FRANÇAIS

ITALIANO

ESPAÑOL

NEDERLANDS

E

ΛΛ

HNIKA

POLSKI

Č

ESKI

MAGYAR

TÜRKÇE

Do you want to start

automatic tuning?

YES

NO

LANGUAGE

ENGLISH

DEUTSCH

FRANÇAIS

ITALIANO

ESPAÑOL

NEDERLANDS

E

ΛΛ

HNIKA

POLSKI

Č

ESKI

MAGYAR

T

Ü

RKÇE

Select language:

S

RM 887

PROGR

MENU

1

4

7

2

5

8

0

3

6

9

K

LANGUAGE

Select language:

ENGLISH

DEUTSCH

FRANÇAIS

ITALIANO

ESPAÑOL

NEDERLANDS

E

ΛΛ

HNIKA

POLSKI

Č

ESKI

MAGYAR

TÜRKÇE

Содержание TRINITRON KV-21FX20D

Страница 1: ...R 1999 by Sony Corporation Printed in Spain KV 21FX20D 4 204 905 11 1 FD Trinitron Colour Television Instruction Manual GB Οδηγίεσ Χρήσησ GR Kullanwm Kwlavuzu TR DE Bedienungsanleitung ...

Страница 2: ...2 ...

Страница 3: ... the basic functions Use Advanced Operation if you wish to know more about the additional features of the TV set Symbols used in the manual Informs you of possible hazards Important information Information on a feature 1 2 Sequence of instructions Shaded buttons on the remote control show the buttons you have to press to follow the sequence of instructions Informs you of the result of the instruct...

Страница 4: ...he TV For Safe Operation Do not operate the TV set on anything other than a 220 240V AC 50Hz supply Do not operate the TV if any liquid or solid objects fall in through the ventilation slots Have it checked immediately For environmental and safety reasons it is recommended that the TV set is not left in standby mode when not in use Switch off at the mains Do not disconnect the TV by pulling on the...

Страница 5: ...cting Language 9 Automatically Tuning the TV using the Remote Control 10 Changing the Programme Order of the TV channels 11 Advanced Operation Advanced Presetting Automatically Tuning the TV 12 Manually Tuning the TV 13 Fine Tuning Channels 14 Adjusting the Picture Rotation 15 Skipping Programme positions 16 Advanced TV Operation Adjusting the Picture 17 Adjusting the Sound 18 Using the Sleep Time...

Страница 6: ...ted Overview On Off Switch Standby indicator Press the flap on the front of the TV to reveal the front control panel press on the mark S RM 887 PROGR MENU 1 4 7 2 5 8 0 3 6 9 K Programme Up or Down buttons Selects TV channels Phono Video Input jack Selecting Input source Volume control buttons Audio Inputs jacks Headphone jack Auto Tune button ...

Страница 7: ...Press to view programmes in 16 9 mode Press again to return to 4 3 mode This button only works in Teletext mode Function associated to this button does not work with this TV Selecting channels Press to select the next or previous channel Muting the Sound Press to mute TV sound Press again to restore the sound Displaying On Screen Information Press to display all on screen indications Press again t...

Страница 8: ...ys remember to dispose of used batteries in an environmental friendly way Connecting the Aerial Connect the TV plug to the mains socket 220 240V AC 50Hz Switching on the TV Inserting Batteries into the Remote Control Push in the On Off switch on the front of the TV Connect a conventional aerial to the socket marked on the rear of the TV ...

Страница 9: ...splays automatically on the TV screen 2 Press the or button on the remote control to select the language then press the OK button to confirm your selection The Auto Tuning menu appears on the TV screen in the selected language First Time Operation Basic Presetting LANGUAGE Select language ENGLISH DEUTSCH FRANÇAIS ITALIANO ESPAÑOL NEDERLANDS EΛΛHNIKA POLSKI ČESKI MAGYAR TÜRKÇE Do you want to start ...

Страница 10: ...A new menu appears automatically on the screen asking you to check that the antenna is connected 2 Confirm that the antenna is connected and then press the OK button The automatic tuning starts and the message Searching flashes on the screen This procedure could take some minutes When the automatic tuning is finished the Programme Sorting menu appears on the TV screen Notes To stop the automatic t...

Страница 11: ...resetting Changing the Programme Order of the TV channels After all available channels TV Broadcast are captioned and stored a new menu appears automatically on the screen to change the order in which the channels appear on the screen However if you wish to rearrange the order of the channels afterwards select the menu PROGRAMME SORTING in the SET UP menu and proceed in the same way as described i...

Страница 12: ...creen asking you to check that antenna is connected 3 Confirm that the antenna is connected and then press the OK button on the remote control The automatic tuning starts and the message Searching flashes on the screen This procedure could take some minutes When the automatic tuning procedure is complete the menu disappears from the TV screen and your TV is now ready for use Note To stop the autom...

Страница 13: ...sh to store this channel press the or button to continue searching for the desired channel 7 If this is the desired channel you wish to store press the OK button and then with the cursor highlighting CONFIRM press the OK button again 8 Repeat steps 4 to 7 if you wish to store more channels 9 Press the MENU button to exit and return to the normal TV screen Your TV is now ready for use PICTURE CONTR...

Страница 14: ...the OK button 6 With the cursor highlighting CONFIRM press the OK button to store 7 Press the MENU button to exit and return to the normal TV screen 8 Repeat steps 1 to 7 to fine tune other channels Your TV is now ready for use 0 SET UP PICTURE ROTATION LANGUAGE ENGLISH AUTO PROGRAMME PROGRAMME SORTING MANUAL PROGRAMME 0 SET UP PICTURE ROTATION LANGUAGE ENGLISH AUTO PROGRAMME PROGRAMME SORTING MAN...

Страница 15: ...the or button to adjust the picture rotation adjusting range is 5 to 5 then press the OK button 5 Press the MENU button to exit and return to the normal TV screen Your TV is now ready for use 0 SET UP PICTURE ROTATION LANGUAGE ENGLISH AUTO PROGRAMME PROGRAMME SORTING MANUAL PROGRAMME 0 SET UP PICTURE ROTATION LANGUAGE ENGLISH AUTO PROGRAMME PROGRAMME SORTING MANUAL PROGRAMME 2 SET UP PICTURE ROTAT...

Страница 16: ...OK button 8 Repeat steps 4 to 7 to skip other unused programme positions 9 Press the MENU button to exit and return to the normal TV screen When changing channels TV Broadcasts with the PROGR buttons the skipped programme positions do not appear You can however still select them using the number buttons 0 SET UP PICTURE ROTATION LANGUAGE ENGLISH AUTO PROGRAMME PROGRAMME SORTING MANUAL PROGRAMME 0 ...

Страница 17: ...e factory preset levels Can be only altered if PERSONAL MODE is selected Only avalaible for NTSC colour signal e g US video tapes Advanced Operation Advanced TV Operation Adjusting the Picture Although the picture is adjusted at the factory you can modify it to suit your own taste Changing Picture Mode Quickly 1 Press the button on the remote control to directly access the PICTURE MODE 2 Press the...

Страница 18: ...ono sound B for channel 2 DSP Digital sound Processor ON OFF RESET Resets sound to the factory preset levels Can be only altered if PERSONAL MODE is selected Advanced Operation Advanced TV Operation Adjusting the Sound Although the sound is adjusted at the factory you can modify it to suit your own taste Changing Sound Mode Quickly 1 Press the button on the remote control to access directly to the...

Страница 19: ...Press the OK button 6 Press the MENU button to exit and return to the normal TV screen One minute before the TV switches into standby mode the time remaining is displayed on the TV screen automatically Notes When watching the TV press the button to display the time remaining To return to normal operation from standby mode press the button Advanced Operation Advanced TV Operation TIMER OFF TIMER ON...

Страница 20: ...ss the standby button The standby indicator on the TV flashes regularly to indicate that the Wake Up timer is active After the selected length of time the TV switches on automatically Notes If you use the Wake Up Timer to switch the TV on and keep it on for one hour without pressing any TV or remote control button the TV switches itself back into Standby mode and the indicator on the TV lights Any...

Страница 21: ...to view 2 Press the button on the remote control to switch on the teletext 3 Input three digits for the page number using the numbered buttons on the remote control if you have made a mistake type in any three digits and then re enter the correct page number 4 Press the button to switch off teletext Using other Teletext functions TO PRESS THE BUTTON Access the next or preceding page for next page ...

Страница 22: ...e button on the remote control Additional Information Connecting a VCR Plug in VCR to the socket E on the rear of the TV set We recommend you tune in the VCR signal to TV programme number 0 using the section Manually Tuning the TV of this instruction manual Connecting Headphones Plug in your headphones to the socket C on the front of the TV set Connecting Decoders Plug in decoders to the socket E ...

Страница 23: ... Tuning information such as the channel overview are downloaded from the TV set to the VCR Direct TV recording While watching TV you need to press just one button on the VCR to record this programme TV in standby mode Press the Play z button on your VCR to switch the TV automatically on If you have connected a decoder to a VCR which supports Smartlink feature select the menu MANUAL PROGRAMME in th...

Страница 24: ...UAL SOUND DSP RESET MODE PERSONAL OFF OFF TIMER OFF TIMER ON TIMER 0 SET UP PICTURE ROTATION LANGUAGE ENGLISH AUTO PROGRAMME PROGRAMME SORTING MANUAL PROGRAMME PICTURE CONTROL CONTRAST BRIGHTNESS COLOUR SHARPNESS HUE RESET MODE PERSONAL STEREO ON SOUND CONTROL TREBLE BASS BALANCE DUAL SOUND DSP RESET MODE PERSONAL OFF OFF TIMER OFF TIMER ON TIMER OFF OFF TIMER OFF TIMER ON TIMER 0 SET UP PICTURE R...

Страница 25: ...epeatedly on the remote control until RGB video source the RGB symbol is displayed on the screen Good picture no sound Press the button on the remote control If is displayed on the screen press the button on the remote control No colour on colour programmes Using the MENU system select the Picture Adjustment display Adjust the colour balance From the Picture Adjustment display select RESET to retu...

Страница 26: ...ENELEC standard including audio video input S video input monitor audio video output Audio outputs phono jacks Front Terminals k video input phono jack 2 audio inputs phono jacks Headphones jack minijack stereo Sound output 2x7 W RMS Power consumption 80 W Standby Power consumption 0 5 W Dimensions w x h x d Approx 545 x 446 x 485 mm Weight Approx 26 5 kg Accessories supplied 1 Remote Control RM 8...

Страница 27: ...ionen des Gerätes vertraut zu machen Verwenden Sie den Teil Zusatzfunktionen falls Sie die Sonder und Zusatzfunktionen des Gerätes interessieren In der Anleitung verwendete Symbole Mögliche Gefahren Wichtiger Hinweis Information zu einer Funktion 1 2 Eine Aufzählung von Bedienschritten Farblich hervorgehobene Tasten auf der Fernbedienung beziehen sich auf die zu drückenden Tasten um eine Bedienfol...

Страница 28: ...n aus Stellen Sie das Gerät nur auf einen stabilen TV Stand der für das Gewicht und die Abmessungen des Gerätes ausgelegt ist Zum sicheren Betrieb Betreiben Sie das Gerät nur an 220 240 V AC 50 Hz Ziehen Sie sofort den Netzstecker falls Flüssigkeiten oder Gegenstände in das Gehäuse gelangen Lassen Sie das Gerät auf jeden Fall überprüfen Schalten Sie das Gerät normalerweise mit dem Netzschalter gan...

Страница 29: ...omatisches Abspeichern von Sendern mit der Fernbedienung 34 Ordnen der Programmspeicherplätze 35 Weitere Funktionen Abspeicherung Zusatzfunktionen Automatisches Abspeichern von Sendern 36 Manuelles Abspeichern von Sendern 37 Feinabstimmen eines Senders 38 Einstellen der Bildrotation 39 Überspringen von Programmspeicherplätzen 40 Bedienung des Fernsehgerätes Zusatzfunktionen Einstellen des Bildes 4...

Страница 30: ...ung RM 887 Zwei Batterien R6 Als erstes Auf einen Blick Programmwahl Netzschalter Ein Aus Bereitschaftsanzeige Tasten am Gerät Zum Öffnen Markierung auf Abdeckung vorne am Gerät drücken Kopfhörer Buchse Cinchbuchse Videoeingang Taste zur Wahl des Video eingangs Lautstärke regelung Taste zur automatischen Abspeicherung von Sendern Cinch buchsen Audio eingang ...

Страница 31: ...mal drücken um 16 9 Breitbildeffekt einzustellen Nochmals drücken um auf 4 3 Format umzuschalten Videotext Taste keine Funktion im TV Betrieb Die Fucktion kann an diesem Fernseher im Zusammenhang mit dieser Taste nicht angewendet werden Programmwahl Drücken um das nächste oder vorherige Programm zu wählen Alle farbigen Tasten und die Symbole in grün haben sowohl im TV Betrieb als auch im Videotext...

Страница 32: ...rgen Sie die verbrauchten Batterien bitte umweltgerecht Anschluß der Antenne Das Gerät an das Netz anschließen 220 240 V AC 50 Hz Einschalten des Fernsehgerätes Einlegen der Batterien in die Fernbedienung Den Netzschalter Ein Aus am Gerät drücken Ein Antennenkabel das den einschlägigen Vorschriften entspricht in die Antennenbuchse einstecken ...

Страница 33: ...cheint beim erstmaligen Einschalten automatisch das Menü LANGUAGE SPRACHE auf dem Bildschirm 2 Mit den Tasten oder auf der Fernbedienung die gewünschte Sprache auswählen Mit der OK Taste bestätigen Nun erscheint das Menü Automatisch Abspeichern in der gewählten Sprache Erstmalige Inbetriebnahme Abspeicherung Grundfunktionen LANGUAGE Select language ENGLISH DEUTSCH FRANÇAIS ITALIANO ESPAÑOL NEDERLA...

Страница 34: ...endet ist erscheint das Menü Programme ordnen auf dem Bildschirm Anmerkungen Sie können den Suchlauf mit der MENU Taste unterbrechen Falls Sie den Suchlauf mit der MENU Taste unterbrochen haben erscheint das Menü Programme ordnen nicht automatisch auf dem Bildschirm Erstmalige Inbetriebnahme Abspeicherung Grundfunktionen Bevor Sie fernsehen können müssen Sie Sender auf Programmspeicherplätze abspe...

Страница 35: ...innen Sie dann bei Abschnitt b dieses Kapitels a Sie möchten die Reihenfolge der Sender beibehalten 1 Die MENU Taste drücken um in den normalen TV Betrieb zurückzukehren Ihr Gerät ist jetzt betriebsbereit b Sie möchten die Reihenfolge der Sender ändern 1 Mit PROGR oder den Sender wählen der auf einen anderen Programmspeicherplatz soll 2 Mit den Tasten oder den neuen Programmspeicherplatz für den S...

Страница 36: ...es Bedienteils zu öffnen 2 Die Taste so lange gedrückt halten bis automatisch ein neues Menü auf dem Bildschirm erscheint das Sie bittet den Antennenanschluß zu überprüfen 3 Überprüfen Sie ob die Antenne korrekt angeschlossen ist und bestätigen Sie mit der OK Taste auf der Fernbedienung Der automatische Suchlauf startet nun und die Meldung Suche blinkt während der Dauer des Suchlaufes Der Suchlauf...

Страница 37: ...nun auf PROGRAMM Die Taste drücken und mit den Tasten oder die gewünschte Programmnummer wählen auf die der Sender abgespeichert werden soll Mit der Taste bestätigen 5 Mit der Taste KANAL wählen dann die Taste drücken Mit der Taste oder entweder C für normale Kanäle oder S für Kabelkanäle wählen Die Taste drücken 6 Mit den Zahlentasten den gewünschten Kanal eingeben oder mit oder den nächsten zur ...

Страница 38: ...un auf BESTÄTIGEN Mit der OK Taste bestätigen 7 Die MENU Taste drücken um in den normalen TV Betrieb zurückzukehren 8 Zum Feinabstimmen weiterer Sender die Schritte 1 bis 7 wiederholen Ihr Gerät ist jetzt betriebsbereit S RM 887 PROGR MENU 1 4 7 2 5 8 0 3 6 9 K BILD MENÜ KONTRAST HELLIGKEIT FARBE BILDSCHÄRFE FARBTON NORMWERTE MODUS ANWENDER BILD MENÜ KONTRAST HELLIGKEIT FARBE BILDSCHÄRFE FARBTON N...

Страница 39: ... die Bildrotation einstellen Skala 5 bis 5 Mit der OK Taste bestätigen 5 Die MENU Taste drücken um in den normalen TV Betrieb zurückzukehren Ihr Gerät ist jetzt betriebsbereit S RM 887 PROGR MENU 1 4 7 2 5 8 0 3 6 9 K BILD MENÜ KONTRAST HELLIGKEIT FARBE BILDSCHÄRFE FARBTON NORMWERTE MODUS ANWENDER BILD MENÜ KONTRAST HELLIGKEIT FARBE BILDSCHÄRFE FARBTON NORMWERTE MODUS ANWENDER 0 INSTALLATION BILDR...

Страница 40: ...itte 4 bis 7 wiederholen um weitere Programm speicherplätze zu überspringen 9 Die MENU Taste drücken um in den normalen TV Betrieb zurückzukehren Bei der Programmwahl mit PROGR erscheinen die übersprungenen Programmspeicherplätze nicht mehr Sie können aber weiterhin mit den Zahlentasten aufgerufen werden 01 B G C 21 EIN NEIN AUS INSTALLATION MANUELL ABSPEICHERN BESTÄTIGEN PROGRAMM TV SYSTEM KANAL ...

Страница 41: ...im Bild Modus ANWENDER eingestellt ist Nur bei NTSC Farbsignal z B US Videobänder Weitere Funktionen Bedienung des Fernsehgerätes Zusatzfunktionen Einstellen des Bildes Die Bildwerte sind werksseitig auf Normwerte eingestellt Im Bild Menü können Sie jedoch das Bild individuell einstellen Schneller Zugriff auf das Bildmenü 1 Die Taste auf der Fernbedienung drücken um direkt das BILD MODUS Menü aufz...

Страница 42: ...er Werte auf Fabrikeinstellung Nur einstellbar wenn im Ton Modus ANWENDER eingestellt ist Weitere Funktionen Bedienung des Fernsehgerätes Zusatzfunktionen Einstellen des Tons Die Tonwerte sind werksseitig auf Normwerte eingestellt Im Ton Menü können Sie jedoch das Bild individuell einstellen Schneller Zugriff auf das Tonmenü 1 Die Taste auf der Fernbedienung drücken um direkt das TON MODUS Menü au...

Страница 43: ...malen TV Betrieb zurückzukehren Eine Minute bevor das Gerät sich in Bereitschaftsbetrieb schaltet wird automatisch die verbleibende Restzeit eingeblendet Anmerkungen Drücken Sie die Taste wenn sie während Sie fernsehen die verbleibende Restzeit einblenden möchten Drücken Sie die Taste wenn Sie das Gerät aus dem Bereitschaftsbetrieb wiedereinschalten möchten Weitere Funktionen Bedienung des Fernseh...

Страница 44: ...en Die Anzeige für den Bereitschaftsbetrieb blinkt nun regelmäßig Dadurch sehen Sie daß der Einschalt Timer aktiviert ist Nach Ende des eingestellten Zeitabschnitts schaltet sich das Gerät automatisch ein Anmerkungen Wenn Sie den Einschalt Timer zum Einschalten aus dem Bereitschaftsbetrieb verwendet haben und während der Stunde nach dem Einschalten weder eine Taste am Gerät noch auf der Fernbedien...

Страница 45: ...ie gewünschte dreistellige Seitenzahl eingeben Bei einer Fehleingabe die dreistellige Zahl beliebig ergänzen dann die richtige Seitenzahl eingeben 4 Die Taste drücken um den Videotext auszuschalten Verwenden anderer Videotext Funktionen FUNKTION DIE FOLGENDE TASTE DRÜCKEN Seitenweises Umblättern für die vorherige Seite für die nachfolgende Seite Einblenden des Videotextes über das Fernsehbild noch...

Страница 46: ...n Videorecorder an die Buchse E hinten am Fernsehgerät anschließen Wir empfehlen das Signal des Videorecorders auf Programmspeicherplatz 0 abzulegen Lesen Sie dazu Manuelles Abspeichern von Sendern in dieser Bedienungsanleitung Anschluß von Kopfhörern Die Kopfhörer in die Buchse C vorne am Fernsehgerät einstecken Anschluß eines Decoders Den Decoder an der Buchse E hinten am Gerät anschließen Ansch...

Страница 47: ...B die Sendertabelle vom Fernsehgerät an den angeschlossenen Videorecorder weitergeben Direkte Aufnahme Während Sie fernsehen reicht ein Tastendruck am Videorecorder um die laufende Sendung aufzunehmen Fernsehgerät ist in Bereitschaftsbetrieb Die Play Taste z am Videorecorder drücken um das Fernsehgerät einzuschalten Falls Sie einen Decoder an einem Smartlink fähigen Videorecorder angeschlossen hab...

Страница 48: ... TIEFEN BALANCE ZWEIKANAL TON DSP NORMWERTE MODUS ANWENDER 0 INSTALLATION BILDROTATION SPRACHE DEUTSCH AUTOM ABSPEICHERN PROGRAMME ORDNEN MANUELL ABSPEICHERN BILD MENÜ KONTRAST HELLIGKEIT FARBE BILDSCHÄRFE FARBTON NORMWERTE MODUS ANWENDER STEREO EIN TON MENÜ HÖHEN TIEFEN BALANCE ZWEIKANAL TON DSP NORMWERTE MODUS ANWENDER 0 INSTALLATION BILDROTATION SPRACHE DEUTSCH AUTOM ABSPEICHERN PROGRAMME ORDNE...

Страница 49: ...lle das Symbol auf dem Bildschirm eingeblendet wird Gutes Bild kein Ton Die Taste auf der Fernbedienung drücken Falls auf dem Bildschirm eingeblendet ist die Taste auf der Fernbedienung drücken Keine Farbe bei Farbsendungen MENU drücken Bild Menü wählen Farbe einstellen Im Bild Menü Normwerte wählen Verzerrtes Bild wenn Sie umschalten oder Das Gerät das an der Euro AV Buchse hinten am Gerät Videot...

Страница 50: ...io und Videosignalen Audio Eingänge Cinchbuchsen Anschlüsse vorne am Gerät k Eingang von Videosignalen Cinchbuchse 2 Eingang von Audiosignalen Cinchbuchsen Kopfhörerbuchse Stereominibuchse Weitere Informationen Technische Daten Weitere Informationen Änderungen die dem technischen Fortschritt dienen bleiben vorbehalten Recyceltes Papier chlorfrei Tonausgang 2 x 7 W RMS Leistungsaufnahme 80 W Leistu...

Страница 51: ...51 ...

Страница 52: ...52 ...

Страница 53: ...nu okumak için tavsiyeler Kullanwm kwlavuzunu okumak için tavsiyeler Kullanwm kwlavuzunu okumak için tavsiyeler Kullanwm kwlavuzunu okumak için tavsiyeler Kullanwm kwlavuzunu okumak için tavsiyeler Cihazwn temel fonksiyonlarwnw temel fonksiyonlarwnw temel fonksiyonlarwnw temel fonksiyonlarwnw temel fonksiyonlarwnw tanwmak ve bu amaçla TV cihazwnwzw kurmak için ilk ixlemler bölümünü okuyunuz TV cih...

Страница 54: ...Ýz TV setini sadece TV nin aqwrlwqw için tasarlanmwx sabit ayak üzerine yerlextirin Güvenli KullanÝm İçin TV cihazÝnÝ mutlaka 220 240 V AC 50 Hz akÝmda çalÝştÝrÝnÝz SÝvÝ ve katÝ nesnelerin havalandÝrma aralÝklarÝndan içeri düşmesi halinde TV cihazÝnÝ kesinlikle çalÝştÝrmayÝnÝz CihazÝnÝzÝ derhal kontrol ettirin Çevre ve güvenlik açÝsÝndan TV cihazÝnÝn kullanÝlmadÝğÝ zamanlarda bekleme konumunda bÝr...

Страница 55: ...il seçimi 59 Uzaktan kumanda cihazw ile otomatik kanal ayarw 60 TV kanallarwnwn program numaralarwnwn swralanmasw 61 Wleri Wxlemler Wleri Wxlemler Wleri Wxlemler Wleri Wxlemler Wleri Wxlemler Wleri programlama TV cihazwndaki düqmeleri kullanarak otomatik kanal ayarw 62 Kanallarwn manuel elle ayarw 63 Manuel elle yapwlan hassas kanal ayarw 64 Görüntü döndürme ayarw 65 Program konumlarwnwn atlanmasw...

Страница 56: ...ukarw ya da axaqw düqmeleri TV kanallarwnw seçer Açma Açma Açma Açma Açma Kapama Kapama Kapama Kapama Kapama düqmesi Bekleme modu göstergesi standby TV cihazwnwn ön tarafwnda bulunan kapaqa bastwrarak kapak üzerindeki ixaretine baswnwz ön kumanda panelini açwnwz Kulaklwk girixi Video girixi Girix sinyali seçici düqmesi Ses yükseklik ayar düqmesi Otomatik ayar düqmesi Audio girixleri S RM 887 PROGR...

Страница 57: ...ak için Ekran formatwnwn seçimi Programlarw 16 9 formatwnda seyretmek için bu tuxa baswnwz 4 3 formatwna dönmek için aynw tuxa tekrar baswnwz Bu tux sadece teleteÍt modunda çalwxwr Bu tuxun fonksiyonu bu TV cihazwnda çalwxmamaktadwr Kanal seçimi Önceki veya sonraki kanalw seçmek için bu tuxa baswnwz Ses kesme tuxu mute Sesi kesmek için baswnwz Sesi tekrar açmak için yeniden baswnwz Ekranda bilgile...

Страница 58: ...illeri çevreye zarar vermeyecek bir şekilde yok ediniz Antenin baqlanmasw TV cihazwnwn fixini prize takwnwz 220 240V AC 50 Hz TV nin çalwxtwrwlmasw Uzaktan kumanda cihazwna pil takwlmasw TV cihazwnwn ön tarafwndaki Açma Açma Açma Açma Açma Kapama Kapama Kapama Kapama Kapama düqmesine baswnwz Televizyon antenini TV cihazÝnÝn arka tarafÝndaki işaretli yuvaya takÝnÝz ...

Страница 59: ...a belirecektir 2 Wstediqiniz dili seçmek için uzaktan kumanda cihazwndaki veya tuxuna baswnwz sonra OK tuxuna basarak seçim ixlemini onaylaywnwz Otomatik kanal arama menüsü TV ekranwnda seçilen dilde gürüntülenecektir TV nin ilk kez çalwxtwrwlmasw Temel programlama S RM 887 PROGR MENU 1 4 7 2 5 8 0 3 6 9 K LANGUAGE Select language ENGLISH DEUTSCH FRANÇAIS ITALIANO ESPAÑOL NEDERLANDS EΛΛHNIKA POLSK...

Страница 60: ...2 Antenin baqlw olduqundan emin olunuz ve OK tuxuna baswnwz Kanallarwn otomatik olarak ayarw baxlayacak ve kanallar aranwrken bulunan kanallar tek tek görüntülenecektir ekranda Arwyor mesajw yanwp sönerek görülecektir Bu ixlem birkaç dakika sürebilir Otomatik kanal ayar ixlemi bittiqinde ekranda Program Swralama menüsü belirecektir Notlar Eqer otomatik kanal ayar ixlemini durdurmak istiyorsanwz uz...

Страница 61: ...evcut olan tüm kanallarwn ayarlanmaswndan sonra ekranda otomatik olarak size TV kanallarwnwn swraswnw deqixtirmek isteyip istemediqinizi soran yeni bir menü görüntülenecektir Bununla beraber eqer bir süre sonra kanallarwn swraswnw deqixtirmek isterseniz AYARLAR içindeki PROGRAM SWRALAMA menüsünü seçiniz ve bu bölümde yer alan b maddesinde belirtilen talimatlarw uygulaywnwz S RM 887 PROGR MENU 1 4 ...

Страница 62: ...enin baqlw olduqundan emin olunuz ve OK tuxuna baswnwz Kanallarwn otomatik olarak ayarw baxlayacak ve kanallar aranwrken bulunan kanallar tek tek görüntülenecektir ekranda Arwyor mesajw yanwp sönerek görülecektir Bu ixlem birkaç dakika sürebilir Otomatik kanal ayar ixlemi bittiqinde menü ekrandan silinecektir TV cihazw çalwxmaya hazwrdwr Not Eqer otomatik kanal ayar ixlemini durdurmak istiyorsanwz...

Страница 63: ...tuxuna baswnwz 7 Aradwqwnwz kanalw bulduqunuzda OK tuxuna baswnwz ve ardwndan imleç ONAYLA kelimesinin üzerindeyken tekrar OK tuxuna baswnwz 8 Daha fazla saywda kanal ayarw ixlemi ve bu kanallarw hafwzaya kaydetmek için 4 7 arasw safhalarwnda anlatwlan ixlemleri tekrar ediniz 9 Normal televizyon ekranwna dönmek için MENU tuxuna baswnwz TV cihazw çalwxmaya hazwrdwr S RM 887 PROGR MENU 1 4 7 2 5 8 0...

Страница 64: ...kelimesinin üzerindeyken yeni ayarwn hafwzada kaywtlw kalmasw için OK tuxuna baswnwz 7 Normal televizyon ekranwna dönmek için MENU tuxuna baswnwz 8 Diqer kanallarwn hassas ayarwnw yapmak için 1 7 safhalarda anlatwlan ixlemleri tekrarlaywnwz TV cihazw çalwwmaya hazwrdwr S RM 887 PROGR MENU 1 4 7 2 5 8 0 3 6 9 K Wleri ixlemler Wleri programlama Wleri ixlemler Wleri programlama RESWM KONTROL KONTRAST...

Страница 65: ...le 5 araswdwr ve ardwndan OK tuxuna baswnwz 5 Normal televizyon ekranwna dönmek için MENU tuxuna baswnwz TV cihazw çalwxmaya hazwrdwr S RM 887 PROGR MENU 1 4 7 2 5 8 0 3 6 9 K Wleri ixlemler Wleri programlama Wleri ixlemler Wleri programlama RESWM KONTROL KONTRAST PARLAKLIK RENK KESKWNLWK TON NORMAL MODU KWXWSEL RESWM KONTROL KONTRAST PARLAKLIK RENK KESKWNLWK TON NORMAL MODU KWXWSEL 0 AYARLAR GÖRÜ...

Страница 66: ...OK tuxuna baswnwz 8 Diqer program konumlarwnw atlamak için 4 7 arasw ixlemleri tekrarlaywnwz 9 Normal televizyon ekranwna dönmek için MENU tuxuna baswnwz Kanalw PROGR tuxuyla seçtiqinizde kanal görünmeyecektir Ancak sözü geçen kanalwn program numarasw rakamlw tuxlar vaswtaswyla baswlarak kanal çaqwrwlabilmektedir S RM 887 PROGR MENU 1 4 7 2 5 8 0 3 6 9 K Wleri ixlemler Wleri programlama Wleri ixle...

Страница 67: ...limsi Kwrmwzwmsw NORMAL Fabrikada ayarlanan görüntü düzeyine döner Sadece KWXWSEL MODU seçilirse deqixtirilebilir Sadece NTSC renk sistemi için mevcuttur örneqin ABD de üretilen video kasetleri için Wleri ixlemler TV cihazwnwn ileri ixlemleri Görüntü ayarw Fabrikada ayarlanmaswna raqmen görüntü ayarwnw kendi ihtiyaçlarwnwza göre deqixtirebilirsiniz Resim modunun hwzlw deqixtirilmesi 1 Doqrudan RES...

Страница 68: ... için MONO STEREO Wki dilde yapwlan yaywnlar için kanal 1 veya Mono için A kanal 2 için B DSP Dijital ses ixlemcisi AÇIK KAP NORMAL Fabrikada ayarlanan görüntü düzeyine döner Sadece KWXWSEL MODU seçilirse deqixtirilebilir Ses ayarw Fabrikada ayarlanmaswna raqmen ses ayarwnw kendi ihtiyaçlarwnwza göre deqixtirebilirsiniz Ses modunun hwzlw deqixtirilmesi 1 Doqrudan SES MODU girebilmek için uzaktan k...

Страница 69: ... 5 OK tuxuna baswnwz 6 Normal televizyon ekranwna dönmek için MENU tuxuna baswnwz TV cihazw bekleme konumuna geçmeden bir dakika önce kalan süre ekranda görüntülenecektir Notlar Televizyonu izlerken kalan süreyi görmek için tuxuna baswnwz Bekleme konumundan normal çalwxma kipine dönmek için uzaktan kumanda cihazwnwn tuxuna baswnwz S RM 887 PROGR MENU 1 4 7 2 5 8 0 3 6 9 K Wleri ixlemler TV cihazwn...

Страница 70: ...uqunu düzenli olarak yanwp sönerek bildirir gösterir Belirlenmix süre geçtikten sonra televizyon otomatik olarak açwlwr Notlar Televizyonu otomatik açwlma fonksiyonu vaswtaswyla çalwxtwrdwktan bir saat sonra uzaktan kumanda cihazwnwn ya da televizyonun hiçbir düqmesine baswlmadwysa cihaz kendiliqinden bekleme konumuna standby dönecek ve TV cihazwnwn göstergesi yanacaktwr Elektrik akwmwndaki herhan...

Страница 71: ...eniden tuxuna baswnwz Bir teleteÍt sayfaswnwn dondurulmasw Dondurulmux sayfayw iptal etmek için tuxuna bir kez daha baswnwz Gizlenmix bilgilerin örn bilmecelere verilen cevaplar görüntülenmesi Bilgiyi gizlemek için tuxuna bir kez daha baswnwz TeleteÍt çoqu TV kanalwnwn yaywnladwqw bir bilgi hizmetidir TeleteÍtini kullanacaqwnwz TV kanalwnwn sinyalinin kuvvetli olduqundan emin olunuz aksi takdirde ...

Страница 72: ...Baqladwqwnwz cihazw çalwxtwrwn 4 Normal TV ekranwna dönmek için uzaktan kumanda cihazw üzerindeki tuxuna baswnwz Ek Bilgiler Video Teybin Baqlanmasw Video Teybinwzw TV cihazwnwn arka panelindeki E soketine takwnwz Bu kwlavuzun Kanallarwn elle ayarlanmasw bölümünde verilen talimatlarw uygulayarak video teybi sinyalini 0 no lu TV programwna ayarlamanwzw öneririz Kulaklwk Baqlanmasw Kulaklwqwnwzw TV ...

Страница 73: ...onnektör e baqlamak için tam telli 21pin SCART kablosu Smartlink özellikleri Ayar bilgileri örneqin kanal genel bakwxw TV setinden video cihazwna yüklenir Direkt TV den kaywt yapma Televizyon izlerken bir düqmeye basarak o programw video cihazwna kaydedebilirsiniz TV cihazw bekleme konumunda standby videonun Play z düqmesine baswnwz ve televizyon otomatik olarak çalwxmaya baxlayacaktwr Smartlink u...

Страница 74: ...KONTROL TIZ BAS BALANS ÇIFT SES DSP NORMAL MODU KWXWSEL 0 AYARLAR GÖRÜNTÜ DÖNDÜRME DIL TÜRKÇE OTOMATWK PROGRAM PROGRAM SIRALAMA MANUEL PROGRAM RESWM KONTROL KONTRAST PARLAKLIK RENK KESKINLIK TON NORMAL MODU KWXWSEL STEREO AÇWK SES KONTROL TIZ BAS BALANS ÇIFT SES DSP NORMAL MODU KWXWSEL 0 AYARLAR GÖRÜNTÜ DÖNDÜRME DIL TÜRKÇE OTOMATWK PROGRAM PROGRAM SIRALAMA MANUEL PROGRAM 0 AYARLAR GÖRÜNTÜ DÖNDÜRME...

Страница 75: ...eo kaynaqwndan gelen görüntü RGB sembolünü ekranda görüntülenene kadar uzaktan bozuk kumanda cihazwndaki tuxuna baswnwz Görüntü iyi ses yok Uzaktan kumanda cihazwndaki tufluna baswnwz Ekranda isembolü görüntüleniyorsa uzaktan kumanda cihazwndaki tufluna baswnwz Renkli programlarda renk yok MENU sistemini kullanarak görüntü ayar menüsüne giriniz Renk balansw ayarlarwnw yapwnwz Görüntü ayar menüsünd...

Страница 76: ...dardw Audio Video sinyalleri girifli S video girifli Monitör audio video çwkwxw Audio çwkwxlarw phono fiflleri Ön Terminaller k Video girixi phono girixi 2 Audio girixi phono girixi Kulaklwk girixi mini girix stereo Ses Çwkwxw 2Í7 Á RMS Güç Tüketimi 80 Á Bekleme konumu güç tüketimi 0 5 Á Boyutlar g Í y Í d Yaklaxwk 545 Í 446 Í 485 mm Aqwrlwk Yaklaxwk 26 5 kg Birlikte verilen aksesuarlar RM 887 uza...

Страница 77: ...ινώντασ Αν επιθυµείτε να γνωρίσετε τα συµπληρωµατικά χαρακτηριστικά τησ τηλεÞρασησ προχωρήστε στο τµήµα ΠρÞσθετεσ λειτουργίεσ Χρησιµοποιούµενα σύµβολα σε αυτÞ το εγχειρίδιο Πιθανοί κίνδυνοι Ενδιαφέρουσεσ πληροφορίεσ Πληροφορίεσ για τη λειτουργία 1 2 Σειρά των οδηγιών που πρέπει να εκτελεστούν Τα πλήκτρα του τηλεχειριστηρίου που έχουν περίγραµµα δείχνουν τα πλήκτρα που πρέπει να πιεστούν για την εκ...

Страница 78: ...σµένη ειδικά για το βάροσ τησ συσκευήσ Για Ασφαλή Λειτουργία Να λειτουργείτε την τηλεÞραση µÞνο στα 220 240V AC 50Hz Μη λειτουργήσετε την τηλεÞραση αν πέσει στο εσωτερικÞ τησ οποιοδήποτε υγρÞ ή στερεÞ αντικείµενο Απευθυνθείτε αµέσωσ σε εξουσιοδοτηµένο σέρβισ Για λÞγουσ ασφαλείασ µην αφήνετε την τηλεÞραση σε κατάσταση αναµονήσ Þταν δεν την χρησιµοποιείτε Κλείστε το διακÞπτη τροφοδοσίασ Μην τραβάτε ...

Страница 79: ...ασ το τηλεχειριστήριο 84 Aλλαγή των αριθµών προγράµµατοσ των καναλιών τησ τηλεÞρασησ 85 ΠρÞσθετα χαρακτηριστικά ΠρÞσθετοσ προγραµµατισµÞσ ΑυτÞµατοσ συντονισµÞσ τησ τηλεÞρασησ χρησιµοποιώντασ τα πλήκτρα τησ τηλεÞρασησ 86 ΣυντονισµÞσ τησ τηλεÞρασησ µε το χέρι 87 ΜικροσυντονισµÞσ καναλιών µε το χέρι 88 Ρύθµιση τησ περιστροφήσ τησ εικÞνασ 89 Υπερπήδηση προγραµµάτων 90 ΠρÞσθετα χαρακτηριστικά τησ τηλεÞ...

Страница 80: ...λλαγήσ προγραµµάτων επιλέγουν τηλεοπτικά κανάλια ιακÞπτησ on off Ένδειξη αναµονήσ Standby Πιέστε το κάλυµµα στο µπροστινÞ µέροσ τησ τηλεÞρασησ πιέστε το σηµείο για να ανοίξετε τον πίνακα ελέγχου Υποδοχή ακουστικών Υποδοχή εισÞδου Βίντεο Πλήκτρο επιλογήσ σήµατοσ εισÞδου Πλήκτρα ρύθµισησ έντασησ ήχου Πλήκτρο αυτÞµατου συντονισµού Υποδοχέσ εισÞδου Hi Fi S RM 887 PROGR MENU 1 4 7 2 5 8 0 3 6 9 K ...

Страница 81: ...οποιήσετε και για να επανέλθει η κανονική τηλεοπτική εικÞνα Επιλογή του µενού Ανεβαίνει ένα επίπεδο Κατεβαίνει ένα επίπεδο Αποστολή στο µενού ή στην προηγούµενη επιλογή Αποστολή στο µενού ή στην επÞµενη επιλογή OK Επιβεβαίωση επιλογήσ Αλλαγή αναλογιών εικÞνασ Πιέστε για παρακoλούθηση προγραµµάτων σε οθÞνη µε αναλογίεσ εικÞνασ 16 9 Πιέστε ξανά για επαναφορά των αναλογιών σε 4 3 ΑυτÞ το πλήκτρο λειτ...

Страница 82: ...ι να απορρίπτετε τισ χρησιµοποιηµένεσ µπαταρίεσ µε έναν τρÞπο φιλικÞ προσ το περιβάλλον Σύνδεση τησ κεραίασ Συνδέστε το φισ τησ τηλεÞρασησ στην πρίζα 220 240V AC 50Hz Ενεργοποίηση τησ τηλεÞρασησ Τοποθέτηση µπαταριών στο τηλεχειριστήριο Πιέστε το διακÞπτη on off στο µπροστινÞ µέροσ τησ τηλεÞρασησ Συνδέστε µια συµβατική κεραία στην υποδοχή στο πίσω µέροσ τησ τηλεÞρασησ ...

Страница 83: ... εµφανιστεί αυτÞµατα στην οθÞνη 2 Για την επιλογή τησ γλώσσασ πιέστε το πλήκτρο ή του τηλεχειριστηρίου και στην συνέχεια πιέστε το πλήκτρο ΟΚ για την επιβεβαίωση τησ επιλογήσ Το µενού ΑυτÞµατου Συντονισµού θα εµφανιστεί στην οθÞνη τησ τηλεÞρασησ στην επιλεγµένη γλώσσα Πρώτη λειτουργία ΒασικÞσ προγραµµατισµÞσ S RM 887 PROGR MENU 1 4 7 2 5 8 0 3 6 9 K LANGUAGE Select language ENGLISH DEUTSCH FRANÇAI...

Страница 84: ... συνδεδεµένη 2 Bεβαιωθείτε Þτι η κεραία είναι συνδεδεµένη και πιέστε το πλήκτρο ΟΚ Ο αυτÞµατοσ συντονισµÞσ αρχίζει και ενώ συντονίζονται Þλα τα κανάλια εµφανίζονται οι τηλεοπτικοί σταθµοί στην οθÞνη αναβοσβήνει το µήνυµα Αναζήτηση Η διαδικασία αυτή µπορεί να διαρκέσει µερικά λεπτά Ùταν ολοκληρωθεί η διαδικασία αυτÞµατου συντονισµού εµφανίζεται στην οθÞνη το µενού ΤαξινÞµηση Προγραµµάτων Σηµ Εάν επ...

Страница 85: ...ων καναλιών τηλεοπτικών σταθµών εµφανίζεται αυτÞµατα στην οθÞνη ένα νέο µενού µε την ερώτηση εάν επιθυµείτε να αλλάξετε την σειρά εµφάνισησ των καναλιών στην τηλεÞραση ΠαρÞλα αυτά εάν µετά απÞ ορισµένο χρÞνο επιθυµείτε να αλλάξετε ξανά την διάταξη των καναλιών επιλέξτε το µενού ΤΑΞΙΝΟΜΗΣΗ ΠΡΟΓΡ µέσα στο ΕΓΚΑΤΑΣΤΑΣΗ και πράξτε κατά τον ίδιο τρÞπο Þπωσ µε εκείνον τησ ενÞτητασ β αυτού του κεφαλαίου S...

Страница 86: ... είναι συνδεδεµένη 3 Bεβαιωθείτε Þτι η κεραία είναι συνδεδεµένη και πιέστε το πλήκτρο ΟΚ Ο αυτÞµατοσ συντονισµÞσ αρχίζει και ενώ συντονίζονται Þλα τα κανάλια εµφανίζονται οι τηλεοπτικοί σταθµοί στην οθÞνη αναβοσβήνει το µήνυµα Αναζήτηση Η διαδικασία αυτή µπορεί να διαρκέσει µερικά λεπτά Ùταν ολοκληρωθεί η διαδικασία αυτÞµατου συντονισµού θα εξαφανιστεί το µενού απÞ την οθÞνη και η τηλεÞραση θα είν...

Страница 87: ...ηκε πιέστε το πλήκτρο ή για να συνεχιστεί η αναζήτηση 7 Εάν βρέθηκε το κανάλι που θέλατε να αποθηκεύσετε πιέστε το πλήκτρο ΟΚ και στη συνέχεια µε τον κέρσορα στην θέση ΕΠΙΒΕΒΑΙΩΣΗ πιέστε ξανά το πλήκτρο ΟΚ 8 Επαναλάβετε τα στάδια 4 έωσ 7 εάν θέλετε να συντονίσετε και να αποθηκεύσετε και άλλα κανάλια 9 Πιέστε το πλήκτρο MENU για να επανέλθει η κανονική τηλεοπτική εικÞνα Η τηλεÞραση είναι έτοιµη για...

Страница 88: ...ορα στην θέση ΕΠΙΒΕΒΑΙΩΣΗ πιέστε ξανά το πλήκτρο ΟΚ ώστε να αποθηκευτεί ο νέοσ συντονισµÞσ 7 Πιέστε το πλήκτρο MENU για να επανέλθει η κανονική τηλεοπτική εικÞνα 8 Επαναλάβετε τα στάδια 1 έωσ 7 εάν θέλετε να πραγµατοποιήσετε µικροσυντονισµÞ και άλλων καναλιών Η τηλεÞραση είναι έτοιµη για λειτουργία S RM 887 PROGR MENU 1 4 7 2 5 8 0 3 6 9 K EΛEΓXOΣ EIKONAΣ ANTIΘEΣH ΦΩTEINOTHTA XPΩMA KAΘAPOTHTA AΠOX...

Страница 89: ...Þ 5 έωσ 5 και στη συνέχεια πιέστε το πλήκτρο ΟΚ 5 Πιέστε το πλήκτρο MENU για να επανέλθει η κανονική τηλεοπτική εικÞνα Η τηλεÞραση είναι έτοιµη για λειτουργία S RM 887 PROGR MENU 1 4 7 2 5 8 0 3 6 9 K EΛEΓXOΣ EIKONAΣ ANTIΘEΣH ΦΩTEINOTHTA XPΩMA KAΘAPOTHTA AΠOXPΩΣH EΠANAΦOPA TYΠOΣ ΠPOΣΩΠIKOΣ EΛEΓXOΣ EIKONAΣ ANTIΘEΣH ΦΩTEINOTHTA XPΩMA KAΘAPOTHTA AΠOXPΩΣH EΠANAΦOPA TYΠOΣ ΠPOΣΩΠIKOΣ 0 EΓKATAΣTAΣH ΠEPIΣ...

Страница 90: ...προγράµµατα 9 Πιέστε το πλήκτρο MENU για να επανέλθει η κανονική τηλεοπτική εικÞνα Με την επιλογή του καναλιού τηλεοπτικού σταθµού µέσου του πλήκτρου ΡRΟGR το κανάλι δεν εµφανίζεται στην οθÞνη τησ τηλεÞρασησ ΩστÞσο µπορείτε να επιλέξετε το κανάλι πατώντασ τα αντίστοιχα αριθµητικά πλήκτρα απÞ το τηλεχειριστήριο S RM 887 PROGR MENU 1 4 7 2 5 8 0 3 6 9 K EΛEΓXOΣ EIKONAΣ ANTIΘEΣH ΦΩTEINOTHTA XPΩMA KAΘ...

Страница 91: ...ισ αρχικέσ ρυθµίσεισ εικÞνασ του εργοστασίου ύναται µÞνο να τροποποιηθεί εάν επιλέξετε ΤΥΠΟΣ ΠΡΟΣΩΠΙΚΟΣ ιατίθεται µÞνο για το σύστηµα χρώµατοσ ΝΤSC π χ βιντεοταινίεσ των Ηνωµένων Πολιτειών ΠρÞσθετα Χαρακτηριστικά ΠρÞσθετα Χαρακτηριστικά τησ τηλεÞρασησ Ρύθµιση τησ εικÞνασ ΠαρÞλο που η εικÞνα έχει ρυθµιστεί απÞ το εργοστάσιο µπορείτε να την τροποποιήσετε ανάλογα µε τισ προτιµήσεισ σασ Γρήγορη αλλαγή...

Страница 92: ...για το κανάλι 1 ή ΠovoφωvικÞσ Β για το κανάλι 2 DSP ΨηφιακÞσ επεξεργαστήσ ήχου ΝΑΙ ΟΧΙ ΕΠΑΝΑΦΟΡΑ Επαναφέρει τισ αρχικέσ ρυθµίσεισ ήχου του εργοστασίου Mπορεί να τροποποιηθεί µÞνο εάν επιλέξετε ΤΥΠΟΣ ΠΡΟΣΩΠΙΚΟΣ Ρύθµιση του ήχου ΠαρÞλο που ο ήχοσ έχει ρυθµιστεί απÞ το εργοστάσιο µπορείτε να τον τροποποιήσετε ανάλογα µε τισ προτιµήσεισ σασ Γρήγορη αλλαγή του τύπου ήχου 1 Πιέστε το πλήκτρο απÞ το τηλε...

Страница 93: ...ο ΜΕΝU για να επανέλθει η κανονική τηλεοπτική εικÞνα Ένα λεπτÞ πριν τεθεί σε λειτουργία ο χρονοδιακÞπτησ ύπνου ο χρÞνοσ που αποµένει θα εµφανιστεί στην οθÞνη Σηµ Για να δείτε το χρÞνο που αποµένει καθώσ βλέπετε την τηλεÞραση πιέστε το πλήκτρο Για να µπορέσετε να βάλετε την τηλεÞραση σε λειτουργία απÞ την κατάσταση προσωρινήσ απενεργοποίησησ πιέστε το πλήκτρο απÞ το τηλεχειριστήριο S RM 887 PROGR M...

Страница 94: ...οποίο επιθυµείτε να µπει σε λειτουργία η τηλεÞραση ΟFF 0 15 λεπτά 0 30 λεπτά 12 00 ώρεσ 5 Πιέστε το πλήκτρο ΟΚ 6 Πιέστε το πλήκτρο ΜΕΝU για να επανέλθει η κανονική τηλεοπτική εικÞνα 7 Πιέστε το πλήκτρο προσωρινήσ απενεργοποίησησ τησ τηλεÞρασησ Standby απÞ το τηλεχειριστήριο Η ένδειξη αναµονήσ Standby αναβοσβήνει περιοδικά για να δείξει Þτι η επιλογή XρονοδιακÞπτη αφύπνισησ βρίσκεται σε λειτουργία ...

Страница 95: ...κτρολογήστε τρία ψηφία του αριθµού σελίδασ χρησιµοποιώντασ τα αριθµητικά πλήκτρα του τηλεχειριστηρίου αν κάνετε λάθοσ πληκτρολογήστε τρία οποιαδήποτε ψηφία και στη συνέχεια πληκτρολογήστε ξανά τον αριθµÞ τησ σελίδασ που επιθυµείτε 4 Πιέστε το πλήκτρο για να κλείσετε το Teletext και να επιστρέψετε στην κανονική τηλεοπτική εικÞνα Χρήση άλλων λειτουργιών του Teletext ΓΙΑ ΝΑ ΠΙΕΣΤΕ ΤΟ ΠΛΗΚΤΡΟ Περάσετε...

Страница 96: ...ο ΠρÞσθετεσ Πληροφορίεσ Σύνδεση Βίντεο Συνδέστε τον βίντεο στην υποδοχή E στο πίσω µέροσ τησ τηλεÞρασησ Οταν συνδέετε µια συσκευή βίντεο στην τηλεÞρασή σασ συνιστάται να συντονίζετε το σήµα του βίντεο στον αριθµÞ προγράµµατοσ 0 ακολουθώντασ τη διαδικασία που περιγράφεται στο τµήµα ΣυντονισµÞσ τησ ΤηλεÞρασησ µε το χέρι αυτών των οδηγιών Σύνδεση Ακουστικών Συνδέστε τα ακουστικά στην υποδοχή C oτο µπ...

Страница 97: ...Πληροφορίεσ συντονισµού καθώσ τα γενικά στοιχεία του καναλιού φορτώνονται απÞ την τηλεÞραση στο βίντεο Άµεση εγγραφή απÞ τηλεÞραση Eνώ παρακολουθείτε τηλεÞραση αρκεί να πιέσετε ένα µÞνο πλήκτρο στο βίντεο για να γράψετε το πρÞγραµµα ΤηλεÞραση σε θέση αναµονήσ Standby Πιέστε το πλήκτρο Play z του βίντεο και η τηλεÞραση θα τεθεί αυτÞµατα σε λειτουργία Εάν έχετε συνδεδεµένο αποκωδικοποιητή σε ένα βίν...

Страница 98: ...EΓXOΣ HXOY ΠPIMA MΠAΣA EΞIΣOPPOΠHΣH HXOΣ DUAL DSP EΠANAΦOPA TYΠOΣ ΠPOΣΩΠIKOΣ 0 EΓKATAΣTAΣH ΠEPIΣTP EIKONAΣ ΓΛΩΣΣA EΛΛHNIKA AYTOM ΠPOΣYNTONIΣMOΣ TAΞINOMHΣH ΠPOΓP ΠPOΣYNT ME TO XEPI EΛEΓXOΣ EIKONAΣ ANTIΘEΣH ΦΩTEINOTHTA XPΩMA KAΘAPOTHTA AΠOXPΩΣH EΠANAΦOPA TYΠOΣ ΠPOΣΩΠIKOΣ STEREO ON EΛEΓXOΣ HXOY ΠPIMA MΠAΣA EΞIΣOPPOΠHΣH HXOΣ DUAL DSP EΠANAΦOPA TYΠOΣ ΠPOΣΩΠIKOΣ 0 EΓKATAΣTAΣH ΠEPIΣTP EIKONAΣ ΓΛΩΣΣA EΛΛH...

Страница 99: ... RGB βίντεο επανειληµµένα µέχρι να εµφανιστεί στην οθÞνη το σύµβολο RGB Καλή εικÞνα αλλά Þχι ήχοσ Πιέστε το πλήκτρο απÞ το τηλεχειριστήριο Εάν εµφανίζεται στην οθÞνη το πιέστε το πλήκτρο απÞ το τηλεχειριστήριο ΕικÞνα ασπρÞµαυρη σε έγχρωµεσ ΑπÞ το MENU επιλέξτε την οθÞνη Ρύθµισησ ΕικÞνασ εκποµπέσ Ρυθµίστε τα χρώµατα ΑπÞ την οθÞνη Ρύθµισησ ΕικÞνασ επιλέξτε EΠANAΦOPA για να επιστρέψετε στισ αρχικέσ ρ...

Страница 100: ...περιλαµβάνει είσοδο για σήµατα ήχου εικÞνασ είσοδο S Video Eξοδοσ ήχου βίντεο Έξοδοι ήχου βύσµατα ρhοnο ΜπροστινÞ µέροσ k είσοδοσ εικÞνασ υποδοχή phono 2 είσοδοι ήχου υποδοχέσ phono Υποδοχή ακουστικών µίνι στέρεο υποδοχή Έξοδοσ ήχου 2x7 W RMS Κατανάλωση ρεύµατοσ 80 W Kατανάλωση ρεύµατοσ σε κατάσταση αναµονήσ 0 5 W ιαστάσεισ π x υ x β Περίπου 545 x 446 x 485 mm Βάροσ Περίπου 26 5 κιλά Aξεσουάρ Τηλε...

Страница 101: ......

Страница 102: ......

Страница 103: ......

Страница 104: ...Sony España S A ...

Отзывы: