


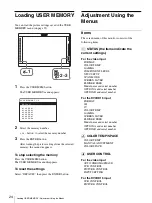


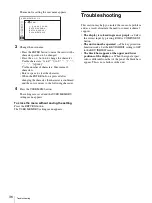


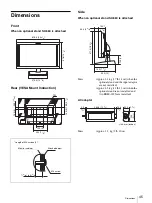

Adjustment Using the Menus
31
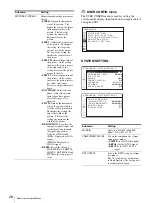
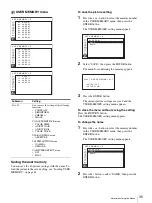
FUNCTION BUTTON SETTING
About the function assigned to the
function button
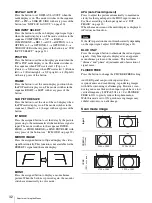
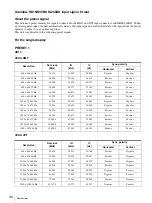
SCAN (Scan mode)
Press to change the scan size of the picture. Press to
switch between NATIVE, NORMAL scan (0% scan),
OVER scan (20% over scan), FULL and ZOOM (see
“Scan mode image” on page 32). NATIVE is effective
only when 720p signal is input. FULL is only available
when DISPLAY LAYOUT is set to SIDE BY SIDE in
the multi display. ZOOM is effective only when 1280 ×
1024 or 1440 × 900 signals from DVI are input.
ASPECT
Press to set the aspect ratio of the picture, 4:3 or 16:9.
AUTO SYNC DETECT
Press the assigned button to detect external sync signals
and internal sync signals automatically.
The unit synchronizes with external sync signals when
they are detected. When external sync signals are not
detected, the unit synchronizes with internal sync
signals.
AUTO SYNC DETECT works when the component/
RGB signals are input.
AUTO SYNC DETECT does not work when signal is
input from BKM-229W.
EXT SYNC (external sync)
Press to operate the unit on an external sync signal
through the EXT SYNC IN connector.
EXT SYNC works when the component/RGB signals
are input.
If AUTO SYNC DETECT is on, this function is not
available.
MULTI DISPLAY
Press the assigned button to display the multi display.
Set the multi display setting in the MULTI DISPLAY
SETTING menu (see page 30).
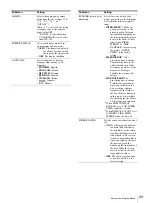
SUB INPUT
SELECT
Sets the input signal of the sub display.
You can select from among
COMPOSITE, Y/C, RGB,
COMPONENT, HD15, DVI, OPTION
A-1, OPTION A-2, OPTION B-1,
OPTION B-2, VIDEO WAVE and OFF.
Notes
• The multi display with COMPOSITE
and Y/C, RGB and COMPONENT,
OPTION A-1 and OPTION A-2, and
OPTION B-1 and OPTION B-2 is not
displayed.
• When you set SUB INPUT SELECT
to OFF, MULTI DISPLAY ENABLE
is set to OFF.
• The input signal formats available for
HD15 and DVI are limited. See “For
the multi display” (page 42).
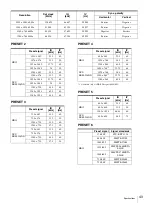
POSITION
Sets the position of the sub display.
When POP is selected:
•
1:
Top
•
2:
Center
•
3:
Bottom
When PIP is selected:
•
1:
Bottom left
•
2:
Bottom right
•
3:
Top right
•
4:
Top left
FRAME
Sets the position of the main display
when POP is selected in DISPLAY
LAYOUT.
•
RIGHT:
The main display is put by
the right side of the sub display.
•
LEFT:
The main display is put by the
left side of the sub display.
SUB PICTURE
SIZE
Sets the sub display size when PIP is
selected in DISPLAY LAYOUT.
•
1:
Small
•
2:
Large
Submenu
Setting
F 1 B U T T O N :
xxxx
F 2 B U T T O N :
xxxx
F 3 B U T T O N :
xxxx
F 4 B U T T O N :
xxxx
USER CONFIG
FUNCTION BUTTON SETTING
Submenu
Setting
F1 BUTTON to F4
BUTTON
Assigns the function to the function
buttons of the front panel and turns the
function on or off.
You can assign the function from
among SCAN, ASPECT, EXT SYNC,
BLUE ONLY, MONO, MULTI
DISPLAY, DISPLAY LAYOUT, SUB
INPUT SELECT, POSITION, FRAME,
APA, I/P MODE, MIRROR IMAGE,
AUTO SYNC DETECT and FLICKER
FREE.
Factory setting
•
F1 button:
EXT SYNC
•
F2 button:
SCAN
•
F3 button:
ASPECT
•
F4 button:
MULTI DISPLAY
Содержание trimaster EL PVM-2551MD
Страница 46: ...Sony Corporation ...


