background image

Getting Started

18

Step 7

Setting up the unit with EASY SET UP (continued)

Front speaker (R)

Front speaker (L)

Rear speaker (L)

Rear speaker (R)

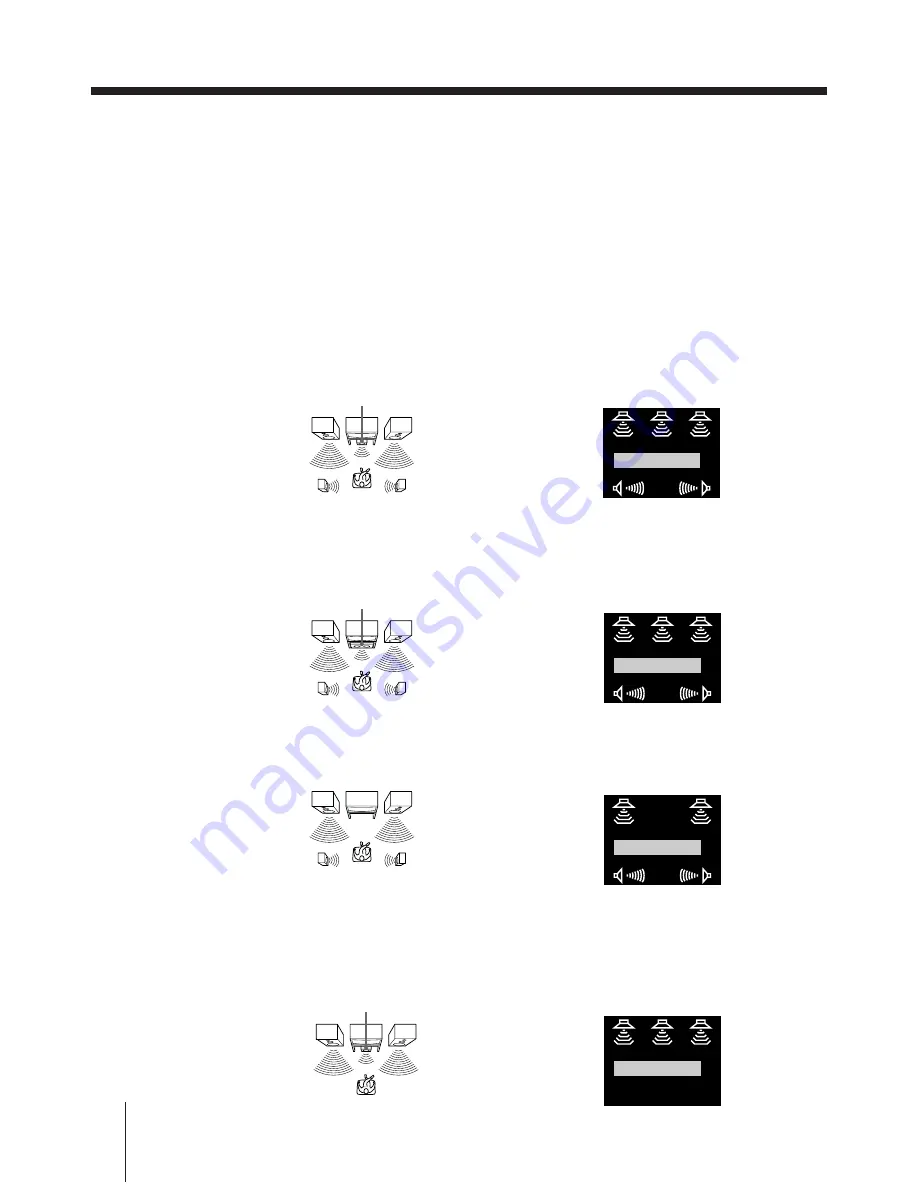
Selecting the centre mode

The centre mode is related to the PROLOGIC and THEATRE sound fields.  (See “Taking
advantage of the sound fields” on page 61 for a detailed explanation on sound fields.) You
must have rear left and right speakers, or one centre speaker other than the front left and
right speakers for these sound fields.
You can select NORMAL, WIDE, PHANTOM, or 3CH LOGIC as the centre mode.  Each
mode is designed for a different speaker configuration.  Select the most suitable mode
considering the following conditions:

If you have front and rear speakers, and a small centre speaker

Select NORMAL.  The centre channel bass sound is output from the front speakers.  This is
because small centre speakers cannot reproduce bass sound sufficiently.

If you have front and rear speakers, and a large centre speaker

Select WIDE.  The combination of this speaker configuration and mode selection is ideal for
Dolby Pro Logic Surround sound.

If you have only front and rear speakers

Select PHANTOM.  The centre channel sound is output from the front speakers.

If you have only front and centre speakers

Select 3CH LOGIC (3 Channel Logic).  The rear channel sound is output from the front
speakers.  You can enjoy some surround sound atmosphere, even if you don’t have surround
(rear) speakers.

Front speaker (R)

Front speaker (L)

Rear speaker (L)

Rear speaker (R)

Centre speaker

NORMAL

Speaker arrangement display on the TV screen

Speaker arrangement display on the TV screen

WIDE

Speaker arrangement display on the TV screen

Front speaker (R)

Front speaker (L)

Rear speaker (L)

Rear speaker (R)

PHANTOM

Front speaker (R)

Front speaker (L)

Centre speaker

Speaker arrangement display on the TV screen

3CH LOGIC

Centre speaker

Содержание SLV-AV100UX

Страница 1: ... 1996 by Sony Corporation Amplifier Integrated Video Cassette Recorder 3 858 238 12 1 Operating Instructions SLV AV100UX PAL NTSC 4 43 ...

Страница 2: ...e cord The mains lead must be changed only at a qualified service shop Installing Allow adequate air circulation to prevent internal heat buildup Do not place the unit on surfaces rugs blankets etc or near materials curtains draperies that may block the ventilation slots Do not install the appliance in a confined space such as a bookcase or built in cabinet Do not install the unit near heat source...

Страница 3: ...57 Controlling an MD deck 59 Controlling an LD player Sound Field Operations 61 Taking advantage of the sound fields 63 Getting the most out of Dolby Pro Logic Surround 2 sound 64 Customizing the sound fields 68 Reconfiguring the PROLOGIC and THEATRE sound fields Advanced VCR Operations 70 Playing searching at various speeds 71 Recording TV programmes using the quick timer 72 Recording stereo and ...

Страница 4: ...Getting Started 4 Unpacking Check that you have received the following items with the unit Remote commander R6 size AA batteries Aerial cable Step 1 ...

Страница 5: ...size AA batteries matching the and on the batteries to the diagram inside the battery compartment 1 2 3 4 5 6 7 8 9 0 10 Remote sensor Notes The remote commander is initially set to control this unit However if it doesn t control the unit press VHS TUNER first If the remote commander still doesn t operate read Controlling VCRs on page 47 first With normal use the batteries should last about three ...

Страница 6: ...able not supplied AERIAL IN Aerial cable 1 Disconnect the aerial cable from your TV and connect it to AERIAL IN on the rear panel of the unit 2 Connect AERIAL OUT on the unit and the aerial input on your TV using the supplied aerial cable 3 Connect VIDEO OUT EURO AV on the unit and the EURO AV Scart connector on the TV 4 Set RF MODULATOR to OFF Whenever you want to watch the unit s VCR picture pre...

Страница 7: ...e from the unit a EURO AV connection is necessary However if your TV doesn t have a EURO AV Scart connector skip step 3 above and set RF MODULATOR to ON in step 4 Note If you connect this unit to your TV with a EURO AV Scart cable you cannot reproduce sound from the unit unless you connect the speakers see next page ...

Страница 8: ... will not be reproduced well Do not connect the mains lead until you finish all the connections through Step 5 Connecting various audio video equipment on page 10 Be sure to make connections firmly to avoid hum and noise 1 Connect the front speakers to the FRONT SPEAKERS L R connectors Twist about 15 mm of the stripped ends of the cord Then insert the stripped ends into the connectors as shown on ...

Страница 9: ... with or slightly behind the faces of the front left and right speakers Mount the surround rear left and right speakers on the walls so they face each other Position the front left and right speakers and centre speaker as close to the same height as possible Connecting an active woofer For further sound improvement connect an active woofer to MIX OUT with an audio cable not supplied The active woo...

Страница 10: ...ing table Equipment Tuner CD player MD deck DAT deck cassette deck LD player other VCR Monitor Satellite tuner Turn off the power to all equipment before making any connections Do not connect the mains lead until all of the connections are complete Be sure to make connections firmly to avoid hum and noise Red R White L Red R Yellow Yellow Video cable Audio cable White L Necessary cable for each pi...

Страница 11: ...and video cables and a EURO AV cable referring to the illustration above Make sure you connect the audio and video cable plugs to jacks of the same colour 2 Connect the mains lead to the mains continued Tuner OUT or or REC OUT REC IN Satellite tuner EURO AV Scart Monitor VIDEO IN LD player Other VCR or AUDIO OUT VIDEO OUT CD player OUT to mains Signal flow MD deck DAT deck Cassette deck ...

Страница 12: ...o jacks of the same colour If the other VCR is a monaural type connect only the VIDEO and AUDIO L jacks Conserving power while the unit is standing by Set STANDBY DISPLAY to OFF The indicators in the display window turn off while the unit is standing by to conserve power When you set a timer recording the indicators in the display window remain on even if STANDBY DISPLAY is set to OFF Connecting t...

Страница 13: ...uctions If the picture does not appear clearly see To obtain a clear picture from the unit s VCR below 5 Press RF CHANNEL You have now tuned your TV to the unit s VCR Whenever you want to play a video tape set the TV to this programme position This programme position will now be referred to as the VCR s programme position RF CHANNEL RF CHANNEL SONY VIDEO CASSETTE RECORDER To check that the TV tuni...

Страница 14: ...NER EASY SET UP 1 Press VHS TUNER to turn on the unit and TV If the TV doesn t turn on turn it on manually Press VHS TUNER again if connected with a EURO AV Scart cable 2 Set the TV for VCR reception If connected with a EURO AV Scart cable the TV is automatically set to VCR reception and VTR appears in the display window If connected with only the antenna cable set the TV to the VCR s programme po...

Страница 15: ...ing presetting the located channels are displayed on the TV screen When all the channels are preset the following screen appears 6 Use CURSOR to set the station names and VIDEO Plus guide channels that could not be preset automatically change the programme positions of the stations and disable the unused programme positions If all the settings are correct skip this step The setting procedures are ...

Страница 16: ...as those described in Manual setup Setting the clock on page 29 9 Press EXECUTE The CENTRE MODE selection menu appears 10 Press to select the centre mode See Selecting the centre mode on page 18 for details 11 Press EXECUTE Each speaker emits the test tone in turn the speaker emitting the test tone is indicated by the red speaker mark Check each speaker s relative volume balance with the test tone...

Страница 17: ...kers volume balance is always even This volume adjustment affects only the PROLOGIC sound field 14 Press EXECUTE A programme position appears on the TV screen CURSOR CURSOR EXECUTE END SET EXECUTE EASY SET UP 1 2 3 6 5 4 7 CENTRE REAR 8 0 dB dB SELECT TEST TONE END SET EXECUTE TEST TONE EASY SET UP 1 2 3 6 5 4 7 CENTRE REAR 8 10 dB dB SELECT 1 Tips To adjust the relative volume balance between the...

Страница 18: ...ecause small centre speakers cannot reproduce bass sound sufficiently If you have front and rear speakers and a large centre speaker Select WIDE The combination of this speaker configuration and mode selection is ideal for Dolby Pro Logic Surround sound If you have only front and rear speakers Select PHANTOM The centre channel sound is output from the front speakers If you have only front and cent...

Страница 19: ...ander Press MENU Then press CURSOR to move the cursor I to VHS MENU and press EXECUTE 2 Press CURSOR to move the cursor I to TUNER PRESET and press EXECUTE 3 Press CURSOR to move the cursor I to CHANNEL SET 4 Press PROG to select the programme position EXECUTE CURSOR PROG Note The menu disappears automatically if you don t proceed within a few minutes VHS MENU T I TUNER PRESET CLOCK SET SET UP CH ...

Страница 20: ... want is displayed The channels are scanned from UHF E21 through E69 If you know the number of the channel you want press the programme number buttons For example for channel 43 first press 4 then press 3 6 To allocate another channel to another programme position repeat steps 4 and 5 7 Press EXECUTE Manual setup Presetting channels continued TUNER PRESET PROG4 SET SELECT CHANNEL SET FINE TUNING 6...

Страница 21: ...ess EXECUTE If the picture is not clear Normally the Auto Fine Tuning AFT function automatically tunes in channels clearly If however the picture is not clear you can also use the manual tuning function 1 Press PROG to select the programme position for which you cannot obtain a clear picture 2 Press MENU then select VHS MENU and press EXECUTE 3 Select TUNER PRESET and press EXECUTE 4 Select FINE T...

Страница 22: ...move the cursor I to VHS MENU and press EXECUTE 2 Press CURSOR to move the cursor I to SET UP CH VIDEO Plus and press EXECUTE When using the EASY SET UP procedure skip this step The preset channels are displayed on the screen The station names and guide channels also appear if the unit s VCR detected them in EASY SET UP in the GUIDE CH column means that the guide channel has not been preset 3 Pres...

Страница 23: ... guide channel of another station repeat steps 3 through 8 If you want to change the programme positions of the stations proceed to step 3 of Manual setup Changing disabling programme positions on page 26 10 Press EXECUTE 5 4 2 1 3 SELECT NAME PROG CH GUIDE CH CONFIRM SET GUIDE CH SET UP CH VIDEO Plus 2 5 27 56 6 4 3 2 1 CH4 BBC2 BBC1 4 2 3 ITV PROG CH GUIDE CH SELECT NAME CONFIRM SET GUIDE CH 5 4...

Страница 24: ... 1 117 PREMIERE 118 3 SAT 119 ARD 120 PRO 7 121 TELE 5 122 TELECLUB 123 UK GOLD 124 DISCOVERY THE LEARNING CHANNEL 125 BRAVO ADULT CHANNEL 126 CNN 127 EURONEWS 129 QVC 130 UK LIVING 131 RAI 1 132 RAI 2 133 TV5 EUROPE 134 TVE INTERNATIONAL 135 MBC ARABIC 136 VTM 137 SPORTNET 138 COUNTRY MUSIC TV 139 VIDEO HITS ONE VH 1 140 SKY SPORT 2 SOAPS TRAVEL 141 TV ASIA 142 LA 5 143 LIVE TV 144 SUPERCHANNEL 1...

Страница 25: ... the satellite tuner The channel number displayed beside CHANNEL SET is used for receiving all satellite broadcasts from the satellite tuner 6 Press PROG to select another programme position for another satellite channel and press the programme number buttons to enter the same channel number as the one displayed in step 5 Repeat this step for all satellite channels 7 Set the guide channel number f...

Страница 26: ... 1 Lift the top cover of the remote commander Press MENU Then press CURSOR to move the cursor I to VHS MENU and press EXECUTE 2 Press CURSOR to move the cursor I to SET UP CH VIDEO Plus and press EXECUTE When using the EASY SET UP procedure skip this step 3 Press CURSOR to move the cursor I to the row on which you want to change the programme position then press CURSOR To display other pages for p...

Страница 27: ...O Plus and press EXECUTE When using the EASY SET UP procedure skip this step 3 Press CURSOR to move the cursor I to the row you want to disable Note Be sure to select the correct programme position you want to disable If you disable a programme position by mistake you have to reset that channel manually 5 4 2 1 3 SELECT PROG CH GUIDE 9 2 1 CH CONFIRM SET STATION NAME SET UP CH VIDEO Plus 7 2 25 56...

Страница 28: ...TIMER CLEAR The selected row will be cleared as shown on the right 5 Repeat steps 3 and 4 for any other programme positions you want to disable 6 Press EXECUTE SELECT 5 PROG CH GUIDE 4 2 9 2 1 MOVE PROG CH 1 3 ERASE PROG TIMER CLEAR 2 5 0 56 6 4 2 1 CH4 BBC2 BBC1 4 2 3 SET UP CH VIDEO Plus ...

Страница 29: ...of the remote commander Press MENU Then press CURSOR to move the cursor I to VHS MENU and press EXECUTE 2 Press CURSOR to move the cursor I to CLOCK SET and press EXECUTE When using the EASY SET UP procedure skip this step 3 Press CURSOR to highlight the date and the day of the week 4 Press CURSOR to set the date The day of the week is set automatically EXECUTE MENU CURSOR Tip To change the digits...

Страница 30: ... the digits 7 Press CURSOR to confirm the setting The cursor I appears in the leftmost column 8 Press EXECUTE to start the clock Manual setup Setting the clock continued EXECUTE CLOCK SET END SET SELECT WED 11 1 996 0 0 0 ON OFF AUTO ADJUST 7 2 EXECUTE CLOCK SET END SET SELECT WED 11 1 996 5 3 0 ON OFF AUTO ADJUST 7 2 1 EXECUTE CLOCK SET END SET SELECT WED 11 1 996 5 3 0 ON OFF AUTO ADJUST 7 2 1 ...

Страница 31: ...UTO ADJUST returns to OFF automatically 5 Press EXECUTE Tip If you set AUTO ADJUST to ON Auto Clock Set is activated whenever the unit is turned off The date and time are adjusted automatically by referring to the time signal from the station whose programme position is displayed in the CLOCK PROG row If you do not need Auto Clock Set highlight OFF Note The menu disappears automatically if you don...

Страница 32: ...of your TV Set NTSC PB to ON PAL TV NTSC 4 43 Press p STOP P PAUSE P PAUSE or PLAY During playback press and hold FF To resume normal playback release the button During playback press and hold 0 REW To resume normal playback release the button FF during stop 0 REW during stop 6 EJECT Before you start Turn MASTER VOLUME to the leftmost position 0 to avoid damaging your speakers 1 Press VHS TUNER If...

Страница 33: ...RN on the unit To display the time counter on the TV screen press DISPLAY To change the information in the display window Press STATUS repeatedly Each press changes the indication in the following way Current time n Counter n Operating function n Sound field See page 34 and 61 Regardless of the selected indication the operational function and selected sound field appears in the display window mome...

Страница 34: ...sound field 4 Press EXECUTE or CURSOR The customizing menu for the selected sound field appears If you want to customize the sound field see Customizing the sound fields on page 64 5 Press MENU to return to the original screen The selected sound field mark appears on the TV screen if the display function is on see To check the remaining tape length on the next page MENU EXECUTE CURSOR SET SELECT S...

Страница 35: ... TUNER PROG PRESET TAPE SPEED SP LP r REC Tips To select a programme position you can use the programme number buttons on the remote commander For two digit numbers press the tens digit button followed by the programme number buttons You can select a video source e g a satellite tuner connected to the EURO LINE IN connector by pressing VHS LINE or PROG PRESET repeatedly until LINE is displayed on ...

Страница 36: ...be recorded on the tape If you don t want to watch TV while recording you can turn off the TV You can enjoy watching or listening to another input source even while recording Notes The display does not appear during still pause mode or slow motion playback The display will not appear while playing an NTSC recorded tape If a tape has portions recorded in both PAL and NTSC systems the time counter r...

Страница 37: ...time Insert a tape with its safety tab in place Make sure the tape is longer than the total recording time Press VHS TUNER If the TV doesn t turn on turn it on manually Press VHS TUNER again if connected with a EURO AV Scart cable If connected with a EURO AV Scart cable the TV is automatically set to VCR reception If connected with only the antenna cable set the TV to the VCR s programme position ...

Страница 38: ... 477 82 CANCEL T I MER CLEAR RECORDI NG T I ME DATE START STOP PROG LP 8 5 0 0 2 2 0 0 0 2 2 TUE 10 1 V P VIDEO Plus PLUSCODE Tip TIMER REC on the unit has the same function as TIMER REC ON OFF on the remote commander Note If you selected any audio input while watching the unit s VCR picture before the unit s VCR enters recording standby only the picture switches to the TV after you press TIMER RE...

Страница 39: ...y and timer recording To use the unit s VCR before a timer recording begins just press TIMER REC ON OFF The TIMER indicator turns off and the unit s VCR switches on Remember to press TIMER REC ON OFF again to reset the timer after using the unit s VCR You can also do the following VCR related tasks while the unit s VCR is recording Reset the counter Display tape information on the TV screen Check ...

Страница 40: ...to that setting and reset To record the same programme every day or on the same day every week press CURSOR while the date is highlighted For details see Daily weekly recording on the next page If you don t want to use the PDC function highlight the V P column and press CURSOR to turn off V P For details see Timer recording with PDC signals on the next page To record from a satellite tuner or othe...

Страница 41: ...gramme Delivery Control signals with their TV programmes These signals ensure that your timer recordings are made regardless of broadcast delay early starts or broadcast interruptions In step 3 above press CURSOR to turn the V P indicator on or off after you set the recording date If you do not want to set the PDC function turn off the V P indicator You can also use the PDC function for equipment ...

Страница 42: ... recording standby 3 Press CURSOR to select the setting you want to change or cancel To change the setting press CURSOR to highlight the item you want to change then press CURSOR to reset it To cancel the PDC function turn off the V P indicator Then press CURSOR repeatedly until the cursor I appears at the beginning of the line To cancel the setting press TIMER CLEAR 4 Press EXECUTE If any setting...

Страница 43: ...s priority and the second programme starts recording only after the first programme has finished If the programmes start at the same time the programme listed first in the menu has priority Programme 1 Programme 2 Programme 1 Programme 2 20 seconds will be cut off 20 Seconds Will be cut off ...

Страница 44: ...it and the input source Function buttons on the remote commander SYSTEM CONTROL FUNCTION Press VHS TUNER VHS LINE VIDEO1 VIDEO2 TV 1 CD TUNER TAPE MD 1 If the TV is connected to the unit with only the aerial cable the unit s speakers do not reproduce the sound even if you press this button When you use the TV tuner press TV CONTROL ON see Using the TV independently on page 50 2 TV usually doesn t ...

Страница 45: ... appear on the TV screen If another monitor is connected to the MONITOR VIDEO OUT jack TV appears on the monitor screen Watching a picture while listening to audio equipment If you change the input from a video source to an audio source the sound will be switched to the audio source but the picture continues to be output The last selected video source s indicator remains lit in the display window ...

Страница 46: ...To increase or decrease the volume Press MASTER VOL on the remote commander or turn MASTER VOLUME on the unit clockwise or anticlockwise To mute the sound Press MUTING To restore the sound press it again To turn off the whole system Press SYSTEM OFF Selecting the equipment continued ...

Страница 47: ...described as COMMAND MODE in these Operating Instructions for the sake of convenience Controlling a VCR which doesn t have a COMMAND MODE selector If a VCR has no COMMAND MODE selector set COMMAND MODE on the remote commander in the following way If your VCR is a Set COMMAND MODE to Sony Betamax format VCR VTR1 Sony 8mm formatVCR VTR2 Sony VHS format VCR VTR3 If you have another VHS format VCR set...

Страница 48: ...on 7 to control the VCR with its COMMAND MODE selector set to VTR1 or Betamax format VCR press number button 8 to control the VCR with its COMMAND MODE selector set to VTR2 or 8mm format VCR or press number button 9 to control the VCR with its COMMAND MODE selector set to VTR3 or VHS format VCR The customized button is no longer related to the COMMAND MODE position To turn on and control the other...

Страница 49: ...ress f to display the Teletext To access the next or previous page Lift the top cover of the remote commander and press PROG To turn off Teletext Press Using FASTEXT This feature allows you to quickly access a Teletext page that uses FASTEXT When a FASTEXT page is broadcast a colour coded menu appears at the bottom of the screen The colours of the menu correspond to the red green yellow and blue b...

Страница 50: ...urns on You can use the buttons described above to control the TV To control the volume lift the top cover of the remote commander and press TV VOL To select the TV s input source Press TV VIDEO repeatedly until you have the desired input source Turning off the TV Press u while the remote commander is in TV control mode ...

Страница 51: ...the tuner with the A B and C categorization system 1 Press TUNER and turn on the tuner The unit turns on and switches the input source to the tuner connected to the TUNER jacks 2 Press SHIFT repeatedly to select A B or C then press the number For example select A and press 7 to tune in the station preset as A7 To scan the preset stations Press PROG PRESET in step 2 above Each press changes the pre...

Страница 52: ...play after pause Scan forward or backward Locate the beginning of other tracks Stop and remove the CD This function doesn t operate some CD players Close the tray This function doesn t operate some CD players Select other discs This function only works for CD players with a built in multi disc changer To locate a track with the number buttons Press one of the number buttons for single digit track ...

Страница 53: ...play P PAUSE This function doesn t operate some cassette decks Resume play after pause DIRECTION 9 DIRECTION or P PAUSE Fast forward F F Rewind 0 R E W Recording on a tape 1 Press TAPE MD and turn on the cassette deck The unit turns on and switches the input source to the cassette deck connected to the TAPE MD jacks 2 Insert a blank cassette with its erasure prevention tabs in place into deck B fo...

Страница 54: ...r deck B if you have a double cassette deck To control deck A first you need to customize one of the function buttons for deck A You can customize the VIDEO 1 VIDEO 2 CD TAPE MD or TV function buttons While pressing the selected function button press the number button 5 You must select the function button corresponding to the input jacks the cassette deck is connected to Now that function button o...

Страница 55: ... on page 80 Playing a tape 1 Press the function button you customized for the DAT deck and turn on the DAT deck The unit turns on and switches the input source to the jacks the DAT deck is connected to 2 Press 6 OPEN CLOSE to open the cassette cover holder If the cassette cover holder doesn t open refer to your DAT deck s operating instructions 3 Insert a cassette 4 Press PLAY The deck starts play...

Страница 56: ... VIDEO 2 on the TV screen If you want to select the CD player or tuner press AUDIO repeatedly to display CD or TUNER on the TV screen 4 Locate the point you want to start recording from To record from the beginning of the tape press 0 REW to rewind the tape to the beginning To record from the end of the recorded portion press FF The deck locates the end of the recorded portion on the tape and stop...

Страница 57: ...mote commander function buttons on page 80 Playing an MD 1 Press the function button you customized for the MD deck and turn on the MD deck The unit turns on and switches the input source to the jacks the MD deck is connected to 2 Insert an MD referring to your MD deck s operating instructions 3 Press PLAY The MD deck starts playing Additional tasks To Stop play Pause play Resume play after pause ...

Страница 58: ... programme position or LINE on the TV screen If you want to select a piece of equipment connected to the VIDEO 1 or VIDEO 2 jacks press VIDEO repeatedly to display VIDEO 1 or VIDEO 2 on the TV screen If you want to select the CD player or tuner press AUDIO repeatedly to display CD or TUNER on the TV screen 4 Lift the top cover of the remote commander and press r REC to set the MD deck to recording...

Страница 59: ...o 2 Press 6 OPEN CLOSE to open the disc tray 3 Place an LD on the disc tray 4 Press PLAY The disc tray closes and side A of the LD starts playing When playback of side A ends side B starts playing automatically Additional tasks To Press Stop play p STOP Pause play P PAUSE Resume play after pause P PAUSE or PLAY Scan forward or backward And hold FF or 0 REW during playback Skip chapters or tracks r...

Страница 60: ...ress PLAY To listen to analog sound from an LD If your LD contains digital sound tracks the player automatically outputs digital sound To listen to the sound recorded on analog soundtracks press ANALOG To resume the digital mode press ANALOG again To play a stereo disc or Second Audio Programme SAP disc When playing SAP discs such as bilingual discs you can alternate the sound output by pressing A...

Страница 61: ...ound sound on the next page Reproduce the acoustics of a hall See What s surround sound on the next page Reproduce the feeling of a large open air stadium See What s surround sound on the next page Obtain maximum audio impact from video game software See What s surround sound on the next page Reproduce normal 2 channel stereo Turn off the sound effect See Selecting the centre mode on page 18 See S...

Страница 62: ...Pro Logic Surround encoded software by looking at the packaging Some video tapes and laser discs may use Dolby Surround even if it s not indicated on the package What s surround sound Surround sound consists of three elements direct sound early reflected sound early reflections and reverberated sound reverberation The acoustics of the venue affect the way these three sound elements are heard The u...

Страница 63: ...DE 1 Repeat steps 1 through 4 in Using the pre programmed sound fields on page 34 and select PROLOGIC in step 3 2 Press CURSOR to move the cursor I to SUR EDIT then highlight DELAY 3 Press EXECUTE then press CURSOR to select 15ms 20ms 25ms or 30ms as the delay time Make the delay time longer when you have placed the rear speakers in a small room or close to your listening position and make it shor...

Страница 64: ... step 1 skip this step If you select THEATRE in step 1 and you set the centre mode to PHANTOM see Selecting the centre mode on page 18 skip this step 4 Press CURSOR to move the cursor I to REAR then press CURSOR to increase or decrease the volume of the rear speakers to a preferable level If you select THEATRE in step 1 and 3CH LOGIC is selected as the centre mode see Selecting the centre mode on ...

Страница 65: ...e low frequencies as you like 4 Press CURSOR to move the cursor I to TREBLE then press CURSOR to adjust the level of the high frequencies as you like 5 Press MENU to return to the original screen To return to the previous menu Select RETURN instead of pressing MENU in step 5 then press EXECUTE To start your adjustment from a flat equalizer curve Select FLAT after pressing EXECUTE in step 3 above t...

Страница 66: ...hlight EFFECT 3 Press EXECUTE then press CURSOR to select 1 2 3 or 4 as the effect level If you select THEATRE in step 1 and you set the centre mode to PHANTOM see Selecting the centre mode on page 18 skip this step 4 Press MENU to return to the original screen Customizing the sound fields continued SET SELECT SOUND SET SOUND FIELD ON LEVEL OFF EFFECT TONE EDIT BASS BOOST SUR EDIT THEATRE CENTRE M...

Страница 67: ...aying a programme source then repeat steps 1 through 4 in Using the pre programmed sound fields on page 34 and select one of the sound fields in step 3 2 Press CURSOR to move the cursor I to BASS BOOST then highlight ON 3 Press MENU to return to the original screen SET SELECT SOUND SET SOUND FIELD ON LEVEL OFF EFFECT TONE EDIT BASS BOOST SUR EDIT THEATRE CENTRE MODE EXIT MENU EXECUTE SOUND SET SOU...

Страница 68: ... the test tone in turn the speaker emitting the test tone is indicated by the red speaker mark Check each speaker s relative volume balance with the test tones 6 Press CURSOR to increase or decrease the volume of the centre speaker If you selected PHANTOM in step 3 skip this step For PROLOGIC sound you should have an equal volume balance with the other speakers at your listening position For THEAT...

Страница 69: ...h 4 in Using the pre programmed sound fields on page 34 and select PROLOGIC or THEATRE in step 3 2 Press CURSOR to move the cursor I to SUR EDIT then highlight LEVEL 3 Repeat steps 5 through 8 on the previous page Increasing the maximum rear speaker level Although the adjustment range of the rear speakers is preset from 15 to 10 dB you can shift the range up 5 dB 10 to 15 dB Hold down MUTING on th...

Страница 70: ...e lift the top cover of the remote commander and press 7 FRAME or FRAME Hold down either button to play one frame each second During playback press During playback press SKIP D SKIP Pressing once skips about 30 seconds Tip Adjust the picture using 4 STILL ADJUST if Streaks appear while playing in slow motion Bands appear at the top or bottom while pausing The picture shakes while pausing Notes The...

Страница 71: ...ops recording and turns off automatically To extend the duration Press QUICK TIMER repeatedly to set to the new duration To stop recording To stop the unit s VCR while recording press TIMER REC ON OFF 0 00 0 30 1 00 10 30 11 00 QUICK TIMER Tips You can also set the quick timer and start recording during stop mode In this case the unit must be turned on before you start recording You can turn off t...

Страница 72: ...M programme HIFI AUDIO in the SET UP MENU should be set to NICAM initial setting To check the menu setting see page 76 To select the sound while recording Press AUDIO MONITOR to select the sound you want Stereo programmes Usually the mixed sound of the left and right channels monaural Bilingual programmes To listen to Main sound Sub sound Main and sub sounds Standard sound Usually the main sound m...

Страница 73: ...is recorded onto the main track along with the picture Monaural sound is recorded onto the normal audio track along the edge of the tape Stereo Usually mixed left right channels Normal audio track monaural Hi fi audio track main track Stereo sound left right channels Bilingual Main left channel Sub right channel Usually main sound ...

Страница 74: ...ss INDEX SEARCH repeatedly to specify how many index signals ahead or behind you want to search To search ahead press INDEX SEARCH To search behind press INDEX SEARCH The unit s VCR starts searching and the index number on the TV screen counts down to zero Playback starts automatically from that point To stop searching Press p STOP 1 2 3 4 5 6 7 8 9 0 10 INDEX SEARCH Note No index signal will be a...

Страница 75: ...re not recorded with OPC OPC recording Whenever you insert a tape and first start recording the unit s VCR adjusts to the tape using the OPC function the OPC indicator flashes rapidly This adjustment remains in effect until the tape is ejected To deactivate the OPC Press MENU and select SET UP MENU then set OPC to OFF The OPC indicator in the display window goes off Tracking meter Notes You can ad...

Страница 76: ...ke the display window dim OFF to make it brighter STD to record standard sound on the hi fi audio track NICAM to record NICAM broadcasts on the hi fi audio track For details see page 72 ON to listen to the hi fi and normal audio tracks at the same time The AUDIO MONITOR button will not function OFF to listen to the hi fi and normal audio tracks separately Select the sound using the AUDIO MONITOR b...

Страница 77: ... playback VCR when recording from another VCR Insert an LD into the LD player when recording from an LD player 4 Press VIDEO or VHS repeatedly to select the input playback source VIDEO1 VIDEO2 or LINE 5 Search for the point to start playback and set it to playback pause 6 To start editing press P PAUSE on this unit and release the pause mode on the other equipment at the same time To stop editing ...

Страница 78: ...TV to the VCR s programme position manually Do not use the remote commander in the following procedure 1 Insert a prerecorded tape with its safety tab in place into this recording VCR Search for the end of the section to be dubbed and press P PAUSE 2 Press COUNTER RESET on this unit to reset the counter to 0H00M00S 3 Rewind the prerecorded tape to the beginning of the section to be dubbed The unit...

Страница 79: ...ly To stop while editing Press the p STOP buttons on the unit and the playback equipment To listen to both the hi fi and normal audio Set AUDIO MIX to ON in the SET UP MENU page 76 Use this feature to listen to the dubbed audio as well as the original hi fi audio When AUDIO MIX is set to ON the AUDIO MONITOR button does not function Remember to reset AUDIO MIX to OFF after playing the tape ...

Страница 80: ...r all the function buttons Remove the batteries from the remote commander and insert the batteries again To restore the factory settings for VIDEO1 or VIDEO2 See To relate VIDEO1 or VIDEO2 with COMMAND MODE again on page 48 While pressing one of the function buttons press 1 2 3 4 5 6 7 8 9 0 The function buttons on the remote commander have two roles One is to select the input sources see Selectin...

Страница 81: ...cted to the TV only with the aerial cable make sure that the RF MODULATOR switch on the rear panel is set to ON Adjust the tracking with the TRACKING NORMAL SLOW buttons The video heads are dirty see below Clean the video heads using the Sony V 25CL video head cleaning cassette If this cleaning cassette is not available in your area have the heads cleaned at your nearest Sony service facility a st...

Страница 82: ...s the remote commander may be switched to control other equipment Make sure the remote commander is set for the unit s VCR control if you use r REC on the remote commander If you want to record TV programmes press VHS TUNER on the remote commander then select a programme position Check that the clock is set Make sure a tape has been inserted Check that the safety tab has not been removed Make sure...

Страница 83: ...CE L R on the unit Check that the speakers and components are connected correctly and securely Check that the connecting cords and cables are away from a transformer or motor and at least 3 meters away from a TV set or fluorescent light Place your TV away from the audio components The plugs and jacks are dirty Wipe them with a cloth slightly moistened with alcohol Select the appropriate centre mod...

Страница 84: ...sumption 180 W During stand by with the STANDBY DISPLAY switch set to OFF 4 6 W Operating temperature 5 C to 40 C Storage temperature 20 C to 60 C Dimensions Approx 430 157 430 mm w h d including projecting parts and controls Mass Approx 13 7 kg Supplied accessories Remote commander 1 R6 size AA batteries 2 Aerial cable 1 Design and specifications are subject to change without notice System Channe...

Страница 85: ...button 77 78 8 6 EJECT button 32 9 0 REW button 32 0 FF button 32 CLICK SHUTTLE ring 70 PLAY button 32 MASTER VOLUME control indicator 32 33 p STOP button 77 78 BALANCE L R control 17 68 MUTING button 33 SURROUND button indicator 61 64 r REC button 77 ª FUNCTION buttons 45 53 56 58 77 78 º STATUS button 33 EDIT button 77 AUDIO MONITOR button 72 76 COUNTER RESET button 33 78 Remote sensor 5 PHONES ...

Страница 86: ...play window 1 Video input indicators 45 2 TIMER indicator 38 41 71 3 REC indicator 71 4 audio dubbing indicator 78 5 VTR indicator 14 6 OPC indicator 75 76 7 PDC indicator 41 8 EDIT indicator 77 9 STEREO indicator 72 0 NICAM indicator 72 RF indicator 13 RF channel 13 line programme position indicator 35 Time counter clock operating function sound field indications 33 Tape speed indicators 35 Ò tap...

Страница 87: ...ctors 8 5 AERIAL IN connector 6 6 AERIAL OUT connector 6 7 RF MODULATOR ON OFF switch 6 8 EURO LINE IN connector 11 9 VIDEO OUT EURO AV connector 6 0 MONITOR VIDEO OUT jack 11 VIDEO 1 IN VIDEO jack 11 Mains lead 11 NTSC PB switch 32 VIDEO 1 IN AUDIO L R jacks 11 TAPE MD REC OUT IN AUDIO L R jacks 11 CD IN AUDIO L R jacks 11 TUNER IN AUDIO L R jacks 11 continued ...

Страница 88: ... REW FF buttons 32 52 53 55 57 59 70 8 PLAY button 32 52 55 57 59 9 p STOP button 32 52 53 55 57 59 0 CLICK SHUTTLE ring 70 COMMAND MODE VTR1 2 3 selector 47 80 SYSTEM OFF button 46 u button 48 50 60 TV VIDEO button 50 VIDEO Plus button 37 PROG PRESET buttons 19 51 MASTER VOL buttons 32 46 MUTING button 33 46 ª INDEX SEARCH 74 AMS 52 55 57 59 buttons º P PAUSE button 32 52 53 56 57 59 1 2 3 4 5 6 ...

Страница 89: ...NTER RESET 33 Teletext off 49 button 7 TRACKING AUTO MANUAL 75 ANALOG CX 60 button 8 4 TRACKING NORMAL SLOW 75 4 STILL ADJUST 70 buttons 9 7 FRAME buttons 60 70 0 TIMER REC ON OFF button 38 41 TIMER CLEAR button 38 42 TV WIDE button 49 PROG Teletext up down 49 buttons TV VOL buttons 50 TAPE SPEED SP LP button 35 STATUS button 33 r REC button 35 54 56 58 9 DIRECTION 53 58 60 SIDE A 9 SIDE B 59 butt...

Страница 90: ...ee Connecting I J K Index searching 74 ITP 15 L LP mode 35 M Monitoring during playback 73 during recording 72 N NICAM broadcasts 72 Normal audio track 73 NORMAL mode 18 O OPC Optimum Picture Control 75 P PDC Programme Delivery Control 41 PHANTOM mode 18 Picture adjustment See Adjusting Playback 32 at various speeds 32 70 frame by frame 70 skip 70 slow motion 70 PlusCode 37 Power conservation 12 P...

Отзывы: