background image

35

Enjoying Playback and Recording a Tape

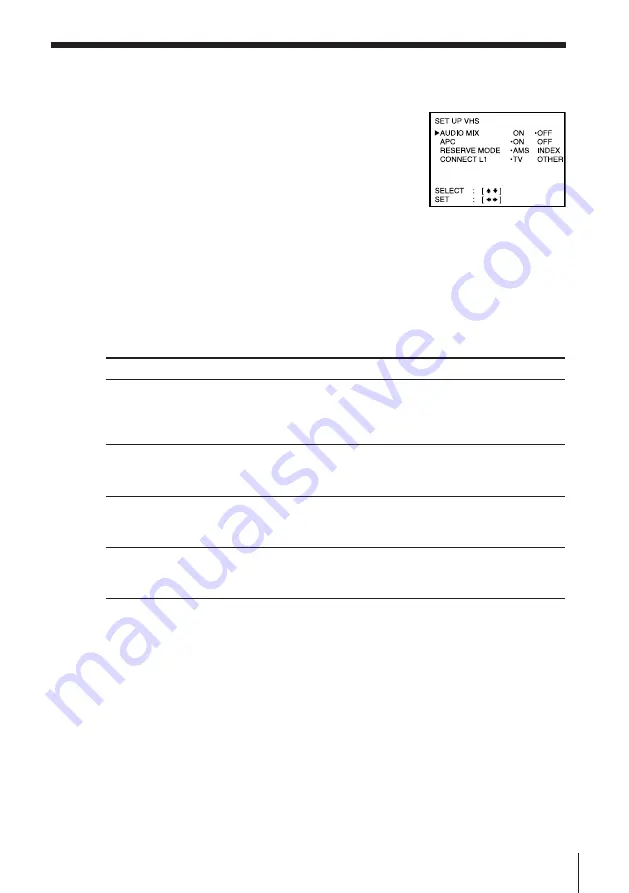
Changing menu options

1

Press MENU and select SET UP VHS.

2

Press CURSOR 

>

/

.

 to select the option to change, then press CURSOR

?

/

/

 to change the setting.

3

Press EXE to return to the original screen.

Menu choices

Initial settings are indicated in bold print.

Menu option

AUDIO MIX

APC

RESERVE MODE

CONNECT L1

Set this option to

• ON to listen to the hi-fi and normal audio tracks at the same

time. The AUDIO MONITOR button will not function.

• OFF 

to listen to hi-fi and normal audio tracks separately.  Select

the sound using the AUDIO MONITOR button.

• ON

 to switch on the APC (Adaptive Picture Control) function

and improve picture quality.

• OFF to switch off APC.

• AMS

 for automatic music search of blank spaces in the sound

track.

• INDEX for index function search of index signal.

• TV

 to record TV programmes using the LINE-1 IN jacks.

• OTHER to record other audio/video sources using the LINE-1

IN  jacks.

Notes

• AMS locates only the blank spaces of more than about 8 seconds.
• INDEX works only when the blank space is more than about 4 seconds long and an

index signal is recorded.

• The settings in the menu return to initial settings when you disconnect the mains

lead.

• When you select TV in CONNECT L1,

- the picture and sound signal from LINE-1 IN do not go out to LINE OUT
- the picture signal from LINE-1 IN does not go out to AERIAL OUT.

Содержание SLV-7000KCH

Страница 1: ...ur singing 56 Grading your singing 59 Reducing the playback vocals 56 L Language selection 10 Locating a specific point 42 a specific scene 39 a specific track 42 using index 33 LP mode 28 M Monitoring during playback 26 N O Normal audio track 32 NTSC recorded tapes 9 P Q PBC functions 51 Picture adjustment See Adjusting Playback 11 16 at various speeds 12 17 26 frame by frame 26 slow motion 26 Pr...

Страница 2: ...3 859 325 11 1 1997 by Sony Corporation SLV 7000K CH PS Operating Instructions Video CD Player Video Cassette Player PAL NTSC ...

Страница 3: ... films video tapes and other materials may be copyrighted Unauthorized recording of such material may be contrary to the provisions of the copyright laws Also use of this recorder with cable television transmission may require authorization from the cable television transmitter and or programme owner Compatible colour systems This player is designed to record and play back using the PAL B G and D ...

Страница 4: ...g TV programmes 30 Editing with another VCR 33 Searching with the index function 34 Adjusting the picture 35 Changing menu options 36 Audio dubbing Enjoying Playback of a VIDEO CD Audio CD 39 Locating scenes directly using the scene numbers Scene Search 41 Resuming playback from the point you stopped a VIDEO CD Resume Play 42 Locating a particular point in a scene or track 45 Playing repeatedly 47...

Страница 5: ... with this player Mains lead Microphone Plug adaptor SLV 7000K CH only Checking your model name The instructions in this manual are for the 2 models SLV 7000K CH 7000K PS Check your model number by looking at the rear panel of your unit The SLV 7000K CH is the model used for illustration purposes Any difference in operation is clearly indicated in the text for example SLV 7000K CH only ...

Страница 6: ... be used to operate your Sony TV To operate VCD VHS a Sony TV Set TV VCD VHS to VCD VHS and point at the remote sensor on this player TV and point at the remote sensor on the TV Notes The TV VIDEO button selects an input source of the TV from aerial in or line in The button does not control this player With normal use the batteries should last about three to six months If you do not use the remote...

Страница 7: ... AUDIO Step 3 Connecting to mains LINE IN Audio video cable LINE OUT AC IN Signal flow 1 Connect LINE 1 OUT of this unit and the LINE IN of your TV using the supplied audio video cable 2 Connect AC IN of the unit to the mains using the supplied mains lead ...

Страница 8: ...V as shown on the right To a stereo system When you enjoy a VCD and an audio CD you can improve sound quality by connecting a stereo system as shown on the right TV Aerial cable This unit Stereo system Audio cable not supplied AERIAL IN IN OUT TV Video cable not supplied LINE 1 OUT Video CD DIRECT OUT AUX IN R AUDIO L VIDEO IN VIDEO ...

Страница 9: ...ing sound This channel will now be referred to as the video channel 4 Tune the TV so that a blue screen appears on the TV screen Refer to your TV manual for tuning instructions You have now tuned your TV to this player From now on whenever you want to play a tape set the TV to the video channel If the blue screen does not appear clearly see To obtain a clear blue screen on the next page Step 4 Tun...

Страница 10: ... B G or K for system D K If this switch is set to the wrong position the sound will be distorted Selecting the NTSC PB switch For your TV to receive the correct signal from this player you must set the NTSC PB switch at the rear of this player If this switch is set to the wrong position the picture will be distorted RF CHANNEL To play an NTSC recorded tape Set NTSC PB at the rear of this player ac...

Страница 11: ...start Turn on this player and the TV Set the TV to the video channel 1 Press MENU 2 Press CURSOR to move the cursor z to LANGUAGE and press EXE 3 Press CURSOR to select the desired language then press EXE Note The settings in the menu return to initial settings when you disconnect the mains lead Step 5 MENU CURSOR EXE ...

Страница 12: ...P PLAY 0 REW DISPLAY COLOR SYSTEM continued In the lid COUNTER RESET 1 Turn on your TV and set it to the video channel 2 Insert a tape The VHS part turns on and starts playing automatically if you insert a tape with its safety tab removed 3 Press PLAY When the tape reaches the end it will rewind automatically SOUND EFFECTOR ...

Страница 13: ...during playback set COLOR SYSTEM on this player to conform to the system that the tape was recorded in Normally set the switch to AUTO If your tape was recorded in PAL NTSC MESECAM Set COLOR SYSTEM to PAL MESECAM NTSC PAL MESECAM Sound effect You can use the surround sound effect To activate the surround function set the SOUND EFFECTOR switch to NORMAL To give a monaural source the effect of a ste...

Страница 14: ...the VHS signal manually press OUTPUT SELECT VHS Notes The counter resets to 0H00M00S whenever a tape is reinserted The counter stops counting when it comes to a portion with no recording If a tape has portions recorded in both PAL and NTSC systems the time counter reading will not be correct This is due to the difference between the counting cycles of the two video systems Depending on your TV the...

Страница 15: ...ation Make sure that the TV s power is in standby mode Press TRINITRON TV SYNCHRO PLAY VHS and hold the remote commander in place for about two seconds This player and TV turn on and the TV is set to VCR reception If there is a tape in this player playback starts automatically Notes If the Trinitron TV Synchro Play function does not work properly Wait a few moments and press the button again Repla...

Страница 16: ... two kinds of playback according to the disc type Disc type VIDEO CD without PBC functions Ver 1 1 VIDEO CDs with PBC functions Ver 2 0 You can Enjoy video playback moving pictures as well as music Play interactive software using menu screens displayed on the TV screen PBC Playback in addition to the video playback functions of Ver 1 1 discs Moreover you can play high resolution still pictures Aud...

Страница 17: ...e label side up PLAY 1 Turn on your TV and set it to the video channel When using an amplifier turn on the amplifier and select this player position 2 Press ON STANDBY to turn on the player 3 Press OPEN CLOSE and place the disc on the disc tray 4 Press PLAY The disc tray closes and the player plays all the tracks once Continuous Play ON STANDBY ...

Страница 18: ...el the surround sound effect Set the SOUND EFFECTOR switch to OFF Tips When RESUME appears in the display window you can resume playback from the point where you stopped the VIDEO CD Automatic pause function works according to the signal encoded on the disc during VIDEO CD playback If the player doesn t resume play for a long time press or to resume play manually A track is a section of a picture ...

Страница 19: ...r is in standby mode Press TRINITRON TV SYNCHRO PLAY VCD and hold the remote commander in place for about two seconds This player and TV turn on and the TV is set to VCR reception If there is a disc in this player playback starts automatically Notes If the Trinitron TV Synchro Play function does not work properly Wait a few moments and press the button again Replace both of the batteries with new ...

Страница 20: ... playing The information also appears when you press OPEN CLOSE to close the disc tray Display information while playing a disc While playing an audio CD or a VIDEO CD without PBC functions the display window shows following items Total playing time Music calendar Total number of tracks Current track number Index number PBC is displayed while playing a VIDEO CD with PBC functions page 51 continued...

Страница 21: ...a disc the display changes as shown in the chart below Note that you cannot check the remaining time during PBC Playback page 51 Note Remaining time on the disc does not appear in Program Play mode if the remaining time exceeds 100 minutes When using the on screen display You can check the operating status of the player and the information about a VIDEO CD and an audio CD with the on screen displa...

Страница 22: ...han DISPLAY OFF for normal operation When you select DISPLAY OFF you cannot check the operating status while operating the player In this case check the information in the display window When you record the playback picture of this player on another VCR etc be sure to select DISPLAY OFF Otherwise the display information is also recorded on this player ...

Страница 23: ... channel When using an amplifier turn on the amplifier and select this player position 2 Connect the supplied microphone to the MIC IN 1 jack and its control plug to the CONTROL jack To sing duets connect another microphone not supplied to the MIC IN 2 jack Note When you select TV in CONNECT L1 under SET UP VHS page 35 and the VHS player is in stop mode the sound from the microphone may not go out...

Страница 24: ... KARAOKE ON OFF button lights up KEY 0 appears in the display window and KARAOKE MODE WELCOME TO THE Sony KARAOKE WORLD appears on the TV screen 3 Press OPEN CLOSE and place the disc on the disc tray 4 Press PLAY of the VCD part The disc tray closes and starts If you want to playback a specific song see Playing a VIDEO CD Audio CD on page 16 5 Set the SELECTOR on the microphone to KEY or S D Now y...

Страница 25: ... is reproduced through a stereo amplifier turn down the volume of amplifier before operation If streaks appear during playback select the colour system that the tape was recorded in see To set the colour system on page 12 If feedback occurs turn down the microphone or TV volume or move the microphone away from the speakers Using the supplied microphone CHOI button Monitor the picture in reverse wh...

Страница 26: ... when the KARAOKE ON OFF switch is set to ON The karaoke information appears on the TV screen If you press DISPLAY once more the remaining tape length and tape counter will also appear Score indicator Time counter Key control indicator KARAOKE ON OFF DISPLAY Remaining tape length DUET indicator KARAOKE ...

Страница 27: ...ring stop press FF or 0 REW During fast forward hold FF down During rewind hold 0 REW down During playback press 2 During playback or pause press SEARCH or 3 SEARCH To change direction press or During playback or pause press SLOW SPEED Press the buttons to change the speed To change direction press or During pause press 7 FRAME or FRAME Hold the button down to play one frame each second During pla...

Страница 28: ...Tip Adjust the picture using TRACKING AUTO MAN and 4 TRACKING NORMAL SLOW STILL ADJUST page 34 if streaks appear while playing in slow motion bands appear at the top or bottom while pausing the picture shakes while pausing Note In LP mode noise may appear or there may be no colour ...

Страница 29: ... INPUT SELECT 1 or press VHS INPUT SELECT on the remote repeatedly until LINE1 appears INPUT SELECT 1 button lights up 3 Insert a tape with its safety tab in place into the VHS part of this player 4 Press TAPE SPEED to select the tape speed SP or LP LP provides recording time twice as long as SP however SP produces better picture and audio quality 5 Press r REC to start recording During recording ...

Страница 30: ...cording time three times as long as SP however SP produces better picture quality When playing back the player automatically detects the tape speed Tips You can select a video source from the LINE 1 IN jacks using VHS INPUT SELECT The display appears on the TV screen indicating information about the tape but the information won t be recorded on the tape Notes The display appears only during playba...

Страница 31: ...ke sure you connect the plugs to jacks of the same colour If the other VCR is a monaural type leave the red plugs unconnected When connecting do not simultaneously connect the LINE 2 IN and LINE OUT jacks on this player A humming noise may occur if you do this VMC 910MS audio video cable not supplied Signal flow LINE OUT LINE 2 IN This player Recorder ...

Страница 32: ...AUSE buttons on the VCR and this VHS part at the same time To stop editing Press the p STOP buttons on the VCR and this VHS part Tips To edit more precisely press the P PAUSE buttons on the VCR and this VHS part to release pause To cut out unwanted scenes while editing press P PAUSE on this VHS part when an unwanted scene begins When it ends press P PAUSE again to resume recording Assemble Editing...

Страница 33: ...e Notes To listen to playback sound in stereo you must use the AUDIO OUT connections When you play a tape recorded in monaural the sound is heard in monaural regardless of the AUDIO MONITOR setting If the AUDIO MONITOR button does not function check that AUDIO MIX under SET UP VHS is set to OFF page 35 Hi fi audio track main track Stereo sound left right channels Mixed left right channels Normal a...

Страница 34: ... the VHS part of this player 2 Press INDEX SEARCH repeatedly to specify how many index signals ahead or behind you want to search To search forward press INDEX SEARCH To search backward press INDEX SEARCH This player starts searching The specified number of index signals is displayed on the TV screen and it counts down to zero At the end of the search playback starts automatically To stop searchin...

Страница 35: ...to ON under SET UP VHS with the APC indicator in the display window lit APC playback The APC function automatically works on all types of tapes including rental tapes and tapes that were not recorded with APC APC recording Whenever you insert a tape and first start recording the VHS part of this player adjusts to the tape using the APC function the APC indicator flashes rapidly This adjustment is ...

Страница 36: ...on ON to switch on the APC Adaptive Picture Control function and improve picture quality OFF to switch off APC AMS for automatic music search of blank spaces in the sound track INDEX for index function search of index signal TV to record TV programmes using the LINE 1 IN jacks OTHER to record other audio video sources using the LINE 1 IN jacks Notes AMS locates only the blank spaces of more than a...

Страница 37: ...playback and set that equipment to playback pause 2 Insert a prerecorded tape into this recording player Search for the end of the section to be replaced and press P PAUSE Make sure that the tape has its safety tab in place 3 Press COUNTER RESET to reset the counter to 0H00M00S 4 Search for the beginning of the section to be replaced and press P PAUSE 5 Press AUDIO DUB The audio dubbing indicator ...

Страница 38: ...e you start Connect the microphone s to the MIC IN 1 and or 2 jack s and its control plug to the CONTROL jack And then the SELECTOR on the microphone to KEY or S D 1 Set KARAOKE ON OFF to ON 2 Insert the prerecorded tape into the VHS part of this player Search for the end of the section to be replaced and press P PAUSE Make sure that the tape has its safety tab in place 3 Press COUNTER RESET to re...

Страница 39: ...disc player to this VCR s LINE 1 IN jacks you can record while singing along to a karaoke LD Be sure to press VHS INPUT SELECT to display L1 before starting recording The mixed sound is recorded on the normal audio track and the sound input from the LINE 1 IN jacks is recorded on the hi fi audio track Tip When dubbing from the microphone you can use the functions of echo effect key control and Sel...

Страница 40: ...memorize the scene number from which you want to start playing SCENE Number buttons PLAY 1 Press SCENE before you start playing or while playing a disc SCENE and the scene numbers appear on the TV screen 2 Press the number buttons 0 9 to select the scene The selected scene number appears on the TV screen If you ve made a mistake press the correct number button again When you change a number under ...

Страница 41: ...n the upper left side of the TV screen Notes Some discs don t allow you to start playing from a particular scene In this case when you do the task before you start playing the player starts playing from scene 1 When you do the task while playing a disc the player starts playing from the current scene Some discs don t display the selected scene on the TV screen Locating scenes directly using the sc...

Страница 42: ...n the front panel display and on the TV screen If RESUME doesn t appear Resume Play is not available 2 Press The player starts playback from the point you stopped the VIDEO CD in Step 1 To view from the beginning of the VIDEO CD When RESUME appears in the front panel display press p then press Notes Resume Play is not available in Shuffle or Program Play mode Depending on where you stopped the VID...

Страница 43: ...disc has reached the end while you were pressing Press 0 or to go back If you want to change the playback speed during Slow motion Play Press SLOW repeatedly until you find the playback speed you want Three speeds are available SLOW 1 1 5th the normal speed SLOW 2 1 10th and SLOW 3 1 15th Note While playing a VIDEO CD the picture may be distorted during the search operation SLOW 0 Press or forward...

Страница 44: ... for indexed discs Also note that you cannot search indexes in different tracks 1 Press INDEX SEARCH while playing a disc INDEX appear on the TV screen 2 Press the number buttons 0 9 to select the index number The selected index number appears on the TV screen If you ve made a mistake press the correct number button again 3 Press to start playing from the selected index The player automatically st...

Страница 45: ...asily locate the point you want You may determine if a disc uses index by looking at the disc s packaging Notes If there is no index THERE IS NO INDEX appears on the TV screen If the index which you select is not recorded THIS NUMBER DOES NOT EXIST appears on the TV screen Locating a particular point in a scene or track continued ...

Страница 46: ...d or programmed order You cannot do Repeat Play during PBC playback page 51 Press REPEAT while playing a disc appears in the display window The player repeats the tracks as follows To cancel Repeat Play Press REPEAT repeatedly until disappears from the display window When the disc is played in Continuous Play page 17 Shuffle Play page 47 Programme Play page 48 The player repeats All the tracks All...

Страница 47: ...nly the current track in Continuous Play mode page 17 While the track you want is being played press REPEAT repeatedly until 1 appears in the display window To cancel repeating the current track Press REPEAT repeatedly until 1 disappears from the display window Playing repeatedly continued ...

Страница 48: ...ress to start Shuffle Play The indication appears while the player is shuffling the tracks To cancel Shuffle Play Press CONTINUE CONTINUE appears in the display window To start Shuffle Play while playing in Continuous Play mode Press SHUFFLE Shuffle Play starts from the current track Note If you play a VIDEO CD with PBC functions in Shuffle Play mode you cannot use the PBC functions SHUFFLE CONTIN...

Страница 49: ...our own programme The programme can contain up to 24 tracks 1 Press PROGRAM PROGRAM appears in the display window 2 Press the number buttons of the tracks you want to programme in the order you want To programme a track numbered over 10 use the button Total playing time Programmed order Programmed tracks Last programmed track PROGRAM is lit PROGRAM Number buttons ...

Страница 50: ...s 1 and 2 to programme more tracks To insert a pause as one step During programming press P to insert a pause The total playing time is reset to 0 00 When playing a programme which contains a pause the player pauses at the step in which a pause is programmed until you press P or This might be useful when you record a programme on both sides of a tape Tip The programme remains even after the Progra...

Страница 51: ...ing time Changing the track order You can change your programme before you start playing Tip You can check the contents of the programme during programming on the TV screen If you press DISPLAY to select DISPLAY OFF mode you won t see this information page 21 To Erase a track Erase the last track in the programme Add tracks to the end of the programme Change the whole programme completely Press CH...

Страница 52: ...the disc as the operating procedure may differ according to the VIDEO CD SELECT ˆ PBC RETURN Number buttons PREV NEXT NEXT ˆ RETURN 1 Start playing a VIDEO CD with PBC functions following Steps 1 through 4 in Playing a VIDEO CD Audio CD on page 16 The menu screen appears on the TV screen and SELECT flashes The MENU indicator on the player flashes and the item numbers you can select in the menu app...

Страница 53: ...hen SELECT ˆ PBC RETURN PREV or NEXT To cancel PBC Playback of a VIDEO CD with PBC functions and play the disc in Continuous Play mode There are three ways Press PBC ON OFF Before you start playing select the track you want with or then press Before you start playing select the track number using the number buttons on the remote PBC OFF appear in the display window and the player starts Continuous...

Страница 54: ...fect AUDIO MONITOR Press AUDIO MONITOR while playing a disc Each time you press the button the indication and the sound from the speakers change as follows When you select DISPLAY OFF mode check the indication in the display window Note When you turn off the player the standard stereo playback will be resumed Press Once Twice Three times Indication L ch R ch STEREO You will hear The sound of the l...

Страница 55: ...ble digits Example To select song number 5 press 0 then 5 If you ve made a mistake press CURSOR to select the desired programme then press correct karaoke source and number button 6 Repeat steps 4 and 5 to program the order you want 7 Press EXECUTE to start playing The video tape automatically rewinds to the beginning and playback starts in the order you selected While the player searches for a so...

Страница 56: ... button the list settings are cleared This player exits the KARAOKE RESERVE mode when you press p STOP press KARAOKE ON OFF use u on standby If you rewind past the beginning of the current song using a microphone with CHOI function the selected song order may not be played correctly To select the way of searching a video tape When you stop playing select on the RESERVE MODE under SET UP VHS in the...

Страница 57: ...rded with strong echo effects and chorus effects Backing up your singing Vocal Assist This player can assist your singing in case you forget the lyrics while you are singing The player fills in the vocal for you automatically if you stop singing into the microphone Use karaoke stereo hi fi sources which have the accompaniment music on the left channel and the accompaniment plus vocal on the right ...

Страница 58: ...pitch of the song in half note intervals The pitch you set appears in the display window To return to the original pitch Press KEY CONTROL or n until 0 appears in the display window Note If you connect an amplifier or TV to Video CD DIRECT OUT you cannot use key control KEY CONTROL n To Raise the pitch Lower the pitch Display window Press 8 half notes 8 half notes n1 to n8 1 to 8 n sharp flat Rang...

Страница 59: ...ony Self Duet You can sing duets by yourself This player creates a harmony voice for your singing at an interval set with the key control To cancel Self Duet Press SELF DUET or n again To improve Duet Effect You can set this player to add vibrato to the harmonized voice when the duet is not in harmony Press MENU and select SET UP MENU then set DUET EFFECT to ON Note If you connect an amplifier or ...

Страница 60: ...r has two different score levels To set the score level press MENU and select SET UP MENU Then set SCORE LEVEL to HIGH for strict grading or LOW for easy grading To grade singing automatically Press MENU and select SET UP MENU Then set AUTO SCORE to ON Tips The highest possible score is 99 points To display your score on the TV screen again press DISPLAY The highest score is cleared each time you ...

Страница 61: ... the MIC IN 1 and or 2 jack s and its control plug to the CONTROL jack And then set the SELECTOR on the microphone to KEY or S D 1 Press KARAOKE ON OFF The KARAOKE ON OFF button lights up 2 Press INPUT SELECT VCD or press VHS INPUT SELECT on the remote repeatedly until VCD appears 3 Press r REC and enjoy playing karaoke To stop recording Press p STOP Tip You can control the volume of the sound fro...

Страница 62: ...ssettes away from equipment with strong magnets such as microwave ovens or large loudspeakers Do not place heavy objects on the unit If the unit is brought directly from a cold to a warm location moisture may condense inside the unit and cause damage to the video head and tape When you first install the unit or when you move it from a cold to a warm location wait for about one hour before operatin...

Страница 63: ...er is connected securely Make sure you set the COLOR SYSTEM switch correctly according to your TV Adjust the tracking with the 4 TRACKING NORMAL SLOW STILL ADJUST buttons when using a video tape Make sure the COLOR SYSTEM switch is set to the position corresponding to the colour system which the tape was recorded with The video heads of VHS part are dirty see below Clean the video heads using the ...

Страница 64: ...MIX option in SET UP VHS is set to OFF R ch or L ch appears in the display window Press CONTINUE CONTINUE appears in the display window then press The safety tab of the video tape has been removed To record on this tape cover the tab hole Check that the safety tab of the video tape has not been removed Make sure the tape is not at its end Select the correct source with the INPUT SELECT buttons Che...

Страница 65: ...O OUT phono jack 2 Standard output 327 mVrms Load impedance 47 kilohms Output impedance less than 10 kilohms Video CD DIRECT OUT VIDEO OUT phono jack 1 Output signal 1 Vp p 75 ohms unbalanced sync negative AUDIO OUT phono jack 2 Standard output 2 0 Vrms max Load impedance 47 kilohms Output impedance less than 600 ohms Specifications General Power requirements 110 240 V AC 50 60 Hz Power consumptio...

Страница 66: ...ton 12 8 Remote sensor 5 9 VIDEO CD Audio CD P PAUSE button 17 º VIDEO CD ˆ RETURN button 52 VIDEO CD Audio CD PREV button 17 VIDEO CD Audio CD p STOP button 17 VIDEO CD Audio CD PLAY SELECT button 17 VIDEO CD Audio CD NEXT button 17 MENU buttons 52 VHS 0 REW 3 SEARCH button 12 VHS p STOP button 12 VHS PLAY button 11 ª VHS r REC button 28 º VHS P PAUSE button 12 VHS FF SEARCH button 12 Refer to th...

Страница 67: ...R SYSTEM switch 12 ECHO control 23 MIC VOL 1 2 controls 23 LINE 2 IN OUT VIDEO AUDIO L R jacks 30 KARAOKE MODE switch 56 ª KEY CONTROL n buttons 57 º SELF DUET n buttons 58 SCORE button 59 SOUND EFFECTOR switch 12 17 24 CONTROL jack 22 MIC IN 1 2 jacks 22 Index to parts and controls continued ...

Страница 68: ...cator 43 7 CONTINUE SHUFFLE PROGRAM RESUME indicator 41 47 48 8 Key control indicators 57 9 S D indicators 58 º APC indicator 34 STEREO indicator 32 KARAOKE RESERVE indicator 54 VHS indicator VHS REC indicator 28 Audio channel sound level indicator PBC indicator 51 TRACK indicator 19 Time counter programme position indicator 13 48 ª SCORE indicator 59 º Tape speed indicator 28 Tape indicator Track...

Страница 69: ...d 1 RF CHANNEL screw 9 2 AERIAL OUT connector 7 3 AERIAL IN connector 7 4 AC IN connector 6 5 LINE 1 OUT VIDEO AUDIO L R jacks 6 6 TV SYSTEM switch 9 7 NTSC PB switch 9 8 LINE 1 IN VIDEO AUDIO L R jacks 8 28 9 Video CD DIRECT OUT VIDEO AUDIO L R jacks 7 Rear panel ...

Страница 70: ...CD buttons 14 18 4 Programme number ten s digit buttons 39 48 51 5 DISPLAY button 13 20 6 INDEX SEARCH buttons 33 7 OUTPUT SELECT VCD button 17 8 VHS 3 SEARCH buttons 12 9 VHS 0 REW button 12 º VHS PLAY button 11 VHS INPUT SELECT button 8 28 31 60 VCD PREV button 17 VCD PLAY SELECT button 17 VCD ˆ PBC RETURN button 52 continued ...

Страница 71: ...EY CONTROL buttons 57 RESERVE button 54 EXECUTE button 54 PROG buttons 28 for TV VOL buttons for TV TV VIDEO button for TV OUTPUT SELECT VHS button 13 KARAOKE button 25 VHS r REC button 28 ª VHS FF button 12 º VHS p STOP button 12 VHS P PAUSE button 12 VCD NEXT button 17 VCD p STOP button 17 VCD P PAUSE button 17 Index to parts and controls continued ...

Страница 72: ...tton 28 SLOW button 42 LOCKED SEARCH buttons 17 PBC ON OFF button 52 TIME button 19 TRACKING AUTO MAN button 34 4 TRACKING NORMAL SLOW STILL ADJUST buttons 34 ª G2 button 26 º AUDIO MONITOR button 32 7 FRAME buttons 26 SLOW SPEED buttons 26 AUDIO DUB button 36 MENU button 10 35 CURSOR buttons 10 35 EXE button 10 35 COUNTER RESET button 13 Remote commander in the lid ...

Отзывы: