background image

2

Safety Regulations

Safety Regulations

Owner’s Record

The model and serial numbers are located on the bottom. Record the serial
number in the space provided below.
Refer to them whenever you call upon your dealer regarding this product.

Model No.

Serial No.

Information

WARNING

To prevent fire or shock hazard, do not expose the
unit to rain or moisture.
To avoid electrical shock, do not open the cabinet.
Refer servicing to qualified personnel only.

MODEL No. for Regulatory Compliance

Your AIT-1 is assigned the MODEL No. ATDEA2A (respectively) for
regulatory compliance certifications. The number is indicated on the model
number label on your drive along with the rated voltage and current.

For customers in the USA

You are cautioned that any changes or modifications not expressly approved
in this manual could void your authority to operate this equipment.

FCC Compliance

This equipment has been tested and found to comply with the limits for a
Class B digital device, pursuant to Part 15 of the FCC rules. These limits are
designed to provide reasonable protection against harmful interference in a
residential installation. This equipment generates, uses and can radiate radio
frequency energy and, if not installed and used in accordance with the
instructions, may cause harmful interference to radio communications.
However, there is no guarantee that interference will not occur in a particular
installation. If this equipment does cause harmful interference to radio or
television reception, which can be determined by turning the equipment off
and on, the user is encouraged to try to correct the interference by one or
more of the following measures:

• Reorient or relocate the receiving antenna.
• Increase the separation between the equipment and receiver.
• Connect the equipment into an outlet on a circuit different from that to

which the receiver is connected.

• Consult the dealer or an experienced radio/TV technician for help.

The shielded interface cable recommended in this manual must be used with
this equipment in order to comply with the limits for a digital device pursuant
to Subpart B of Part 15 of FCC Rules.

Содержание SDX-D420V Series

Страница 1: ...2 108 661 01 2 2004 Sony Corporation Operating Instructions AIT Drive SDX D420V Series ...

Страница 2: ...l device pursuant to Part 15 of the FCC rules These limits are designed to provide reasonable protection against harmful interference in a residential installation This equipment generates uses and can radiate radio frequency energy and if not installed and used in accordance with the instructions may cause harmful interference to radio communications However there is no guarantee that interferenc...

Страница 3: ... sein Der Leitungsquerschnitt kann 0 5 mm2 betragen wenn die Anschlußleitung eine Länge von 2 m nicht überschreitet Anderenfalls muß der Leitungsquerschnitt mindestens 0 75 mm2 betragen If you have any questions about this product please refer to Sony contact in the instruction manual DECLARATION OF CONFORMITY Trade Name SONY Model ATDEA2A Responsible Party Sony Electronics Inc Address 16450 W Ber...

Страница 4: ...4 Safety Regulations ...

Страница 5: ...plug If you are unable to insert the plug into the outlet contact your electrician to have a suitable plug installed Do not defeat the safety purpose of the grounding plug AC Power cord The AC power cord should have appropriate safety approvals or marking for the country in which the equipment will be used Consult your dealer or local power company Cleaning Unplug the unit from the wall outlet bef...

Страница 6: ...the slots and openings by placing the unit on a bed sofa rug or other similar surface Never place the unit in a confined space such as a bookcase or built in cabinet unless proper ventilation is provided SERVICE Damage Requiring Service Unplug the unit from the wall outlet and refer servicing to qualified service personnel under the following conditions When the power cord or plug is damaged or fr...

Страница 7: ...ures 9 System Requirements 10 Useable Cartridges 10 Part Names and Functions 11 Front Panel 11 Rear Panel 12 Chapter 2 Preparation Supplied Items 13 Interconnections 13 Option Switches DIP Switch 14 Chapter 3 Operation How to use the AIT Drive 16 Cartridge Removal 17 Attaching the Dust Cover 18 Chapter 4 Care and Maintenance Taking Care of the Drive 20 Safety Considerations 20 Avoiding Damage 20 T...

Страница 8: ...chapter when you install the drive Chapter 3 Operation Describes how to use the drive including how to turn it on and how to insert and remove cartridges Read this chapter when you are going to use the drive Chapter 4 Care and Maintenance Describes how to take care of the drive and cartridges and how to clean the drive head Read this chapter before using the drive Appendix Contains the specificati...

Страница 9: ...mes with a data compression function providing a maximum of 91 GB of storage on an AIT 1 data cartridge 230 m tape 1 Stored data is automatically checked for compression The drive can also read data recorded with other devices The drive is equipped with a USB interface You can therefore connect the drive to either connector to your computer Note You cannot use the USB interface simultaneously The ...

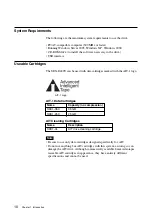
Страница 10: ...with data cartridges marked with the AIT 1 logo AIT 1 Logo AIT 1 Data Cartridges Name Capacity no compression SDX1 35C 35 GB SDX1 25C 25 GB AIT Cleaning Cartridges Name Description SDX1 CL AIT drive cleaning cartridge Note Be sure to use only data cartridges designed specifically for AIT Do not use anything but AIT cartridges with this system as doing so can damage the AIT drive Although commercia...

Страница 11: ...ceptacle 4 LED Indication for Drive Status The LED indicators are defined as follows LED TAPE CLEANING REPLACE Sense MOTION REQUEST TAPE Independent Independent Tape Loaded Independent Independent Tape Access in Progress write read Independent Independent Tape Access in Progress others Independent Independent Cleaning is requested Independent Independent Cleaning is Not Completed Independent Indep...

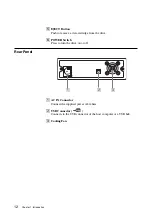
Страница 12: ...move a data cartridge from the drive 6 POWER Switch Press to turn the drive on or off Rear Panel 2 3 1 1 AC IN Connector Connect the supplied power cable here 2 USB Connector Connects to the USB connector of the host computer or a USB hub 3 Cooling Fan ...

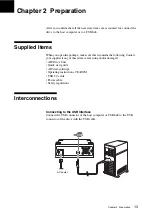
Страница 13: ... make sure that it contains the following Contact your supplier if any of these items are missing and or damaged AIT Drive Unit Quick start guide AIT data cartridge Operating instructions CD ROM USB 2 0 cable Power cable Safety regulations Interconnections Connecting to the USB Interface Connect the USB connector of the host computer or USB hub to the USB connector of the drive with the USB cable ...

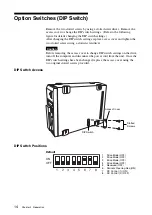
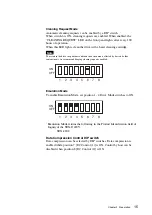
Страница 14: ... a slotted screwdriver Caution Before removing the access cover to change DIP switch settings on the drive turn off the computer and disconnect the power cord from the unit Once the DIP switch settings have been changed replace the access cover using the two original slotted screws provided DIP Switch Access DIP Switch Positions Default ON OFF 1 2 3 4 5 6 7 8 1 Drive Mode OFF 2 Drive Mode OFF 3 Dr...

Страница 15: ...ndition in environments affected by dust and other contaminants we recommend keeping cleaning requests enabled ON OFF 1 2 3 4 5 6 7 8 Emulation Mode To enable Emulation Mode set position 1 4 Drive Mode switches to ON ON OFF 1 2 3 4 5 6 7 8 Emulation Mode returns the following in the Product Identification field of Inquiry of the SDX D420V SDX 420C Data Compression Control DIP switch Data compressi...

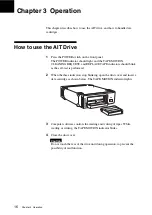
Страница 16: ...EST and REPLACE TAPE indicators should blink as the self test is performed 2 When the three indicators stop blinking open the dust cover and insert a data cartridge as shown below The TAPE MOTION indicator lights 3 Computer software controls the reading and writing of tapes While reading or writing the TAPE MOTION indicator blinks 4 Close the dust cover Caution Do not touch the rear of the drive u...

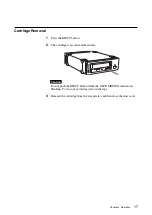
Страница 17: ... the EJECT button 2 The cartridge is ejected automatically Caution Do not push the EJECT button while the TAPE MOTION indicator is blinking To do so may destroy data on the tape 3 Remove the cartridge from the receptacle and then close the dust cover ...

Страница 18: ...dust cover s hinge clips one on each side with the pins of the drive bezel The dust cover should be positioned so that the magnets on the cover s back face the drive bezel This magnet does not affect the tape of the cartridge Holding the dust cover at an angle as shown in the figure below set the hinge clips on top of the bezel pins positioning them so that they bracket the pins ...

Страница 19: ... on each side in turn until you hear the hinge clips click into place Caution Do not press the dust cover in horizontally from the front Doing so could cause the dust cover to break 3 Close the dust cover This completes attachment of the dust cover ...

Страница 20: ...nd vibration Intense shock such as from dropping the drive will damage it Environmental considerations Do not store or use the drive in locations subject to high humidity excessive dust high temperature intense vibration direct sunlight sudden changes in temperature Proper ventilation To avoid overheating install the drive where it has free air circulation around the case and cooling fan Also do n...

Страница 21: ...lug it from the wall outlet and contact your supplier for assistance Cabinet cleaning Wipe the cabinet with a soft dry cloth For heavy dirt wipe with a soft cloth moistened with a gentle liquid soap then wipe again with a soft dry cloth Do not use alcohol paint thinner bug sprays or other volatile solvents as they can damage the finish ...

Страница 22: ...dden change in temperature condensation may interfere with reading and writing to a tape Avoid unnecessary insertion and removal of cartridge if you do not need to write or read a tape When you are done using the drive remove the cartridge Avoid touching AIT cartridges Memory in Cassette MIC terminals as they are sensitive precision components Storage Precautions Keep cartridges in their cases whe...

Страница 23: ...the CLEANING REQUEST indicator lights How to Clean 1 Load the head cleaning cartridge SDX1 CL into the AIT drive Cleaning starts automatically 2 After about 15 seconds cleaning will stop and the cartridge will be ejected automatically Notice Do not rewind the cleaning cartridge and reuse it When you reach the end of the cartridge dispose it and buy a new cleaning cartridge with the AIT logo ...

Страница 24: ... C Power Supply Miscellaneous Rated Power Supply 100 to 240 V AC 50 60 Hz 1 2 A Case Dimensions 198 64 5 246 mm W H D excluding projections Mass 2 4 kg Equipment Quick start guide 1 AIT 1 data cartridge SDX1 35C 1 Operating instructions CD ROM 1 USB 2 0 cable 1 Power cable 1 Safety regulations 1 Specifications may be subject to change in the interest of technological improvement without notice or ...

Страница 25: ...evices Marketing Singapore A division company of Sony Electronics S Pte Ltd Enterprise Storage Solutions Dept 2 International Business Park 01 10 Tower One The Strategy Singapore 609930 TEL 65 6544 8000 FAX 65 6544 7390 Sony Corporation of Hong Kong Ltd Computer Peripheral Sales Marketing Division Electronic Devices Marketing Hong Kong 45 F The Lee Gardens 33 Hysan Avenue Causeway Bay Hong Kong TE...

Страница 26: ...017 Las Condes Santiago Chile TEL 02 210 6000 FAX 02 210 5417 Sony Taiwan Limited Optical Devices Storage Dept Data Storage Section 5F 145 Changchun Road Taipei 104 Taiwan TEL 886 2 2522 7920 FAX 886 2 2522 2153 Sony Korea Corporation EDMK CP Sales Marketing Team 34F ASEM Tower World Trade Center 159 1 Samsung Dong Kangnam Ku Seoul 135 798 Korea TEL 82 2 6001 4249 FAX 82 2 6001 4115 URL http www s...

Страница 27: ......
Отзывы: