background image

Playing Discs

15

US

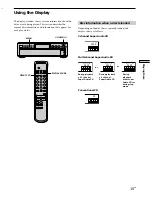
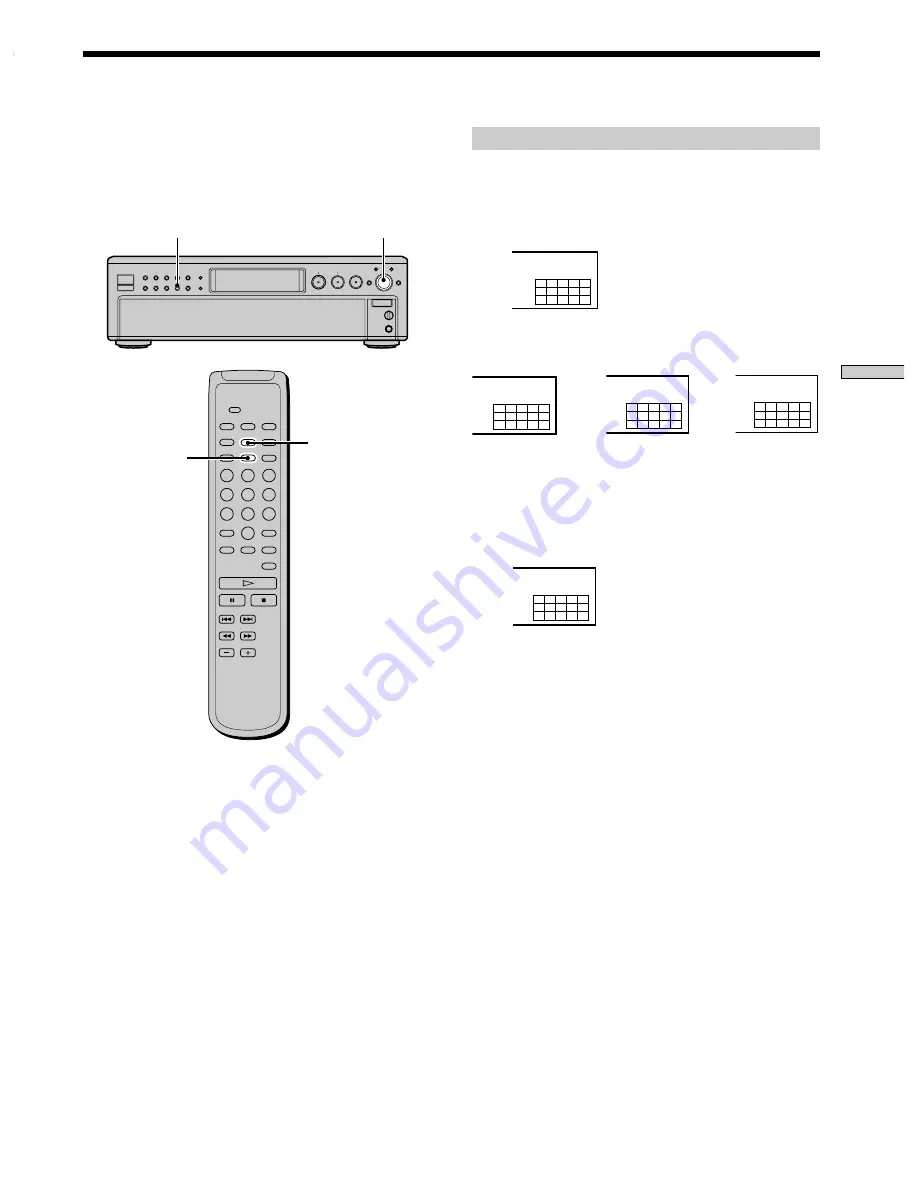
Using the Display

The display window shows various information about the
disc or track being played. This section describes the
current disc information and information that appears for
each play status.

l

AMS

L

or

MENU

TIME/TEXT

DISPLAY MODE

Disc information when a disc is loaded

Depending on the disc that is currently loaded, the
display shows as follows:

2 channel Super Audio CD

Multi-channel Super Audio CD

Conventional CD

or

C D

1

2

3

4

5

6

7

8

9 10

S A C D

MULTI

5 CH

1

2

3

4

5

6

7

8

9 10

S A C D

MULTI

CH

1

2

3

4

5

6

7

8

9 10

During playback
a 5.1 channel
Super Audio CD

During playback
a 5 channel
Super Audio CD

During
playback
other Super
Audio CDs or
during stop
mode

S A C D

MULTI

5.1CH

1

2

3

4

5

6

7

8

9 10

S A C D

2

CH

1

2

3

4

5

6

7

8

9 10

Содержание SCD-C555ES - Super Audio Cd

Страница 1: ...4 233 219 12 1 Super Audio CD Player 2001 Sony Corporation SCD C555ES Operating Instructions Mode d emploi US FR ...

Страница 2: ...terference to radio communications However there is no guarantee that interference will not occur in a particular installation If this equipment does cause harmful interference to radio or television reception which can be determined by turning the equipment off and on the user is encouraged to try to correct the interference by one or more of the following measures Reorient or relocate the receiv...

Страница 3: ...allows you to adjust the multi channel playback environment according to the allocation and size of your speakers A Super Audio D A Converter and Direct Digital Sync System which allows higher quality sound reproduction Editing of Disc and Track Titles etc on a TEXT display for Super Audio CDs and conventional CDs Others A Super Audio CD can mark up to 255 track numbers This feature applies to SCD...

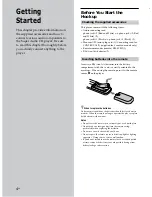
Страница 4: ...ries into the remote Insert two R06 size AA batteries into the battery compartment with the and correctly oriented to the markings When using the remote point it at the remote sensor on the player z When to replace the batteries Under normal conditions the batteries should last for about six months When the remote no longer operates the player replace both batteries with new ones Notes Do not leav...

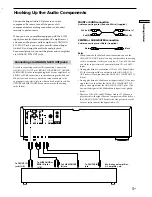
Страница 5: ...r CENTER and SUB WOOFER connection use the connecting cords Black FRONT or SURR connection Audio connecting cords Red and White supplied CENTER or SUB WOOFER connection Audio connecting cords Black supplied Notes When you make the Multi channel connection connect the ANALOG 2CH OUT jacks also using another audio connecting cord not supplied so that you can play a CD or SACD when you set the input ...

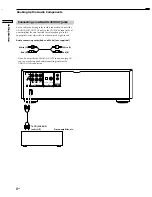
Страница 6: ...R jacks to the CD SACD input jacks of your amplifier Be sure to match the color coded pin to the appropriate jacks white left to white and red right to red Audio connecting cords Red and White not supplied If you do not make the ANALOG 5 1 CH connection page 5 you can use the supplied audio connecting cable for the ANALOG 2CH connection White L Red R White L Red R Hooking Up the Audio Components T...

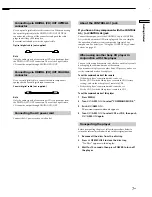
Страница 7: ... CD2 then push l AMS L again Transporting the player Before transporting the player follow the procedure below to return the internal mechanisms back to their original position 1 Remove all the discs from the disc tray 2 Press A OPEN CLOSE to close the disc tray No Disc appears in the display 3 Wait for 10 seconds then press POWER to turn off the player Connecting via DIGITAL CD OUT OPTICAL connec...

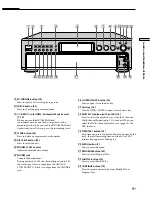
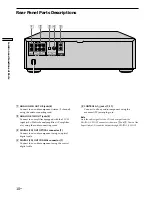
Страница 8: ... Descriptions 1 POWER switch 14 Press to turn on off the player 2 Remote sensor 4 3 DISC 1 5 button 14 Press to select the disc 4 SACD CD button with an LED 14 Each time you press the button while the Hybrid disc page 13 is loaded the layer changes between an HD SACD layer the LED turns on and CD layer the LED turns off 5 Display window 15 Shows various information 6 N button 14 Press to start pla...

Страница 9: ...t from the PHONES jack POWER PHONES LEVEL MIN MAX AMS PUSH ENTER SACD MULTI 2CH CHECK CLEAR DISC SKIP EX CHANGE DISC 1 CONTINUE DISC 2 SHUFFLE DISC 3 PROGRAM DISC 4 MENU DISC 5 TIME TEXT OPEN CLOSE qh A OPEN CLOSE button 14 Press to open close the disc tray qj Disc tray 14 Press A OPEN CLOSE to open close the disc tray qk MULTI 2CH button with an LED 14 Press to select the playback area when the 2...

Страница 10: ... OPTICAL connector 7 Connect to an audio component using an optical digital cable 4 DIGITAL CD OUT COAXIAL connector 7 Connect to an audio component using the coaxial digital cable R L 5 1CH OUT ANALOG CONTROL A1ΙΙ OUT DIGITAL CD COAXIAL OPTICAL CENTER SUB WOOFER SURR FRONT L R 2CH OUT 5 CONTROL A1 jacks 7 31 Connect to a Sony audio component using the monaural 2P mini plug cord Note Only the audi...

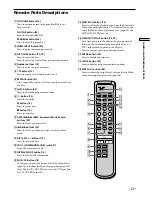
Страница 11: ... stop play 9 AMS AMS Automatic Music Sensor buttons 19 Press to locate a specific track 0 m M buttons 20 Press to locate a portion you want to play within a track qa DISC SKIP buttons 14 Press to select the disc qs CD1 2 COMMAND MODE switch 7 Select the command mode qd DISPLAY MODE button 16 Press to turn off the information qf SACD CD button 14 Each time you press the button while the Hybrid disc...

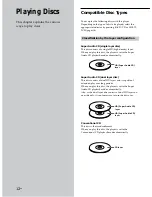
Страница 12: ...this disc the player is set to the Super Audio CD playback mode automatically Super Audio CD dual layer disc This disc consists of dual HD layers and is capable of extended play over long periods When you play this disc the player is set to the Super Audio CD playback mode automatically Also as the dual layer disc consists of dual HD layers on one side only it is not necessary to turn the disc ove...

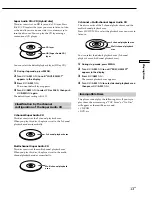
Страница 13: ...utomatically Multi channel Super Audio CD This disc consists of the multi channel playback area When you play this disc the player is set to the multi channel playback mode automatically CD layer 2 channel playback area Multi channel playback area 2 channel Multi channel Super Audio CD This disc consists of the 2 channel playback area and the multi channel playback area Press MULTI 2CH to select t...

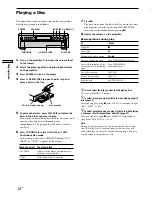
Страница 14: ...o the speakers or ears 7 Press N Playback starts from the first track If you want to start playing from a specific track turn lAMSL to select the track number before pressing N 8 Adjust the volume on the amplifier When you select ALL DISCS 1 DISC The player plays All discs in the player consecutively in the order of disc number Only the disc you ve selected Playing a Disc The operations for normal...

Страница 15: ...sc is loaded Depending on the disc that is currently loaded the display shows as follows 2 channel Super Audio CD Multi channel Super Audio CD Conventional CD or C D 1 2 3 4 5 6 7 8 9 10 S A C D MULTI 5 CH 1 2 3 4 5 6 7 8 9 10 S A C D MULTI CH 1 2 3 4 5 6 7 8 9 10 During playback a 5 1 channel Super Audio CD During playback a 5 channel Super Audio CD During playback other Super Audio CDs or during...

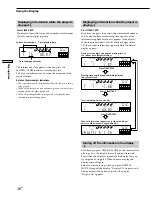
Страница 16: ... M U L T I 5 1 C H S A C D CD1 TRACK 1 2 3 4 5 6 7 8 9 10 1 2 3 4 5 DISCS ALL 1 1 1 5 6 S A C D CD1 DISC TRACK MIN SEC 1 2 3 4 5 6 7 8 9 10 1 2 3 4 5 DISCS ALL 1 1 1 1 5 7 S A C D CD1 DISC TRACK INDEX MIN SEC 1 2 3 4 5 6 7 8 9 10 1 2 3 4 5 MULTI 5 1CH MULTI 5 1CH MULTI 5 1CH MULTI 5 1CH Playing track number and elapsed playing time of the current track default display Press TIME TEXT Playing track...

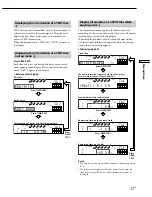
Страница 17: ...c name artist name and track names from TEXT discs Other information cannot be displayed DISCS ALL S O N Y B A N D A C D ART CD1 TEXT 1 2 3 4 5 6 7 8 9 10 1 2 3 4 5 DISCS ALL S O N Y H I T S S A C D CD1 TEXT 1 2 3 4 5 6 7 8 9 10 1 2 3 4 5 DISCS ALL 1 1 0 4 5 2 8 S A C D CD1 TEXT DISC TRACK INDEX MIN SEC 1 2 3 4 5 6 7 8 9 10 1 2 3 4 5 MULTI CH S MULTI CH MULTI CH Disc title Artist name Total number...

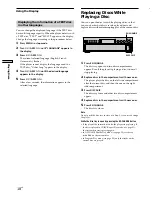
Страница 18: ... the play of the current disc ends the player stops playing If the disc is played in 1 DISC Repeat Play mode see page 21 the current disc starts playing again In ALL DISCS Shuffle Play mode see page 22 tracks are reshuffled on the current disc In Program Play mode see page 23 only the tracks on the current disc are played EX CHANGE DISC SKIP Using the Display Displaying the information of a TEXT d...

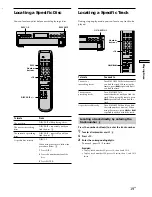
Страница 19: ...ber buttons 10 To locate The next or succeeding tracks The current or preceding tracks A specific track directly You need to Turn l AMS L clockwise until you find the track When using the remote press repeatedly until you find the track Turn l AMS L counterclockwise until you find the track When using the remote press repeatedly until you find the track Turn l AMS L until you find the track number...

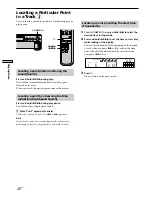
Страница 20: ...display The disc has reached its end Press or m to go back Note Tracks that are only a few seconds long may be too short for monitoring In this case the player may not search correctly m M lAMSL H Locating a point by setting the start time Time Search 1 Turn l AMS L or press to select the desired track in stop mode 2 Press and hold m M to set the time to start play while looking at the display You...

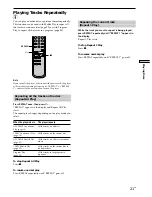
Страница 21: ... will store the last setting of repeat play REPEAT or REPEAT 1 and recall it the next time you turn on the player Repeating all the tracks on the disc Repeat All Play Press REPEAT once then press H REPEAT appears in the display and Repeat All Play starts The repeat play changes depending on the play mode you select When the play mode is The player repeats ALL DISCS Continuous Play page 14 1 DISC C...

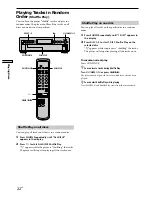
Страница 22: ...aying all the tracks once H CONTINUE SHUFFLE Shuffle Play on one disc You can play all tracks on the specific disc in a random order 1 Press SHUFFLE repeatedly until 1 DISC appears in the display 2 Press DISC 1 5 to start 1 DISC Shuffle Play on the selected disc appears while the player is shuffling the tracks The player will stop after playing all the tracks once To resume normal play Press CONTI...

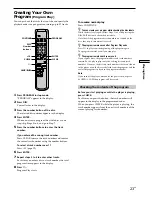
Страница 23: ...ram while checking the disc labels While the disc tray is open follow Steps 1 to 8 with pressing the DISC SKIP button to check the disc labels Note that if the programmed track number isn t found on the disc that step is automatically erased z The program remains even after Program Play ends Press H to play from the beginning of the program again The program remains even if you stop play z The pro...

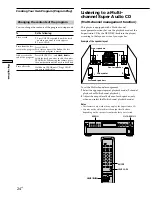
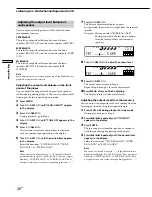
Страница 24: ...gement 1 Select the appropriate preset playback mode 2 channel playback or Multi channel playback 2 Adjust the output level balance of each speaker only when you select the Multi channel playback mode Notes This features only work when you play the Super Audio CD You may not be able to adjust the output level balance depending on the speaker layout mode that you selected Surround speakers Center s...

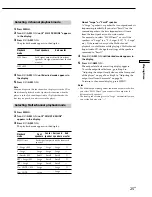
Страница 25: ...ntifully If you select Small for the surround speakers the bass frequencies will come from the front speakers and or sub woofer For normal use select MCH Direct or set all the speakers to Large ex 5 Large SW 5 Large etc If the sound is noisy or the Multi channel playback is not effective while playing a Multi channel Super Audio CD change the settings of the speakers concerned to Small 4 Turn l AM...

Страница 26: ...nel playback mode page 25 SW BALANCE does not appear Similarly CNTR BALANCE or SURR BALANCE does not appear when you set the corresponding speaker to 7 Press l AMS L The balance adjustment display appears In stop mode the test tone is output from the selected speaker Example When you select SURR BALANCE during stop mode the test tone is output from the front speakers and surround speakers 8 Turn l...

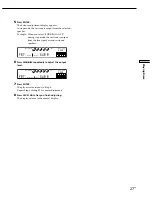
Страница 27: ...akers and surround speakers 6 Press repeatedly to adjust the output level 7 Press ENTER The player status returns to Step 4 Repeat Step 4 through 7 for more adjustments 8 Press LEVEL ADJ after you finish adjusting The display returns to the normal display F R T _ _ _ _ _ S U R R S A C D MULTI 5 1CH 1 2 3 4 5 6 7 8 9 10 DISCS ALL CD1 1 2 3 4 5 F R T _ _ _ _ _ S U R R S A C D MULTI 5 1CH 1 2 3 4 5 6...

Страница 28: ... When you use Disc Name page 29 Where is the Disc Name stored The Disc Name is stored not on the disc but in the player s memory It means you cannot use the Disc Name when you play the disc on other players Erasing all Disc Names of all discs Turn off the player While holding down CLEAR press POWER to turn on the player ALL ERASE appears in the display and all Disc Names will be erased Storing Inf...

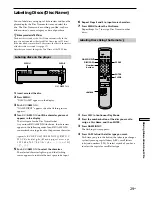
Страница 29: ...hes As you turn l AMS L clockwise the characters appear in the following order Turn l AMS L counterclockwise to go back to the previous character space A B C D E F G H I J K L M N O P Q R S T U V W X Y Z a b c d e f g h i j k l m n o p q r s t u v w x y z 0 1 2 3 4 5 6 7 8 9 _ 5 Push l AMS L to select the character The selected character lights up and the flashing cursor appears to indicate the ne...

Страница 30: ...tter press the number button corresponding to the letter you want indicated beside each number button Each time you press the button the letter changes cyclically among the ones indicated beside the button To input symbols press the number button 1 repeatedly until the symbol you want appears in the display Example To select the letter E Press the number button 3 twice To insert a space press SPAC...

Страница 31: ...u to control various functions for each component Note The CONTROL A1II control system is designed to maintain upward compatibility as the control system is upgraded to handle new functions In this case however older components will not be compatible with the new functions CONTROL A1II and CONTROL A1 compatibility The CONTROL A1 control system has been updated to the CONTROL A1II which is the stan...

Страница 32: ...the correct input when you press the play button on one of the connected components For example when you press H play button on the CD while the MD deck is playing the function selector on the amplifier switches from MD to CD Notes This function works only when the components are connected to the amplifier or receiver inputs according to the names on the function buttons Certain receivers allow yo...

Страница 33: ...tage is indicated on the nameplate at the rear of the player The player is not disconnected from the mains as long as it is attached to the mains even if the player itself has been turned off If you are not going to use the player for a long time be sure to disconnect the player from the mains To disconnect the mains lead grasp the plug itself never pull the cord On placement Place the player in a...

Страница 34: ...n or the drive s characteristics Besides the discs which are not yet finalized at the end of recording cannot be played back Troubleshooting If you experience any of the following difficulties while using the player use this troubleshooting guide to help you remedy the problem Should any problem persist consult your nearest Sony dealer There is no sound Check that the player is connected securely ...

Страница 35: ...tter Value of measurable limit 0 001 W PEAK or less When a CD is played Frequency response 2 Hz to 20 kHz Dynamic range 99 dB or more Total harmonic distortion rate 0 002 or less Wow and flutter Value of measurable limit 0 001 W PEAK or less Output connector Output only the audio signals of the CD General Laser Semiconductor laser l 780 nm Emission duration continuous Laser radiant power 5 47 uW a...

Страница 36: ...9 repeatedly 21 track in random order 22 Program Play Checking the contents of the program 23 Changing the contents of the program 24 how to create your own program 23 R Remote commander remote 11 Repeat All Play 21 1 Play 21 Replacing discs while playing a disc 18 S Search High Speed Search 20 Time Search 20 Shuffle Play 22 Super Audio CD 3 12 T U V W X Y Z TEXT 16 TOC 13 Index ...

Страница 37: ...37US Additional Information ...

Страница 38: ...s pouvez également utiliser les commandes de la télécommande si elles portent le même nom que celles du lecteur Les icônes suivantes sont utilisées dans ce mode d emploi Indique que vous pouvez effectuer cette opération avec la télécommande Indique une astuce ou un conseil qui simplifie l opération z Z Pour les utilisateurs au Canada Cet appareil numérique de la classe B est conforme à la norme NM...

Страница 39: ...n et de la taille de vos enceintes convertisseur N A Super Audio et système sync numérique direct qui offre une reproduction du son de meilleure qualité affichage des titres du disque des pistes sous format TEXTE pour les Super Audio CD et les CD classiques Divers Un Super Audio CD peut comporter jusqu à 255 numéros de plages Cette fonctionnalité s applique au modèle SCD C555ES La télécommande fou...

Страница 40: ...ndre les pôles et comme illustré dans le schéma suivant Lorsque vous utilisez la télécommande dirigez la vers le capteur de télécommande du lecteur z Quand faut il remplacer les piles Dans des conditions d utilisation normales les piles offrent une autonomie de fonctionnement d environ six mois Lorsque la télécommande n agit plus sur le lecteur remplacez les piles Remarques Ne laissez pas la téléc...

Страница 41: ...nc L Rouge R Blanc L Rouge R noir noir R L 5 1CH OUT ANALOG CONTROL A1ΙΙ OUT DIGITAL CD COAXIAL OPTICAL CENTER SUB WOOFER SURR FRONT L R 2CH OUT Vers les prises FRONT IN L R Vers les prises SURROUND ou REAR IN L R Vers la prise CENTER IN Vers la prise SUB WOOFER IN Amplificateur multicanal amplificateur AV etc Raccordement sur FRONT ou SURR Câbles de connexion audio rouge et blanc fournis Raccorde...

Страница 42: ...dement Raccordez les prises ANALOG 2CH OUT L R aux prises d entrée CD SACD de votre amplificateur Branchez les broches sur les prises identifiées par le même code de couleur le blanc gauche sur le blanc et le rouge droite sur le rouge Câble de connexion audio rouge et blanc non fourni Si vous ne raccordez pas les prises ANALOG 5 1 CH page 5 vous pouvez utiliser le câble de connexion audio fourni p...

Страница 43: ...z simplifier l utilisation de systèmes audio constitués de composants Sony séparés Pour plus de détails reportez vous à la section Utilisation du système CONTROL A1II page 31 Si vous utilisez un autre lecteur CD Sony conjointement avec ce lecteur Vous pouvez régler la télécommande fournie pour qu elle agisse uniquement sur ce lecteur en changeant le mode de commande Si vous raccordez ce lecteur à ...

Страница 44: ...ecteur sous hors tension 2 Capteur de la télécommande 4 3 Touche DISC 1 5 14 Appuyez sur cette touche pour sélectionner le disque 4 Touche SACD CD avec voyant 14 A chaque fois que vous appuyez sur cette touche alors qu un disque hybride page 13 est chargé le lecteur commute entre la couche HD le voyant s allume et la couche CD le voyant s éteint 5 Fenêtre d affichage 15 Affiche différentes informa...

Страница 45: ...OSE 14 Appuyez pour ouvrir fermer le plateau de lecture qj Plateau du disque 14 Appuyez sur A OPEN CLOSE pour ouvrir fermer le plateau de lecture qk Touche MULTI 2CH avec voyant 14 Appuyez sur cette touche pour sélectionner la zone de lecture une fois que le Super Audio CD bi canal et multicanal est chargé dans le lecteur Le voyant s allume dès que vous sélectionnez la zone de lecture multicanal p...

Страница 46: ...Raccordez ce connecteur à un composant audio à l aide d un câble numérique optique 4 Connecteur DIGITAL CD OUT COAXIAL 7 Raccordez ce connecteur à un composant audio à l aide d un câble numérique coaxial R L 5 1CH OUT ANALOG CONTROL A1ΙΙ OUT DIGITAL CD COAXIAL OPTICAL CENTER SUB WOOFER SURR FRONT L R 2CH OUT 5 Prises CONTROL A1 II 7 31 Raccordez ces prises au composant audio Sony à l aide du cordo...

Страница 47: ...puyez sur cette touche pour localiser un passage dans une plage qa Touches DISC SKIP 14 Appuyez sur cette touche pour sélectionner le disque qs Commutateur CD1 2 COMMAND MODE 7 Sélectionnez le mode de commande qd Touche DISPLAY MODE 16 Appuyez sur cette touche pour désactiver l affichage des informations qf Touche SACD CD avec voyant 14 A chaque fois que vous appuyez sur cette touche alors qu un d...

Страница 48: ...udio CD disque à double couche Ce disque est constitué d une double couche HD et offre une lecture de longue durée Lorsque vous écoutez ce type de disque le lecteur passe automatiquement en mode lecture Super Audio CD De même comme un disque à double couche est constitué de deux couches HD sur une seule face il n est pas nécessaire de retourner le disque CD classique Ce disque est au format standa...

Страница 49: ...iquement en mode lecture bi canal Super Audio CD multicanal Ce disque possède une zone de lecture multicanal Lorsque vous écoutez ce type de disque le lecteur passe automatiquement en mode lecture multicanal Couche CD Zone de lecture multicanal Zone de lecture bi canal Super Audio CD bi canal multicanal Ce disque possède une zone de lecture bi canal ainsi qu une zone de lecture multicanal Appuyez ...

Страница 50: ...magement de vos haut parleurs ou des lésions auditives 7 Appuyez sur N La lecture commence par la première plage Si vous souhaitez commencer la lecture par une plage spécifique tournez lAMSL pour sélectionner le numéro de la plage choisie puis appuyez sur N 8 Réglez le volume sur l amplificateur Si vous sélectionnez ALL DISCS 1 DISC Le lecteur reproduit Consécutivement tous les disques contenus da...

Страница 51: ...ives au disque ou à la plage en cours de lecture Cette section décrit les informations relatives au disque et les informations qui apparaissent pour chaque statut de lecture lAMSL ou MENU TIME TEXT DISPLAY MODE S A C D 2 CH 1 2 3 4 5 6 7 8 9 10 ou C D 1 2 3 4 5 6 7 8 9 10 S A C D MULTI 5 CH 1 2 3 4 5 6 7 8 9 10 S A C D MULTI CH 1 2 3 4 5 6 7 8 9 10 Lecture d un Super Audio CD 5 1 canaux Lecture d ...

Страница 52: ... et la durée totale de lecture Durée totale de lecture Nombre total de plages Numéro de disque en cours DISCS ALL 1 1 0 1 4 5 5 7 S A C D DISC TRACK INDEX MIN SEC 1 2 3 4 5 6 7 8 9 10 1 2 3 4 5 MULTI CH Les informations s affichent également lorsque vous appuyez sur la touche A OPEN CLOSE pour refermer le plateau de lecture Les plages dont le numéro est supérieur à 16 ne peuvent pas être affichées...

Страница 53: ...Les informations TEXT affichées par ce lecteur sont le titre du disque le nom de l artiste et le titre de la plage en cours Lorsque le lecteur détecte la présence d un disque TEXT l indication TEXT apparaît dans la fenêtre d affichage Affichage des informations d un disque TEXT en mode d arrêt Z Appuyez sur TIME TEXT Chaque fois que vous appuyez sur cette touche le titre du disque ou le nom de l a...

Страница 54: ...uche EX CHANGE Lorsque la lecture du disque en cours se termine le lecteur interrompt la lecture Si le disque est reproduit en mode de lecture répétée 1 DISC voir page 21 la lecture du disque en cours recommence En mode de lecture aléatoire ALL DISCS voir page 22 les plages du disque en cours sont remélangées En mode de lecture programmée voir page 23 seules les plages du disque en cours sont repr...

Страница 55: ...ifique Vous devez Tourner lAMSL dans le sens des aiguilles d une montre jusqu à ce que vous ayez trouvé la plage désirée Si vous utilisez la télécommande appuyez plusieurs fois sur jusqu à ce que vous ayez trouvé la plage désirée Tourner lAMSL dans le sens inverse des aiguilles d une montre jusqu à ce que vous ayez trouvé la plage désirée Si vous utilisez la télécommande appuyez plusieurs fois sur...

Страница 56: ... Cela signifie que vous êtes arrivé à la fin du disque Appuyez sur ou m pour revenir en arrière Remarque Les plages dont la durée n excède pas quelques secondes peuvent être trop courtes pour être contrôlées Dans ce cas le lecteur risque de ne pas effectuer correctement la recherche m M lAMSL H Comment localiser un point en définissant une heure de départ recherche temporelle 1 En mode d arrêt tou...

Страница 57: ...us avez sélectionné Lorsque le disque est reproduit en Lecture continue ALL DISCS page 14 Lecture continue 1 DISC page 14 Lecture aléatoire ALL DISCS page 22 Lecture aléatoire 1 DISC page 22 Lecture programmée page 23 H x REPEAT Pour arrêter la lecture répétée complète Appuyez sur x Pour reprendre la lecture normale Appuyez plusieurs fois de suite sur REPEAT jusqu à ce que l indication REPEAT disp...

Страница 58: ...etourne pas à des titres qui ont déjà été joués z Vous pouvez activer la lecture aléatoire en cours de lecture Appuyez sur SHUFFLE et la lecture aléatoire démarre à partir de la plage en cours Vous pouvez régler le lecteur pour qu il mélange les plages musicales et les reproduise dans un ordre quelconque Le lecteur lit dans un ordre aléatoire toutes les plages de tous les disques ou du disque que ...

Страница 59: ...vérifiant la face imprimée des disques Lorsque le plateau de lecture est ouvert suivez les étapes 1 à 8 en appuyant sur la touche DISC SKIP pour vérifier la face imprimée des disques Notez que si le lecteur ne trouve pas le numéro de la plage programmée sur le disque cette étape est automatiquement supprimée z Le programme reste en mémoire après la fin de la lecture programmée Appuyez sur H pour r...

Страница 60: ...e jusqu à ce que Prog CLEAR s affiche Création de votre propre programme musical lecture programmée Lecture d un Super Audio CD multicanal fonction de gestion multicanal le lecteur dispose d une fonction de gestion multicanal permettant de régler le mode lecture du Super Audio CD utilisant la technologie DSD DSP intégrée au lecteur en fonction de la configuration ou de la taille de vos enceintes E...

Страница 61: ... fréquences de ces enceintes sont reproduites par les enceintes avant et ou le caisson de basses Pour une utilisation standard sélectionnez MCH Direct ou réglez toutes les enceintes sur Large exemple 5 Large SW 5 Large etc Si le son obtenu ou la lecture multicanal ne vous satisfont pas lors de l écoute d un Super Audio CD multicanal réglez les enceintes concernées sur Small 4 Tournez la commande l...

Страница 62: ...BALANCE ne s affiche pas De même lorsque vous réglez les enceintes centrale et surround sur CNTR BALANCE et SURR BALANCE ne s affichent pas F R T _ _ _ _ _ S U R R S A C D MULTI 5 1CH 1 2 3 4 5 6 7 8 9 10 DISCS ALL CD1 1 2 3 4 5 F R T _ _ _ _ _ S U R R S A C D MULTI 5 1CH 1 2 3 4 5 6 7 8 9 10 DISCS ALL CD1 1 2 3 4 5 7 Appuyez sur la commande l AMS L Le réglage de la balance apparaît En mode d arrê...

Страница 63: ...ound 6 Appuyez plusieurs fois de suite sur pour régler le niveau de sortie 7 Appuyez sur ENTER Le lecteur revient au statut décrit à l étape 4 Répétez les étapes 4 à 7 pour d autres réglages 8 Appuyez sur LEVEL ADJ après avoir effectué tous vos réglages L affichage redevient normal F R T _ _ _ _ _ S U R R S A C D MULTI 5 1CH 1 2 3 4 5 6 7 8 9 10 DISCS ALL CD1 1 2 3 4 5 F R T _ _ _ _ _ S U R R S A ...

Страница 64: ...disque n est pas enregistré sur le disque mais dans la zone de mémoire du lecteur En d autres termes vous ne pouvez utiliser le nom du disque si vous jouez ce disque sur un autre lecteur Suppression de tous les noms de disques Mettez le lecteur hors tension Tout en maintenant la touche CLEAR enfoncée appuyez sur POWER pour mettre le lecteur sous tension L indication ALL ERASE apparaît dans la fenê...

Страница 65: ... nom du disque clignote En tournant la commande l AMS L dans le sens horaire les caractères apparaissent dans l ordre suivant Tournez la commande l AMS L dans le sens antihoraire pour revenir au caractère précédent espace A B C D E F G H I J K L M N O P Q R S T U V W X Y Z a b c d e f g h i j k l m n o p q r s t u v w x y z 0 1 2 3 4 5 6 7 8 9 _ 5 Appuyez sur l AMS L pour sélectionner le caractère...

Страница 66: ...ique Pour introduire un caractère appuyez sur la touche numérique correspondant au caractère voulu indiqué à côté de chaque touche numérique Chaque fois que vous appuyez sur cette touche les caractères indiqués à côté de la touche s affichent alternativement Pour introduire des symboles appuyez plusieurs fois de suite sur la touche numérique 1 jusqu à ce que le symbole apparaisse dans la fenêtre d...

Страница 67: ...onctionnera comme un bus multifonctions vous permettant de contrôler diverses fonctions de chaque appareil Remarque Le système CONTROL A1II est conçu de façon à pouvoir évoluer lors d une mise à niveau pour l ajout de nouvelles fonctions Dans ce cas cependant les anciens appareils ne seront plus compatibles avec les nouvelles fonctions Compatibilité CONTROL A1II et CONTROL A1 Le système CONTROL A1...

Страница 68: ...ion de l amplificateur ou récepteur bascule automatiquement vers l entrée adaptée lorsque vous appuyez sur la touche de lecture de l un des appareils raccordés Par exemple lorsque vous appuyez sur H touche de lecture sur le lecteur CD alors que la platine MD est en cours de lecture le sélecteur de fonction de l amplificateur bascule de MD sur CD Amplificateur Remarques Cette fonction est active un...

Страница 69: ...e lecteur d une pièce froide dans une pièce chaude ou si vous l installez dans une pièce particulièrement humide de la condensation peut se former sur les lentilles montées à l intérieur du lecteur Le fonctionnement du lecteur risque d en être affecté En pareil cas retirez le disque du plateau de lecture et laissez le lecteur sous tension pendant environ une heure pour permettre à l humidité de s ...

Страница 70: ...manière à paramétrer le caisson de basses sur a page 25 Remarques sur les disques Manipulation des disques Pour que les disques restent propres saisissez les par le bord N en touchez pas la surface Ne collez pas de papier ni de bande adhésive sur les disques Utilisez uniquement des disques de forme ronde L utilisation d un disque de forme spéciale par exemple disque carré en forme d étoile de cœur...

Страница 71: ...ion électrique 38 W Dimensions l h p 430 138 409 mm 17 5 1 2 16 1 8 pouces parties saillantes comprises Masse approx 11 0 kg 24 livres 5 onces Accessoires fournis Voir page 4 La conception et les spécifications sont sujettes à modifications sans préavis Type de prise Prises phono Connecteur de sortie optique carré Connecteur de sortie coaxial Niveau de sortie 2 Vrms à 50 kilohms 18 dBm 0 5 Vp p Im...

Страница 72: ...rande vitesse 20 M Mode lecture bi canal 25 multicanal 25 N O Nom du disque 29 P Q Pause de lecture 14 Piles 4 Placement du disque 14 R Raccordement composant audio 5 source d alimentation 7 Recherche recherche à grande vitesse 20 recherche temporelle 20 Remplacement des disques pendant la lecture d un disque 18 Répétition lecture complète 21 lecture d une seule plage 21 S Super Audio CD 3 12 Supe...

Отзывы: