


1-17
68
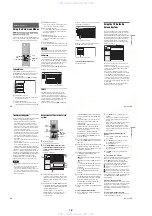
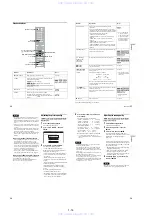
Creating chapters manually
You can manually insert a chapter mark at any
point you like during playback or recording.
Press CHAPTER MARK at the point where you
want to divide the title into chapters.
Each time you press the button, “Marking...”
appears on the screen and the scenes to the left and
right of the mark become separate chapters.
To erase chapter marks
You can combine two chapters by erasing the
chapter mark during playback.
Press
.
/
>
to search for a chapter number, and
while displaying the chapter containing the
chapter mark you want to erase, press CHAPTER
ERASE.
The current chapter combines with the previous
chapter.
Notes
• If a message appears and indicates that no more chapter
marks can be added, you may not be able to record or
edit.
• When dubbing, any chapter marks you enter will be
erased.
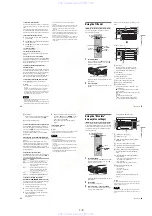
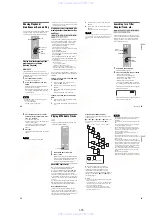
Creating and Editing a
Playlist
Playlist edit allows you to edit or re-edit without
changing the actual recordings. A Playlist title can
contain up to 50 scenes.
For details, see “Edit options for DVD-RWs (VR
mode)” (page 64).
Note
Once you create a Playlist title from original titles, you
will be unable to erase or edit the original titles.
1
Press TITLE LIST to turn on the Title List
menu, and press TOOLS.
The TOOLS menu appears.
2
Select
“
Create Playlist,
”
and press ENTER.
The display for selecting titles appears.
-RWVR
HDD
Marking...
-RWVR
1
2
3
4
5
6
7
8
9
0
<
/
M
/
m
/
,
,
ENTER
TOOLS
H
PLAY
TITLE LIST
m
/
M
69
E
d
it
in
g
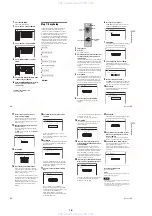
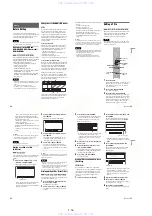
3
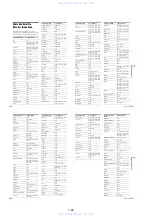
Select the title you want to include in the
Playlist title, and press ENTER.
A check mark appears in the check box next to
the selected title. To clear the check mark,
press ENTER again. To select all of the titles,
select “Select All.”
4
Repeat step 3 to add more titles.
To go to the next page of titles, press
m
. To
clear all of the check marks, select “Reset
All.”
5
Select
“
OK,
”
and press ENTER.
The list of selected titles appears. To add
another title, select “Add Title.”
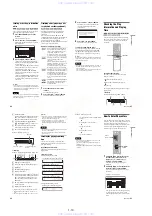
6
Select one of the titles, and press ENTER.
The sub-menu appears.
“Capture”: Adds a section of the title to the
Playlist title as one scene.
“Capture All”: Adds the entire title to the
Playlist title as one scene. After capturing the
title, select “Scene List” and go to step 12.
“Check Scenes”: Allows you to check the
captured scene.
7
Select
“
Capture,
”
and press ENTER.
The display for setting the start point (IN)
appears. The title starts to play in the
background.
8
Select the IN point by pressing
m
/
M
,
and press ENTER.
The display for setting the end point (OUT)
appears, and the title continues to play in the
background.
9
Select the OUT point by pressing
m
/
M
,
and press ENTER.
The display asks for confirmation. To reset the
IN or OUT point, select “Change IN” or
“Change OUT” and repeat step 8 or 9. To view
the selected scene, select “Preview.”
10
Select
“
OK,
”
and ENTER.
The selected section is captured as a scene,
and the display asks whether you want to
continue. To continue, select “More,” and
repeat the steps above. To capture a scene
from another title, select “New Title.”
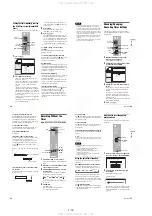
11
When you finish capturing scenes, select
“
No more
”
and press ENTER.
The Scene List menu appears with all of the
selected scenes.
12
Select the scene you want to edit, and
press ENTER.
The sub-menu appears.
“Move”: Changes the scene order.
“Erase”: Erases the scene. The selection is
canceled.
“Preview”: Displays thumbnail pictures of the
scenes.
“Change IN”: Allows you to change the IN
point, and repeat from step 8.
Create Playlist
Select the titles you want to capture.
OK
Cancel
Select All
Reset All
Original
1 2ch 1:00PM - 2:00PM
2 5ch 8:00PM - 9:00PM
3 12ch 9:00AM - 9:30AM
4 3ch 8:00PM - 8:30PM
5 25ch 8:00PM - 8:30PM
6 L2 9:00PM - 9:30PM
9/15
9/17
9/25
9/25
10/15
10/19
Create Playlist - Selected Titles
Select a title to start capturing.
Cancel
Add Title
1 2ch 1:00PM - 2:00PM
2 5ch 8:00PM - 9:00PM
9/15
9/17
Scene List
Capture (Set IN point)
2 5ch 8:00PM - 9:00PM
OUT - : - - : - -
IN 0:10:26
Capture (Set OUT point)
IN
2 5ch 8:00PM - 9:00PM
OUT 0:23:45
IN 0:10:26
Scene List
Total 0:33:28
Scenes 2
OK
Quit
Add
Preview
5ch 8:00PM - 9:00PM
0:10:26 - 0:23:45
1
2
5ch 8:00PM - 9:00PM
0:25:00 - 0:45:08
Total number of scenes
Total duration of
the selected scene
,
continued
70
“Change OUT”: Allows you to change the
OUT point, and repeat from step 9.
To add more scenes, select “Add” and go to
step 6. To preview all of the captured scenes in
the listed order, select “Preview.”
13
When you finish editing the Scene List,
select
“
OK,
”
and press ENTER.
The display for entering the title name
appears. To enter a new name, select “Enter”
(see page 43).
14
Select
“
OK
”
to use the default name, and
press ENTER.
Press TOOLS while the Title List menu is turned
on. Then, select “Playlist” and press ENTER.
When the Title List (Playlist) menu appears, select
a title and press
When a Playlist title is created, the IN and OUT points
will become chapter marks, and each scene will become
a chapter.
The picture may pause when the edited scene is played.
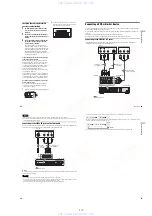
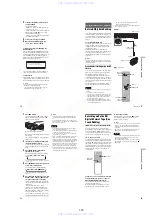
Moving a Playlist title (Move Title)
You can change the Playlist title order within the
Title List (Playlist).
Press TITLE LIST to turn on the Title List
(Playlist) menu.
If the Title List (Original) menu appears, press
TOOLS and select “Playlist.”
2
Select
“
Number
”
in the
“
Sort
”
column,
and press ENTER.
The titles are sorted in order of title number.
3
Select a title, and press ENTER.
The sub-menu appears.
4
Select
“
Move Title,
”
and press ENTER.
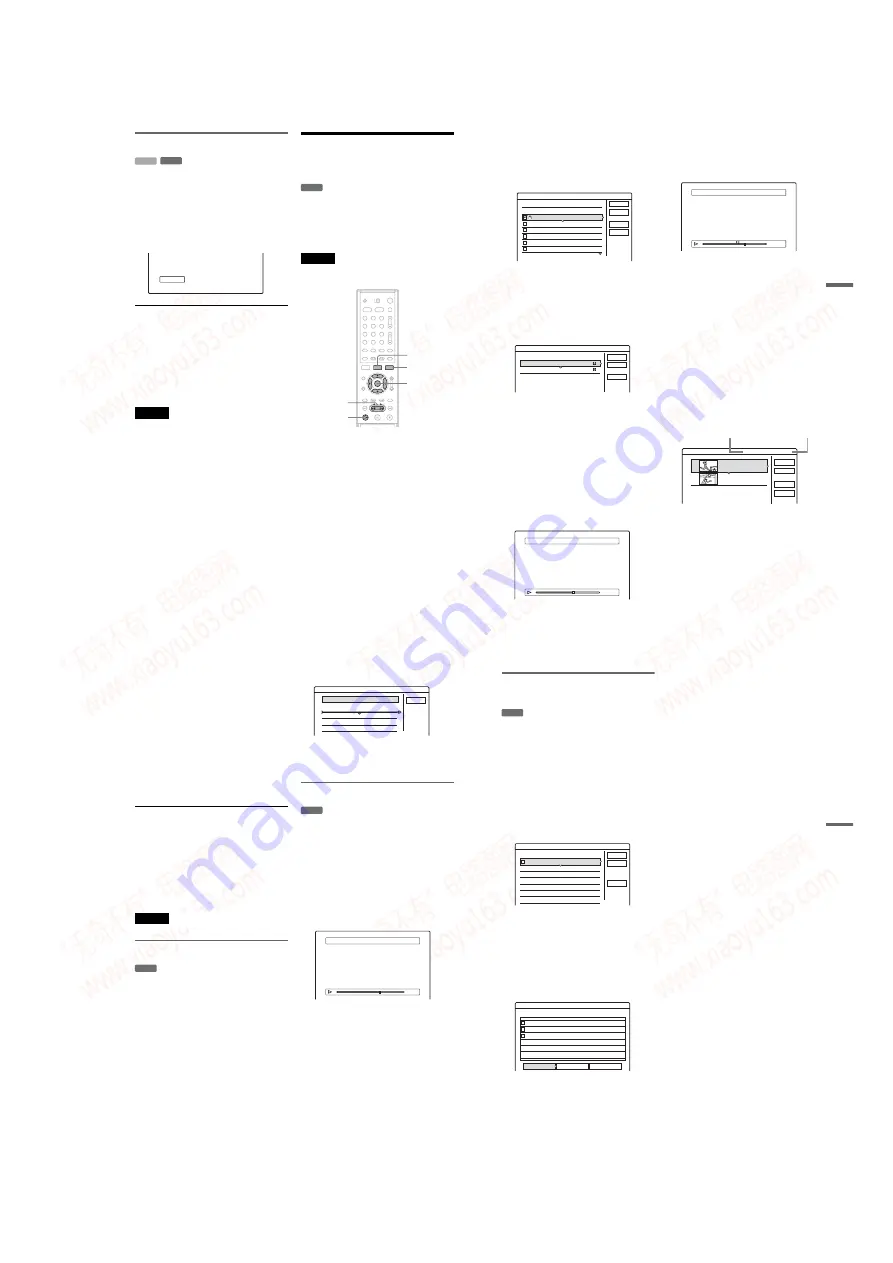
5
Select a new location for the title by
pressing
M
/
m
and press ENTER.
The title moves to the new location.
Dividing a Playlist title (Divide Title)
1
Press TITLE LIST to turn on the Title List
(Playlist) menu.
If the Title List (Original) menu appears, press
TOOLS and select “Playlist.”
2
Select a title, and press ENTER.
The sub-menu appears.
3
Select
“
Divide Title,
”
and press ENTER.
The display for setting the dividing point
appears. The title starts to play in the
background.
4
Select the dividing point by pressing
m
/
M
, and press ENTER.
The display asks for confirmation. To change
the dividing point, select “Change.”
5
Select
“
OK,
”
and press ENTER.
The display for entering the title name
appears. To use the same title name as before,
select “No.”
6
Select
“
Yes,
”
and press ENTER to enter a
new name.
Follow the explanations on page 43. After you
enter a new name, the title is divided in two.
Move
Cancel
1 2ch 1:00PM - 2:00PM
2 5ch 8:00AM - 9:00AM
Where do you want to move this title?
9/15
9/17
Wed
Fri
-RWVR
Divide
0:12:34
1 2ch 1:00PM - 2:00PM
71
E
d
it
in
g
Combining multiple Playlist titles
(Combine Titles)
1
Press TITLE LIST to turn on the Title List
(Playlist) menu.
If the Title List (Original) menu appears, press
TOOLS and select “Playlist.”
2
Press TOOLS to select
“
Combine Titles,
”
and press ENTER.
The display for selecting titles appears.
3
Select a title, and press ENTER.
A number indicating the order in which you
selected the title appears. To cancel the
selection, press ENTER again.
4
Repeat step 3 to select all of the titles you
want to combine.
To cancel all of the selections, select “Reset
All.”
5
Select
“
OK,
”
and press ENTER.
The list of titles to be combined appears. To
change the selection, select “Change” and go
to step 3.
6
Select
“
OK,
”
and press ENTER.
The display for selecting a title name from
among the selected titles appears. To enter a
new name, select “Enter Text,” and follow the
explanations on page 43.
7
Select a name, and press ENTER.
The titles are combined.
-RWVR
Combine
Select the titles to combine.
Cancel
Reset All
1
1 2ch 1:00PM - 2:00PM
2 5ch 8:00PM - 9:00PM
3 2ch 1:00PM - 2:00PM
4 2ch 1:00PM - 2:00PM
9/15
9/17
9/28
10/ 5
OK
Combine
Combine the titles in the following order.
OK
Change
Cancel
1
2
3
1 2ch 1:00PM - 2:00PM
2 2ch 1:00PM - 2:00PM
3 2ch 1:00PM - 2:00PM
9/15
9/28
10/ 5
www. xiaoyu163. com
QQ 376315150
9
9
2
8
9
4
2
9
8
TEL 13942296513
9
9
2
8
9
4
2
9
8
0
5
1
5
1
3
6
7
3
Q
Q
TEL 13942296513 QQ 376315150 892498299
TEL 13942296513 QQ 376315150 892498299


