


1-6
24
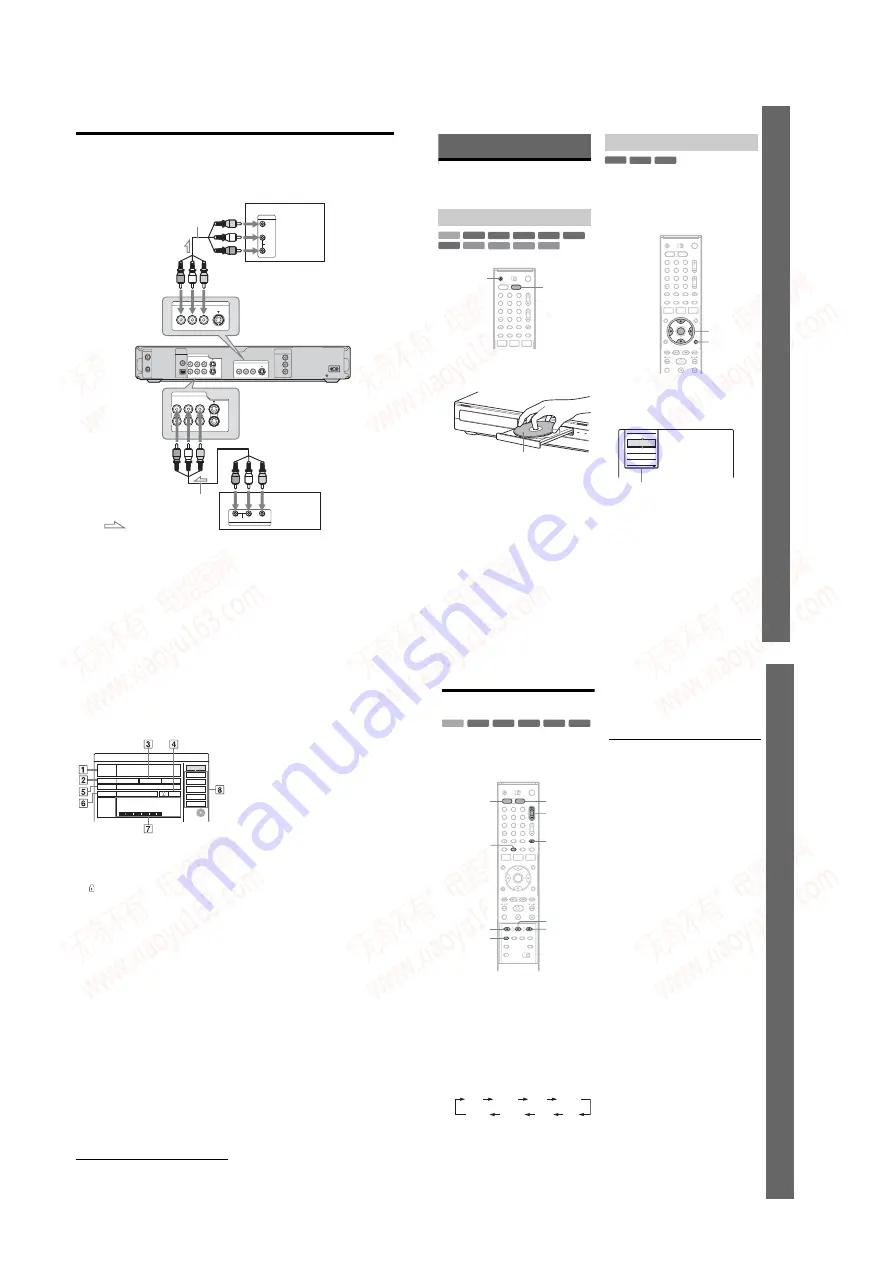
Connecting to a Satellite or Digital Tuner
Connect a satellite or digital tuner to this recorder using the LINE IN 1 jacks. Disconnect the recorder’s
power cord (mains lead) from the mains when connecting the tuner.
To use the Synchro-Rec function, see below.
If you want to use the Synchro Rec function
This connection is necessary to use the Synchro-
Recording function. See “Recording from
connected equipment with a timer (Synchro Rec)”
on page 46.
b
Notes
• Synchro-Recording does not work with some tuners.
For details, see the tuner’s operating instructions.
• If you disconnect the recorder’s power cord (mains
lead), you will not be able to view the signals from the
connected tuner.
~
AC IN
COMPONENT
VIDEO OUT
PB/CB
Y
PR/CR
DIGITAL
OUT
COAXIAL
OPTICAL
PCM/DTS/MPEG
DOLBY DIGITAL
LINE OUT
VIDEO
S VIDEO
R-AUDIO-L
LINE IN
1
3
VIDEO
S VIDEO
R-AUDIO-L
IN
OUT
AERIAL
LINE IN
1
3
VIDEO
S VIDEO
R-AUDIO-L
AUDIO
OUTPUT
L
R
VIDEO
LINE OUT
VIDEO
S VIDEO
R-AUDIO-L
AUDIO
INPUT
L
R
VIDEO
TV
Satellite tuner, etc.
to LINE OUT
DVD recorder
to LINE IN 1
: Signal flow
Audio/video cord
(supplied)
Audio/video cord
(not supplied)
25
Se
ve
n B
a
si
c O
p
e
rat
ion
s
— G
e
tt
in
g
t
o
Kn
o
w
Yo
u
r DVD Re
c
o
rd
e
r
Seven Basic Operations
— Getting to Know Your DVD Recorder
1. Inserting and Formatting
a DVD Disc (Disc Info)
1
Press DVD.
2
Press
Z
(open/close), and place a disc on
the disc tray.
3
Press
Z
(open/close) to close the disc
tray.
Wait until “LOAD” disappears from the front
panel display.
Unused DVDs are formatted automatically.
New discs are automatically formatted when
inserted. If necessary, you can manually re-format
a DVD+RW or DVD-RW disc to make a blank
disc. For DVD-RWs, you can select a recording
format (VR mode or Video mode) according to
your needs (page 8).
1
Insert a disc.
See “Inserting a Disc” on page 25.
2
Press TOOLS.
The TOOLS menu appears.
The TOOLS menu displays options
applicable to the entire disc (e.g. disc
protection), recorder (e.g. audio settings
during recording), or multiple items on a list
menu (e.g. erasing multiple titles). The
displayed options differ depending on the
situation and disc type.
Inserting a Disc
+
R
DVD
VCD
CD
DATA CD
-RWVR -RW
Video
+
RW
-
R
HDD
DATA DVD
1
2
3
4
6
7
8
9
0
5
Z
DVD
With the recording/playing side facing down
Formatting a DVD disc (Disc Info)
-RWVR -RW
Video
+
RW
1
2
3
4
6
7
8
9
0
5
TOOLS
<
/
M
/
m
/
,
,
ENTER
Close
Protect
Erase
Dubbing
Stop
Options for the disc or picture
,
continued
26
3
Move the cursor down the TOOLS menu
until “Disc Info” is selected, and press
ENTER.
Example: When a DVD-RW (VR mode) is
inserted.
“Format”: Recording format type (DVD-
RW only)
protection is set (DVD-RW in VR mode
only)
“Title no.”: Total number of titles
“Date”: Dates of when the oldest and the
most recent titles were recorded (DVD
only)
“Continuous Rem. Time”/“Remainder”
(approximate)
• The remaining recording time in each of the
• Disc space bar
• Remaining disc space/total disc space
8
Disc setting buttons
“Disc Name” (page 34)
“Protect Disc” (page 35)
“Finalize”/“Unfinalize” (page 35)
“Erase All” (page 66)
“Format”
Available settings differ depending on the
disc type.
4
Select “Format,” and press ENTER.
5
Select “OK,” and press ENTER.
For DVD-RWs, select “VR” or “Video,” and
press ENTER.
All contents on the disc are erased.
z
Hints
• By reformatting, you can change the recording format
on DVD-RWs, or record again on DVD-RWs that have
been finalized.
• For DVD+RWs and DVD-RWs (Video mode), you can
check free space and title location on the disc using the
Disc Map display (page 66).
b
Note
On this model, 1 GB (read “gigabyte”) is equivalent to 1
billion bytes. The larger the number, the larger the disc
space.
Format
Disc Name
Disc Information
DiscName Movie
Media
DVD-RW
Format
VR
Title no.
2
Date
Off
13.10.2005 ~ 28.10.2005
HQ : 0H30M
HSP : 0H45M
SP : 1H00M
LSP : 1H15M
LP : 1H30M
EP : 2H00M
SLP : 3H00M
SEP : 4H00M
2. 3 / 4. 7
Remainder
Close
Erase All
Finalize
Protect Disc
Original 3 / Playlist
GB
27
Se
ve
n B
a
si
c O
p
e
rat
ion
s
—
G
e
tt
in
g
t
o
Kn
o
w
Yo
u
r DVD Re
c
o
rd
e
r
2. Recording a Programme
This section introduces the basic operation to
record the current TV programme to the hard disk
(HDD) or to a disc (DVD). For an explanation of
how to make timer recordings, see page 37.
1
Press HDD or DVD.
When you record to a DVD, insert a
recordable DVD (see “Inserting a Disc” on
page 25).
2
Press PROG +/– to select the programme
position or input source you want to
record.
3
Press REC MODE repeatedly to select the
recording mode.
Each time you press the button, the display on
the TV screen changes as follows:
For more details about the recording mode,
see page 37.
4
Press
z
REC.
Recording starts.
Recording stops automatically after 8 hours of
continuous recording or when the HDD or
DVD is full.
To stop recording
Press
x
REC STOP located beneath the remote
control cover.
Note that it may take a few seconds for recorder to
stop recording.
To pause recording
Press
X
REC PAUSE located beneath the remote
control cover.
To restart recording, press the button again.
To watch another TV programme while
recording
Set your TV to the TV input using the
t
TV/
VIDEO button (page 18).
About the Teletext function
Some broadcasts systems ensure a Teletext
service* in which the complete programmes and
their data (title, date, channel, recording start time
etc.) are stored day by day. When recording a
programme, the recorder automatically takes the
programme name from the Teletext pages and
stores it as the title name. For detail, see “TV
Guide Page” on page 83.
Note that the Teletext information will not appear
on your TV screen. To view the Teletext
information on your TV screen, press
t
TV/
VIDEO on the remote to switch the input source to
your TV (page 18).
* This feature mostly likely cannot be used because it
requires a service that is provided in limited areas only.
z
Hint
If you do not want to watch TV while recording, you can
turn off the TV. When using a decoder, make sure to
leave it on.
b
Notes
• After pressing
z
REC, it may take a short while to start
recording.
• You cannot change the recording mode while
recording or during recording pause.
• If there is a power failure, the programme you are
recording may be erased.
+
RW
-RWVR -RW
Video
-
R
+
R
HDD
1
2
3
4
6
7
8
9
0
5
PROG +/–
REC MODE
HDD
DVD
x
REC STOP
z
REC
t
TV/VIDEO
X
REC PAUSE
DISPLAY
HQ
SP
HSP
LSP
SEP
EP
SLP
LP
,
continued
www. xiaoyu163. com
QQ 376315150
9
9
2
8
9
4
2
9
8
TEL 13942296513
9
9
2
8
9
4
2
9
8
0
5
1
5
1
3
6
7
3
Q
Q
TEL 13942296513 QQ 376315150 892498299
TEL 13942296513 QQ 376315150 892498299