background image

13

Ge
tting S

tar

te

d

Connecting Your 
Turntable

Connecting via the audio 
cable

Note

• Be sure to turn off the audio device, such as a 

stereo system or an amplifier, before connection.

• Be sure to make all the connections before you 

connect the AC adaptor to a power outlet.

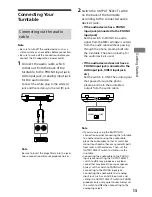
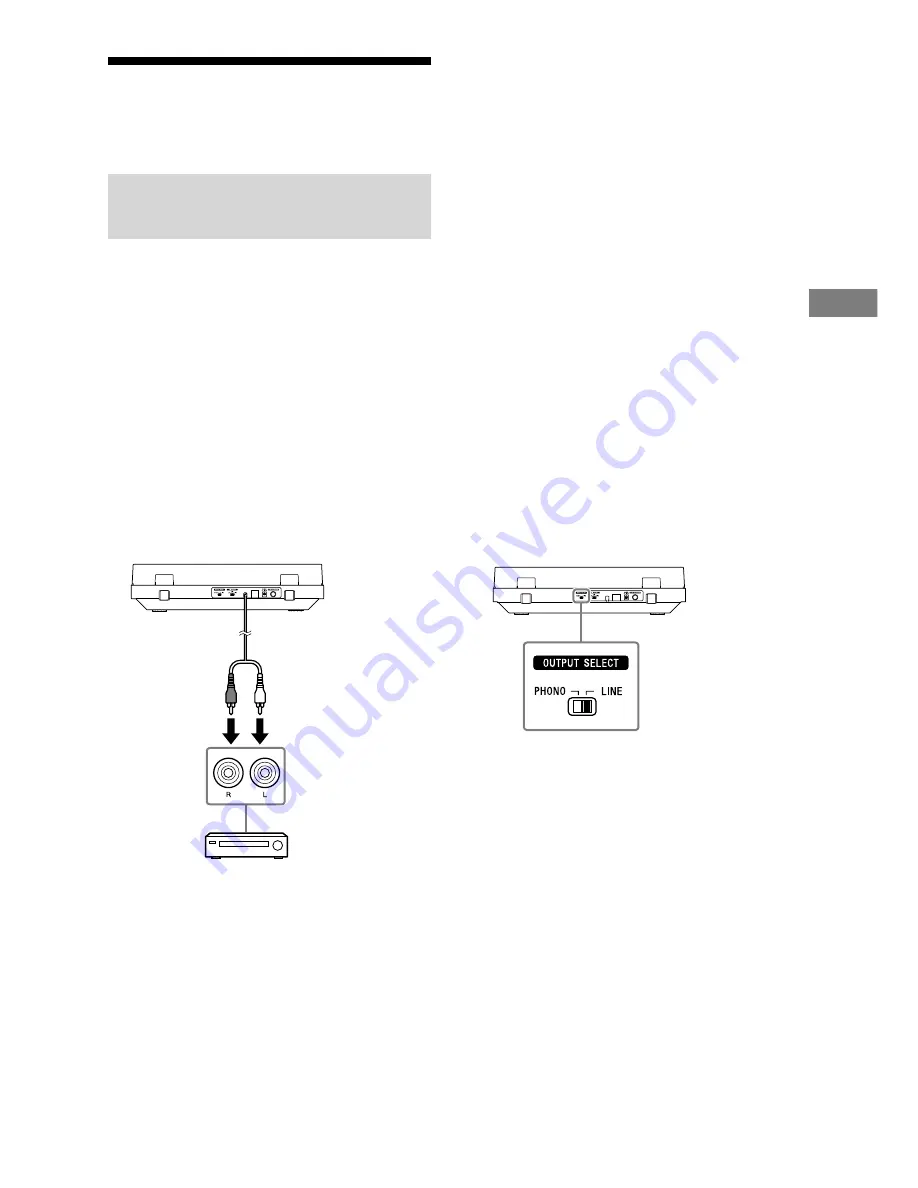
Connect the audio cable, which 
comes out from the back of the 
turntable, to the PHONO input jack, 
AUX input jack, or analog input jack 
for the audio device. 

Connect the white plug to the white (L) 
jack and the red plug to the red (R) jack.

Note

Be sure to insert the plugs firmly into the jacks. 
Loose connection will cause playback noises.

Switch the OUTPUT SELECT switch 
on the back of the turntable 
according to the connected audio 
device's jack.

• 

If the audio device has a PHONO 
input jack (connected to the PHONO 
input jack)


Set the switch to PHONO. An audio 
signal from the MM cartridge is output 
from the audio cable without passing 
through the phono preamp built into 
the turntable. The phono preamp for 
the audio device is used. 

• 

If the audio device does not have a 
PHONO input jack (connected to the 
AUX input jack, VIDEO input jack, 
etc.) 

Set the switch to LINE. The audio signal 
that passes through the phono 
preamp built into the turntable is 
output from the audio cable.

Note

• If you are only using the BLUETOOTH 

connection and not connecting the turntable 
to another device using the audio cable, 
place the audio cable so that its metal tips 
do not touch each other or any metallic parts 
from racks or other devices. Then, set the 
OUTPUT SELECT switch to LINE to use the 
turntable. 

• Connecting the audio cable to the PHONO 

input jack and setting the OUTPUT SELECT 
switch to LINE may produce a very loud 
sound that may break the amp or speaker. 
Always set the switch to PHONO when 
connecting to the PHONO input jack. 
Connecting the audio cable to an analog 
input jack, such as an AUX input jack, and 
setting the OUTPUT SELECT switch to PHONO 
produces only a very quiet sound. Always set 
the switch to LINE when connecting to the 
analog input jack.

Содержание PS-LX310BT

Страница 1: ...Stereo Turntable System Operating Instructions PS LX310BT Getting Started Listening to a Vinyl Record Recording a Vinyl Record Maintenance Additional Information 4 748 755 11 1 ...

Страница 2: ...from the AC outlet immediately The AC adaptor is not available for repair and its use should be terminated immediately when the AC adaptor is found damaged or defective CAUTION RISK OF ELECTRIC SHOCK DRY LOCATION USE ONLY Polarity of DC output of the AC adaptor For the stereo turntable system The name plate is located on the bottom of the stereo turntable system About the AC adaptor The model name...

Страница 3: ...ff and on the user is encouraged to try to correct the interference by one or more of the following measures Reorient or relocate the receiving antenna Increase the separation between the equipment and receiver Connect the equipment into an outlet on a circuit different from that to which the receiver is connected Consult the dealer or an experienced radio TV technician for help CAUTION You are ca...

Страница 4: ... must accept any interference including interference that may cause undesired operation of the device This equipment complies with ISED radiation exposure limits set forth for an uncontrolled environment and meets RSS 102 of the ISED radio frequency RF Exposure rules as this equipment has very low levels of RF energy For the customers in Australia or New Zealand Disposal of old electrical electron...

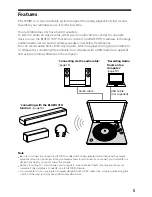
Страница 5: ...t supplied and using recording software on the computer Connecting via the audio cable page 13 Connecting with the BLUETOOTH function page 14 Recording Audio Tracks onto a Computer page 19 Audio cable USB Cable not supplied Note Be sure to connect to and use a BLUETOOTH wireless technology enabled audio device with a volume adjustment function Audio tracks may be played at very loud volumes if you...

Страница 6: ...ng to a Vinyl Record Playing a Vinyl Record 16 Recording a Vinyl Record Recording Audio Tracks onto a Computer 19 Maintenance Cleaning the Stylus 22 Replacing the Stylus 22 Replacing the Drive Belt 23 Cleaning the Dust Cover and the Turntable Body 23 Additional Information Precautions 24 Troubleshooting 25 Repair Services 26 Specifications 27 Index 28 Customer Support Websites 28 ...

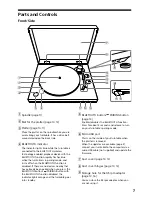
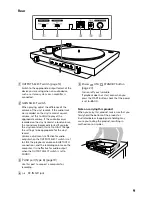
Страница 7: ...ces nearby that have already been paired when you press the BLUETOOTH button PAIRING button with the BLUETOOTH function disabled the indicator lights orange and the turntable goes into standby BLUETOOTH button PAIRING button page 14 Enables disables the BLUETOOTH function Press for about 2 seconds and release to turn on your turntable s pairing mode Micro USB port This is on the inside of your tur...

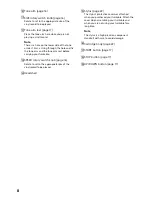
Страница 8: ...he tone arm rest before carrying your turntable SPEED rotary switch knob page 16 Rotate to set to the appropriate rpm of the vinyl record to be played Headshell Stylus page 22 The stylus s protective cover was attached when you purchased your turntable Attach the cover when assembling your turntable and when you are not using your turntable for a long time Note The stylus is a high precision compo...

Страница 9: ...ppropriate for the vinyl record Volume adjustment is effective for audio output when the OUTPUT SELECT switch is set to LINE the playback volume on BLUETOOTH connections and the recording volume on the computer It is ineffective for audio output when the OUTPUT SELECT switch is set to PHONO USB port Type B page 19 Use this port to connect a computer for recording DC IN 12V jack Power ON STANDBY bu...

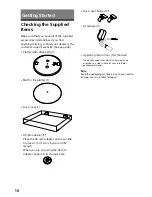
Страница 10: ... 1 Dust cover 1 45 rpm adaptor 1 Place the 45 rpm adaptor on the spindle to play a 7 in 17 cm vinyl record EP record When you are not using the 45 rpm adaptor keep it in its storage hole Dust cover hinges 2 AC adaptor 1 Operating Instructions this manual The 45 rpm adaptor and dust cover hinges are attached to a side surface of your turntable s packaging material Note Keep the packaging materials ...

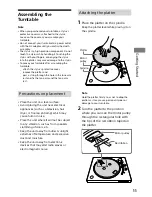
Страница 11: ... placement Place the unit on a level surface Avoid placing the unit near electrical appliances such as a television hair dryer or fluorescent lamp which may cause hum or noise Place the unit where it will not be subject to any vibration such as from speakers slamming of doors etc Keep the unit away from direct sunlight extremes of temperature and excessive dust and moisture Keep the unit away from...

Страница 12: ...he platter over and wind the drive belt around the circumference of the inner circle Then start again from the beginning of the procedure Be sure to remove the red ribbon after you place the drive belt around the motor pulley The red ribbon is intended to help you with this work Placing the drive belt around the motor pulley is still possible without the red ribbon The red ribbon is no longer need...

Страница 13: ...ough the phono preamp built into the turntable The phono preamp for the audio device is used If the audio device does not have a PHONO input jack connected to the AUX input jack VIDEO input jack etc Set the switch to LINE The audio signal that passes through the phono preamp built into the turntable is output from the audio cable Note If you are only using the BLUETOOTH connection and not connecti...

Страница 14: ...ile playing a vinyl record may cause the stylus to skip We recommend connecting to BLUETOOTH before playing a vinyl record Note Do not connect to headphones for which you cannot adjust the volume Audio tracks may be played at very loud volumes Registering pairing devices to your turntable When you first connect your turntable to a playback device that supports BLUETOOTH wireless technology you mus...

Страница 15: ...to enable your turntable s BLUETOOTH function You can also connect to the paired device and play vinyl records by pressing the START button on the front of the turntable when the BLUETOOTH indicator is lit orange in standby Press the BLUETOOTH button PAIRING button to disengage from the BLUETOOTH connection The BLUETOOTH indicator turns off You can register information for a maximum of 8 devices p...

Страница 16: ...ick to the vinyl records when they are taken out of their sleeves may cause noise 1 Place a vinyl record onto the platter Vinyl record Note Place only one vinyl record on the platter at a time To play 7 in 17 cm vinyl records EP records Place the supplied 45 rpm adaptor on the spindle to play 7 in 17 cm vinyl records EP record When you have finished using the 45 rpm adaptor keep it in its storage ...

Страница 17: ...rning vinyl record During playback do not change the settings with the switches on the rear of your turntable 6 Adjust the volume using the audio device To stop playback Press the STOP button The tone arm returns to the tone arm rest The platter stops rotating To pause playback Press the UP DOWN button to raise the stylus off the vinyl record The platter keeps rotating When playback is finished Th...

Страница 18: ...ip If you disable the BLUETOOTH function of the playback device connected via BLUETOOTH wireless technology your turntable s BLUETOOTH indicator lights orange and the turntable goes into standby In standby the turntable automatically connects to the playback device if the playback device s BLUETOOTH function is re enabled and the turntable is playing To switch playback devices To switch to another...

Страница 19: ...ly for recording not for playback System requirements Windows OS Windows 7 32 64 bit Windows 8 1 32 64 bit Windows 10 32 64 bit The latest service pack is required Mac OS Mac OS X 10 9 Mac OS X 10 10 Mac OS X 10 11 macOS 10 12 macOS 10 13 macOS 10 14 Any operating systems other than the listed ones are not supported The standard driver software of Windows and Mac is supported No installation of th...

Страница 20: ...u must do the settings for the recording device and the playback device on your computer in advance to record the vinyl record s audio tracks When doing the settings make sure that your turntable is connected to the computer with a USB cable and that the turntable is turned on For Windows users The following procedure is an example when using Windows 10 as the operating system 1 Click Start and th...

Страница 21: ... output Note that no sound will be output if you select this option 4 Select the Input tab and USB Audio CODEC under Select a device for sound input To hear sounds during recording When the recorded sound on the computer is output but no sound is output during recording enable the setting Software playthrough of input of your recording software to send the input directly to the playback device Dep...

Страница 22: ...over before you replace the stylus so as not to harm your fingertips or damage the stylus To remove the stylus 1 Turn off your turntable and the connected audio device and unplug the AC adaptor from the power outlet 2 Attach the stylus protective cover to the stylus 3 Hold the cartridge body with one hand grasp the stylus with the other and then pull the stylus in the direction of the arrow to rem...

Страница 23: ... the platter s round holes to hold the platter and remove the platter 5 Turn the platter upside down and remove the drive belt 6 Wind a new drive belt around the platter while keeping it untwisted Follow the steps in Assembling the Turntable to finish assembly See page 11 Note Spare drive belts do not have the red indication ribbon attached Cleaning the Dust Cover and the Turntable Body Use a dry ...

Страница 24: ...requires permission of the copyright holders Trademarks IBM and PC AT are registered trademarks of International Business Machines Corporation Microsoft Windows and Windows Media are either trademarks or registered trademarks of Microsoft Corporation in the United States and or other countries Mac Mac OS and macOS are trademarks of Apple Inc registered in the U S and other countries Qualcomm aptX ...

Страница 25: ...urntable away from the speakers This phenomenon called acoustic feedback occurs when vibrations that travel through the air or solid objects such as shelves a cabinet or the floor from speakers are picked up by the stylus amplified and reproduced through the speakers You hear noises Make sure that the OUTPUT SELECT switch on the rear of your turntable is set to LINE If the PHONO LINE switch is set...

Страница 26: ...reless technology however because your turntable cannot receive data from smartphones TVs or computers your turntable cannot connect to them The BLUETOOTH wireless communication range is short Try the following If there are other electronic devices connected to your turntable and the playback device disconnect them Connect the turntable to a power outlet to which a microwave is not connected Place...

Страница 27: ...50 60 Hz Output DC 12 V 0 8 A AC adaptor BLUETOOTH section Communication system BLUETOOTH Specification version 4 2 Output BLUETOOTH Specification Power Class 2 Maximum communication range Line of sight approx 10 m 33 feet 1 Frequency band 2 4 GHz band Modulation method FHSS Compatible BLUETOOTH profiles 2 A2DP 1 3 Supported Codecs 3 SBC 4 Qualcomm aptX Transmission range A2DP 20 Hz 20 000 Hz Samp...

Страница 28: ...ony eu support For customers in the U S A http esupport sony com US For customers in Canada http esupport sony com CA For customers in other countries regions http www sony asia com support Index 45 rpm adaptor 10 16 audio cable 13 cartridge body 8 22 dust cover hinges 7 10 12 headshell 8 Mat for the platter 7 10 12 noise 25 platter 7 10 11 26 pulley 11 23 rotation speed 16 spindle 7 11 tone arm 8...

Страница 29: ...29 Additional Information ...

Страница 30: ...30 ...

Страница 31: ...31 ...

Страница 32: ... 2019 Sony Corporation Printed in China ...

Отзывы: