


2-18 (E)
PMW-EX1R
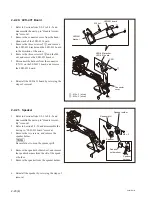
2-2-16. Prism Assembly
1. Refer to Sections from 2-2-1 to 2-2-5 and
disassemble the unit up to “Handle Assem-
bly” removal.
2. Refer to Sections from 2-2-8 to 2-2-15 and
disassemble the unit up to “Case R” removal.
3. Remove the screw of
a
, and remove the
plate.
4. Peel off the adhered portion of the C MOS
fl
exible sheet.
5. Remove the four screws of
b
, and remove
the prism assembly.
6. Reinstall the prism assembly by reversing the
steps of removal.
n
When installing, check that the two position-
ing holes of the prism assembly are aligned
with the dowels.
Plate
: M2
x
3 (silver)
: Tapping M2
x
5 (black)
Prism assembly
Adhesion position
Adhered portion of
C MOS flexible sheet
dowels
Positioning holes
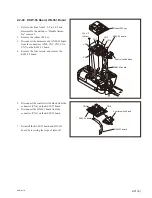
2-2-17. ND Filter
1. Refer to Sections from 2-2-1 to 2-2-5 and
disassemble the unit up to “Handle Assem-
bly” removal.
2. Refer to Sections from 2-2-8 to 2-2-16 and
disassemble the unit up to “Prism Assembly”
removal.
3. Disconnect the harness from the connector on
the ND
fi
lter.
4. Remove the three screws and remove the ND
fi
lter by drawing the lever block of the ND
fi
lter out of the hole of the main frame.
5. Reinstall the ND
fi
lter by reversing the steps
of removal.
m
.
When installing, check that the two posi-
tioning holes of the ND
fi
lter are aligned
with the dowels.
.
When reinstalling the ND
fi
lter, loosely
fi
x
the three screws, and then fully tighten
them while paying attention not to deform
the ND
fi
lter.
P2.6
x
5
P2.6
x
5
ND filter
Connector
Harness
Hole of the
main frame
dowels
Lever block
Positioning
holes
Содержание PMW-EX1R
Страница 1: ...SOLID STATE MEMORY CAMCORDER PMW EX1R WIDE CONVERSION LENS VCL EX0877 SERVICE MANUAL 1st Edition ...
Страница 4: ......
Страница 8: ......
Страница 106: ......
Страница 107: ......