background image

PCM-D50. US. 3-277-770-11(2)

46

Using the “Memory Stick” for 
recording/playback

Go to the menu display, and set the 
“MEMORY” setting to “MEMORY STICK” 
(page 41).

Follow the steps of “Recording analog 
sound” (page 23), “Digital recording” 
(page 28) or “Playing back recorded 
audio data (tracks)” (page 31).

To store tracks on a computer

Connect the recorder with the “Memory 
Stick” inserted to a computer (page 36).

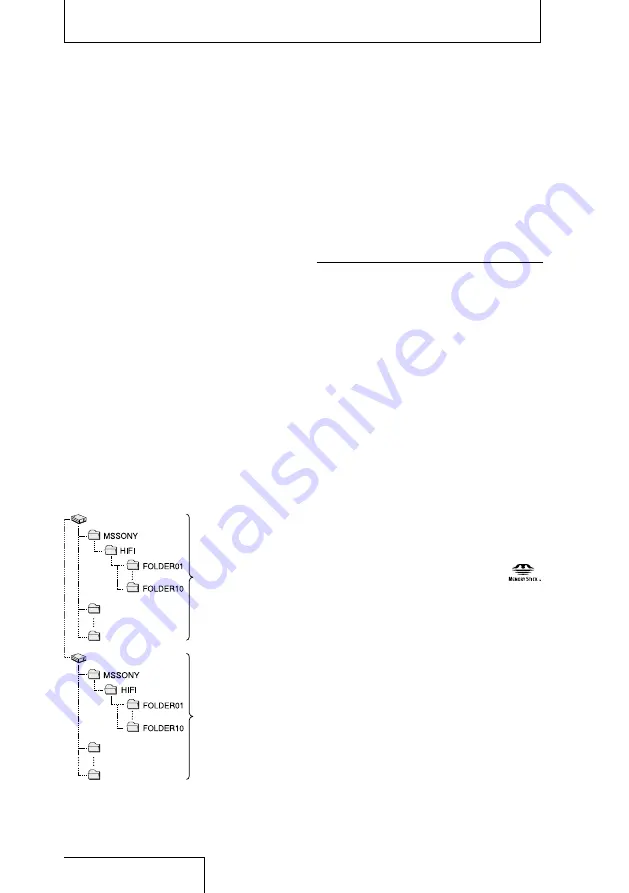
On folder and track file structure

Ten folders are created in the “Memory 
Stick,” separately from the folders of the 
built-in memory. The structure of folders and 
track files are the same as those of the built-
in memory (page 37).

Folders in 
the built-in 
memory

Folders in the 
“Memory 
Stick”

Removable disk

Removable disk

For details about the specifications of folder 
and track files, see page 37.

Notes

Do not insert or remove the “Memory Stick” during 
recording/playback. Doing so may cause a 
malfunction of the recorder.
If you use a “Memory Stick” formatted with other 
device than the recorder, you cannot record tracks 
properly. Make sure to use a “Memory Stick” 
formatted with the recorder.
The recorder is accessing memory while 
“ACCESSING MEMORY...” appears on the display 
or the ACCESS indicator flashes. During this time, 
do not remove the “Memory Stick.” Doing so may 
damage the data.
Operations of a “Memory Stick PRO-HG Duo” and 
“Memory Stick PRO Duo (High Speed)” of up to 4 
GB are checked on the recorder, but this does not 
guarantee operations of all series or models of 
“Memory Stick.” Because the Sony “Memory Stick” 
is the only “Memory Stick” that has been  
operationally tested on the recorder, “Memory Stick” 
models of other makers may cause a malfunction.
For the “Memory Stick” compatibilities list, access 
the following web page: 
http://www.sony.net/Products/mssupport
“Memory Stick”, “Memory Stick PRO-HG Duo”, 
“Memory Stick PRO Duo (High Speed)” and 


are trademarks of Sony Corporation.
“MagicGate” is the general name of a copyright 
protection technology developed by Sony. 
The recorder does not support parallel data transfer.
Data may be damaged on the following occasions:

The “Memory Stick” is removed or the recorder is 
turned off during a read or write operation.
The “Memory Stick” is used in a location subject 
to static electricity or electrical noises.

We recommend that you save a backup of any 
important data.
When you use a “Memory Stick” without a write-
protect switch, make sure not to edit or delete data 
by accident.


Using a “Memory Stick”  (not supplied) (continued)

Содержание PCM-D50 - Portable Linear Pcm Recorder

Страница 1: ...3 277 770 11 2 Linear PCM Recorder Operating Instructions 2007 Sony Corporation PCM D50 ...

Страница 2: ...s manual could void your authority to operate this equipment Notice for the customer in the countries applying EU Directives The manufacturer of this product is Sony Corporation 1 7 1 Konan Minato ku Tokyo Japan The Authorized Representative for EMC and product safety is Sony Deutschland GmbH Hedelfinger Strasse 61 70327 Stuttgart Germany For any service or guarantee matters please refer to the ad...

Страница 3: ...elp If you have any questions about this product you may call Sony Customer Information Services Center 1 800 222 7669 or http www sony com Declaration of Conformity Trade Name SONY Model PCM D50 Responsible Party Sony Electronics Inc Address 16530 Via Esprillo San Diego CA 92127 U S A Telephone Number 858 942 2230 This device complies with part 15 of the FCC Rules Operation is subject to the foll...

Страница 4: ...should be operated only from the type of power source indicated on the marking label If you are not sure of the type of electrical power supplied to your home consult your dealer or local power company For those appliances designed to operate from battery power or other sources refer to the operating instructions Grounding or Polarization This appliance is equipped with a polarized AC power cord p...

Страница 5: ...e personnel under the following conditions When the power cord or plug is damaged or frayed If liquid has been spilled or objects have fallen into the appliance If the appliance has been exposed to rain or water The appliance does not appear to operate normally or exhibits a marked change in performance This indicates a need for service If the appliance does not operate normally when following the...

Страница 6: ...re recording 21 Recording analog sound 23 Monitoring the recording 26 Recording a few seconds in advance before starting to record Pre recording 26 Recording with an external microphone 27 Recording from external equipment Line Input 28 Digital recording 28 Recording digital signals from external equipment Optical Input 29 Synchronizing recording with playback Digital Synchronized Recording 30 Usi...

Страница 7: ...back speed DPC the Digital Pitch Control function 33 Connecting external equipment for playback 34 Playing back repeatedly 34 Dividing a track 35 Deleting tracks 35 Storing tracks on a computer 36 On folder and track file structure 37 Playing back MP3 files copied from a computer 38 Menu Operations Using the menu display 40 Menu items 41 LED Indicator lighting CLOCK Date time settings MEMORY Recor...

Страница 8: ...n LCF Low Cut Filter function SBM Super Bit Mapping function PRE REC Pre recording function SYNC REC Synchronized recording function PLUG IN PWR Plug in power function Additional Information Using a Memory Stick not supplied 45 Inserting a Memory Stick 45 Using the Memory Stick for recording playback 46 Maintenance 47 Troubleshooting 48 Error messages 51 Specifications 54 File Specifications 56 In...

Страница 9: ...itch Control feature provides quick or slow playback of a musical performance which is best suited for modeling your playing on the playback on the recorder Page 33 The optional remote commander RM PCM1 allows you to control the PCM D50 operations remotely starting and stopping recording dividing a track and other basic operations You can attach the optional tripod VCT PCM1 to the recorder Continu...

Страница 10: ...pter XLR 1 to the recorder you can use an external microphone via the XLR balance connection The XLR 1 is capable of phantom power supply operation The pre recording feature allows you to buffer sound sources for a maximum of five seconds prior to the point when the button for recording is actually pressed Page 26 Long battery life affording you to record for approximately 12 hours with four LR6 s...

Страница 11: ...usic library of DAT or MD media just as they are in the original digital recording Page 29 Line connection makes it possible to digitize analog sound sources such as an analog record disc or cassette tape Page 28 You can also transfer that digitized sound data to a computer to store them Page 36 MP3 playback is supported The optional carrying case CKL PCMD50 is best suited for carrying the PCM D50...

Страница 12: ...12 Identifying parts and controls Front Right side ...

Страница 13: ... the display on or off FR fast rewind down button pages 19 32 REC LEVEL recording level dial page 24 Adjusts the recording volume by turning the dial to set the desired level 0 to 10 to the position DISPLAY button page 15 Switches time information on the display PAUSE button indicator pages 24 25 32 ACCESS indicator pages 18 45 Flashes when the recorder is accessing memory except during recording ...

Страница 14: ...external equipment that is connected to the LINE IN OPT jack LINE OUT OPT line output optical jack page 34 headphone jack pages 26 31 MIC ATT microphone attenuator switch page 22 USB connector page 36 DC IN 6V jack page 19 HOLD switch When set to ON the buttons on the recorder are locked to prevent accidental operation It is recommended that you set this switch to ON during recording and playback ...

Страница 15: ...ecording Recording start date Recording playing status Displays as follows according to the current operation Recording Flashing Recording pause standby for recording Playback Flashing Playback pause Stop Fast reverse forward Go to previous succeeding tracks Level meter peak values page 24 Displays the level meter and the maximum value of the peak level When the level exceeds the set value appears...

Страница 16: ...mode currently specified in the menu in the stop mode During playback or recording displays the recording mode of the current track Limiter setting Displayed when the LIMITER switch is set to ON LCF setting Displayed when the LOW CUT FILTER switch is set to ON SYNC REC setting Displayed when the SYNC REC is set to ON Remaining memory amount Displays the remaining amount of current memory page 25 F...

Страница 17: ...6 size AA alkaline batteries 1 Open the battery compartment lid on the rear of the recorder First slide the lid downward and then open it 2 Pull out the battery case from the recorder Push the buttons on both sides to pull it out Battery case 3 Insert four LR6 size AA alkaline batteries into the battery case Be sure to insert the batteries with the and ends in the right position 4 Insert the batte...

Страница 18: ...t room temperatures Use the following charger and rechargeable batteries for the recorder Nickel metal hydride rechargeable battery NH AA 4BE Quick battery charger for nickel metal hydride rechargeable batteries BCG 34HE Battery life When using Sony LR6 size AA alkaline batteries supplied Linear PCM MP3 96 kHz 24 bit 44 kHz 16 bit 128 kbps 44 1 kHz Playback Approx 20 hours Approx 20 hours Approx 2...

Страница 19: ...disconnect or connect the AC power adapter or the USB cable Doing so may damage the data Step 2 Setting the clock Recorded audio files tracks are named using the date and time of the clock By setting the clock before recording the recording s date and time will be correctly saved 1 When the recorder is turned on before the clock has been set SET CLOCK appears on the display After about 3 seconds t...

Страница 20: ...K display appears 3 Press the FF and FR buttons to select y m and d or the time display and then press the PLAY ENTER button to fix the value 4 Follow steps 2 and 3 of Step 2 Setting the clock to reset the clock Note If you leave the recorder for approximately several weeks with no batteries inserted the date and time change to the default settings In this case reset the clock Getting Started cont...

Страница 21: ...e built in microphones adjust direction of the recorder and the angle of the microphones Sound source Approx 2 to 3 m 6 56 to 9 84 ft Place the recorder with its front side facing upward and the built in microphones pointing at the sound source Tripod not supplied On the characteristics of the built in microphones The built in microphones are unidirectional You can change the directions of the mic...

Страница 22: ...s You can change the LOW CUT FILTER switch and LIMITER switch settings according to the sound sources LIMITER switch LOW CUT FILTER switch To reduce the noise caused by wind or breath set the LCF from the menu and set the LOW CUT FILTER switch to ON To reduce the distortion that may be caused by a sudden input of loud sound set the LIMITER from the menu and set the LIMITER switch to ON To position...

Страница 23: ...the memory drive for a recording go to the menu display page 40 The default sampling frequency and quantifying bit number are 44 10 kHz 16 bit 1 Position the recorder and the built in microphones referring to Preparation before recording page 21 2 Set the INPUT switch to the microphones position 3 Press the MENU button The screen used to select a folder is displayed Currently selected folder Conti...

Страница 24: ...e the peak meter to check the level If appears when the maximum peak value is output distortion may occur Peak indicator crest value of input signal Maximum peak value When checking the level on the peak level lamps The peak level lamps for left and right channels light according to the input signal levels If the OVER lamp lights up in red when the recording level exceeds 1dB distortion may occur ...

Страница 25: ... recording stops When the remaining recordable time is more than 10 minutes the icon that represents remaining memory amount appears When memory is unused 100 appears Notes While is lit on the display do not remove the batteries or the AC power adapter Doing so may damage the data If the recorder remains in stop mode for about 10 minutes or longer the recorder will enter low power consumption mode...

Страница 26: ...eadphones which have less sound leakage Recording a few seconds in advance before starting to record Pre recording The pre recording feature allows you to record sound sources for a maximum of five seconds prior to the point when the recording is started Sounds for 5 seconds are buffered in the memory Press REC to enter on the recording standby mode Press PLAY or PAUSE Recording starts 1 While the...

Страница 27: ...nal external microphone to the recorder 1 Connect an external microphone to the microphone jack of the recorder and adjust the position of the microphone For the characteristics of the microphone refer to the operating instructions supplied with it External microphone not supplied to the jack When you connect an external microphone to the microphone jack of the recorder in stop mode the PLUG IN PW...

Страница 28: ...g recording digital sound signals from an external digital device such as a CD or DAT player When digital signals are input Digital recording signals the recorder supports The recorder supports the following digital signals when a digital device such as a CD MD or DAT player is connected to the LINE IN OPT jack When incompatible signals are input UNKNOWN DATA is displayed and you cannot record the...

Страница 29: ...3 While the recorder is stopped press and hold the MENU button until the menu is displayed 4 Press the FF and FR buttons to select SYNC REC synchronized recording and press the PLAY ENTER button The SYNC REC display appears 5 Press the FF and FR buttons to select OFF and press the PLAY ENTER button to fix the setting 6 Follow steps 3 and 6 of Recording using the built in microphones pages 23 and 2...

Страница 30: ...a or operations attempted We cannot guarantee the operation of all types of CD MD DAT players Some external devices you use may not operate properly When the remaining recordable time is less than 10 seconds you may not be able to use synchronized recording function When you are recording sound as the 99th track in a folder the digital synchronized recording does not work and recording continues a...

Страница 31: ...es to the headphone jack of the recorder Headphones not supplied to the headphone jack Stereo mini plug 2 Press the PLAY ENTER button Playback starts from the first track of the selected folder or the last point at which you stopped playback The is lit on the display All the tracks in the folder are played in track number order To change a folder 1 Press the MENU button The screen used to select a...

Страница 32: ... FR button repeatedly Go to the beginning of the next track Press the FF button once Go to the beginning of succeeding tracks Press the FF button repeatedly If you press and hold the button the recorder goes forward or backward slowly at first and then at gradually higher speed These operations are for when EASY SEARCH is set to OFF When tracks are played back to the end of the last track When you...

Страница 33: ...the MENU button to exit the menu mode 4 Slide the DPC switch to ON The track is played back at the specified speed To resume normal playback slide the DPC switch to OFF Continued on the next page Playing back an MP3 file You can play an MP3 file on the recorder by copying it from your PC or other device onto the recorder For details see page 38 Quickly locating the point you wish to start playback...

Страница 34: ... back repeatedly Playing back a track repeatedly 1 During playback press and hold the PLAY ENTER button The repeat play mark 1 appears The selected track will be played back repeatedly To exit the repeat play mode To resume normal playback press the PLAY ENTER button again To stop at the current position press the STOP button Playing back a specified section repeatedly A B Repeat 1 During playback...

Страница 35: ... TRACK FULL appears on the display the new track name exceeds a maximum number of characters You cannot divide an MP3 file You cannot divide a track if its name after division is the same as an existing file in the folder Deleting tracks Deleting tracks one by one 1 While the recorder is playing the track that you want to delete or is stopped press and hold the MENU button until the menu is displa...

Страница 36: ...t use a computer to format the built in memory of the recorder or a Memory Stick you use with the recorder 3 The recorder is recognized on Windows Explorer or Macintosh Desktop as a removable storage device Drag and drop the track file you want to store on the hard disk drive of the computer System requirements for the computer to be connected to the recorder1 Operating Systems Windows Vista Home ...

Страница 37: ...emarks of Apple Inc registered in the United States and or other countries To use Windows 2000 Installation of the supplied driver is required Install the driver using SonyRecorder_Driver exe in the recorder On folder and track file structure The folders and files are displayed on the computer screen as shown below The folder indicators on the display of the recorder are as follows Folder in which...

Страница 38: ...tc into MP3 files as ID3 tag information The recorder can display the ID3 tag information It is useful if you input the ID3 tag information using the software you use to make the MP3 files on your computer Note If no title name or artist name has been entered into the ID3 tag information Unknown will be displayed 1 2 3 4 Playing back MP3 files copied from a computer You can copy MP3 files from you...

Страница 39: ...ess the FF and FR buttons to select the desired folder and then press the PLAY ENTER button 4 Press the FF and FR buttons to select the file that you want to play 5 Press the PLAY ENTER button to start playback 6 Press the STOP button to stop playback Artist name and title information up to 254 characters File name ...

Страница 40: ...em and option When you select the item with in step 2 the confirmation display will appear 2 Press the FF and FR buttons to select an item and press the PLAY ENTER button The current setting of the selected item appears Example When REC MODE is selected Available options 3 Press the FF and FR buttons to select an option or operation and press the PLAY ENTER button The option or operation is execut...

Страница 41: ...automatically once the Memory Stick is removed FORMAT 2 5 Initializing memory You can delete all data in current memory selected in MEMORY and change the folder structure page 37 to the default setting Be sure to confirm whether the current memory is the built in memory or Memory Stick before selecting YES Do not format the built in memory or Memory Stick with your computer DELETE ALL 2 4 5 Deleti...

Страница 42: ...ord for a longer time 44 10 kHz 16 bit The default setting 44 10 kHz 24 bit 48 00 kHz 16 bit 48 00 kHz 24 bit You can record with higher sound quality 96 00 kHz 16 bit 96 00 kHz 24 bit Notes Sampling frequency is a value that represents how many times an analog signal is converted into a digital signal A D conversion per second The larger the value of sampling frequency the better the sound qualit...

Страница 43: ... input In this case sound may be distorted When the setting is ON the peak value with the limiter circuit in operation appears if the maximum peak value exceeds 0 dB LCF 7 Low Cut Filter function When the LOW CUT FILTER switch is set to ON the low cut filter is activated so that audio under the following frequencies is filtered and is not recorded This function reduces noise caused by the flow of ...

Страница 44: ...sed SYNC REC9 Synchronized recording function You can start recording simultaneously with the input playback signals from the external device connected to the LINE IN OPT jack during digital recording ON Synchronized recording is enabled OFF Synchronized recording is disabled You can start recording by pressing the REC button and the PLAY ENTER button or the PAUSE button PLUG IN PWR Plug in power ...

Страница 45: ...format the Memory Stick on the recorder so it contains no data 1 Open the cover of the Memory Stick slot 2 Insert the Memory Stick into the Memory Stick slot firmly until it clicks in the direction shown in the illustration on the left and close the cover To use the Memory Stick Select MEMORY STICK from the MEMORY item of the menu When you insert the Memory Stick into the recorder ACCESSING MEMORY...

Страница 46: ...RY appears on the display or the ACCESS indicator flashes During this time do not remove the Memory Stick Doing so may damage the data Operations of a Memory Stick PRO HG Duo and Memory Stick PRO Duo High Speed of up to 4 GB are checked on the recorder but this does not guarantee operations of all series or models of Memory Stick Because the Sony Memory Stick is the only Memory Stick that has been...

Страница 47: ...hot Never expose it to temperatures above 60ºC Under direct sunlight or close to heaters In a sun heated car with the windows closed especially in summer In a humid place such as in a bathroom Anywhere dusty On the built in microphones The built in microphones are high performance electret condenser microphones Do not expose them to strong wind or water On maintenance When the exterior is dirty cl...

Страница 48: ...F position Set it to the ON position You cannot start recording The INPUT switch is in the wrong position Set it to the microphones position when using the built in microphones or an external microphone to input audio for recording Set it to the LINE position when external equipment is connected for recording pages 23 28 30 The memory is full or a maximum number of tracks page 38 have already been...

Страница 49: ...page 41 The recorder was placed near an AC power source a fluorescent lamp or a mobile phone during recording or playback Noise may occur if the plug of the connected external microphone was dirty when recording Clean the plug Noise may occur if the plug of the connected headphones is dirty during playback or monitoring the recording sound Clean the plug The sound picked up is distorted The INPUT ...

Страница 50: ...minimum amount of memory even when recording very short tracks As a result the actual total recording time of the Memory Stick may be shorter than the maximum recording time of the recorder The maximum recording time indicated on page 57 is estimated It varies depending on the number of tracks Due to the limitations of the recording system the sum of the total recorded time in the counter elapsed ...

Страница 51: ...r page 19 16 bit ONLY The SBM item can be set to ON only when the quantifying bit number is set to 16 bit Change the quantifying bit number to 16 bit on REC MODE in the menu display and then set SBM again page 43 TRACK FULL The number of tracks saved in the current folder has reached the maximum 99 tracks and you cannot record or divide tracks To reduce the number of tracks record new tracks in an...

Страница 52: ...Display the track on the Macintosh Desktop and remove the check for Locked under GetInfo of File UNKNOWN DATA The file you are trying to play back or record is an unsupported type of data or a file of a different format It cannot be played or recorded on the recorder FILE DAMAGED The track you are trying to play back or edit is damaged It cannot be played or edited on the recorder NO TRACK There i...

Страница 53: ...n a folder for playback only cannot be divided You can divide only a WAV file contained in a folder for saving recorded tracks CHANGE BATTERY The batteries are exhausted Replace the batteries with new ones page 17 SYSTEM ERROR A system error has occurred Remove the batteries or the AC power adapter to turn off the recorder completely and then turn on the recorder again If this message appears agai...

Страница 54: ... IHF A for 24 bit Total harmonic distortion Input from the LINE IN OPT jack 22 05 kHz 16 bit 44 10 kHz 16 24 bit 0 01 or below 1 kHz 22 kHz LPF 48 00 kHz 16 24 bit 96 00 kHz 16 24 bit 0 01 or below 1 kHz 22 kHz LPF Wow and flutter Below measurable limit less than 0 001 W PEAK Input output microphone jack stereo mini jack Input impedance 22k Rated input level 2 5mV Minimum input level 0 7mV headpho...

Страница 55: ...Stick compatibilities list access the following web page http www sony net Products mssupport Stereo headphones MDR V900HD MDR V700DJ Audio connecting cable RK G129 G129CS Optical digital cable POC 10B optical mini plug optical mini plug POC 10AB optical mini plug rectangular shaped optical plug External microphone ECM MS957 AC power adaptor for European countries AC E60HG Battery charger for nick...

Страница 56: ...9 tracks The maximum data capacity that one WAV format track can deal with is 2 GB If the data amount of one track exceeds 2 GB during recording recording as a new track starts automatically In this case the elapsed recording time display changes to 0 second but the contents that have been recorded up to the 2 GB limit are stored normally While recording analog audio signals one track is created e...

Страница 57: ...00 kHz 16 bit 2 hrs 55 min 96 00 kHz 24 bit 1 hr 55 min Memory Stick PRO HG Duo Sampling frequency quantifying bit number Maximum recordable time 1 GB 2 GB 4 GB 22 05 kHz 16 bit 3 hrs 5 min 6 hrs 25 min 12 hrs 50 min 44 10 kHz 16 bit 1 hr 30 min 3 hrs 10 min 6 hrs 25 min 44 10 kHz 24 bit 1 hr 0 min 2 hrs 5 min 4 hrs 15 min 48 00 kHz 16 bit 1 hr 25 min 2 hrs 55 min 5 hrs 55 min 48 00 kHz 24 bit 55 ...

Страница 58: ...uter 36 D DC IN 6V jack 19 DELETE ALL 41 DELETE TRK 41 Deleting a track 35 Digital limiter 43 Digital recording 28 DISPLAY button 15 DIVIDE button 35 DPC Digital Pitch Control 33 42 E Easy Search 33 Elapsed recording playback time 15 Error messages 51 External microphone 27 F Fast forwards 32 Fast reverse 32 Folder 31 37 46 56 FORMAT 41 G Go to the beginning of track 32 H HOLD switch 14 I INPUT sw...

Страница 59: ...ing 30 Pause 25 Recording analog sound 23 Recording digital signals from external equipment Optical Input 29 Recording using the built in microphones 23 Stop 25 Remaining battery power 18 Remaining memory amount 16 25 Remaining recordable time 15 25 Remaining time of the current track 15 Remote commandar 30 REMOTE jack 30 Repeat play 34 S Sampling frequency 42 SBM 43 Slot for a wrist strap 13 Supe...

Страница 60: ...Printed in China ...

Отзывы: