39
4
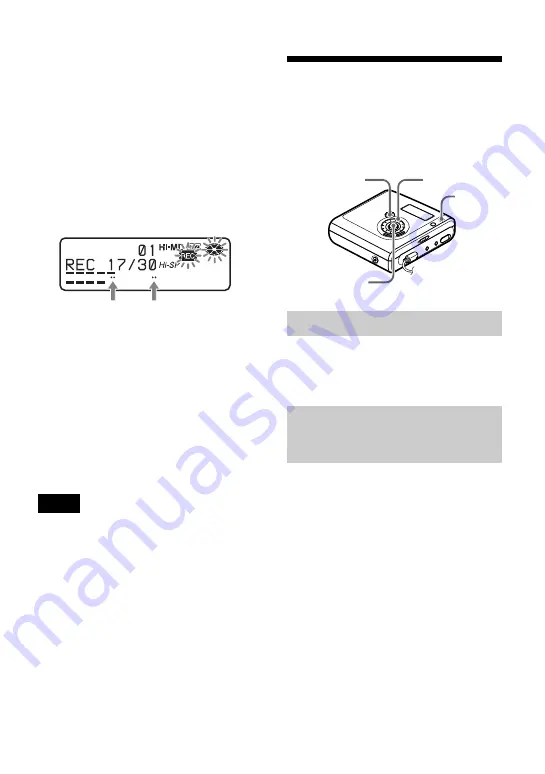
While observing the level meter in the
display, adjust the recording level by
turning the jog dial.
Set the level so that the meter
segments light up around –12dB
segment.
If a high sound level causes the level
meter to reach the OVER segment,
lower the recording level.
Each level meter shows the following.
Upper — L channel input level
Lower — R channel input level
5
Press
X
again to start recording.
If your source is an externally
connected component, play the
source to the beginning of the
material to be recorded, and then start
recording.
To switch back to automatic
level control
Select “Auto(AGC)” in step 2.
•
You cannot adjust the left and right channel
levels separately.
•
Once you stop recording, the recorder will
revert to automatic recording level adjustment
mode the next time you start a recording
operation.
•
To adjust the recording level manually during
synchro-recording, do steps 1 to 4 of the
procedure in this section with “SYNC REC”
is set to “SYNC Off”. Afterwards, set “SYNC
REC” setting to “SYNC On”, and start
recording (page 42).
Adding track marks
while recording
You can add track marks (track number)
while recording to divide the material into
separate parts, that allow you to go to
specific track quickly and easily.
While the recorder is recording, press
T MARK at the point you want to add a
track mark.
Use this feature to add track marks
automatically at specified intervals when
recording through the analog input
connector or a microphone. This function
is convenient for recording long period of
time, such as lectures, meetings, etc.
1
While the recorder is recording or in
recording pause, enter the menu and
select “REC Set” - “Time Mark” -
“On”.
2
Turn the jog dial until the desired
time interval appears in the display,
and then press
N
ENT to enter the
selection.
One rotation changes the time setting
(Time:) by 1 minute, within the range
of 1 to 60 minutes.
Notes
–12dB
OVER
Adding track marks manually
Adding track marks
automatically (Auto Time
Mark)
Jog dial
5-way control
key (
N
ENT)
NAVI/
MENU
T MARK/REC
Содержание MZ-NHF800
Страница 5: ...5 ...
Страница 129: ......
Страница 130: ......
Страница 131: ......
Страница 132: ...Printed in Malaysia 3 2 6 6 5 7 1 9 1 1 This warranty is valid only in the United States ...


