background image

18-FR

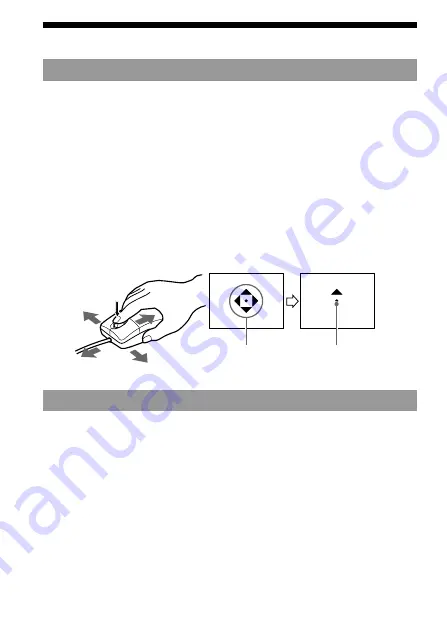
Autopan

1

Appuyez sur la roulette.

L’icône d’autopan apparaît dans la barre de défilement.

2

Lorsque l’icône apparaît, déplacez la souris dans la direction
souhaitée.

Une grande quantité de données défile vers la gauche, la droite, le
haut ou le bas.

Pour revenir à la position d’origine du curseur, appuyez une nouvelle
fois sur la roulette, ou cliquez sur le bouton gauche ou droit de la
souris. Vous pouvez aussi régler la vitesse de défilement dans les sens
horizontal et vertical par rapport au mouvement de la souris.

Zoom

Faites tourner la roulette vers l’avant ou l’arrière tout en
appuyant sur la touche Ctrl du clavier.

L’écran de l’application devient plus grand ou plus petit.

Icône d’autopan

Indique le sens
du défilement.

Utilisation de la souris (suite)

Содержание MSAC-US5

Страница 1: ...3 065 562 11 1 Memory Stick Reader Writer 2000 Sony Corporation MSAC US5 Operating Instructions Mode d emploi GB FR ...

Страница 2: ...es or modifications not expressly approved in this manual could void your authority to operate this equipment Declaration of Conformity Trade Name SONY Model MSAC US5 Responsible Party Sony Electronics lnc Address 1 Sony Drive Park Ridge NJ 07656 USA Telephone number 201 930 6972 This device complies with Part 15 of the FCC Rules Operation is subject to the following two conditions 1 This device m...

Страница 3: ... an experienced radio TV technician for help For the customers in Canada This class B digital apparatus complies with Canadian ICES 003 For the customers in Germany Directive EMC Directive 89 336 EEC 92 31 EEC This equipment complies with the EMC regulations when used under the following circumstances Residential area Business district Light industry district This equipment complies with the EMC s...

Страница 4: ...neven surfaces A bright LED is used in operation of the image identification sensor So do not look directly into the light on the rear Do not use this product in the following locations Doing so might cause malfunction Locations subject to splashing water Locations subject to direct sunlight Near hot locations such as heating apparatus Near humid or dusty locations Prevent fluids or metal objects ...

Страница 5: ...mend formatting them on the device you are using so that they are compatible when used on Memory Stick compatible device Cautions When Formatting Memory Stick s on a Personal Computer Pay attention to the following points when formatting Memory Stick s on the personal computer for example that you are using Operation of Memory Stick s formatted on Windows machines is not guaranteed on Memory Stick...

Страница 6: ...lling the mouse driver software 11 Installing the Memory Stick driver software 13 For Macintosh Installing the USB driver software 14 Operation Using the Reader Writer For Windows 15 For Macintosh 16 For users of SONY digital HandyCam and Cyber shot 17 Using the mouse 18 Additional Information Troubleshooting 20 Specifications 22 Recommended connections 23 ...

Страница 7: ...e that you have all the accessories below If some of the accessories are missing contact the store or purchase of a Sony dealer or local authorized Sony service facility Memory Stick Reader Writer 1 CD ROM SPVD 003 USB driver 1 for Windows Macintosh Manual 1 WARRANTY CARD 1 ...

Страница 8: ... PNotes The access lamp lights when you access data on Memory Stick When the access lamp is lit never remove the Memory Stick turn off the power of your personal computer or disconnect the connector Doing so might damage the data in Memory Stick When disconnecting this unit from the personal computer do not hold it by its cable hold it by its connector Access lamp Connector Scroll button USB port ...

Страница 9: ...fer to the operating instructions for the keyboard For Windows 2000 You must log in using administrator s privileges Installing the USB driver software The screens shown in the following procedure are examples Actual screens differ according to the OS Do not connect this unit to the personal computer at this time 1 Turn on your machine to start up Windows and insert the USB driver software CD ROM ...

Страница 10: ...low the on screen instructions until the end to install the USB driver software 6 After the USB driver software has been installed reboot your personal computer Follow the on screen instructions to reboot your personal computer 7 After your personal computer has rebooted remove the CD ROM ...

Страница 11: ...nect the connector on this unit to the personal computer without inserting a Memory Stick For Windows 2000 The mouse driver software installation starts automatically Go to Installing the Memory Stick driver software section on page 13 10The Windows machine will recognize this unit and Add New Hardware Wizard will start up Click Next Follow the on screen instructions to proceed with the installati...

Страница 12: ...ck Next 12Click Next without changing the checkbox settings Follow the on screen instructions until the end to install the mouse driver software 13The Add New Hardware Wizard starts twice Follow the on screen instructions until the end to install the mouse driver software 14Make sure that mouse works ...

Страница 13: ...llation of the Memory Stick driver ends Note that addition of the removable disk takes a while PNotes When you install the Memory Stick driver software a massage which is not described in this manual may appear on the screen If this happens follow the on screen instruction Before disconnecting this unit with the Memory Stick inserted from the personal computer or removing the Memory Stick after in...

Страница 14: ...he connector on this unit to the USB port on the personal computer 4 Double click the CD ROM drive icon 5 Double click the hard disk icon containing the System Folder to open the hard disk window 6 Drag the following two Mac driver files in the window opend in step 4 onto the System Folder in the window opened in step 5 Drag and Drop Sony Peripheral USB Driver Sony Peripheral USB Shim 7 The messag...

Страница 15: ...Insert Memory Stick into the unit and open Explorer or My computer Removable disk is newly set up so that you can access data on Memory Stick The screen shown above is an example Actual screen may differ according to the OS This screen shows a window opened by Explorer Removing Memory Stick 1 Close softwares such as Explorer running for this unit 2 Make sure that the access lamp is not lit then re...

Страница 16: ...ow to use 1 When you insert Memory Stick into this unit Memory Stick icon appears on the desktop 2 Open the Memory Stick icon You can access the data Note that displaying the Memory Stick icon takes a while Removing Memory Stick 1 Close softwares running for this unit 2 Make sure that the access lamp is not lit 3 Move the Memory Stick icon from the hard disk to Trash or select Eject from Special m...

Страница 17: ...m or Cyber shot is stored to the following file names in the following folders Actual screens differ according to the OS Recording mode Still picture Moving picture VOICE E MAIL Folder name Dcim Mssony Mssony Mssony Folder name 100msdcf Moml0001 Momlv100 Imcif100 File name Example Dsc00001 jpg Mov00001 mpg Dsc00001 mpg Dsc00001 jpg PNote The folder names and file names vary according to the equipm...

Страница 18: ...ording to the application software Refer to the operating instructions for respective softwares Scroll Easy up down scroll Press the scroll button forwards or backwards when the up down scroll bar is displayed on the application This scrolls the window up or down Auto up down scroll Press the scroll button forwards or backwards and hold the button in this state when the up down scroll bar is displ...

Страница 19: ...eft right up or down To return the cursor to its original position either press the scroll button again or click the left or right button You can also freely set the scroll speed in the X or Y directions by how much you move this unit Zooming Press the scroll button forward or backwards while pressing the Ctrl key on the keyboard This enlarges or reduces the application screen Auto panning icon In...

Страница 20: ...unit is not correct t Connect correctly page 23 Device other than this unit is connected to the USB port on the personal computer t Disconnect or turn off the USB devices except this unit SETUP exe on CD ROM has not been carried out t Carry out SETUP exe on CD ROM Memory Stick is not in this unit t Insert Memory Stick into this unit The connection between the personal computer and this unit is not...

Страница 21: ...oftware Another software for the mouse is working t Uninstall another software You are using a Macintosh Device other than this unit is connected to the USB port on the personal computer t Disconnect or turn off the USB devices except this unit The Memory Stick is in this unit t Remove the Memory Stick from this unit once and reinsert it The setting on the Device Manager to recover from standby on...

Страница 22: ... W H D Weight Approx 120 g 4 23 oz not including Memory Stick Environmental specification Temperature 0 C to 40 C 32 F to 104 F Humidity 20 80 RH Non Condensing Personal Computer Windows Supported OS Microsoft Windows 98 98SE Windows 2000 Professional standard installation CPU MMX Pentium 200 MHz or faster Others device The USB connectors must be provided as standard CD ROM drive Personal computer...

Страница 23: ...nnected to the other port PNotes Operation is not guaranteed when two or more USB devices are connected to a single personal computer and a hub is used Be sure to connect this unit to the USB port on the personal computer Operation is not guaranteed if it is connected to the USB jack on the keyboard or hub Operation is sometimes not normal depending on the USB devices that are used simultaneously ...

Страница 24: ...accorder cet appareil comment installer son pilote et comment utiliser le lecteur enregistreur ainsi que la souris Les fonctions de défilement et de zoom ne sont pas supportées sur le Macintosh PRemarques Lorsque vous utilisez un Macintosh il n est pas possible d utiliser la fonction de défilement car la souris n a pas de boutons gauche et droit Lorsque vous accédez au Memory Stick inséré dans cet...

Страница 25: ...talliques dans l appareil Si le coffret est sale essuyez le avec un chiffon doux N utilisez jamais de benzène alcool diluant de peinture ou autre solvant De l humidité peut se condenser sur la lentille du capteur en raison d un brusque changement de température Dans ce cas la souris ne fonctionnera pas correctement mais il suffit d essuyer la lentille pour y remédier Le contenu des données ne peut...

Страница 26: ...ry Stick il est conseillé de le faire sur l appareil que vous utilisez pour qu ils soient compatibles Précautions lors du formatage de Memory Stick sur un ordinateur Veuillez prendre les précautions suivantes lors du formatage de Memory Stick sur un ordinateur Le fonctionnement des Memory Stick formatés sur des machines Windows n est pas garanti sur un autre périphérique compatible avec le Memory ...

Страница 27: ... du pilote de la souris 10 Installation du pilote de Memory Stick 12 Macintosh Installation du pilote USB 13 Fonctionnement Utilisation du lecteur enregistreur Windows 14 Macintosh 15 Pour les utilisateur des HandyCam et Cyber shot numériques SONY 16 Utilisation de la souris 17 Informations supplémentaires En cas de problème 19 Spécifications 21 Raccordements conseillés 22 ...

Страница 28: ...us d être en possession de tous les accessoires indiqués ci dessous Si certains manquent contactez votre revendeur ou un service après vente agréé Sony Lecteur Enregistreur de Memory Stick 1 CD ROM pilote USB SPVD 003 1 pour Windows et Macintosh Manuel 1 CARTE DE GARANTIE 1 ...

Страница 29: ... voyant d accès s allume lorsque l ordinateur accède aux données du Memory Stick Lorsque le voyant d accès est allumé ne jamais retirer le Memory Stick éteindre l ordinateur ni débrancher le connecteur Les données du Memory Stick risquent sinon n être détruites Lorsque vous débranchez l appareil de l ordinateur ne tirez pas sur le câble mais sur le connecteur Voyant d accès Connecteur Roulette Por...

Страница 30: ...r le détail Windows 2000 Vous devez vous connecter par Privilèges de l administrateur Installation du pilote USB Les écrans mentionnés dans les procédures suivantes servent à titre d exemple Selon le système d exploitation utilisé ils peuvent être différents Ne raccordez pas encore l appareil à l ordinateur 1 Allumez votre ordinateur pour démarrer Windows et insérez le CD ROM contenant le pilote U...

Страница 31: ...les instructions qui apparaissent à l écran jusqu à la fin pour installer le pilote USB 6 Lorsque le pilote USB a été installé redémarrez l ordinateur Suivez les instructions qui apparaissent à l écran pour redémarrer l ordinateur 7 Lorsque l ordinateur a redémarré retirez le CD ROM ...

Страница 32: ...de Memory Stick Windows 2000 L installation du pilote de souris commence automatiquement Reportez vous à Installation du pilote de Memory Stick à la page 12 10La machine Windows reconnaît cet appareil et l ajout de nouveau périphérique Add New Hardware Wizard démarre Cliquez sur Next Suivez les instructions qui apparaissent à l écran pour installer le pilote L assistant Add New Hardware Wizard dém...

Страница 33: ...ns changer les paramètres à cocher Suivez les instructions qui apparaissent à l écran jusqu à la fin pour installer le pilote de souris 13L assistant Add New Hardware Wizard démarre deux fois Suivez les instructions qui apparaissent à l écran jusqu à la fin pour installer le pilote de souris 14Assurez vous que la souris fonctionne ...

Страница 34: ...nstallation du pilote de Memory Stick est terminée L ajout du disque amovible prend un certain temps PRemarques Lors de l installation du pilote Memory Stick un message non mentionné dans ce manuel peut apparaître à l écran Le cas échéant suivez les instructions qui apparaissent à l écran Avant de débrancher cet appareil avec un Memory Stick de l ordinateur ou de retirer le Memory Stick après l in...

Страница 35: ...et appareil au port USB de l ordinateur 4 Double cliquez sur l icône du pilote CD ROM 5 Double cliquez sur l icône du disque dur contenant le dossier système pour ouvrir la fenêtre du disque dur 6 Tirez les deux fichiers Mac se trouvant dans la fenêtre ouverte à l étape 4 pour les déposer dans le dossier Système se trouvant dans la fenêtre ouverte à l étape 5 Tirez et déposez Sony Peripheral USB D...

Страница 36: ...uter Maintenant que le disque amovible a été installé vous pouvez accéder aux données du Memory Stick L écran ci dessus est un exemple Sur votre système l écran peut être différent Cet écran montre une fenêtre ouverte par l explorateur Retrait du Memory Stick 1 Fermez les logiciels ouverts pour cet appareil par exemple l explorateur 2 Assurez vous que le voyant d accès n est pas allumé puis retire...

Страница 37: ...intosh Emploi 1 Lorsque vous insérez un Memory Stick dans cet appareil l icône Memory Stick apparaît sur le bureau 2 Ouvrez l icône de Memory Stick Vous pouvez accéder aux données L icône de Memory Stick met un certain temps à apparaître Retrait du Memory Stick 1 Fermez les logiciels ouverts pour cet appareil 2 Assurez vous que le voyant d accès n est pas allumé 3 Déposez l icône de Memory Stick d...

Страница 38: ...ers et dossiers suivants Selon le système d exploitation utilisé les écrans peuvent être différents Mode d enregistrement Image fixe Image animée VOICE E MAIL Nom de dossier Dcim Mssony Mssony Mssony Nom de dossier 100msdcf Moml0001 Momlv100 Imcif100 Nom de fichier Exemple Dsc00001 jpg Mov00001 mpg Dsc00001 mpg Dsc00001 jpg PRemarque Les noms de dossiers et de fichiers peuvent varier selon l appar...

Страница 39: ...fonction de défilement avec certaines applications Reportez vous au mode d emploi de chaque logiciel Défilement Défilement haut bas facile Faites tourner la roulette vers l avant ou l arrière lorsque la barre de défilement haut bas apparaît dans l application La fenêtre défile vers le haut ou le bas Défilement haut bas automatique Faites tourner la roulette vers l avant ou l arrière et maintenez l...

Страница 40: ... origine du curseur appuyez une nouvelle fois sur la roulette ou cliquez sur le bouton gauche ou droit de la souris Vous pouvez aussi régler la vitesse de défilement dans les sens horizontal et vertical par rapport au mouvement de la souris Zoom Faites tourner la roulette vers l avant ou l arrière tout en appuyant sur la touche Ctrl du clavier L écran de l application devient plus grand ou plus pe...

Страница 41: ... Raccordez correctement les appareils page 22 Un autre périphérique est raccordé au port USB de l ordinateur t Débranchez le ou éteignez les périphériques USB sauf cet appareil SETUP exe sur le CD ROM n a pas été exécuté t Exécutez SETUP exe du CD ROM L appareil ne contient pas de Memory Stick t Insérez un Memory Stick dans cet appareil La connexion entre l ordinateur et cet appareil n est pas cor...

Страница 42: ...llez l autre logiciel Vous utilisez un Macintosh Un autre périphérique est raccordé au port USB de l ordinateur t Débranchez et éteignez les périphériques USB sauf cet appareil Un Memory Stick est inséré dans cet appareil t Enlevez le Memory Stick de l appareil puis remettez le Le réglage du gestionnaire de périphériques permettant de remettre l ordinateur en marche après une mise en attente ou en...

Страница 43: ...10 mm L H P Poids Approx 120 g sans Memory Stick Conditions ambiantes Température 0 C à 40 C Humidité 20 80 d humidité relative sans condensation Ordinateur Windows Système d exploitation supporté Microsoft Windows 98 98SE Windows 2000 Professionnel installation standard Processeur MMX Pentium 200 MHz ou supérieur Autres dispositifs Les connecteurs USB doivent être fournis en standard Lecteur de C...

Страница 44: ...st pas garanti lorsque deux périphériques USB ou plus sont raccordés à un seul ordinateur et une boîte de connexion est utilisée Veillez à raccorder cet appareil au port USB de l ordinateur Le fonctionnement n est pas garanti s il est raccordé au clavier ou à une boîte de connexion Le fonctionnement peut être anormal lorsque certains types de périphériques USB sont utilisés en même temps Le foncti...

Страница 45: ......

Страница 46: ......

Страница 47: ......

Страница 48: ...pan Sony Electronics Inc Customer Support If you have any questions comments related to this product please visit our Customer Support website at http www sony com service If you do not have internet access please call 1 800 22 SONY ...

Отзывы: