background image

14 

FR

B

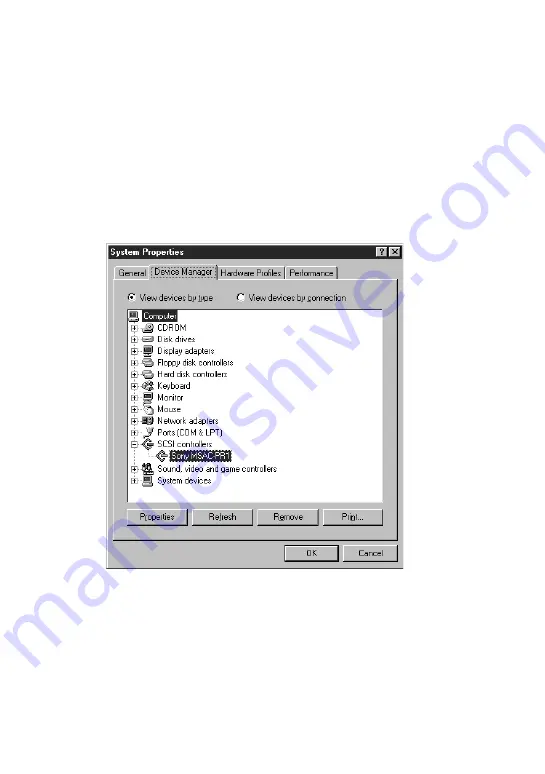
Ajout des paramètres du pilote de périphérique du MSAC-PR1 (sous
Windows 95/98 seulement)

Si le MSAC-PR1 ne fonctionne pas normalement, ajoutez les paramètres du pilote
de périphérique en procédant de la façon suivante.

1

Sélectionnez “Properties” (Propriétés) dans le menu contexte quand vous
cliquez avec le bouton droit sur “This Computer” (Cet ordinateur), ou
double-cliquez sur “System” (Système) dans le panneau de configuration
pour ouvrir la fenêtre des propriétés système.

2

Double-cliquez sur l’onglet du gestionnaire de périphérique, puis double-
cliquez sur la catégorie de contrôleur SCSI pour afficher “Sony MSAC-PR1”
dans la liste des périphériques.

3

Double-cliquez sur “Sony MSAC-PR1” pour afficher la fenêtre des
propriétés, puis cliquez sur l’onglet Settings (Paramètres).

4

Le paramètre d’adaptateur s’affiche comme “/flash/W95”. Ajoutez-y “/ni /
de /di”, et cliquez sur “OK” en veillant bien à taper un espace avant
chaque barre oblique.

Содержание MSAC-PR1

Страница 1: ...PC Card Parallel Port Adaptor 1999 by Sony Corporation 3 867 219 11 1 MSAC PR1 Operating Instructions__________________ GB Mode d emploi ________________________ FR ...

Страница 2: ...easonable protection against harmful interference in a residential installation This equipment generates uses and can radiate radio frequency energy and if not installed and used in accordance with the instructions may cause harmful interference to radio communications However there is no guarantee that interference will not occur in a particular installation If reception which can be determined b...

Страница 3: ...tion 6 Installing the Driver 6 Changing Settings for Installation 13 Uninstalling the Driver 17 Operating the MSAC PR1 18 Inserting a PC card 18 Removing a PC card 19 Instructions for Memory Stick 20 Changing the Drive Name 21 Troubleshooting 22 Compatible Equipment 24 Specifications 26 GB English ...

Страница 4: ...ted without prior permission from Sony Corporation Sony Corporation disclaims all liability for any damage or loss resulting from the use of this equipment or the bundled software and for all claims from any third parties Please be sure to back up any important data Please refer to the warranty card provided with this product for the warranty terms and conditions The software bundled with this equ...

Страница 5: ...t your supplier or local Sony Service personal PC Card Parallel Port Adaptor MSAC PR1 Power cable Reverse connector Setup Disc CD ROM 1 Instruction Manual Caution The power cable supplied is for use only with the PC Card Parallel Port Adaptor It cannot be used for connection with any other kind of equipment ...

Страница 6: ... 6 1 PC card socket Insert the PC card here 2 Eject button Press this to remove the PC card 3 PC Card Parallel Port Adaptor 4 Power Access lamp This lamp illuminates when the power is on It blinks when data is being accessed Caution Do not disconnect the PC card or Memory Stick while the Power access lamp is blinking as it may cause internal damage to the PC card or the Memory Stick ...

Страница 7: ...alled When you connect the connector make sure that it is the right way up Trying to force the connector in can cause damage 7 DC jack 8 Power connection cable 9 DC plug 0 D sub 25 pin connector male PC parallel port D sub 25 pin connector female If there are more than two connectors connect to LPT 1 PC PC keyboard connector Mini DIN 6 pin connector male DIN 5 pin connector male Connect the PC key...

Страница 8: ...n the driver is installed Please select the language that matches that of your computer s operating system Installing the Driver 1 Insert the supplied CD ROM into the CD ROM drive on the computer The Sony MSAC PR1 Setup window appears If the CD ROM automatic run has not been set open the CD ROM drive with the Explorer and double click autorun exe to display the menu Alternatively you can directly ...

Страница 9: ...r The Setup Language window appears 3 Select language and click Next The Welcome window appears At the beginning of the installation a warning appears It is necessary to close all other applications for the MSAC PR1 to be installed correctly 4 Click the Next button ...

Страница 10: ...he conditions in the contract Once you agree with all the conditions in the license agreement you can use MSAC PR1 6 Parallel port sharing Windows NT 4 0 only Select Yes I want to share my parallel port if you are to use the MSAC PR1 printer connector as well as another printer connected ...

Страница 11: ...the Next button If you want to change the directory for the installation specify the path in the box and then click the Next button The Select Program Folder window appears 8 The program names registered in the start menu appear Click Next If you want to change the file name input the name and then click Next ...

Страница 12: ... have finished being copied Caution The cursor will be immobilized for about 10 seconds while the driver is being loaded If the cursor remains immobile on the screen after loading is complete it may be that the BIOS settings in the PC are not suitable for MSAC PR1 You will need to change the BIOS settings For details refer to Changing Settings for Installation A page 13 and B page 14 to change the...

Страница 13: ... must be on Insert the power connection cable associated with the keyboard connector of the PC and connect it to the DC jack of the MSAC PR1 If the Removable Disk icon does not appear on restarting the PC even with the PC card inserted it may be that the BIOS settings in the PC are not set correctly for MSAC PR1 You will need to change the BIOS settings For details refer to Changing Settings for I...

Страница 14: ...er to the PC off and connect the printer If the printer does not run normally Refer to Changing Settings for Installation C page 15 and D page 16 Installing a new printer Turn the PC off remove the device from the PC and then connect the printer cable directly to the parallel port After installing the printer driver reconnect the printer cable to the printer connector of this device and perform a ...

Страница 15: ...ar standard this message appears at the top right corner of the Energy Star logo screen Press the xx button as instructed by the message before the message disappears from the screen Pressing the xx button invokes the BIOS settings screen Some computers do not display this message for BIOS settings Refer to the instruction manual for the computer for more information 3 In most BIOS setting screens...

Страница 16: ...ck over This Computer or double click System in the control panel to open the system properties window 2 Double click the device manager tab then double click SCSI controller category to display Sony MSAC PR1 in the device list 3 Double click Sony MSAC PR1 to display the Properties window and then click the Settings tab 4 The adaptor setting will be flash W95 Add ni de di to this and click OK maki...

Страница 17: ... ceases to do so after installing MSAC PR1 or a newly installed printer does not function properly this can be rectified by closing all applications not directly related to printing and changing the printer driver settings C Deleting an application from the start up folder Depending on the type of printer you are using the parallel port may be occupied by some other application installed at the ti...

Страница 18: ...Up to display the application shortcuts 6 Select the application shortcut you wish to delete and then click Remove 7 Click Close and the Remove Shortcuts Folders window closes 8 Click OK to close the Taskbar Properties window D Changing Printer Driver Settings If Enable bi directional support for this printer have been selected in the printer driver settings either or both the printer and the MSAC...

Страница 19: ...1 Click Start on the taskbar and then click UNINSTALL in Sony MSAC PR1 in Programs A window for confirming uninstallation is displayed 2 Click Yes The uninstall program starts A window with Remove Programs From Your Computer is displayed and the deletion of files commences 3 When the uninstallation is complete click the OK button ...

Страница 20: ... PC card firmly all the way in Icon display When a PC card or Memory Stick is inserted when using Windows 95 98 a Removable Disk icon is displayed This icon disappears when the card or Memory Stick is removed With Windows NT the Removable Disk icon is displayed when the PC is started even if there is no PC card or Memory Stick inserted There is no recycle bin for Removable Disks Care must be taken...

Страница 21: ...linking If the card is removed while the lamp is blinking damage to the card or Memory Stick may occur Also even when the lamp stops blinking some processing may still be taking place To be safe wait a while after the lamp has stopped blinking before removing the card or Memory Stick 2 Press the eject button and gently remove the card Caution Do not attempt to remove insert or access a PC card or ...

Страница 22: ... switch in the LOCK position the response from the PC will be slow and data reading writing errors may occur Use the card with the switch released Further make backup copies of important data and files to some other media Memory Stick Format initialization The Memory Stick comes supplied from the factory with a suitable format Please do not attempt to format it If the Memory Stick is reformatted b...

Страница 23: ...erties from the context menu or double click System in the control panel to display System Properties 2 Click the Device Manager tab and double click Disk Drive Category All connected drives are displayed 3 Double Click Parallel Flash Unit The Properties window appears 4 Click the Settings tab and change the display for the starting drive The next time Windows is started this will be the drive nam...

Страница 24: ...ate of the printer Printing cannot be done and the computer does not recognize the PC card in the normal way Close the permanent application Cause Action The parallel port settings on the computer are incorrect Try changing the BIOS settings Cause Action The printer is incompatible with this device Some printers cannot be used when connected to the MSAC PR1 printer connector Symptom When writing o...

Страница 25: ...isplayed during accessing the power access lamp blinks Allow ample time after the lamp stops blinking before removing the PC card Symptom The PC card cannot be inserted all the way into the PC Card Adaptor Cause Action Some foreign object is lodged in the card slot of the PC Card Adaptor Remove the foreign object Damage may occur to the internal connector in this case ...

Страница 26: ...Canon BJC 4000 Canon BJC 4300 Fujitsu DL1100 ALPS MD 1000J ALPS MD 2000J Sony DPP M55 PC Cards whose Compatibility has been Confirmed Hitachi HB286008A3 HB286015A3 HB286030A3 HB286045A3 HB286060A3 SanDisk SDP3B 2 101 00 SDP3B 4 101 00 SDP3B 2 6 101 00 SDP3B 8 101 00 SDP3B 10 101 00 SDP3B 20 101 00 I O DATA DEVICE PCFCA 10MS PCFCA 20MS PCFCA 40MS PCFCA 85M MELCO DPF 10J DPF 20J DPF 40J SCM Microsys...

Страница 27: ...25 GB EPSON EP10 EP20 EP40 EP85 Panasonic BN 012ABP3 BN 020ABP3 TDK SFD004M SFD012M SFD024M SFD032M SFD096M HAGIWARA SYS COM HPC FC20M ...

Страница 28: ...peration cannot be guaranteed with notebook computers 83mm 21mm 124mm W H D 150g approx DC5V supplied from keyboard connector 150mA approx 0ºC 40ºC 32ºF 104ºF no condensation Parallel port IEEE1284 3 compliant Computer side D sub 25 pin male parallel port IEEE1284 3 compliant Printer side D sub 25 pin female parallel port IEEE1284 3 compliant The device cannot be used if there is any other equipme...

Страница 29: ...e 6 Installation du pilote 6 Réglage des paramètres d installation 13 Désinstallation du pilote 17 Utilisation du MSAC PR1 18 Insertion d une carte PC 18 Retrait la carte PC 19 Instructions relatives au Memory Stick 20 Changement de nom du lecteur 21 Dépannage 22 Matériel compatible 24 Fiche technique 26 FR Français ...

Страница 30: ...oit et le logiciel ne peut être prêté ou loué sans autorisation préalable de Sony Corporation Sony Corporation ne saurait être tenu responsable des dommages ou pertes résultant de l utilisation de cet appareil ou du logiciel qui l accompagne ni des revendications émanant d un tiers Faites une copie de sauvegarde des données importantes Pour les conditions de garantie voyez la carte de garantie qui...

Страница 31: ...otre fournisseur ou votre service après vente Sony Adaptateur de port parallèle carte PC MSAC PR1 Câble d alimentation Connecteur inverse Disque de configuration CD ROM 1 Mode d emploi Attention Le câble d alimentation fourni a été conçu exclusivement pour l adaptateur de port parallèle carte PC Ne le raccordez à aucun autre périphérique ...

Страница 32: ...nsérez la carte PC 2 Touche d éjection Appuyez sur cette touche pour retirer la carte PC 3 Adaptateur de port parallèle carte PC 4 Voyant d alimentation accès Ce voyant s allume lorsque l appareil est sous tension Il clignote pendant l accès aux données Attention Ne déconnectez pas la carte PC ni le Memory Stick pendant que le voyant d alimentation accès clignote Vous pourriez endommager l intérie...

Страница 33: ...ez le connecteur veillez bien à ce qu il soit dirigé dans le bon sens Vous risquez d endommager le connecteur si vous l insérez de force 7 Prise CC 8 Câble de connexion d alimentation 9 Fiche CC 0 Connecteur D sub 25 broches mâle Connecteur D sub 25 broches de port parallèle du PC femelle S il y a plus de deux connecteurs raccordez le à LPT 1 PC Connecteur de clavier du PC Connecteur mini DIN 6 br...

Страница 34: ...allation du pilote Sélectionnez la langue du système d exploitation de votre ordinateur Installation du pilote 1 Insérez le CD ROM fourni dans le lecteur de CD ROM de l ordinateur La fenêtre Sony MSAC PR1 Setup Configuration du MSAC PR1 Sony s affiche Si vous n avez pas réglé l exécution automatique du CD ROM ouvrez le lecteur du CD ROM avec Explorer et double cliquez sur autorun exe pour afficher...

Страница 35: ...guage Configuration de la langue s affiche 3 Sélectionnez la langue et cliquez sur Next Suivant La fenêtre Welcome Bienvenue s affiche Au début de l installation un avertissement s affiche Pour pouvoir effectuer correctement l installation du MSAC PR1 vous devrez fermer toutes les autres applications 4 Cliquez sur le bouton Next Suivant ...

Страница 36: ... Une fois que vous avez accepté toutes les conditions de l accord de licence vous pouvez utiliser le MSAC PR1 6 Partage du port parallèle Windows NT 4 0 uniquement Sélectionnez Yes I want to share my parallel port Oui je veux partager mon port parallèle si vous voulez utiliser le connecteur d imprimante du MSAC PR1 ainsi qu une autre imprimante raccordée ...

Страница 37: ... voulez effectuer l installation dans un autre répertoire spécifiez le chemin dans la boîte et cliquez sur le bouton Next Suivant La fenêtre Select Program Folder Sélectionnez le dossier du programme s affiche 8 Les noms des programmes enregistrés dans le menu Start Démarrer s affichent Cliquez sur Next Suivant Si vous voulez changer le nom du fichier tapez le nom et cliquez sur Next Suivant ...

Страница 38: ...sque tous les fichiers ont été copiés Attention Le curseur s immobilise pendant environ 10 secondes pendant le chargement du pilote Si le curseur reste immobile à l écran alors que le chargement est terminé il est possible que les paramètres BIOS du PC ne conviennent pas pour le MSAC PR1 Vous devrez modifier les paramètres BIOS Pour les détails sur le réglage des paramètres BIOS voyez la section R...

Страница 39: ...Il faut que le MSAC PR1 soit sous tension Raccordez le câble de raccordement d alimentation associé au connecteur de clavier du PC et branchez le dans la prise DC du MSAC PR1 Si l icône Removable Disk Disque amovible ne s affiche pas au redémarrage du PC bien que vous ayez inséré la carte PC il est possible que les paramètres BIOS du PC ne conviennent pas pour le MSAC PR1 Vous devrez modifier les ...

Страница 40: ... l imprimante Si l imprimante ne fonctionne pas normalement Voyez la section Réglage des paramètres d installation C page 15 et D page 16 Installation d une nouvelle imprimante Mettez le PC hors tension débranchez le périphérique du PC puis raccordez le câble d imprimante directement au port parallèle Après avoir installé le pilote d imprimante rebranchez le câble d imprimante dans le connecteur d...

Страница 41: ...a touche xx comme indiqué dans le message avant que le message ne disparaisse de l écran Quand vous appuyez sur la touche xx l écran de réglage du BIOS apparaît Certains ordinateurs n affichent pas ce message pour le réglage du BIOS Pour tout complément d information reportez vous au mode d emploi de l ordinateur en question 3 Sur la plupart des écrans de réglage du BIOS vous devez effectuer deux ...

Страница 42: ...uble cliquez sur System Système dans le panneau de configuration pour ouvrir la fenêtre des propriétés système 2 Double cliquez sur l onglet du gestionnaire de périphérique puis double cliquez sur la catégorie de contrôleur SCSI pour afficher Sony MSAC PR1 dans la liste des périphériques 3 Double cliquez sur Sony MSAC PR1 pour afficher la fenêtre des propriétés puis cliquez sur l onglet Settings P...

Страница 43: ...tte procédure Dans ce cas supprimez uniquement les paramètres que vous avez ajoutés pour ramener l adaptateur au réglage flash W95 L imprimante ne fonctionne pas correctement Si l imprimante ne fonctionne plus correctement après l installation de MSAC PR1 alors qu elle fonctionnait normalement avant ou si une imprimante nouvellement installée ne fonctionne pas correctement vous pourrez corriger la...

Страница 44: ...bien supprimez le raccourci dans le dossier de démarrage Ce genre d applications permanentes est presque toujours enregistré dans le dossier de démarrage En les supprimant du dossier de démarrage elles ne seront plus lancées lorsque vous redémarrerez l ordinateur 1 Cliquez sur Start Démarrer dans la barre des tâches 2 Cliquez sur Taskbar Barre des tâches dans Settings Paramètres pour ouvrir la fen...

Страница 45: ...r ouvrir la page des propriétés 4 Cliquez sur l onglet des détails et cliquez sur Spoul Settings Paramètres de spoule 5 Cliquez sur le bouton radio Disable bi directional support for this printer Invalider le support bidirectionnel pour cette imprimante puis cliquez sur OK 6 Cliquez sur le bouton OK pour fermer la page des propriétés Désinstallation du pilote Si vous n avez plus besoin du pilote d...

Страница 46: ...t Enfoncez la carte PC à fond Affichage d icône Si vous insérez une carte PC ou un Memory Stick lorsque vous travaillez sous Windows 95 98 une icône Removable Disk Disque amovible s affiche Cette icône disparaît lorsque vous retirez la carte PC ou le Memory Stick Sous Windows NT l icône Removable Disk Disque amovible s affiche au démarrage du PC même si vous n avez pas inséré de carte PC ou de Mem...

Страница 47: ...t que le voyant clignote vous risquez d endommager la carte ou le Memory Stick Par ailleurs même si le voyant a cessé de clignoter certaines opérations de traitement peuvent ne pas être complètement terminées A titre de sécurité attendez quelques instants après que le voyant a cessé de clignoter pour retirer la carte ou le Memory Stick 2 Appuyez sur la touche d éjection et retirez délicatement la ...

Страница 48: ...rte PC avec le commutateur sur la position LOCK Fermé l ordinateur répondra lentement et il risque de se produire des erreurs de lecture écriture des données Utilisez la carte avec le commutateur ouvert Par ailleurs faites des copies de sauvegarde des données et des fichiers importants sur un autre support Format du Memory Stick initialisation Lorsque le Memory Stick quitte nos usines il est prêt ...

Страница 49: ...anneau de configuration pour afficher System Properties Propriétés du système 2 Cliquez sur l onglet Device Manager Gestionnaire de périphérique et double cliquez sur Disk Drive Category Catégorie du lecteur de disque Tous les lecteurs raccordés s affichent 3 Double cliquez sur Parallel Flash Unit Unité flash parallèle La fenêtre des propriétés s affiche 4 Cliquez sur l onglet Settings Paramètres ...

Страница 50: ...r ne reconnaît pas la carte PC normalement Fermez l application permanente Cause Correction Les paramètres du port parallèle de l ordinateur sont mal réglés Essayez de modifier les paramètres BIOS Cause Correction L imprimante n est pas compatible avec ce périphérique Certaines imprimantes ne fonctionnent pas lorsqu elles sont raccordées au connecteur d imprimante du MSAC PR1 Symptôme Lors d une é...

Страница 51: ...affiché pendant un accès le voyant d alimentation accès clignote Attendez suffisamment longtemps après que le voyant a cessé de clignoter pour retirer la carte PC Symptôme Impossible d insérer la carte PC à fond dans l adaptateur de carte PC Cause Correction Il y a un corps étranger dans l emplacement de l adaptateur de carte PC Retirez le corps étranger Dans ce cas vous risquez d endommager le co...

Страница 52: ...Canon BJC 4000 Canon BJC 4300 Fujitsu DL1100 ALPS MD 1000J ALPS MD 2000J Sony DPP M55 Cartes PC dont la compatibilité a été confirmée Hitachi HB286008A3 HB286015A3 HB286030A3 HB286045A3 HB286060A3 SanDisk SDP3B 2 101 00 SDP3B 4 101 00 SDP3B 2 6 101 00 SDP3B 8 101 00 SDP3B 10 101 00 SDP3B 20 101 00 I O DATA DEVICE PCFCA 10MS PCFCA 20MS PCFCA 40MS PCFCA 85M MELCO DPF 10J DPF 20J DPF 40J SCM Microsys...

Страница 53: ...25 FR EPSON EP10 EP20 EP40 EP85 Panasonic BN 012ABP3 BN 020ABP3 TDK SFD004M SFD012M SFD024M SFD032M SFD096M HAGIWARA SYS COM HPC FC20M ...

Страница 54: ... fonctionnement normal n est pas garanti avec les ordinateurs de type Notebook 83mm 21mm 124mm L H P Environ 150 g CC 5V fourni par le connecteur du clavier Environ 150mA 0ºC 40ºC 32ºF 104ºF pas de condensation Port parallèle norme IEEE1284 3 Côté ordinateur D sub 25 broches mâle port parallèle norme IEEE1284 3 Côté imprimante D sub 25 broches femelle port parallèle norme IEEE1284 3 Le périphériqu...

Страница 55: ......

Страница 56: ...Electronics Inc Customer Support If you have any questions comments related to this product please visit our Customer Support website at http www sony com service If you do not have internet access please call 1 800 222 SONY ...

Отзывы: