background image

Playback/Recording

11

Recording

Before you start
recording

MDs (MiniDisc) let you digitally record and play
music with high quality sound. Another feature of
MDs is track marking. The track marking feature
lets you quickly locate a specific point or easily
edit the recorded tracks. However, depending on
the source you record, the recording method and
the way the track numbers are recorded differ.

When the source you record from is:

• This system’s CD player (CMT-

SP55TC)

– The MD deck performs digital recording.*

1

– Track numbers are automatically marked as on

the original CD.

• Other digital components

connected to the DIGITAL
OPTICAL AUX IN jack of MDS-
SP55 (e.g., a DVD player)

– The MD deck performs digital recording.*

1

*

2

*

3

– Track numbers are marked differently

depending on the source you record.

• This system’s tuner or tape deck,

or other analogue components
connected to the AUX IN jacks of
CMT-SP55TC (e.g., a VCR)

– The MD deck performs analogue recording.
– A track number is marked at the beginning of a

recording, but when you turn on the Level
Synchro Recording function (see page 24),
track numbers are automatically marked in sync
with the level of the input signal.

*

1

For details on the limitations of digital recording,
see page 42.

*

2

The sound produced from the speakers during
recording is the AUX IN jacks audio. When
making a digital connection, be sure to also make
an analogue connection.

*

3

If a digital component is not connected to the
DIGITAL OPTICAL AUX IN jack using an optical
cable, the MD deck performs analogue recording.

Note on MD track numbers

On an MD, the track numbers (track sequence), track
start and end point information, etc., are recorded in
the TOC*

4

 area independent of the sound information.

You can edit recorded tracks quickly by modifying
the TOC information.

*

4

TOC:  Table Of Contents

After recording

,

Press 

A

 on the MD deck to remove the

MD or press 

?/1

 (power) to turn off

the system.

“TOC” lights up or starts flashing. The TOC
is updated and recording is completed.

Before pulling out the mains lead

MD recording is completed when the MD Table
of Contents (TOC) is updated. The TOC is
updated when you eject the MD or press 

?/1

 to

turn off the system. Do not pull out the mains lead
before updating the TOC (while “TOC” is lit) or
while updating the TOC (while “TOC” is flashing)
to ensure a complete recording.

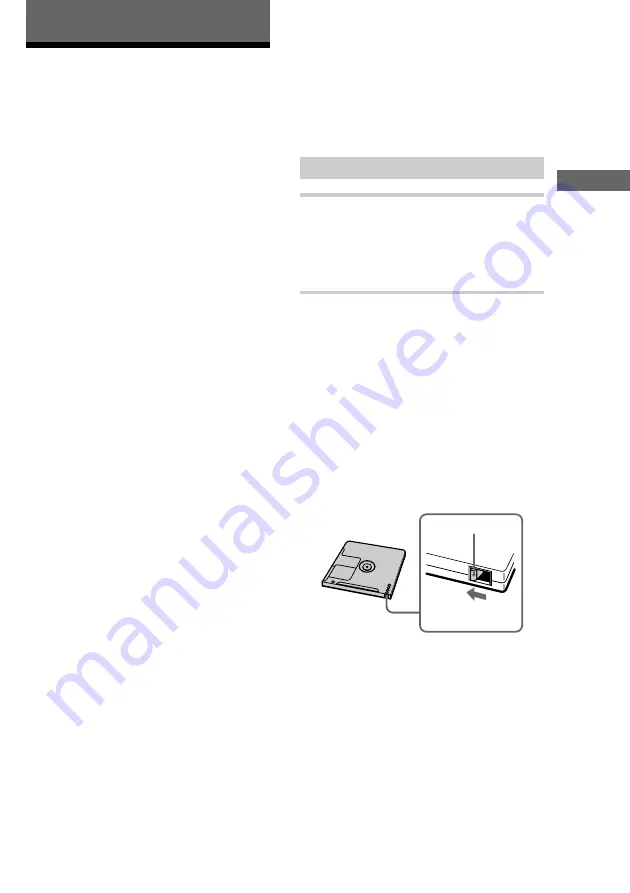
Protecting a recorded MD

• To protect a recorded MD, slide the tab on the side

of the MD to open the slot. In this position, the MD
cannot be recorded.  To record on the MD, slide the
tab to close the slot.

Tab

Slide the tab

• If the MD is record protected, “C11” and

“Protected” appear alternately and the MD cannot
be recorded. Remove the MD, then slide the record
protection tab to the closed position.

Содержание MDS-SP55

Страница 1: ...Operating Instructions MiniDisc Deck 4 230 236 12 1 2000 Sony Corporation MDS SP55 ...

Страница 2: ...th the CMT SP55TC Micro Hi Fi component system see page 4 Auto Power On Off The MD deck power is tied with the CMT SP55TC Micro Hi Fi component system Synchro Recording You can easily record a CD onto an MD see pages 12 and 15 Automatic Source Selection You can switch from another source to the MD deck and start playing an MD just by pressing H on the MD deck see page 6 Timer You can wake up to mu...

Страница 3: ...cording 19 Timer recording radio programmes 20 Making a space between tracks 3 seconds long Smart Space 22 Starting recording with 6 seconds of prestored audio data Time Machine Recording 23 Marking track numbers 24 Adjusting the recording level 26 Monaural recording 27 Editing Before you start editing 28 Labelling an MD Name Function 29 Erasing recordings Erase Function 31 Moving recorded tracks ...

Страница 4: ...using the supplied cords Note Be sure to hook up the system with the mains lead unplugged from the mains Hooking up the system with the mains lead plugged in may cause the system to malfunction AM loop aerial Right speaker Rear panel FM aerial Left speaker Tuner Amplifier CD player Tape deck MD deck ...

Страница 5: ...SYSTEM CONTROL 3 connectors in the order of the tuner tape deck and MD deck using the system cable supplied with MDS SP55 SYSTEM CONTROL 3 SYSTEM CONTROL 3 Notes The system cable is used to send signals and electricity between the components for interlinked operation Be sure to insert the connector horizontally until it clicks into place Otherwise the system will not operate correctly Keep the sys...

Страница 6: ...move the MD Press A on the MD deck Adjust the volume Press VOLUME or Tips You can start playing from the desired track in step 3 1 Press the track number of the track you want to listen to To select track number 11 and higher Press 10 once and then the number buttons of the track number For example to select track 32 press 10 3 and 2 To select track number 100 and higher Press 10 twice and then th...

Страница 7: ...on to MD 2 Press PLAY MODE repeatedly until SHUFFLE appears in stop mode 3 Press N Shuffle Play starts To cancel Shuffle Play Press x to stop Shuffle Play then press PLAY MODE repeatedly until SHUFFLE and PROGRAM disappear Tip To skip a track press Press to go back to the beginning of the current track However you cannot go back to the previous track ...

Страница 8: ...nd higher Press 10 once and then the number buttons of the track number For example to select track 32 press 10 3 and 2 To select track number 100 and higher Press 10 twice and then the number buttons of the track number Selected track number Total playing time 4 To programme additional tracks repeat step 3 Each time you programme the total time of the programme is displayed You can make a program...

Страница 9: ...ears when you try to programme 26 or more tracks m s appears when the total MD programme time exceeds 199 minutes Playing MD tracks repeatedly Repeat Play You can repeat an MD in normal play Shuffle Play and Programme Play 1 REPEAT Press REPEAT during play until REPEAT or REPEAT 1 appears REPEAT For all the tracks on the MD Play mode Repeat Normal All the tracks in order Shuffle Play page 7 To Do ...

Страница 10: ... of the programme appears during Programme Play 2 No Name appears if no track title is labelled In stop mode t Total number of tracks and total playing time r Remaining recordable time Only for a recordable MD Disc title appears for a pre mastered MD r Disc title 3 r Clock display 3 No Name appears if no disc title is labelled Tips You can check a track title during play If you press SCROLL a trac...

Страница 11: ... the speakers during recording is the AUX IN jacks audio When making a digital connection be sure to also make an analogue connection 3 If a digital component is not connected to the DIGITAL OPTICAL AUX IN jack using an optical cable the MD deck performs analogue recording Note on MD track numbers On an MD the track numbers track sequence track start and end point information etc are recorded in t...

Страница 12: ...er 1 Insert a recordable MD With the arrow pointing toward the deck With the label side up and the shutter on the righthand side 2 Press A on the CD player and place a CD on the disc tray With the label side up When you play a CD single 8 cm CD place it on the inner circle of the tray Press A again to close the disc tray 3 Turn FUNCTION until CD appears 4 Press CD SYNC REC on the MD deck The CD SY...

Страница 13: ...deck and CD player in stop mode Tips If you use a partially recorded MD recording starts after the recorded tracks To erase the recorded contents see Erasing recordings on page 31 Depending on the disc CD TEXT information may also be recorded If CD TEXT flashes during recording press NAME EDIT on the remote and then press ENTER YES to record the title of the current track If CD TEXT is lit it is a...

Страница 14: ...and 4 again 5 Press H on the MD deck Recording starts 6 Press H on the tape deck To stop recording Press s on the MD deck Tips If you use a partially recorded MD recording starts after the recorded tracks To erase the recorded contents see Erasing recordings on page 31 If the Smart Space function is on and there is no sound input for about 3 seconds or more but less than 30 seconds while recording...

Страница 15: ...ars 3 Press the track number of the track you want to record To select track number 11 and higher Press 10 once and then the number buttons of the track number For example to select track 32 press 10 3 and 2 4 To programme additional tracks repeat step 3 Each time you programme the total time of the programme is displayed You can make a programme of up to 25 tracks Recording on an MD 5 Insert a re...

Страница 16: ...ng When CD TEXT flashes press NAME EDIT on the remote and then press ENTER YES to record the title of the current track Note Depending on the disc the CD TEXT information may not be recorded automatically Recording your favourite portions on an MD Manual Recording With manual recording you can record just the portions you like from a CD or start recording from the middle of the tape If you use a p...

Страница 17: ...sed position see page 11 Recording an MD on a tape You can make an analogue recording of an MD on a tape with the tracks in the same sequence as the original MD You can also record a programme of favourite tracks Recording tracks in the same sequence as the original MD 7 1 Insert a blank tape 2 Insert an MD 3 Turn FUNCTION on the amplifier until MD appears 4 Press z REC on the tape deck The tape d...

Страница 18: ...tarts 8 Press H on the MD deck MD play starts When the recording is completed the MD deck stops To stop recording Press s on the tape deck Tip When you want to reduce the hiss noise in high frequency signals recorded at low level press DOLBY NR after step 6 so DOLBY NR appears in the display Turning DOLBY NR on reduces the noise when playing back these types of signals Recording your favourite MD ...

Страница 19: ...ramme of up to 25 tracks Last programmed track number Total playing time 5 Insert a blank tape 6 Do steps 3 to 7 of Recording tracks in the same sequence as the original MD see page 17 Recording from the radio Manual Recording You can make an analogue recording a radio programme on an MD 6 5 1 Insert a recordable MD 2 Press TUNER BAND on the tuner repeatedly to select AM or FM 3 Press TUNING MODE ...

Страница 20: ...tected C11 and Protected appear alternately and the MD cannot be recorded Remove the MD then slide the record protection tab to the closed position see page 11 Timer recording radio programmes To timer record you must first preset the radio station and set the clock refer to the CMT SP55TC Operating Instructions You can make a timer recording of a radio programme or the audio signal from a digital...

Страница 21: ...e Do not operate the system from the time the system turns on until the recording starts about 30 seconds before the preset time If the system is on about 30 seconds before the preset time the timer recording will not be activated The Smart Space and Level Synchro Recording functions do not operate The volume is reduced to minimum during recording 4 Set the time to start recording Press or repeate...

Страница 22: ... H to restart the recording Making a space between tracks 3 seconds long Smart Space The Smart Space function lets you make the blank spaces between tracks 3 seconds long automatically while making a digital recording from a CD For other types of recording if the Smart Space function is on and there is no sound input for about 3 seconds or more but less than 30 seconds while recording the MD deck ...

Страница 23: ...or OFF Starting recording with 6 seconds of prestored audio data Time Machine Recording When recording from an FM or satellite broadcast the first few seconds of material are often lost due to the time it takes you to ascertain the contents and press the record button To prevent the loss of this material the Time Machine Recording feature constantly stores the most recent audio data in a buffer me...

Страница 24: ...ck numbers are automatically marked as on the original source during recording from this system s CD player CMT SP55TC or components connected to the DIGITAL OPTICAL AUX IN jack Use the Level Synchro Recording function to automatically mark track numbers during recording from this system s tuner tape deck or components connected to the AUX IN jacks At any point during recording You can mark track ...

Страница 25: ... then press ENTER YES 2 Turn l L until MD T Mark LSync appears then press ENTER YES 3 Turn l L until MD T Mark Off appears then press ENTER YES LEVEL SYNC disappears 4 Press MENU NO When LEVEL SYNC is off a track number is marked only at the beginning of each recording Marking track numbers at a specific point during recording Track Mark You can mark track numbers at any time during recording rega...

Страница 26: ...ENTER YES 3 Turn l L to adjust the recording level The sound source and recording level are displayed The recording level can be adjusted from 12 to 12 While monitoring the sound adjust to the optimum level while making sure that OVER does not appear in the display at the loudest portion Adjust the level so that OVER does not appear 4 Press ENTER YES 5 Press MENU NO Notes If you adjust the recordi...

Страница 27: ...eck The MD deck stands by for recording 7 Press H on the MD deck Recording starts The sound source is heard as is e g stereo sound when recording a stereo broadcast from the speakers To stop recording Press s on the MD deck To return to stereo recording 1 Press MENU NO in stop mode Turn l L until MD Setup appears then press ENTER YES 2 Turn l L until MD Mono Rec appears then press ENTER YES 3 Turn...

Страница 28: ...edit page 38 Use this function to cancel the last edit and restore the contents of the MD to the condition before the edit Before editing You can edit an MD only when The MD is recordable The MD play mode is normal play Check the following before editing 1 Check the tab of the MD to be edited If the MD is protected C11 and Protected appear alternately and the MD cannot be edited Slide the tab to c...

Страница 29: ...l a track press or until the desired track number appears 2 Press NAME EDIT The text input screen appears and the cursor flashes Cursor 3 Press CHARACTER to select the desired type of character Each time you press the button the display changes as follows A Upper cases t a Lower cases t 0 Numbers t Symbols t Blank space t A Upper cases t 4 Press or repeatedly to select the desired character To ent...

Страница 30: ...g You can return to the original condition immediately after labelling or erasing a title by using the Undo function see page 38 6 Repeat steps 3 to 5 to complete the entire title If you made a mistake Press CURSORT or t until the character you want to change flashes then repeat steps 3 to 5 To erase a character Press CURSORT or t until the character you want to erase flashes then press CLEAR 7 Pr...

Страница 31: ...rack number When you erase a track the total number of tracks on the MD decreases by one and all the tracks following the erased one are renumbered Example Erasing track 2 1 2 3 1 2 3 4 A A C D B C D Erase track 2 Track number Original tracks After ERASE When erasing multiple tracks you should proceed in order from high to low track number to prevent the renumbering of tracks that have not been er...

Страница 32: ... Erase function You can erase the disc title all recorded tracks and their titles at once 1 2 1 3 3 3 4 1 Press MD to switch the function to MD 2 Press MENU NO to display MD Edit Menu 3 Press or repeatedly until MD All Erase appears then press ENTER YES MD All Erase appears 4 Press ENTER YES again MD Complete appears for a few seconds and the disc title all recorded tracks and their titles are era...

Страница 33: ...Press ENTER YES if point A is correct MD Point B Set appears and playback for setting the ending point of the portion to be erased point B starts 9 Continue playback until the deck reaches point B then press ENTER YES MD A B Ers and MD Point B ok appear alternately and the deck repeats a portion of the few seconds before point A and after point B successively Erasing a portion of a track A B Erase...

Страница 34: ...he procedure is the same as step 6 11 Press ENTER YES if point B is correct MD Complete appears for a few seconds and the portion between point A and B is erased To cancel A B Erase Press MENU NO before completing the procedure To return to the condition before A B Erase You can return to the original condition immediately after erasing the track by using the Undo function see page 38 Note If Impo...

Страница 35: ...nto track B and C 3 Press or repeatedly until MD Move appears then press ENTER YES 4 Press or repeatedly until the desired track number to move appears then press ENTER YES 5 Press or repeatedly until the new track position appears Original track number 6 Press ENTER YES MD Complete appears for a few seconds and the selected track moves to the appointed position To cancel moving Press MENU NO befo...

Страница 36: ... Press or to shift the position 2 Press MENU NO to display MD Edit Menu 3 Press or repeatedly until MD Divide appears then press ENTER YES 4 Press or repeatedly until the desired track number to divide appears then press ENTER YES MD Rehearsal appears and the portion to be divided is played repeatedly 5 While monitoring the sound press or repeatedly to adjust the point to be divided You can shift ...

Страница 37: ...appears Second track number to be combined New track number 6 Press ENTER YES MD Complete appears for a few seconds and the tracks are combined Play starts Combining recorded tracks Combine Function You can use this function to combine 2 tracks into a single track The total number of tracks decreases by one and all tracks following the combined ones are renumbered Example Combining track 3 to trac...

Страница 38: ...ot appear when there is no editing function that can be cancelled To cancel combining Press MENU NO before completing the procedure To return to the condition before Combine You can return to the original condition immediately after combining the tracks by using the Undo function see this page You can also return to the original condition by using the Divide function see page 35 Notes If both of t...

Страница 39: ...ing the procedure Optional Components Connecting a digital component Connect the digital component using audio cords not supplied and an optical cable square optical connector not supplied The digital audio signal from the connected component is digitally recorded to the MD The analogue connection is for monitoring the audio and the digital connection is for recording If there is no analogue conne...

Страница 40: ...tal component 1 Take the cap off the DIGITAL OPTICAL AUX IN 2 Connect an optical cable 3 Connect the cable to the digital optical output of a digital component 2 Connect audio cords not supplied SYSTEM CONTROL 2 SYSTEM CONTROL 1 IN OUT R L Connect the cords to the audio output of a digital component Tip Switch the function to AUX when listening to or recording the sound of connected components Tun...

Страница 41: ...y Very humid Subject to vibrations Subject to direct sunlight continued Notes Digital recording is prohibited for most DVD software To record DVD software for which digital recording is prohibited disconnect the optical cable and make an analogue recording A built in sampling rate converter lets you make a digital recording of the sound from a digital component to the MD deck regardless of the sou...

Страница 42: ...d the shutter or in other locations Note that the shape of the indentation depends on the disc System limitations of MDs The recording system in your MD deck has the limitations described below Note however that these limitations are due to the inherent nature of the MD recording system itself not to mechanical causes MD Disc Full appears before the MD has reached the maximum recording time When 2...

Страница 43: ...when the tracks are not in order Track numbers cannot be marked When LEVEL SYNC see page 24 lights up in the display window during analogue recording the track numbers may not be marked at the beginning of the track if the input signal is below a certain fixed level for less than two seconds between tracks if the input signal is below a certain fixed level for more than two seconds in the middle o...

Страница 44: ...annot read the disc information properly cRemove the MD once then insert it again Play does not start from the first track Press PLAY MODE repeatedly while the MD deck is in stop mode until PROGRAM or SHUFFLE disappears to return to normal play OVER appears Keep pressing m on the MD deck or turn l L on the MD deck counter clockwise to return to the desired playing position OVER lights up during re...

Страница 45: ...orded contents of the MD using the All Erase function see page 32 C41 Cannot Copy The sound source is a copy of a commercially available music software or you tried to record a CD R Recordable CD cThe Serial Copy Management System prevents making a digital copy see page 43 You cannot record a CD R C71 Check OPT IN This appears momentarily because of the signal of the digital broadcast during recor...

Страница 46: ...more space to store track or disc titles No Name You tried to show the title of a non labelled disc or track OVER You have reached the end of the MD while keep pressing M on the MD deck during playing pause Position OK The position to be divided by the Divide function is being played Push STOP You pressed PLAY MODE during play Rehearsal The MD is playing the specified dividing point for confirmati...

Страница 47: ...Additional Information 47 ...

Страница 48: ...hro Recording 24 M Manual recording 16 19 Messages 45 Monaural recording 27 Move Function 34 N Name Function 29 Normal Play 6 O Optional components 39 P Q Playing an MD 6 tracks in random order Shuffle Play 7 tracks in the desired order Programme Play 8 tracks repeatedly Repeat Play 9 Programme Play 8 Protecting recordings 11 R Recording a CD 12 15 16 a radio programme 19 a tape 13 16 an MD 17 man...

Отзывы: