background image

Playing CDs

Getting Started

SONY MCE-K700 (E, C1, C2) 3-859-191-11(1)

Actual page number:

5

EN

Getting Started

Getting Started

L

R

VIDEO

AUDIO

INPUT

CD

L

R

IN

L

R

OUT

IN

OUT

AUDIO

VIDEO

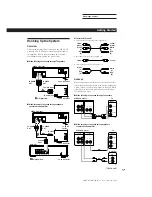
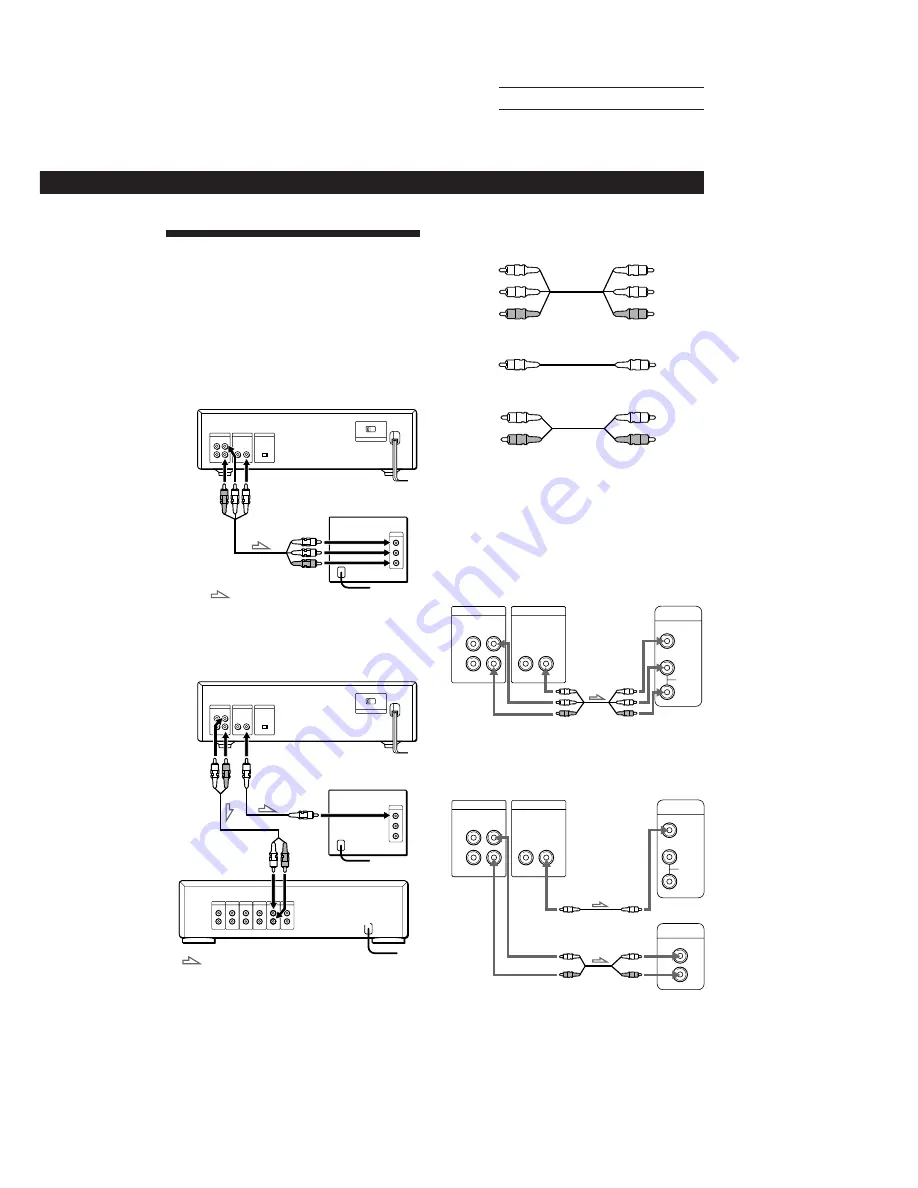
Hooking Up the System

Overview

This section describes how to hook up the VIDEO CD
player to a TV (with audio/video input jacks) and/or
an amplifier. Be sure to turn off the power of each
component before making the connections.

p

When listening to the sound through TV speakers

What cords will I need?

Audio and video connecting cord (supplied) (1)

Hookups

When connecting the cord, be sure to match the color-
coded cord to the appropriate jacks on the components:
Yellow (video) to Yellow, Red (right) to Red and White
(left) to White. Be sure to make connections firmly to
avoid hum and noise.

p

When listening to the sound through TV speakers

VIDEO CD player

TV

p

When listening to the sound through speakers
connected to an amplifier

VIDEO CD player

TV

(Continued)

To an AC outlet

To video input

To audio input

: Signal flow

To an AC outlet

TV

To VIDEO
OUT

To AUDIO
OUT

VIDEO CD player

p

When listening to the sound through speakers
connected to an amplifier

VIDEO CD player

To AUDIO
OUT

To VIDEO
OUT

To an AC
outlet

TV

To an AC outlet

To an AC outlet

: Signal flow

Amplifier

To audio
input

To video
input

Yellow

Yellow

Audio connecting cord (not supplied) (1)

White

(L)

Red

(R)

Video connecting cord (not supplied) (1)

Yellow
(video)

White

(L)

Red

(R)

Red

(R)

White

(L)

Yellow
(video)

White
(L)
Red
(R)

L

R

VIDEO

AUDIO

INPUT

IN

L

R

OUT

IN

OUT

AUDIO

VIDEO

Amplifier

Содержание MCE-K700

Страница 1: ...SONY MCE K700 E C1 C2 3 859 191 11 1 Actual page number 3 859 191 11 1 1996 by Sony Corporation MCE K700 VIDEO CD Player Operating Instructions MMMMM MMMMM EN C1 C2 ...

Страница 2: ...SONY MCE K700 E C1 C2 3 859 191 11 1 Actual page number ...

Страница 3: ...SONY MCE K700 E C1 C2 3 859 191 11 1 Actual page number ...

Страница 4: ...n to prevent heat build up in the player Do not place the player on a soft surface such as a rug that might block the ventilation holes on the bottom Do not place the player in a location near heat sources or in a place subject to direct sunlight excessive dust or mechanical shock On operation If the player is brought directly from a cold to a warm location or is placed in a very damp room moistur...

Страница 5: ...ying Repeatedly 19 Playing in Random Order Shuffle Play 20 Creating Your Own Program Program Play 20 Reducing Distortion of the Picture DNR 22 Adding an Incidental Image to Moving Pictures COMET 22 Enjoying Sound Effects Surround Sound 23 Controlling the TV with the Supplied Remote 23 Enjoying Karaoke Using the Various Effects Adding richness to your voice Karaoke Star 24 Adjusting the Balance of ...

Страница 6: ... CDs with PBC functions Ver 2 0 discs VIDEO CDs Audio Video moving pictures 12 cm 8 cm 74 min 20 min Audio CDs Audio 12 cm 8 cm CD single 74 min 20 min z You can control Sony TVs with the g mark using the supplied remote See page 23 z When to replace batteries With normal use the batteries should last for about six months When the remote no longer operates the player replace all the batteries with...

Страница 7: ... to Yellow Red right to Red and White left to White Be sure to make connections firmly to avoid hum and noise pWhen listening to the sound through TV speakers VIDEO CD player TV pWhen listening to the sound through speakers connected to an amplifier VIDEO CD player TV Continued To an AC outlet To video input To audio input Signal flow To an AC outlet TV To VIDEO OUT To AUDIO OUT VIDEO CD player pW...

Страница 8: ...t signal Pictures will be displayed with the switch set to either NTSC or PAL If you set the COLOR SYSTEM switch to AUTO the player automatically changes the color system of video output according to the color system of the VIDEO CD to be played In this case the color system selected remains until you turn off the player or you play another VIDEO CD with a different color system If you turn off th...

Страница 9: ... the rear panel of the player is set to the local power line voltage If not set the selector to the correct position using a screwdriver before connecting the AC power cord to a wall outlet When you set the selector to 110 120 V position be sure to use the supplied plug adaptor Connecting the AC power cord Connect the AC power cord to a wall outlet 220 240V 110 120V VOLTAGE SELECTOR ...

Страница 10: ...nteractively following the instructions on the menu screen PBC Playback see page 26 z What is a VIDEO CD with PBC functions See page 26 or 30 z You can turn on the player using the remote Press POWER while the indicator above the POWER button on the front panel is lit When using a TV Turn on the TV and select the video input so that you can view the pictures from this player When using an amplifie...

Страница 11: ...nd the track Go to the next track press once Go back to the preceding track press repeatedly Before you start playing Turn JOG SELECTOR or press repeatedly to select the track number then press SELECT or OPEN CLOSE OPEN CLOSE z What is a track A disc is divided into sections of a picture or a music piece called tracks Each track is assigned with a track number to locate the track you want z When R...

Страница 12: ...LIST Waiting 1 2 3 4 5 6 7 8 TV screen 3 Select the track you want to play On the player Turn JOG SELECTOR until the track number you want to play appears in the front panel display then press SELECT On the remote Press the number button of the track To select a track numbered over 15 use the 15 button see page 15 TV screen Example when you select track 5 Play starts automatically 4 Turn the MIC 1...

Страница 13: ...fect on the settings of the MIC LEVEL controls Note When playing a CD as a general CD set the MUSIC LEVEL selector to HIGH Press n N Front panel display in Karaoke mode 2 Repeat Step 1 to reserve up to 8 tracks After reserving 8 tracks you can reserve a new track when the current track is played to the end When you want to Play the current track again Go to the next specified track Check the track...

Страница 14: ... for a few seconds only when you change the operating status PLAY Playing status PLAY when you start playing PAUSE when you pause playing Before you start playing except for the Program Play mode Total playing time While playing VIDEO CDs with PBC functions Setting of the mode selector When Resume Play is available Play mode Music calendar During Repeat Play While DNR function is turned on COMET i...

Страница 15: ... Select the display mode other than ON SCREEN OFF for normal operation When you select ON SCREEN OFF you cannot check the operating status while operating the player In this case check the information in the front panel display When you record the playback picture of this player on another VCR etc be sure to select ON SCREEN OFF Otherwise the display information is also recorded on the VCR The inf...

Страница 16: ...ESUME appears in the front panel display and on the TV screen If RESUME doesn t appear Resume Play is not available 2 Press The player starts playback from the point you stopped the VIDEO CD in Step 1 z To view from the beginning of the VIDEO CD When RESUME appears in the front panel display press p then press Notes Depending on where you stopped the VIDEO CD the player may resume playback from a ...

Страница 17: ...rack is assigned with a track number to locate the track you want Note During PBC Playback the JOG SELECTOR and buttons have different functions from the ones explained in the left column JOG SELECTOR 15 Number buttons To locate The next or succeeding tracks AMS The current or preceding tracks AMS A specific track directly Z z When you directly locate a track numbered over 15 Z Press 15 first then...

Страница 18: ...serving the TV screen Slow motion Play Z Quickly by observing the front panel display during pause z If you want to locate a particular point of a long track It is convenient to use Track Digest see page 18 z If appears in the front panel display The disc has reached the end while you were pressing Press 0 or to go back z If you want to change the playback speed during Slow motion Play Z Press SLO...

Страница 19: ...evious screen press 3 Press the number button to select the track The player starts playing from the selected track To select tracks numbered over 15 Use the 15 button see page 15 To cancel Disc Digest Press p z While the still pictures are displayed in Step 2 you can start playing the track you want right away before all the still pictures are displayed Press when the picture of the track you wan...

Страница 20: ...rder TV screen 3 Press the number button 1 9 to select the point you want The player starts playing from the selected point The player may start playing from a point which is a little different from the one displayed during Track Digest To cancel Track Digest Press p TV screen Current track z You can select a point which isn t displayed yet on the TV screen in Step 2 z During Track Digest you can ...

Страница 21: ...when you find the starting point point A to be played repeatedly A of REPEAT A flashes in the front panel display 2 When you reach the ending point point B press A B again REPEAT A B appears The player plays this specific portion repeatedly To cancel A B Repeat Press REPEAT z When you want to restart from the starting point A Press during A B Repeat Note During A B Repeat Slow motion Play is not a...

Страница 22: ...e indication appears while the player is shuffling the tracks To cancel Shuffle Play Press PLAY MODE repeatedly until CONTINUE appears in the front panel display When playing a VIDEO CD with PBC functions press PLAY MODE repeatedly until SHUFFLE disappears from the front panel display z You can start Shuffle Play while playing in Continuous Play mode Press PLAY MODE repeatedly until SHUFFLE appear...

Страница 23: ...ying a program which contains a pause the player pauses at the step in which a pause is programed until you press P or This might be useful when you record a program on both sides of a tape z You can check the contents of the program during programing on the TV screen If you press ON SCREEN to select ON SCREEN OFF display mode you won t see this information page 12 z The program remains even after...

Страница 24: ...COMET function Press COMET again COMET disappears from the front panel display Notes If you press DNR COMET will be automatically canceled The COMET function does not work when the mode selector is set to LINE IN To cancel the DNR function Press DNR to goes off the DNR button indicator on the player DNR disappears from the front panel display To turn on the DNR function again Press DNR to lights u...

Страница 25: ...disappear from the front panel display Note If you press MPX see page 24 the surround sound mode is automatically set to KARAOKE SURROUND Atmosphere Creates the effect of singing in a bar Gives your song a rich carrying tone Suitable for listening to the music Simulates the resonance of a movie theater Emphasizes the bass and extends the dynamic mid range Controlling the TV with the Supplied Remot...

Страница 26: ...otes When you press MPX in Step 1 the surround sound mode see page 23 is automatically set to KARAOKE You can change or cancel the surround sound mode if you like The last surround sound mode setting is resumed whenever you press MPX If you press KARAOKE PON see page 25 MPX will be automatically canceled When you select ON SCREEN OFF display mode no information is shown on the TV screen You will h...

Страница 27: ...PON disappears from the front panel display z When you use Karaoke Pon Use stereo recorded discs Notes Karaoke Pon may not work well for the following cases Monaural recorded discs The accompaniment is also reduced Only a few instruments are playing in the stereo recorded disc A duet is being played The disc has strong echoes or chorus The singer s voice on the disc deviates from the center Multip...

Страница 28: ...the menu screen Z Do the following Turn JOG SELECTOR on the player to select the item number then press SELECT Press the number button of the item you want on the remote In this case you can go to another scene even while playing moving pictures Turn JOG SELECTOR then press SELECT on the player or press number button of the item you want on the remote Press RETURN ˆ PREV or NEXT on the remote Also...

Страница 29: ...remote 2 To go to the preceding menu Press RETURN ˆ 3 To go to the next page of the menu Press NEXT 4 To go back to the preceding page of the menu Press PREV Locating Scenes Directly Using the Scene Numbers Scene Search Z On VIDEO CDs with PBC functions the menu screens moving pictures and still pictures are divided into scenes and each scene is assigned with a scene number You can check the curre...

Страница 30: ...scene The player automatically starts PBC Playback page 26 z You can check the scene number while playing a disc Press ON SCREEN repeatedly to select ON SCREEN 2 display mode see page 12 The scene numbers appear on the upper left side of the TV screen Notes Some discs don t allow you to start playing from a particular scene In this case when you do the task before you start playing the player star...

Страница 31: ...te doesn t function Remove the obstacles in the path of the remote and the player Point the remote at the remote sensor g on the player Replace all the batteries in the remote with new ones if they are weak There s no sound from the microphone Switch the microphone on Turn the MIC 1 and or MIC 2 LEVEL controls clockwise Howling occurs Move the microphone away from the speakers Lower the volume Low...

Страница 32: ...piece on a disc Each track is assigned with a track number to locate the track you want Specifications VIDEO CD player Laser Semiconductor laser Wavelength 780 790 nm Signal format system NTSC PAL Frequency response 2 Hz to 20 kHz 1 dB Signal to noise ratio More than 94 dB Outputs AUDIO OUT VIDEO OUT PHONES Inputs AUDIO IN VIDEO IN MIC 1 MIC 2 General Power requirements 110 120 V or 220 240 V AC a...

Страница 33: ...uently a 12 cm VIDEO CD can contain up to 74 minutes of moving pictures VIDEO CDs also contain compact audio information Sounds outside the range of human hearing are compressed while the sounds we can hear aren t compressed VIDEO CDs can hold 6 times the audio information of conventional audio CDs There are 2 versions of VIDEO CDs Version 1 1 You can play only moving pictures and sounds Version 2...

Страница 34: ... 27 SURROUND 23 TIME 13 8 26 P 9 p 9 9 15 0 16 15 15 Switch Mode KARAOKE NORMAL LINE IN 8 10 25 MUSIC LEVEL LOW MID HIGH 11 POWER 8 Control ECHO LEVEL 11 JOG SELECTOR 9 10 26 MIC 1 MIC 2 LEVEL 10 PHONES LEVEL 8 VOCAL LEVEL 24 25 Jack MIC CONTROL 10 MIC 1 MIC 2 10 PHONES 8 Others Disc tray 8 Front panel display 13 g 4 L M N Locating a specific point 16 a specific scene 15 a specific track 15 by mon...

Страница 35: ...SONY MCE K700 E C1 C2 3 859 191 11 1 Actual page number Sony Corporation Printed in Japan ...

Отзывы: