background image

master page=right

17

KV-21CL10U_Grp U12_GB

4-093-929-

61

(1)

GB

Connecting Optional Equipment

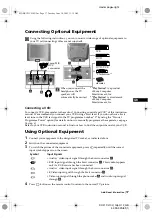
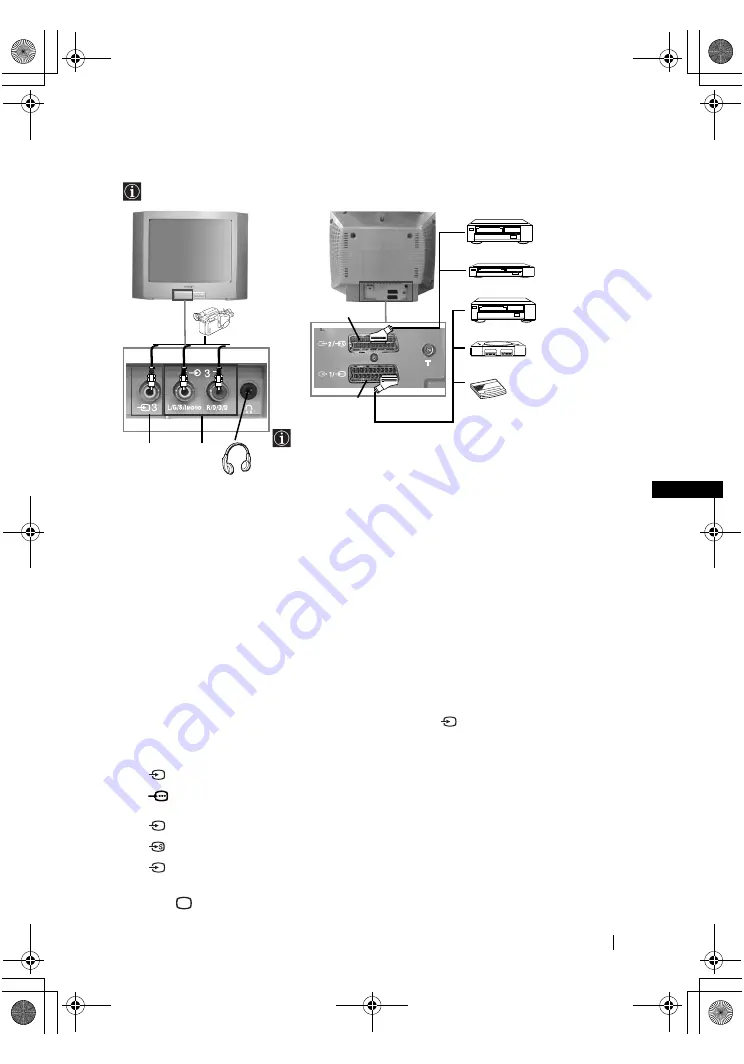
Using the following instructions, you can connect a wide range of optional equipment to 
your TV set (connecting cables are not supplied).

Connecting a VCR: 

To connect a VCR, please refer to the section “Connecting an aerial and VCR” of this instruction 
manual. We recommend you connect your VCR using a Scart lead. If you do not have a Scart 
lead, tune in the VCR test signal to the TV programme number “0” by using the “Manual 
Programme Preset” option (for details on how to manually programme these presets, see page 
14, step a).
Refer to your VCR instruction manual to find out how to find the output channel of your VCR.

Using Optional Equipment

1

Connect your equipment to the designated TV socket, as indicated above.

2

Switch on the connected equipment.

3

To watch the picture of the connected equipment, press 

 repeatedly until the correct 

input symbol appears on the screen.

4

Press 

 button on the remote control to return to the normal TV picture.

Symbol

Input Signals

1

•Audio / video input signal through the Scart connector 

C

1

•RGB input signal through the Scart connector 

C

. This symbol appears 

only if a RGB source has been connected.

2

•Audio / video input signal through the Scart connector 

D

.

2

•S Video input signal through the Scart connector 

D

.

3

•Video input signal through the phono socket 

A

 and Audio input signal 

through 

B

.

A

B

1

2

C

8mm/Hi8/
DVC
camcorder

DVD/VCR

“PlayStation”*

decoder

When you connect the 
headphones, the TV 
speakers will 
automatically be muted

* “PlayStation” 

is a product

of Sony Computer 
Entertainment, Inc.

* “PlayStation

” is a trademark 

of Sony Computer 
Entertainment, Inc.

DVD

VCR

D

Additional Information

02GBKV21CL10U.fm  Page 17  Tuesday, June 10, 2003  11:15 AM

Содержание KV-21CL10U

Страница 1: ...4 093 929 61 1 R 2003 Sony Corporation Instruction Manual GB FD Trinitron Colour Television KV 21CL10U 01CoverKV21CL10U fm Page 2 Tuesday June 10 2003 11 28 AM ...

Страница 2: ... and an appropriate plug fitted in accordance with the following instructions The wires in this mains lead are coloured in accordance with the following code Blue Neutral Brown Live As the colours of the wires in the mains lead of this apparatus may not correspond with the coloured markings identifying the terminals in your plug proceed as follows The wire which is coloured blue must be connected ...

Страница 3: ... Table of Contents Notice for Customers in the United Kingdom 2 Introduction 3 Safety Information 4 Overview Overview of Remote Control Buttons 5 Overview of TV Buttons 6 Installation Inserting Batteries into the Remote Control 6 Connecting an Aerial and VCR 6 First Time Operation Switching On the TV and Automatically Tuning 7 Menu System Introducing and Using the Menu System 9 Picture 9 Sound 11 ...

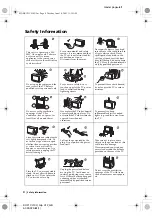
Страница 4: ...ll around the set Never place the TV in hot humid or excessively dusty places Do not install the TV where it may be exposed to mechanical vibrations To prevent fire keep inflammable objects or naked lights e g candles away from the TV Clean the screen and cabinet with a soft lightly dampened cloth Do not use any type of abrasive pad alkaline cleaner scouring powder or solvent such as alcohol or be...

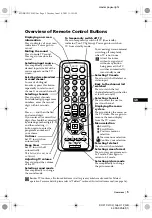
Страница 5: ...witch on automatically Sleep timer Set TV to switch off automatically This button does not work on this set Adjusting TV volume Press to adjust the volume of the TV Selecting sound mode Press repeatedly to change the sound mode To temporarily switch off TV Press to temporarily switch off TV the standby indicator 1 on TV lights up Press again to switch on TV from standby mode To save energywe recom...

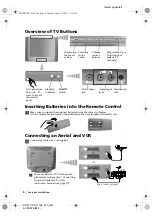
Страница 6: ...are not supplied Displaying the menu system Selecting Input source Volume control buttons ProgrammeUpor Down buttons selects TV channels Lift up the door flap with mark to reveal the control panel Standby indicator On Off switch Video Input jack AudioInput jacks Headphone jack or Scart lead is optional For more details of VCR connection please refer to the section Connecting Optional Equipment of ...

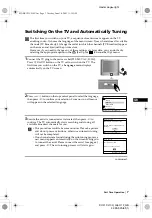
Страница 7: ...l panel to select the language then press t to confirm your selection From now on all menus will appear in the selected language 3 Ensure the aerial is connected as instructed then press t to confirm The TV automatically starts searching and storing all available broadcast channels for you This procedure could take some minutes Please be patient and do not press any buttons otherwise automatic tun...

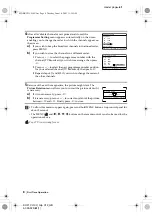
Страница 8: ...he other channels 5 Because of the earth s magnetism the picture might slant The Picture Rotation menu allows you to correct the picture slants if it is necessary a If it is not necessary press t b If it is necessary press 2 to correct any slant of the picture between 10 and 10 Finally press t to store To allow this menu to appear again press and hold MENU button at top control panel for about 5 s...

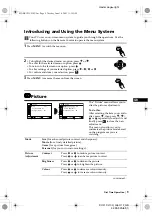
Страница 9: ...tem you want to alter press then press or repeatedly to adjust it and finally press to store the new adjustment This menu also allows you to customize the picture mode based on the programme you are watching Mode Live for enhanced picture contrast and sharpness Movie for a finely detailed picture Game for a picture from game Personal for your own custom settings Picture Adjustment Contrast Press o...

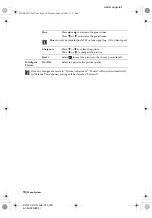
Страница 10: ... or to decrease the green tones Press or to increase the green tones Hue can only be adjusted for NTSC colour signal e g USA video tapes Sharpness Press or to soften the picture Press or to sharpen the picture Reset Select to reset the picture to the factory preset levels Intelligent Picture On Off Select to optimize the picture quality Menu System 02GBKV21CL10U fm Page 10 Tuesday June 10 2003 11 ...

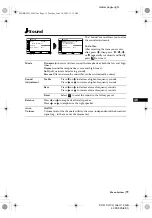
Страница 11: ...ent Treble Press or to decrease higher frequency sounds Press or to increase higher frequency sounds Bass Press or to decrease lower frequency sounds Press or to increase lower frequency sounds Reset Select to reset the sound to the factory preset Balance Press or to emphasize the left speaker Press or to emphasize the right speaker Auto Volume On Off Volume level of the channels will stay the sam...

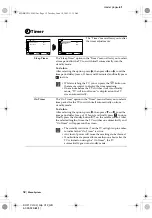
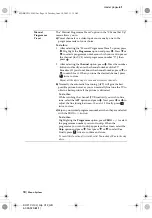
Страница 12: ...n the Timer menu allows you to select a time period for the TV to switch itself automatically on from standby mode To do this After selecting the option press then press or to set the time period delay max of 12 hours and finally press to store Finally press the standby button 1 on the remote control After the selected length of time the TV switches on automatically and On Timer will appear on the...

Страница 13: ...in step 4b of the section Switching On the TV and Automatically Tuning see page 8 Programme Labels The Programme Labels option in the Channel Set Up menu allows you to name a channel using up to five characters letters or numbers To do this 1 After selecting the option press Press or to select the programme number with the channel you wish to name then press 2 Press With the first element of the l...

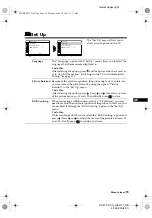
Страница 14: ...store Repeat all the above steps to tune and store more channels b Normally the automatic fine tuning AFT will give the best possible picture however you can manually fine tune the TV to obtain a better picture if the picture is distorted To do this While watching the channel TV Broadcast you wish to fine tune select the AFT option and press Next press or to adjust the fine tuning between 15 and 1...

Страница 15: ... Rotation in the Set Up menu To do this After selecting the option press Press or to correct any slant of the picture between 10 and 10 and finally press to store RGB Centring When connecting an RGB source such as a PlayStation you may need to readjust the horizontal position of the picture In that case you can readjust it through the RGB Centring option in the Set Up menu To do this While watchin...

Страница 16: ...ess Press it again to cancel the freeze To reveal concealed information e g answer to a quiz Press Press it again to conceal the information To enlarge the Teletext display Press Each time you press the Teletext display changes as follows Enlarge upper half t Enlarge lower half t Normal size To stand by for a Teletext page while watching a TV program 1 Enter the Teletext number that you want to re...

Страница 17: ...t as indicated above 2 Switch on the connected equipment 3 To watch the picture of the connected equipment press repeatedly until the correct input symbol appears on the screen 4 Press button on the remote control to return to the normal TV picture Symbol Input Signals 1 Audio video input signal through the Scart connector C 1 RGB input signal through the Scart connector C This symbol appears only...

Страница 18: ...nitor audio video output Front Terminals t3 video input phono jack 3 audio input phono jacks headphone jack Sound Output 2 x 10 W music power 2 x 5 W RMS Power Consumption 66 W Standby Power Consumption 1 W Dimensions w x h x d Approx 630 x 460 x 492 mm Weight Approx 25 kg Accessories supplied 1 Remote Control RM W100 2 Batteries IEC designated Other features Teletext Fastext TOPtext Sleep Timer O...

Страница 19: ...e 17 Good picture no sound Press the button on the remote control Check that the headphones are not connected No colour on colour programmes Using the menu system select the Picture Adjustment menu and select Reset to return to factory settings see page 9 Distorted picture when changing programmes or selecting teletext Turn off any equipment connected to the Scart connector on the rear of the TV P...

Страница 20: ...or United Kingdom Only the main transmitters are listed Information regarding the regional sub relay channel numbers can be obtained by contacting The BBC Engineering Information Dept Telephone Number 020 7852 5040 Additional Information 02GBKV21CL10U fm Page 20 Tuesday June 10 2003 11 15 AM ...

Страница 21: ...02GBKV21CL10U fm Page 21 Tuesday June 10 2003 11 15 AM ...

Страница 22: ...02GBKV21CL10U fm Page 22 Tuesday June 10 2003 11 15 AM ...

Страница 23: ...02GBKV21CL10U fm Page 23 Tuesday June 10 2003 11 15 AM ...

Страница 24: ...Sony España S A Printed in Spain 01CoverKV21CL10U fm Page 1 Tuesday June 10 2003 11 28 AM ...

Отзывы: