background image

– 5 –

SECTION  1

GENERAL

The operating instructions mentioned here are partial abstracts 
from the Operating Instruction Manual.  The page numbers of 
the Operating Instruction Manual remain as in the manual.

4

-EN

Welcome!

Precautions

This projection monitor operates on extremely high
voltage.  To prevent fire or electric shock, please follow
the precautions below.

On safety

Operate the monitor only on 100 V to 120 V AC.

One blade of the plug is wider than the other for
safety purposes and will fit into the power outlet
only one way. If you are unable to insert the plug
fully into the outlet, contact your dealer.

Should any liquid or solid object fall into the
cabinet, unplug the monitor and have it checked by
qualified personnel before operating it further.

Unplug the monitor from the wall outlet if you are
not going to use it for several days or more.  To
disconnect the cord, pull it out by the plug.  Never
pull the cord itself.

The fans inside the monitor continue working for a
while even after the monitor has been turned off.
Do not unplug the monitor from the AC outlet
while the fans are working.

On installation

• To prevent internal heat build-up, do not block the

ventilation openings.

• Do not install the monitor in a hot or humid place,

or in a place subject to excessive dust or mechanical
vibration.

On screen

The screen surface is easily scratched. Do not rub,
touch or tap it with sharp or abrasive objects.
Be especially careful when transporting the monitor.

On LCD panel

• Do not expose the screen to direct sunlight. It may

damage the LCD panel.

• When the monitor is used in a cold place, the image

may look lengthened. This is not a malfunction. The
image will become normal when the temperature
rises.

• When the same static picture has been displayed

continuously, an afterimage impression of that
picture may remain on the screen. This will
disappear after a certain time.

• If you turn on the monitor immediately after power

has been restored at an interruption, an LCD burn
may occur. This is not a malfunction. The image will
become normal after a certain time.

On blanking around the pciture

The monitor displays black masks between the picture
and the screen vessel because the monitor under-scans
to obtain the necessary space on the screen to display
the picture. This is called blanking. Note that the black
masks on each vessel are not uniform.
The blanking on the video picture will be wider to
optimize picture.

On moisture condensation

If the projection monitor is transported directly from a
cold to a warm location, or if the room temperature
has changed suddenly, the picture may be blurred or
show poor color.  This is because moisture has
condensed on the lenses inside.  If this happens, let the
moisture evaporate before using the monitor.

On cleaning

• Clean the cabinet of the monitor with a dry soft

cloth. Stubborn stains may be removed with a cloth
slightly dampened with solution of mild soap and
water, then wipe it with a dry soft cloth.
Do not use any type of solvent such as alcohol,
benzine, thinner or insecticide. Such solvent may
damage the finish of the monitor or erase the
indications on the panel.

• Wipe the screen with a dust remover (supplied)

occasionally, as the screen easily catches dust. The
dust remover is washable. Wash it with warm water
or mild detergent solution.

• Stubborn stains on the screen may be removed with

a soft cloth slightly dampened with solution of mild
soap and water.

• If the picture becomes dark after using the monitor

for a long period of time, it may be necessary to
clean the inside of the monitor. Consult qualified
service personnel.

Screen vessel

Picture

Blanking

Getting Started

5

-EN

EN

p


for KL-W9000

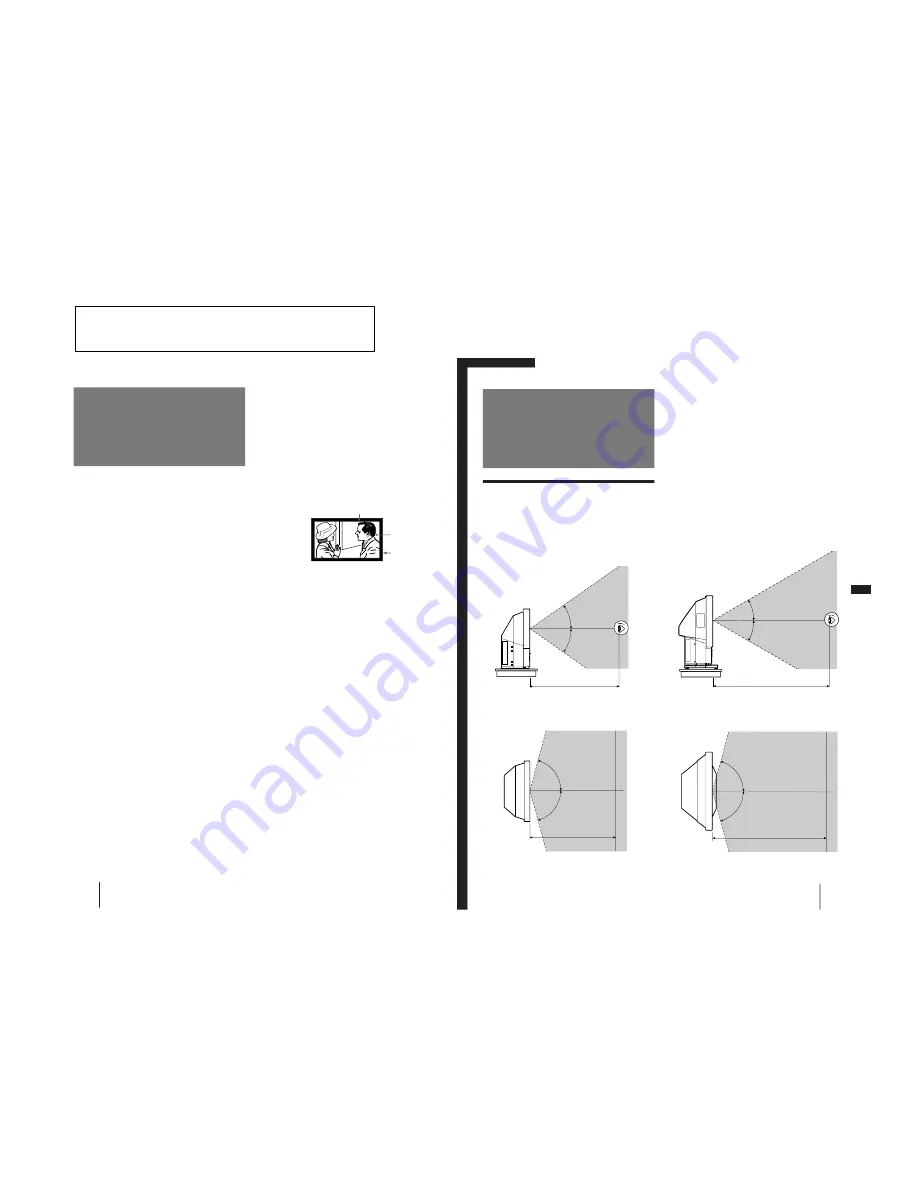
Vertical viewing area (side view)

Horizontal viewing area (top view)

Getting Started

Step 1: Installing
the projection
monitor

Optimum viewing area

For the best picture quality, install the monitor within
the areas shown below.

p

 for KL-W7000

Vertical viewing area (side view)

Horizontal viewing area (top view)

30

°

30

°

2 m

75

°

75

°

2 m

35

°

35

°

75

°

75

°

1.5 m

1.5 m

Содержание KL-W7000

Страница 1: ... COMMANDER DEST COMMANDER DEST LCD PROJECTION DATA MONITOR 37 Please file according to model size 50 LJ 2T KL W9000 KL W9000 KL W7000 KL W7000 KL W7000 KL W9000 RM Y980 SCC N56B A SCC N56B A RM Y980 RM Y980 US Canadian RM Y980 RM Y980 US Canadian SCC N56A A SCC N56A A ...

Страница 2: ...acks 1 Vp p 75 ohms unbalanced sync negative AUDIO phono jacks 2 channels 500 mVrms Impedance less than 5 kohms RGB 1 2 IN VIDEO D sub 15 pin female R G B 0 7 Vp p positive 75 ohms terminated Sync on Green 0 286 Vp p SYNC HD Composite sync TTL high impedance sync positive negative Horizontal sync TTL high impedance sync positive negative VD Vertical sync TTL high impedance sync positive negative A...

Страница 3: ... screw is at ground potential See Fig B After correcting the original service problem perform the fol lowing safety checks before releasing the set to the customer 1 Check the area of your repair for unsoldered or poorly sol dered connections Check the entire board surface for solder splashes and bridges 2 Check the interboard wiring to ensure that no wires are pinched or contact high wattage resi...

Страница 4: ...d 87 8 Schematic Diagram of C 2 2 Board 91 9 Schematic Diagrams of G and GA Boards 95 4 4 Semiconductors 99 5 EXPLODED VIEWS 5 1 Chassis W7000 101 5 2 Front Cover W7000 102 5 3 Screen Mirror Block and Optics Unit W7000 103 5 4 Chassis W9000 104 5 5 Front Cover W9000 105 5 6 Screen Mirror Block and Optics Unit W9000 106 6 ELECTRICAL PARTS LIST 107 SAFETY RELATED COMPONENT WARNING COMPONENTS IDENTIF...

Страница 5: ...or immediately after power has been restored at an interruption an LCD burn may occur This is not a malfunction The image will become normal after a certain time On blanking around the pciture The monitor displays black masks between the picture and the screen vessel because the monitor under scans to obtain the necessary space on the screen to display the picture This is called blanking Note that...

Страница 6: ...patibility Some PC systems which are not compatible with either DDC1 or DDC2B may not accept the No 9 pin If you are not sure whether your PC system accepts the No 9 pin or not use the HD15 Female HD15 Male without the No 9 pin adapter supplied Step 2 Hookup Before making the connection turn off the power and disconnect the AC power cords of the monitor and the equipment to be connected Refer to t...

Страница 7: ...des When using a video mode that is not one of the preset modes some fine tuning may be required to optimize the display to your preference Simply adjust the monitor according to the adjustments instructions on page 16 The adjustments will be stored automatically and recalled whenever that mode is used A total of 15 user defined modes can be stored in memory If a 16th mode is entered it will repla...

Страница 8: ...VIDEO 1 IN or VIDEO 3 IN Getting Started 11 EN EN OPTION N AUTO SHUT OFF OFF LANGUAGE ENGLISH Step 3 Setting up the remote control Inserting batteries Insert two size AA R6 batteries supplied by matching the and on the battery to the diagram inside the battery compartment Notes Under normal conditions batteries will last up to six months If the remote control does not operate properly the batterie...

Страница 9: ... SELECT STANDBY ENTER Power switch green 13 EN Operations EN Watching the video picture in wide mode You can enjoy a variety of wide mode picture Press WIDE until the mode you want appears on the screen Each time you press WIDE the mode changes as follows NORMAL n FULL n ZOOM n SUB TITLE n WIDE ZOOM To turn off the monitor Press POWER on the remote control The monitor enters standby mode and the S...

Страница 10: ...t is 15 EN Operations EN ASPECT N ASPECT ZOOM V SCROLL 0 Adjusting the vertical position of the video picture You can scroll the picture up or down when the upper or lower portions of the picture in WIDE ZOOM mode are cut off you want to move the picture in ZOOM mode as you like subtitles are lost from the screen in SUB TITLE mode Scrolling the picture functions on the WIDE ZOOM ZOOM and SUB TITLE...

Страница 11: ...preset setting Press RESET on the monitor At the same time the picture position and video audio settings pages 17 to 21 are also reset to the factory preset levels Notes For a picture with resolution of 640 350 640 400 or 640 480 the vertical size cannot be increased from the size that was projected the first time You can adjust the size using the CENTER SIZE and ı buttons on the monitor CENTER SI...

Страница 12: ...plish Soften the picture Press V or b to Brighten the picture Brighten the picture Increase color intensity Make picture tones become greenish Sharpen the picture ENTER 19 EN Operations EN MENU N CONTRAST BRIGHTNESS COLOR HUE SHARPNESS RESET VIDEO ADJUST MENU N NR OFF H WHITE ON COLOR TEMP MEDIUM RESET VIDEO ADJUST Adjusting the picture in more details You can adjust the picture with the NR noise ...

Страница 13: ...se the bass response Emphasize the right speaker s volume Press v or B to Decrease the treble response Decrease the bass response Emphasize the left speaker s volume BASS AUDIO ADJUST CENTER SIZE VOL ENTER MENU ENTER 21 EN Operations EN MENU N TREBLE BASS BALANCE EFFECT OFF RESET AUDIO ADJUST Audio effect mode allows you to enjoy dynamic sound with surround like effect 1 Press MENU 2 Press V or v ...

Страница 14: ...3 EN Additional Information EN The air filter should be cleaned once a month When it becomes difficult to remove the dust replace the filter with a new one To clean the filter follow the steps below 1 Turn off the power switch on the monitor and unplug the power cord 2 Remove the front panel from the monitor Pull the panel towards you holding its left end Be careful not to damage your nails 3 Pull...

Страница 15: ...e power of the connected equipment is turned on Try to press any key on the connected computer Check that the RGB signal cable or audio video cords are properly connected The supplied HD15 HD15 adaptor may be needed for some models of IBM PC AT or compatible computers For a Macintosh or compatible computer use the supplied Macintosh adaptor Make sure that no pins on the HD15 connectors are bent Ch...

Страница 16: ...The lamp for the light source burns out Replace it with new one page 24 The LAMP STANDBY and u indicators flash The temperature inside the monitor has risen abnormally or the fans have stopped Check that the air filter is not clogged and the ventilation holes are not blocked After a while turn on the monitor page 23 If the monitor is not recovered after correcting the problems contact with qualifi...

Страница 17: ...witch page 12 º VOLUME buttons page 12 MENU button page 11 ENTER button page 11 INPUT SELECT button page 12 RESET button pages 16 17 This section briefly describes the buttons and controls on the monitor and on the remote control For more information refer to the pages next to each description Projection monitor Front 30 EN Additional Information RESET CENTER SIZE VOL ENTER MENU VIDEO MUTING DISPL...

Страница 18: ...R REMOVAL 2 3 SERVICE POSITION 2 4 U BOARD REMOVAL 2 2 CHASSIS ASSY REMOVAL Rear cover 2 Twelve screws BVTP 4 x 16 1 Chassis assy Chassis assy 2 Two screws BVTP 4 x 16 1 Five screws BVTP 3 x 12 1 U bracket 3 Two claws 4 U board 5 Two claws 2 ...

Страница 19: ...2 6 FILTER REMOVAL Power block 5 Terminal 2 Two printed circuit board holders 4 K board 8 Two printed circuit board holders 7 Two screws BVTP 4 x 16 6 Two screws BVTP 4 x 16 3 Two screws BVTP 3 x 12 1 Filter 2 Front panel L 1 Filter Reserve 3 ...

Страница 20: ...on socket bolt 4 x 12 4 Two screws BVTP 4 x 16 1 Screen frame 3 Eight screws BVTP 4 x 16 2 2 9 2 SCREEN FRAME REMOVAL W9000 2 8 HA AND HB BOARDS REMOVAL Two screws BVTP 3 x 12 5 HB board 6 Eight screws BVTP 4 x 16 1 Front cover 2 HA board 4 Six screws BVTP 3 x 12 3 Sixteen screws BVTP 4 x 16 2 Screen frame 3 Two screws BVTP 4 x 16 1 ...

Страница 21: ... BOARD Screen mirror block 2 Six screws BVTP 4 x 16 1 Four printed circuit board holders 5 Four screws BVTP 3 x 12 3 C cover 4 C board 6 CN5003 CN5001 CN5002 C board Extension cable Optical shield 1 Three screws BVTP 4 x 16 4 Optical unit 5 Three screws BVTP 4 x 16 2 Lamp base 3 ...

Страница 22: ... Data Item No Item register name G Memory reading normal NG Memory reading failed Function of commander in SERVICE mode Example of SERVICE mode using the commander of other TV set Enter SERVICE Mode Replace board Write in memory Release SERVICE mode If memory IC 1103 were replaced If repair concerning picture quality was executed Replace LCD Write standard values Adjust registration W B screen pos...

Страница 23: ...of WRITE characters on screen When MUTING button ON Green When 12 button ON Red 5 To release SERVICE mode Turn off the POWER switch on TV set and again turn it on As a result the SERVICE mode display is cleared and normal TV mode is resumed Or turn off the POWER switch from the remote commander and again turn on the POWER switch on the remote commander in the standby status As a result the SER VIC...

Страница 24: ...een Cut Off OFFSET 0 255 127 Green W B of color temp color temp low low center value 31 8 BCOL Blue Cut Off OFFSET 0 255 118 Blue W B of color temp color temp low low center value 31 BIAS3 CXA1315 Item Display Register Name Range Standard Values Typical Standard Values 0 RBS RL_Bias 0 255 0 VIDEO 0 RGB RL Bias 2 systems of VIDEO RGB 1 BLBS RL_Bias 0 255 0 VIDEO 0 RGB BL Bias 2 systems of VIDEO RGB...

Страница 25: ...M SHARP MOVIE 0 63 27 31 1 kind AI mode MOVIE sharpness value CXD2052 Digital Chroma Decoder Item Display Register Name Range Standard Values Typical Standard Values VIDEO RGB 0 ACR ACR 0 255 53 35h 1 AKO AKO 0 255 20 24h 2 AKF AKF 0 255 50 32h 3 PKO PKO 0 255 252 FCh 4 PKF PKF 0 255 16 10h 5 OFS OFS 0 255 128 80h 6 BPF1 BPF1 0 1 0 C 1 S 2 kinds of S COMP 7 BPF2 BPF2 0 1 0 C 0 S 2 kinds of S COMP ...

Страница 26: ...e screen V scroll standard value Standard value 37S0RS bit 0 of V SCROLL 0 1 Every wide screen V scroll standard value bit 0 Standard value MID2 CXD2072Q VIDEO Item Register Range Standard Values Typical Standard Values Display Name NORMAL FULL ZOOM SUBTITLE WIDEZOOM 0 HSIZ HSIZEA 0 255 88 Every input signal H size adj NTSC 1 VGAH VGAHS 0 127 0 Every input signal polarity Wide screen H size adj RG...

Страница 27: ...ll standard value Standard value 37S0RS bit 0 of V SCROLL 0 1 Every wide screen V scroll standard value bit 0 Standard value MID2 CXD2072Q RGB 2 Item Register Range Standard Values Typical Standard Values Display Name VGA85 SVGA56 SVGA60 W SVGA SVGA72 0 HSIZ HSIZEA 0 255 A0 Every input signal H size adj NTSC 1 VGAH VGAHS 0 127 2F 26 1A 18 1F Every input signal polarity Wide screen H size adj RGB 2...

Страница 28: ...rpolation 16OFST OFFSET 0 255 0 Every input signal Linear interpolation offset setting 17VSCA VSCA 0 1 1 0 0 1 Every input signal A ch vertical size 18OSVA OSVA 0 1 1 Every input signal A ch vertical offset 19PLL1 PLL1 0 7 4 Every input signal PLL 1 frequency dividing ratio setting 20YUV YUV 0 3 1 Every input signal YUV signal sampling ratio 21REF REF 0 7 5 3 4 5 Every input signal V size referenc...

Страница 29: ...sed 18 TIME Lamp Counting Timer Current time count and 0 time are displayed alternately with UP DOWN 19 FMTL fh of distinction difference range 0 3 FHTL 0 2 kHz 20 FVTL fv of distinction difference range 0 1 0 FVTL Hz 21HV1 Threshold of scanning line 0 15 505 5 HV1 lines distinction low 22 HV2 Threshold of scanning line 0 15 555 5 HV2 lines distinction high 23 MINH fh of the frequency correspond 0...

Страница 30: ...ncy counter to the pin 1 of IC5004 5 Adjust L5002 so as to satisfy the specified value 6 Input H SYNC for NT double speed and confirm the wave form at the TP with oscilloscope 2 NORMAL mode 1 Select NORMAL mode 2 Open the CN5202 pin 1 H SYNC input 3 Connect IC5004 pin 2 to the GND TP5009 via 100Ω resis tance 4 Connect frequency counter to the pin 1 of IC5004 5 Adjust L5004 so as to satisfy the spe...

Страница 31: ...d adjust RV5205 so that 10 IRE 100 IRE A becomes 1 35 0 02Vp p 3 Adjust RV5201 so that the forward 10 IRE reverse 10 IRE B becomes 5 70 0 02Vp p at TP5203 4 Confirm that a difference in voltage amplitude of forward 10 IRE 100 IRE and forward 10 IRE reverse 10 IRE between waveform at TP5202 TP5204 and waveform at TP5203 is within 150mV 2 G channel 1 Using DC power apply 0V to TP5411 2 Connect oscil...

Страница 32: ... IRE reverse 10 IRE between waveform at TP5602 TP5604 and waveform at TP5603 is within 150mV 4 Vcom Adjustment Using I2 C bus encoder set the NT WIDE mode Enter NT double speed 10 step signal of bias 2 2V and amplitude 1 8Vp p to the CN5201 pins 2 4 I2 C bus encoder DC power Oscilloscope RV5605 B GAIN RV5601 B BIAS A 1 35 0 02Vp p B 5 90 0 02Vp p TP5203 Rch OUT TP5205 R Vcom OUT TP5403 Gch OUT Val...

Страница 33: ...3 Adjust RV5203 so that 10 IRE 20 IRE becomes 600 20mV Adjustment is no good when 0 IRE 10 IRE voltage is below 100 mV 4 Confirm that forward 10 IRE reverse 10 IRE voltage is over 6 5V G channel 1 Connect oscilloscope to TP5403 2 DC power apply 3 60 0 02V to TP5411 3 Adjust RV so that 10 IRE 20 IRE becomes 700 20mV 4 Stop the voltage application to TP5411 I2 C bus encoder TP5403 R SIG2 TP5411 GLBS...

Страница 34: ...RV so that the forward 10 IRE reverse 10 IRE A be comes 8 30 0 02Vp p Adjustment is no good when 0 IRE 10 IRE voltage is below 100mV 6 Confirm that forward 100 IRE reverse 100 IRE B is 3 45 0 10Vp p RV5402 GL BIAS RV5603 GL GAIN B channel 1 Connect oscilloscope to TP5603 2 DC power apply 3 60 0 02V to TP5611 3 Adjust RV so that 10 IRE 20 IRE becomes 800 20mV Confirm that 0 IRE 10 IRE voltage is ov...

Страница 35: ...e at the TP5603 with digital voltmeter 6 Adjust RV5602 so that the voltage at TP5605 becomes Value in 5 0 80 0 02V A Board Adjustment 1 Enter 1Vp p 10 step signal from the Video1 input 2 Set the user control to the RESET of AV MEMORY PIX to maximum and H WHITE to OFF 3 Connect oscilloscope to TP4002 RV5404 G VCOM RV5602 B VCOM NTSC 10 step signal Oscilloscope Voltmeter TP5405 G VCOM OUT TP5603 Bch...

Страница 36: ...No 6 SPC2 so that 0 IRE 100 IRE becomes almost 2 0Vp p 5 In the same manner adjust CXA1839 No 1 SBRT so that the 0IRE level becomes 2 8Vdc 6 Save the data 1 Hue and Color Adjustment NTSC 1 Enter 75 Full Field Color Bar from the RGB1 input 2 Connect oscilloscope to TP4003 3 In the SERVICE mode adjust CXA1839 No 7 SCL2 so that the peak level of two pulses on both sides becomes almost equal 4 In the ...

Страница 37: ...G picture as shown in figure 2 Enter all black signal to the B panel and also R monochrome crosshatch signal then adjust the registration between R and G 3 Tighten tentatively the registration locking screws on the R and B panels and fix the registration blocks A and B with an adhesive 4 Tighten the regi locking screws To replace G panel 1 Attach the G panel 2 Enter G monochrome crosshatch signal ...

Страница 38: ... No 7 BDOF to satisfy the specification Fix CXA2011 No 6 GDOF to 31 4 Repeating the steps 2 and 3 adjust so that 30 IRE and 70 IRE satisfy the specification 5 Enter 10 IRE flat field signal to the input and select the SER VICE mode Adjust BIAS3 No 00 RLBS and No 01 BLBS to satisfy the specification 6 In the SERVICE mode set CXA1839 No 12 Y DC to 1 and CXA1839 No 13 DPIX to 2 7 Enter 10 step signal...

Страница 39: ...KL W7000 W9000 RM Y980 KL W7000 W9000 RM Y980 KL W7000 W9000 RM Y980 KL W7000 W9000 RM Y980 SECTION 4 DIAGRAMS 40 39 42 41 4 1 BLOCK DIAGRAMS ...

Страница 40: ...KL W7000 W9000 RM Y980 KL W7000 W9000 RM Y980 KL W7000 W9000 RM Y980 KL W7000 W9000 RM Y980 44 43 46 45 ...

Страница 41: ...KL W7000 W9000 RM Y980 KL W7000 W9000 RM Y980 KL W7000 W9000 RM Y980 KL W7000 W9000 RM Y980 48 47 50 49 ...

Страница 42: ...INDUCTOR CAPACITOR TA TANTALUM PS STYROL PP POLYPROPYLENE PT MYLAR MPS METALIZED POLYESTER MPP METALIZED POLYPROPYLENE ALB BIPOLAR ALT HIGH TEMPERATURE ALR HIGH RIPPLE Note The components identified by shading and mark are critical for safety Replace only with part number specified Note Les composants identifiés per un tramé et une marque sont critiques pour la sécurité Ne les remplacer que par un...

Страница 43: ... TO A BOARD 4 5 CN1009 PIN TA SENSOR LAMP COVER B SS530 U C TA 1 2 3 S9551 CN9551 3P YEL L S MICRO FILTER COV NC GND TO A BOARD CN1009 PIN 6 7 TB SENSOR FILTER COVER B SS530 U C TB 9V 20V AUDIO R AUDIO L AUDIO R AUDIO L AUDIO L AUDIO R AUDIO R AUDIO L AUDIO L AUDIO R 1 2 3 4 5 6 7 8 1 2 3 4 5 6 7 8 1 2 3 4 5 6 7 8 9 10 11 1 2 3 4 5 6 7 8 9 10 11 1 2 3 1 2 3 4 1 2 3 4 5 6 7 8 1 2 3 4 5 6 R8503 R850...

Страница 44: ...B 5 1 Q2021 B 5 1 Q2024 B 4 1 Q2027 B 4 1 Q2028 B 5 1 Q2029 B 5 1 Q2030 B 3 1 Q2031 A 3 1 Q2035 B 5 1 Q2036 B 5 1 Q2037 B 5 1 Component Side Conductor Side Component Side Conductor Side Q2041 B 4 1 Q2050 B 4 1 Q2051 B 4 1 Q2052 B 4 1 Q2061 A 5 1 Q2062 A 5 1 Q4001 C 3 1 Q4002 C 3 1 Q4003 C 3 1 Q4004 E 2 2 Q4005 E 5 1 Q4006 E 2 2 Q4007 E 5 1 Q4008 A 1 1 Q4009 A 1 1 Q4010 A 1 1 Q4018 B 1 1 Q4019 B 1 ...

Страница 45: ...CHIP 100p CH CHIP 100p CH CHIP 1 0 01 B CHIP 220p CH CHIP 47 16V 0 1 25V F CHIP 0 1 25V F CHIP 1000 16V 2 2 2 2 1 1 10 10 10 4 7 10 0 0047 B CHIP 10 0 001 B CHIP 0 033 PT 0 1 PT 0 033 PT 0 033 PT 47 25V 0 1 25V F CHIP 220 16V 220p CH CHIP 47 10V 0 01 B CHIP 47 10V 22p CH CHIP 47p CH CHIP 22p CH CHIP 22p CH CHIP 22p CH CHIP 100p CH CHIP 100p CH CHIP 100p CH CHIP 100p CH CHIP 100p CH CHIP 0 01 B CHI...

Страница 46: ...00 10V 0 1 25V B CHIP 0 1 25V B CHIP 0 1 25V B CHIP 47 10V 0 01 B CHIP 0 1 25V B CHIP 1 1 0 1 25V B CHIP 47 10V 0 1 25V B CHIP 10p CH CHIP 0 001 B CHIP 47 10V 0 01 B CHIP 0 1 25V B CHIP 680p CH CHIP 0 1 25V B CHIP 0 01 B CHIP 0 01 B CHIP 0 01 B CHIP 0 01 B CHIP 220p CH CHIP 0 0015 CH CHIP 0 01 B CHIP 330p CH CHIP 50V 47 10V 0 01 B CHIP 0 1 25V B CHIP 0 01 B CHIP 4 7 0 1 25V B CHIP 0 1 25V B CHIP 4...

Страница 47: ... 18µH 10µH 22µH 10µH 22µH 22µH 47µH 10k RN CP 16k RN CP 16k RN CP 10k RN CP 10k RN CP 10k RN CP 12k RN CP 12k RN CP 2 2k CHIP 270 CHIP 4 7k CHIP 100 CHIP 100 CHIP 10k CHIP 10k CHIP 10k CHIP 10k CHIP 100 CHIP 100 CHIP 100 CHIP 15k CHIP 3 3M CHIP 1k CHIP 100 CHIP 100 CHIP 100 CHIP 100 CHIP 27k CHIP 100 CHIP 100 CHIP 100 CHIP 100 CHIP 100 CHIP 100 CHIP 10k CHIP 10k CHIP 100 CHIP 100 CHIP 470 CHIP 15k...

Страница 48: ... 25V F CHIP 0 1 25V F CHIP 0 1 25V F CHIP 47 16V 0 1 25V F CHIP 0 1 25V F CHIP 0 1 25V F CHIP 0 1 25V F CHIP 0 1 25V F CHIP 0 1 25V F CHIP 0 1 25V F CHIP 0 1 25V F CHIP 0 1 25V F CHIP 0 1 25V F CHIP 0 1 25V B CHIP 47 16V 0 1 25V B CHIP 0 1 25V F CHIP 47 16V 0 1 25V B CHIP 47 16V 47 16V 47 16V 47 16V 47 16V 47 16V 47 16V 47 16V 10 10 10 0 1 25V F CHIP 47 16V 10 0 1 25V F CHIP 47 16V 10 0 1 25V F CH...

Страница 49: ...ARD Terminal name of semiconductors in silk screen printed circuit Ref Q3204 Q3207 Q3209 Q3305 D3308 Q3018 Q3019 Q3201 Q3203 Q3205 Q3206 Q3210 Q3212 1 2 Refer to Terminal name of semiconductors in silk screen printed circuit see page 54 KL W7000 W9000 RM Y980 KL W7000 W9000 RM Y980 ...

Страница 50: ...in silk screen printed circuit Ref 1 2 3 6 7 Q308 Q311 Q316 Q801 Q803 Q301 Q303 Q306 Q309 Q310 Q317 Q602 Q603 Q804 D1 D5 D8 D10 D201 D207 D301 D309 D312 D314 D511 D513 D501 D507 D509 D502 D506 D508 D510 Refer to Terminal name of semiconductors in silk screen printed circuit see page 54 KL W7000 W9000 RM Y980 KL W7000 W9000 RM Y980 ...

Страница 51: ...CH CHIP 100 16V 47 25V 22 25V 100 16V 47 16V 0 001 B CHIP 0 01 B CHIP 4 7 4 7 0 1 B CHIP 0 0033 B 22 25V 1 0 22 16V B 0 22 16V B 0 22 16V B 10P WHT L S MICRO 3P BLK L S MICRO 9P RED L S MICRO 5P WHT L S MICRO 20P 20P RD10SB T1 RD10SB T1 RD10SB T1 RD10SB T1 RD10SB T1 RD10SB T1 RD10SB T1 RD10SB T1 RD10SB T1 RD10SB T1 RD10SB T1 RD10SB T1 RD10SB T1 RD10SB T1 MA111 RD10SB T1 1SS226 1SS226 1SS226 1SS226...

Страница 52: ...V 0 01 F CHIP 0 1 F CHIP 47 10V 0 1 F CHIP 0 1 F CHIP 0 1 F CHIP 0 1 F CHIP 0 1 F CHIP 0 1 F CHIP 0 1 F CHIP 0 1 F CHIP 0 1 F CHIP 47 10V 0 1 F CHIP 0 1 F CHIP 0 1 F CHIP 0 1 F CHIP 0 1 F CHIP 47 25V 0 1 F CHIP 10 1 35V TA CP 1 35V TA CP 1 35V TA CP 0 1 F CHIP 47 25V 47 16V 0 1 F CHIP 0 1 F CHIP 47 10V 0 1 F CHIP 0 1 F CHIP 0 1 F CHIP 0 1 F CHIP 0 1 F CHIP 0 1 F CHIP 0 1 F CHIP 0 1 F CHIP 0 1 F CH...

Страница 53: ...C5003 IC5005 0 01 B CHIP 47 10V 100p CH CHIP 0 1 B CHIP 25V 3 3 0 0033 B CHIP 30p UJ CHIP 0 001 B CHIP 0 01 B CHIP 47p UJ CHIP 0 001 B CHIP 100p CH CHIP 0 1 B CHIP 25V 3 3 0 0033 B CHIP 43p UJ CHIP 0 001 B CHIP 0 01 B CHIP 0 0033 B CHIP 3 3 0 1 B CHIP 25V 100p CH CHIP 0 01 B CHIP 0 01 B CHIP 0 01 B CHIP 47 10V 0 01 B CHIP 0 01 B CHIP 0 1 F CHIP 47 25V CI 100p CH CHIP 100p CH CHIP 100p CH CHIP 100p...

Страница 54: ... 47 25V 1P 3P BLK VH B D5L60 1SS119 1SS119 1SS119 1SS119 RD13ESB1 1SS119 RM2CS 1SS119 1SS119 1SS119 1SS119 1SS119 0 45UH 0 45UH 0 45UH 3 3µH 10µH 10µH 22µH PC123FY2 PC123FY2 4 7k 1k 1k 4 7 4 7 22k 10k 1 5k 10k 4 7k 2 2k 22k 100 10k 10k 10 220k RN 270k RN 10k 10k 4 7 FPRD 270k RN 47k RN 1k 2 2k 10k 220 4 7k 1k 1k 10k 100k 10k RN 1k 10k RN LFT 33k 0 1 MPS 1 8k RN 1 6k RN 470k 470k 0 22 2W RS 0 22 2W...

Страница 55: ...P110 99 KL W7000 W9000 RM Y980 4 4 SEMICONDUCTORS ...

Страница 56: ...P110 100 KL W7000 W9000 RM Y980 ...

Страница 57: ...tramé et une marque sont critiques pour la sécurité Ne les remplacer que par une piéce portant le numéro spécifié REF NO PART NO DESCRIPTION REMARK REF NO PART NO DESCRIPTION REMARK 1 A 1380 551 A K BOARD COMPLETE 2 3 703 141 00 HOLDER PRINTED CIRCURT BOARD 3 1 473 545 13 POWER BLOCK 4 4 051 332 01 BRACKET MAIN 5 A 1311 597 A G BOARD COMPLETE 6 A 1311 631 A GA BOARD COMPLETE 7 A 1298 254 A A BOARD...

Страница 58: ... 60 4 051 285 01 BUTTON POWER 61 4 820 917 01 SPRING COMPRESSION 62 4 838 438 00 LATCH 63 1 505 207 11 SPEAKER 5 7CM 64 A 1390 763 A TB BOARD COMPLETE 65 A 1390 762 A TA BOARD COMPLETE 66 A 1372 396 A HB BOARD COMPLETE 67 A 1372 395 A HA BOARD COMPLETE 68 A 1482 758 A LAMP BLOCK ASSY 69 70 69 3 901 261 01 WASHER 70 3 650 537 00 WASHER 71 4 908 882 01 CLAMP The components identified by shading and ...

Страница 59: ... 1335 094 A C BOARD COMPLETE 114 1 543 653 11 CORE ASSY BEAD DIVISION TYPE 115 3 703 141 00 HOLDER PRINTED CIRCUIT BOARD 116 A 1501 135 A PANEL BLOCK ASSY B 117 A 1501 209 A PANEL BLOCK ASSY G 118 A 1501 133 A PANEL BLOCK ASSY R 119 1 475 523 11 OPTICAL UNIT 120 4 051 825 01 SHIELD OPTICAL 121 4 051 343 01 BASE LAMP 122 1 533 746 11 THERMOSTAT 123 X 4035 094 1 CABINET ASSY 124 4 908 882 01 CLAMP 1...

Страница 60: ...D COMPLETE 161 4 056 402 11 BRACKET U 162 4 389 025 01 SCREW M4 EXT TOOTH WASHER 163 1 251 662 11 INLET AC 3P WITH NOISE FILTE 165 4 329 127 00 CLAMP CORD 164 4 052 345 01 SCREW 3X8 K TAPPING 166 4 033 719 01 BUCKLE A 167 X 4035 090 1 COVER ASSY REAR 165 166 168 1 543 982 11 CORE FERRITE 169 4 057 132 01 PEDESTAL 170 4 378 522 01 SCREW TAPPING HEXAGON HEAD The components identified by shading and ...

Страница 61: ...285 01 BUTTON POWER 211 4 820 917 01 SPRING COMPRESSION 212 4 838 438 00 LATCH 213 1 505 207 11 SPEAKER 5 7CM 214 A 1390 763 A TB BOARD COMPLETE 215 A 1390 762 A TA BOARD COMPLETE 216 A 1372 396 A HB BOARD COMPLETE 217 A 1372 395 A HA BOARD COMPLETE 218 A 1501 247 A LAMP BLOCK ASSY 219 220 219 3 901 261 01 WASHER 220 3 650 537 00 WASHER 221 4 908 882 01 CLAMP The components identified by shading a...

Страница 62: ...263 264 266 4 374 745 11 CUSHION A Les composants identifiés per un tramé et une marque sont critiques pour la sécurité Ne les remplacer que par une piéce portant le numéro spécifié The components identified by shading and mark are critical for safety Replace only with part number specified 251 252 253 254 255 256 257 258 259 260 261 262 263 264 265 266 267 268 269 270 271 272 273 274 275 276 277 ...

Страница 63: ...IC CHIP 0 1MF 25V C3027 1 163 038 91 CERAMIC CHIP 0 1MF 25V C3028 1 109 982 11 CERAMIC CHIP 1MF 10 10V C3029 1 163 038 91 CERAMIC CHIP 0 1MF 25V C3030 1 109 982 11 CERAMIC CHIP 1MF 10 10V C3031 1 163 038 91 CERAMIC CHIP 0 1MF 25V C3032 1 109 982 11 CERAMIC CHIP 1MF 10 10V C3035 1 126 964 11 ELECT 10MF 20 50V C3036 1 163 038 91 CERAMIC CHIP 0 1MF 25V C3037 1 163 038 91 CERAMIC CHIP 0 1MF 25V C3038 ...

Страница 64: ... IC3002 8 759 295 09 IC TLC2932IPW IC3003 8 752 390 58 IC CXD2072AQ IC3004 8 759 478 46 IC MSM548332 25TS K IC3005 8 759 478 46 IC MSM548332 25TS K IC3006 8 759 478 92 IC TC7SET04FU TE85R IC3007 8 759 485 79 IC TC7SET08FU TE85L IC3008 8 759 485 79 IC TC7SET08FU TE85L IC3009 8 759 271 88 IC TC7SHU04FU IC3010 8 759 058 64 IC TC7S32FU TE85R IC3011 8 759 085 51 IC NJM2284M IC3301 8 752 386 04 IC CXD23...

Страница 65: ...AZE 150 5 1 10W R3229 1 216 029 00 METAL GLAZE 150 5 1 10W R3230 1 216 029 00 METAL GLAZE 150 5 1 10W R3231 1 216 647 11 METAL CHIP 680 0 50 1 10W R3232 1 216 647 11 METAL CHIP 680 0 50 1 10W R3233 1 216 651 11 METAL CHIP 1K 0 50 1 10W R3234 1 216 649 11 METAL CHIP 820 0 50 1 10W R3235 1 216 649 11 METAL CHIP 820 0 50 1 10W bb R3236 1 216 643 11 METAL CHIP 470 0 50 1 10W R3237 1 216 041 00 METAL G...

Страница 66: ... 163 237 11 CERAMIC CHIP 27PF 5 50V C1120 1 164 232 11 CERAMIC CHIP 0 01MF 10 50V C1121 1 163 251 11 CERAMIC CHIP 100PF 5 50V C1126 1 107 909 11 ELECT 47MF 20 10V C1127 1 164 232 11 CERAMIC CHIP 0 01MF 10 50V C1128 1 163 251 11 CERAMIC CHIP 100PF 5 50V C1129 1 163 251 11 CERAMIC CHIP 100PF 5 50V C1130 1 164 004 11 CERAMIC CHIP 0 1MF 10 25V C1131 1 163 251 11 CERAMIC CHIP 100PF 5 50V C1132 1 164 00...

Страница 67: ... CHIP 0 01MF 10 50V C2046 1 107 905 11 ELECT 4 7MF 20 50V C2047 1 164 004 11 CERAMIC CHIP 0 1MF 10 25V C2048 1 164 004 11 CERAMIC CHIP 0 1MF 10 25V C2049 1 107 909 11 ELECT 47MF 20 10V C2050 1 164 232 11 CERAMIC CHIP 0 01MF 10 50V C2051 1 107 909 11 ELECT 47MF 20 10V C2052 1 164 232 11 CERAMIC CHIP 0 01MF 10 50V C2053 1 164 004 11 CERAMIC CHIP 0 1MF 10 25V C2054 1 164 004 11 CERAMIC CHIP 0 1MF 10 ...

Страница 68: ...C CHIP 0 33MF 10 16V C4047 1 164 232 11 CERAMIC CHIP 0 01MF 10 50V C4048 1 164 232 11 CERAMIC CHIP 0 01MF 10 50V C4049 1 164 232 11 CERAMIC CHIP 0 01MF 10 50V C4050 1 164 232 11 CERAMIC CHIP 0 01MF 10 50V C4051 1 163 113 00 CERAMIC CHIP 68PF 5 50V C4052 1 126 933 11 ELECT 100MF 20 16V C4053 1 164 232 11 CERAMIC CHIP 0 01MF 10 50V C4055 1 126 964 11 ELECT 10MF 20 50V C4056 1 164 232 11 CERAMIC CHIP...

Страница 69: ...CTOR 0UH FILTER FL2001 1 239 847 11 FILTER LOW PASS FL2002 1 233 535 11 FILTER LOW PASS FL2003 1 233 534 11 FILTER LOW PASS FL2004 1 233 535 11 FILTER LOW PASS FL2005 1 233 536 11 FILTER LOW PASS FL2006 1 233 536 11 FILTER LOW PASS FL2007 1 239 847 11 FILTER LOW PASS FL2015 1 233 539 21 FILTER EMI FL2019 1 233 520 21 FILTER EMI FL2020 1 233 520 21 FILTER EMI FL2021 1 233 520 21 FILTER EMI FL2022 1...

Страница 70: ... 22 TRANSISTOR 2SA1162 G Q2027 8 729 216 22 TRANSISTOR 2SA1162 G Q2028 8 729 216 22 TRANSISTOR 2SA1162 G Q2029 8 729 216 22 TRANSISTOR 2SA1162 G Q2030 8 729 422 27 TRANSISTOR 2SD601A Q Q2031 8 729 422 27 TRANSISTOR 2SD601A Q Q2035 8 729 216 22 TRANSISTOR 2SA1162 G Q2036 8 729 216 22 TRANSISTOR 2SA1162 G Q2037 8 729 216 22 TRANSISTOR 2SA1162 G Q2041 8 729 422 27 TRANSISTOR 2SD601A Q Q2050 8 729 422...

Страница 71: ... 10W R1605 1 216 049 91 METAL GLAZE 1K 5 1 10W R1606 1 216 033 00 METAL GLAZE 220 5 1 10W R1607 1 216 049 91 METAL GLAZE 1K 5 1 10W R1608 1 216 057 00 METAL GLAZE 2 2K 5 1 10W R1609 1 216 057 00 METAL GLAZE 2 2K 5 1 10W R1610 1 216 035 00 METAL GLAZE 270 5 1 10W R1611 1 216 035 00 METAL GLAZE 270 5 1 10W R1612 1 216 049 91 METAL GLAZE 1K 5 1 10W R1613 1 216 035 00 METAL GLAZE 270 5 1 10W R1614 1 2...

Страница 72: ... METAL GLAZE 10K 5 1 10W R2102 1 216 049 91 METAL GLAZE 1K 5 1 10W R2103 1 216 043 91 METAL GLAZE 560 5 1 10W R2108 1 216 643 11 METAL CHIP 470 0 50 1 10W R2109 1 216 033 00 METAL GLAZE 220 5 1 10W R2111 1 216 043 91 METAL GLAZE 560 5 1 10W R2112 1 216 295 91 SHORT 0 R2113 1 216 067 00 METAL GLAZE 5 6K 5 1 10W R2125 1 216 047 91 METAL GLAZE 820 5 1 10W R2129 1 216 043 91 METAL GLAZE 560 5 1 10W R2...

Страница 73: ...0W R4093 1 216 073 00 METAL GLAZE 10K 5 1 10W R4094 1 216 041 00 METAL GLAZE 470 5 1 10W R4095 1 216 077 00 METAL GLAZE 15K 5 1 10W R4096 1 216 073 00 METAL GLAZE 10K 5 1 10W R4103 1 216 025 91 METAL GLAZE 100 5 1 10W R4104 1 216 051 00 METAL GLAZE 1 2K 5 1 10W R4105 1 216 025 91 METAL GLAZE 100 5 1 10W R4106 1 216 051 00 METAL GLAZE 1 2K 5 1 10W R4107 1 216 025 91 METAL GLAZE 100 5 1 10W R4108 1 ...

Страница 74: ...V C607 1 126 941 11 ELECT 470MF 20 25V C608 1 104 664 11 ELECT 47MF 20 25V C609 1 126 929 11 ELECT 4700MF 20 10V C610 1 137 479 11 FILM 1MF 10 400V C611 1 113 607 11 ELECT SOLID 330MF 20 400V C612 1 117 699 51 CERAMIC 0 001MF 99 250V C613 1 117 699 51 CERAMIC 0 001MF 99 250V C614 1 126 937 11 ELECT 4700MF 20 16V C616 1 104 664 11 ELECT 47MF 20 25V C617 1 107 655 11 ELECT 47MF 20 250V C619 1 104 66...

Страница 75: ...093J 1 T COIL L601 1 412 519 11 INDUCTOR 3 3UH L603 1 412 525 31 INDUCTOR 10UH L604 1 412 525 31 INDUCTOR 10UH L605 1 412 525 31 INDUCTOR 10UH L610 1 416 512 11 COIL CHOKE L702 1 412 529 11 INDUCTOR 22UH PHOTO COUPLER PH680 8 749 010 65PHOTO COUPLER PC123F2 PH701 8 749 010 65PHOTO COUPLER PC123F2 TRANSISTOR Q602 8 729 119 76 TRANSISTOR 2SA1175 HFE Q603 8 729 119 76 TRANSISTOR 2SA1175 HFE Q604 8 72...

Страница 76: ...249 441 11 CARBON 100K 5 1 4W R703 1 215 445 00 METAL 10K 1 1 4W R704 1 249 417 11 CARBON 1K 5 1 4W R706 1 215 445 00 METAL 10K 1 1 4W RELAY RY601 1 755 057 21RELAY RY602 1 755 057 11 RELAY TRANSFORMER T601 1 429 180 11 TRANSFORMER LINE FILTER T602 1 431 624 11 TRANSFORMER CONVERTER PIT T641 1 429 992 11 TRANSFORMER CONVERTER PRT T660 1 431 625 11 TRANSFORMER CONVERTER SRT THERMISTOR TH601 1 809 2...

Страница 77: ...1 ELECT 47MF 20 25V C5204 1 165 319 11 CERAMIC CHIP 0 1MF 50V C5205 1 104 664 11 ELECT 47MF 20 25V C5209 1 104 664 11 ELECT 47MF 20 25V C5210 1 104 664 11 ELECT 47MF 20 25V C5220 1 165 319 11 CERAMIC CHIP 0 1MF 50V C5221 1 126 967 11 ELECT 47MF 20 10V C5222 1 165 319 11 CERAMIC CHIP 0 1MF 50V C5225 1 165 319 11 CERAMIC CHIP 0 1MF 50V C5226 1 165 319 11 CERAMIC CHIP 0 1MF 50V C5227 1 165 319 11 CER...

Страница 78: ...01 1 543 813 21 FILTER EMI FB5002 1 543 813 21 FILTER EMI FB5003 1 543 813 21 FILTER EMI FB5004 1 543 813 21 FILTER EMI FB5005 1 543 813 21 FILTER EMI FB5010 1 543 813 21 FILTER EMI FB5011 1 543 813 21 FILTER EMI FB5012 1 543 813 21 FILTER EMI FB5013 1 412 364 11 INDUCTOR 0UH FB5014 1 412 364 11 INDUCTOR 0UH FB5015 1 412 364 11 INDUCTOR 0UH FB5016 1 412 364 11 INDUCTOR 0UH FB5017 1 412 364 11 INDU...

Страница 79: ...5 1 216 121 91 METAL GLAZE 1M 5 1 10W R5066 1 216 121 91 METAL GLAZE 1M 5 1 10W R5071 1 216 031 00 METAL GLAZE 180 5 1 10W R5072 1 216 031 00 METAL GLAZE 180 5 1 10W R5073 1 216 019 00 METAL GLAZE 56 5 1 10W R5074 1 216 019 00 METAL GLAZE 56 5 1 10W R5087 1 216 049 91 METAL GLAZE 1K 5 1 10W R5089 1 216 295 91 SHORT 0 R5092 1 216 017 91 METAL GLAZE 47 5 1 10W R5093 1 216 017 91 METAL GLAZE 47 5 1 1...

Страница 80: ...5 1 216 666 11 METAL CHIP 4 3K 0 50 1 10W R5636 1 216 295 91 SHORT 0 R5637 1 216 057 00 METAL GLAZE 2 2K 5 1 10W R5640 1 216 295 91 SHORT 0 R5641 1 216 057 00 METAL GLAZE 2 2K 5 1 10W R5644 1 216 295 91 SHORT 0 R5650 1 216 111 91 METAL GLAZE 390K 5 1 10W R5651 1 216 111 91 METAL GLAZE 390K 5 1 10W R5652 1 216 111 91 METAL GLAZE 390K 5 1 10W R5653 1 216 295 91 SHORT 0 R5654 1 216 295 91 SHORT 0 R56...

Страница 81: ... 8 719 016 73 DIODE STZ6 8T FERRITE BEAD FB131 1 414 233 21 INDUCTOR 0UH FB132 1 414 233 21 INDUCTOR 0UH FB133 1 414 233 21 INDUCTOR 0UH FB134 1 216 295 91 SHORT 0 FB135 1 414 233 21 INDUCTOR 0UH FB136 1 414 233 21 INDUCTOR 0UH FB137 1 414 233 21 INDUCTOR 0UH FB138 1 414 233 21 INDUCTOR 0UH FB139 1 216 295 91 SHORT 0 FB140 1 414 233 21 INDUCTOR 0UH FILTER FL8001 1 233 512 21 FILTER EMI FL8002 1 23...

Страница 82: ...6V C315 1 126 967 11 ELECT 47MF 20 16V C316 1 126 967 11 ELECT 47MF 20 16V C317 1 126 967 11 ELECT 47MF 20 16V C401 1 164 232 11 CERAMIC CHIP 0 01MF 10 50V C402 1 164 232 11 CERAMIC CHIP 0 01MF 10 50V C403 1 164 232 11 CERAMIC CHIP 0 01MF 10 50V C404 1 126 967 11 ELECT 47MF 20 16V C405 1 126 967 11 ELECT 47MF 20 16V C406 1 126 967 11 ELECT 47MF 20 16V C407 1 164 232 11 CERAMIC CHIP 0 01MF 10 50V C...

Страница 83: ... D512 8 719 976 99 ZENER DIODE DTZ5 1B D513 8 719 976 99 ZENER DIODE DTZ5 1B FERRITE BEAD FB300 1 414 233 21 INDUCTOR 0UH FB301 1 414 233 21 INDUCTOR 0UH FB302 1 414 233 21 INDUCTOR 0UH FB303 1 414 233 21 INDUCTOR 0UH FB304 1 414 233 21 INDUCTOR 0UH FB312 1 216 295 91 SHORT 0 FB313 1 216 295 91 SHORT 0 FB314 1 414 233 21 INDUCTOR 0UH FB315 1 414 233 21 INDUCTOR 0UH FB317 1 216 295 91 SHORT 0 FB318...

Страница 84: ...10W R313 1 216 113 00 METAL GLAZE 470K 5 1 10W R314 1 216 113 00 METAL GLAZE 470K 5 1 10W R317 1 216 081 00 METAL GLAZE 22K 5 1 10W R318 1 216 081 00 METAL GLAZE 22K 5 1 10W R319 1 216 021 00 METAL GLAZE 68 5 1 10W R322 1 216 113 00 METAL GLAZE 470K 5 1 10W R324 1 216 081 00 METAL GLAZE 22K 5 1 10W R325 1 216 049 91 METAL GLAZE 1K 5 1 10W R326 1 216 025 91 METAL GLAZE 100 5 1 10W R327 1 216 041 00...

Страница 85: ...R633 1 216 025 91 METAL GLAZE 100 5 1 10W R634 1 216 025 91 METAL GLAZE 100 5 1 10W R635 1 216 033 00 METAL GLAZE 220 5 1 10W R636 1 216 033 00 METAL GLAZE 220 5 1 10W R637 1 216 097 91 METAL GLAZE 100K 5 1 10W R642 1 216 049 91 METAL GLAZE 1K 5 1 10W R658 1 216 049 91 METAL GLAZE 1K 5 1 10W R659 1 216 041 00 METAL GLAZE 470 5 1 10W R660 1 216 001 00 METAL GLAZE 10 5 1 10W R661 1 216 001 00 METAL ...

Страница 86: ...8508 1 249 421 11 CARBON 2 2K 5 1 4W R8509 1 215 455 00 METAL 27K 1 1 4W R8510 1 249 429 11 CARBON 10K 5 1 4W R8511 1 215 383 00 METAL 27 1 1 4W R8512 1 215 463 00 METAL 56K 1 1 4W R8513 1 215 421 00 METAL 1K 1 1 4W R8514 1 247 843 11 CARBON 3 3K 5 1 4W R8515 1 249 429 11 CARBON 10K 5 1 4W R8516 1 215 463 00 METAL 56K 1 1 4W R8517 1 215 455 00 METAL 27K 1 1 4W R8518 1 215 421 00 METAL 1K 1 1 4W R8...

Страница 87: ... sont critiques pour la sécurité Ne les remplacer que par une piéce portant le numéro spécifié MISCELLANEOUS 1 251 662 11 INLET AC 3P WITH NOISE FILTE 1 473 545 13 POWER BLOCK 1 475 523 11 OPTICAL UNIT W9000 1 505 207 11 SPEAKER 5 7CM 1 505 208 11 SPEAKER 10CM 1 533 746 11 THERMOSTAT 1 543 653 11 CORE ASSY BEAD DIVISION TYPE 1 543 982 11 CORE FERRITE 1 698 696 11 FAN DC 1 475 523 21 OPTICAL UNIT W...

Страница 88: ...tical for safety Replace only with part number specified Les composants identifiés per un tramé et une marque sont critiques pour la sécurité Ne les remplacer que par une piéce portant le numéro spécifié Sony Corporation Display Company Quality Assurance Department Service Promotion Section English 97JH05173 1 Printed in Japan 1997 10 9 965 180 01 ...

Отзывы: