background image

8

5

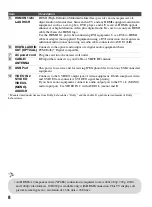
HDMI IN 1/2/3
L-AUDIO-R

HDMI (High-Definition Multimedia Interface) provides an uncompressed, all-
digital audio/video interface between this TV and any HDMI-equipped audio/video 
equipment, such as a set-top box, DVD player, and A/V receiver. HDMI supports 
enhanced, or high-definition video, plus digital audio. Be sure to use only an HDMI 
cable that bears the HDMI logo.
Use the HDMI IN 1 port when connecting DVI equipment. Use a DVI-to-HDMI 
cable or adapter (not supplied). Equipment using a DVI connection also requires an 
additional audio connection using an audio cable connected to AUDIO (L/R).

6

DIGITAL AUDIO 
OUT (OPTICAL)

Connects to the optical audio input of a digital audio equipment that is 
PCM/Dolby* Digital compatible.

7

AC power cord

Plug the cord into the nearest wall outlet.

8

CABLE/
ANTENNA

RF input that connects to your Cable or VHF/UHF antenna.

9

USB Port

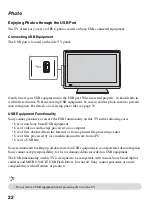
This port is for service and for viewing JPEG photo files from Sony USB connected 
equipment.

0

VIDEO IN 2 
S VIDEO
VIDEO/L 
(MONO)-
AUDIO-R 

Connects to the S VIDEO output jack of video equipment. If both composite video 
and S VIDEO are connected, S VIDEO signal has priority. 
If you have mono equipment, connect its audio output port to the TV’s L (MONO) 
audio input port. Use VIDEO IN 2 with AUDIO L (mono) and R.

* Manufactured under license from Dolby Laboratories. "Dolby" and the double-D symbol are trademarks of Dolby 
Laboratories.

Item

Description

• An HDMI or Component video (YP

B

P

R

) connection is required to view 480i, 480p, 720p, 1080i 

and 1080p video formats. 1080/24p is available only with HDMI connection. This TV displays all 
picture format types in a resolution of 1,366 dots × 768 lines. 

Содержание KDL-32LL150 - 32" Class Bravia L Series Lcd Tv

Страница 1: ...ng Instructions Sony Customer Support U S A www sony com tvsupport Canada www sony ca support United States 1 800 222 SONY Canada 1 877 899 SONY Sony will work to resolve your questions more quickly than your retailer Please Do Not Return the Product to the Store ...

Страница 2: ...certain features settings and functionalities of this TV i e Picture Sound Power Savings can slightly change the power consumption Depending upon such changed settings the power consumption may increase which possibly could exceed the limits required for the ENERGY STAR qualification Compatible Wall Mount Bracket Information Use the following Sony WALL MOUNT BRACKET with your TV model Use with oth...

Страница 3: ...A Sync with Control for HDMI 21 Inputs 21 Photo 22 Accessing Photo 23 Using PIP Feature 25 Favorites 25 Wide Mode 26 Wide Mode with PC 26 Using the Menus Navigating through TV Menus 27 Using the Picture Settings 28 Using the Sound Settings 29 Using the Screen Settings 30 Using the Channel Settings 32 Using the Parental Lock Settings 33 Using the Setup Settings 36 Using the Photo Settings 38 Other ...

Страница 4: ...D programming Your BRAVIA TV can receive and display HD programming from Over the air broadcasting via HD quality antenna HD cable subscription HD satellite subscription Blu ray Disc player or other HD compatible external equipment Contact your cable or satellite provider for information on upgrading to HD programming Safety Booklet Contains precautionary measures to keep you and your TV safe Read...

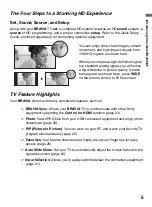
Страница 5: ...USB connected equipment and enjoy photo slideshows page 22 PIP Picture in Picture You can work on your PC and watch your favorite TV program simultaneously page 25 Favorites Your favorite channels and inputs are at your finger tips for easy access page 25 Auto Wide Mode Set your TV to automatically adjust the screen based on the signal resolution page 26 Input Selection Allows you to easily switch...

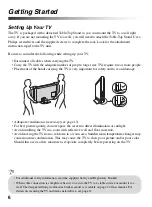
Страница 6: ...o avoid damage Adequate ventilation is necessary see page 13 For best picture quality do not expose the screen to direct illumination or sunlight Avoid installing the TV in a room with reflective wall and floor materials Avoid moving the TV from a cold area to a warm area Sudden room temperature changes may cause moisture condensation This may cause the TV to show poor picture and or poor color Sh...

Страница 7: ... audio L mono and R for audio signal For component connection use Y PB PR for video signals and also connect the audio L mono and R for audio signal This TV can auto detect and switch between the VIDEO 1 and COMPONENT 1 when VIDEO 1 or COMPONENT 1 is connected To set to auto detection press MENU and go to the Setup settings Select the Video Component 1 Selection option then set to Auto 3 COMPONENT...

Страница 8: ...le 7 AC power cord Plug the cord into the nearest wall outlet 8 CABLE ANTENNA RF input that connects to your Cable or VHF UHF antenna 9 USB Port This port is for service and for viewing JPEG photo files from Sony USB connected equipment 0 VIDEO IN 2 S VIDEO VIDEO L MONO AUDIO R Connects to the S VIDEO output jack of video equipment If both composite video and S VIDEO are connected S VIDEO signal h...

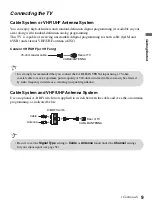
Страница 9: ...ystem Use an optional A B RF switch not supplied to switch between the cable and over the air antenna programming as indicated below 75 ohm coaxial cable Rear of TV CABLE ANTENNA It is strongly recommended that you connect the CABLE ANTENNA input using a 75 ohm coaxial cable to receive optimum picture quality A 300 ohm twin lead cable can easily be affected by radio frequency interference resultin...

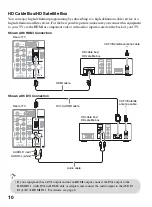
Страница 10: ...L R AUDIO R IN AUDIO OUT FIX COMPONENT IN 1080p 1080i 720p 480p 480i 1 1 2 3 Rear of TV HDMI cable HD cable box HD satellite box CATV Satellite antenna cable PR PB Y VIDEO RGB MONO VIDEO IN AUDIO L PC IN DIGITAL AUDIO OUT OPTICAL AUDIO L R AUDIO R IN AUDIO OUT FIX COMPONENT IN 1080p 1080i 720p 480p 480i 1 1 2 3 Rear of TV DVI to HDMI cable HD cable box HD satellite box CATV Satellite antenna cable...

Страница 11: ...ellite antenna cable AUDIO R red AUDIO L white Component video cable Audio cable PR red PB blue Y green HD cable box HD satellite box PR PB Y VIDEO RGB MONO VIDEO IN AUDIO L PC IN DIGITAL AUDIO OUT OPTICAL AUDIO L R AUDIO R IN AUDIO OUT FIX COMPONENT IN 1080p 1080i 720p 480p 480i 1 1 2 3 Rear of TV HD15 HD15 cable analog RGB Audio cable stereo mini plugs Connect the PC IN jack to the PC using an H...

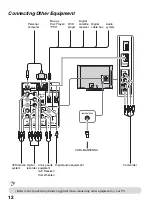
Страница 12: ... 3 CABLE ANTENNA AUDIO R VIDEO MONO L IN VIDEO IN 2 2 S VIDEO Personal computer Blu ray Disc Player PS3 DVD player Digital satellite receiver Camcorder Digital recorder Analog audio equipment A V Receiver HomeTheater CABLE ANTENNA Digital cable box Audio system VCR Game system Digital audio equipment Refer to the Quick Setup Guide supplied when connecting other equipment to your TV ...

Страница 13: ...e sure that your TV has adequate ventilation Allow enough space around the TV as shown below Avoid operating the TV at temperatures below 41 F 5 C 30 cm 11 7 8 inches 6 cm inches 4 inches 10 cm 4 inches 10 cm 2 3 8 Leave at least this much space around the set Installed with stand inches 11 7 8 4 inches 10 cm 4 inches 10 cm 4 inches 10 cm 30 cm Installed on the wall Leave at least this much space ...

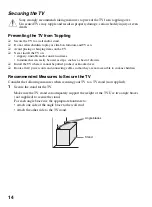
Страница 14: ... easily be used as steps such as a chest of drawers Install the TV where it cannot be pulled pushed or knocked over Route all AC power cords and connecting cables so that they are not accessible to curious children Recommended Measures to Secure the TV Consider the following measures when securing your TV to a TV stand not supplied 1 Secure the stand for the TV Make sure the TV stand can adequatel...

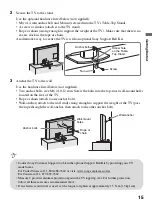
Страница 15: ...ocated on the rear of the TV Rope or chain attach to one anchor bolt Wall anchor attach to the wall stud strong enough to support the weight of the TV pass the rope through the wall anchor then attach to the other anchor bolt Screw hole on the Table Top Stand Anchor bolt Screw Nut Wall mount holes Anchor bolts Wall anchor Rope or chain Contact Sony Customer Support to obtain the optional Support B...

Страница 16: ...e button Allows you to select the highlighted option and advance to the next screen Please select your language Initial Setup Español Français Select English TOOLS WIDE INPUT When prompted to select Retail or Home be sure to select Home for ENERGY STAR compliant mode Select Cancel to stop or cancel the Auto Program The Auto Program can be done at later time To run Auto Program at later time press ...

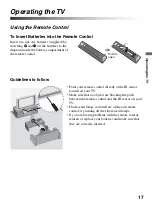
Страница 17: ...ontrol Guidelines to follow Push to open Point your remote control directly at the IR sensor located on your TV Make sure that no objects are blocking the path between the remote control and the IR sensor on your TV Fluorescent lamps can interfere with your remote control try turning off the fluorescent lamps If you are having problems with the remote control reinsert or replace your batteries and...

Страница 18: ...DMI device and then press SYNC MENU to display the menu of connected equipment not available on all Control for HDMI equipment x STOP Press to stop playback THEATER Press to turn on and off the Theater Mode The picture settings will be set for a cinema like experience and the audio will be switched to the audio output of the attached speakers of your BRAVIA Sync audio system Your BRAVIA Sync audio...

Страница 19: ...Inputs and TV mode Press repeatedly to toggle through the inputs See page 21 qf V v B b Press V v B b to move focus highlight Press to select confirm an item qg TOOLS Press to display a list of convenient functions and menu shortcuts The TOOLS menu items vary based on current input and content qh CH Press to scan through channels To scan quickly through channels press and hold down either CH qj JU...

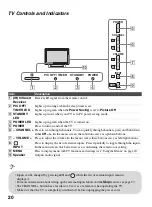
Страница 20: ...e menu screen these buttons serve as up down buttons 7 VOLUME Press to adjust the volume In the menu screen these buttons serve as left right buttons 8 INPUT Press to display the list of external inputs Press repeatedly to toggle through the inputs In the menu screen this button serves as confirming the selection or setting 9 MENU Press to display menu with TV functions and settings see Using the ...

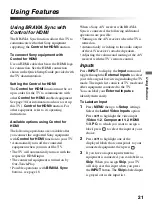
Страница 21: ...y Possible operations with BRAVIA Sync buttons see page 18 When a Sony A V receiver with BRAVIA Sync is connected the following additional operations are possible Turning on the A V receiver when the TV is turned on Automatically switching to the audio output of the A V receiver s attached speakers Adjusting the volume and muting of the A V receiver with the TV s remote control Inputs Press INPUT ...

Страница 22: ... TV in the following cases Use of non Sony brand USB equipment Use of video or audio clips processed on a computer Use of files obtained from the Internet or from a printed file processing center Use of files processed by size modification software from a PC Use of a USB hub Sony recommends backing up all data stored on USB equipment to avoid potential data corruption Sony cannot accept responsibi...

Страница 23: ...the previous thumbnail page Device Selection This option is available when multi LUN USB equipment is connected Slideshow Select to view photos in a slideshow Setup Select to access the Slideshow Speed Slideshow Loop Slideshow Effect or the File Order Set Back RETURN Photo USB Auto Start Photo TV On Photo 102 287 DSC0001243 jpg 9 18 2008 3 27PM 2048x1536 Next Page Previous Page Device Selection Sl...

Страница 24: ...Select Setup to adjust your Slideshow viewing preferences Setup Menu Slideshow Speed Select to set the transition between photos Transition speeds can be set to 5 10 20 or 30 seconds Slideshow Loop Select On to continuously repeat the entire slideshow Select Off to disable the feature Slideshow Effect Select to set the slideshow effect to Fade Wipe Simple or Box out File Order Select to set the fi...

Страница 25: ...avorite channels and external inputs can be easily accessed by pressing the FAVORITES button once they are added to the list Adding to Favorites While tuned to the channel you want to watch or viewing connected equipment press FAVORITES to display the list Highlight Add to Favorites then press Your newly added item will be listed at the top of the list When you continue to add items beyond the 10t...

Страница 26: ...vailable with 480i or 480p sources only Wide Mode with PC Wide Mode is also available when a PC is connected to the TV To change the Wide Screen Mode for PC Timing Press WIDE repeatedly to cycle through the available modes while in the PC input mode 4 3 Original source 16 9 Original source Standard definition source High definition source m m Wide Zoom Wide Zoom Normal Normal This mode is not avai...

Страница 27: ...utput the sound to your connected audio equipment Screen Settings Adjust the size and shape of the images you see on the screen Channel Settings Navigate your favorite channels and inputs and select the signal type as well as autoprogram channels You can also customize the channels you see and the labels assigned to them Parental Lock Settings Set the password and limit access to programming based...

Страница 28: ...hite adjustment Cool Select to give the white colors a bluish tint Neutral Select to give the white colors a neutral tint Warm Select to give the white colors a reddish tint Sharpness Adjust to sharpen or soften the picture Noise Reduction Select to reduce the picture noise level Select from High Medium Low and Off Advanced Settings Reset Resets all the advanced settings to the default values Blac...

Страница 29: ...st in stereo Auto SAP Select to automatically switch the TV to second audio programs when a signal is received If no SAP signal is present the TV remains in Stereo mode Mono Select for mono reception Use to reduce noise during weak stereo broadcasts Alternate Audio Digital channels only Select among the available options to switch among the alternate audio streams The program you are tuned to may ...

Страница 30: ... Normal Select to display the 4 3 picture in its original size Full Select to enlarge the 4 3 picture horizontally only to fill the display area Zoom Select to enlarge the picture horizontally and vertically to an equal aspect ratio that fills the wide screen Off Select to continue using the current Wide Mode setting when the channel or input is changed Display Area Normal Displays the recommended...

Страница 31: ...y area Auto Adjustment Select to automatically adjust the display position and phase of the picture when the TV receives an input signal from the connected PC Note that Auto Adjustment may not work well with certain input signals In such cases manually adjust the options below Phase Adjust after Pitch to fine tune overall sharpness Pitch Adjust uneven sharpness on screen Horizontal Center Allows y...

Страница 32: ...u find the channel you want to show or hide Then press to select it 2 Press V v to determine if the channel will be shown or hidden Then press to select it Label Channels Allows you to assign labels such as station call letters to channel numbers 1 Press V v to scroll through the channel numbers Then press to select the channel number that you want to assign a label 2 Press V v to scroll through t...

Страница 33: ...om viewing Custom Select to block programs based on downloadable ratings Clear All Select to clear the entire downloadable rating system Unrated Available only when Country is set to U S A Allow Allows programs and movies that are broadcasted without a rating Block Blocks all programs and movies that are broadcasted without a rating Channel Block Allows you to block channels regardless of program ...

Страница 34: ...arental guidance is suggested for children under 17 NC 17 and X No one 17 or under allowed TV Rating Block programs by their rating content or both Age Based Ratings TV Y All children TV Y7 Directed to children age 7 and older TV G General audience TV PG Parental guidance suggested TV 14 Parents strongly cautioned TV MA Mature audience only Content Based Ratings FV Fantasy violence D Suggestive di...

Страница 35: ...control feature To reactivate the Parental Lock settings turn off the TV When the TV is turned on again your Parental Lock settings are reactivated Option Description English Rating C All children C8 Children 8 years and older G General programming PG Parental guidance 14 Viewers 14 and older 18 Adult programming French Rating G General programming 8 ans Not recommended for young children 13 ans N...

Страница 36: ...on On when Muting Closed Captions CC is turned on when the TV is muted Off Closed Captions CC is turned off Analog CC Allows you to select basic analog EIA 608 closed caption options CC1 CC2 CC3 CC4 Displays a printed version of the dialogue or sound effects of a program Should be set to CC1 for most programs Text1 Text2 Text3 Text4 Displays network station information presented using either half ...

Страница 37: ...nected to the TV such as a VCR DVD etc For example if you have a DVD player connected to the COMPONENT IN jack you can select the label DVD for the Component input Then when you press INPUT to change inputs the video label you assigned to that input appears on screen 1 Press V v to highlight the video input Video 1 2 Component 1 2 HDMI 1 3 PC to which you want to assign a label Then press to selec...

Страница 38: ...l for HDMI is connected to display the Device Control options The Device Control option provides access to the Menu Options and Content List of your connected equipment with your TV remote control Some equipment with Control for HDMI does not support the Device Control feature Picture Adjustments Lock Select Lock so no adjustment can be made to items grayed out Select Unlock to allow adjustment to...

Страница 39: ... VESA Guidelines WXGA 1 280 768 47 4 60 VESA 1 280 768 47 8 60 VESA 1 360 768 47 7 60 VESA This TV s PC input does not support Sync on Green or Composite Sync This TV s PC VGA input does not support interlaced signals Your PC must support one of the above PC input signals to display on the television In plug and play signals with a 60 Hz vertical frequency will be detected automatically PC reboot ...

Страница 40: ...e supplied screws are designed so that they are 8 mm to 12 mm in length when measured from the attaching surface of the mounting hook The diameter and length of the screws differ depending on the Wall Mount Bracket model Use of screws other than those supplied may result in internal damage to the TV set or cause it to fall etc 1 Disconnect all the cables from the TV 2 Secure the Mounting Hook to t...

Страница 41: ...e TV is turn on WARNING The factory reset will clear all of your customized settings including the Parental Lock setting When the Password is lost or cannot remember enter the master password 4357 This password clears your previous password and allows you to enter a new password Condition Explanation Solution No picture No picture Check the Power Saving settings see page 36 Cannot receive any chan...

Страница 42: ... avoid TV interference make sure to use an undamaged antenna cable Blurry picture Poor color Transporting the TV from a cold to a warm location or a sudden change in room temperature may cause moisture condensation resulting in a blurry picture or poor color Turn off your TV and wait a few hours before powering on again No sound Noisy sound No sound but good picture Check the volume control Press ...

Страница 43: ...Screen settings is set to other than Off If you want to lock in Wide Mode selected with WIDE on the remote control set 4 3 Default to Off in the Screen settings see page 30 Check the Auto Wide option in the Screen settings see page 30 Suddenly the picture gets smaller The picture gets smaller during the commercials due to the method in which the provider broadcasts their content When HD content ch...

Страница 44: ...e Show Hide Channels setting see page 32 Photo files are not being displayed from my USB equipment or digital camera s internal memory If This USB device is not supported appears on your TV screen there may be a problem with your USB connection or a FAT12 device is connected This TV only supports FAT16 and FAT32 file systems Photo files cannot be displayed from a digital camera s internal memory C...

Страница 45: ...ould void your authority to operate this equipment The shielded interface cable recommended in this manual must be used with this equipment in order to comply with the limits for a digital device pursuant to Subpart B of Part 15 of FCC Rules Note This television includes a QAM demodulator which should allow you to receive unscrambled digital cable television programming via subscription service to...

Страница 46: ...M 32 44 1 and 48 kHz 16 20 and 24bits Dolby Digital AUDIO HDMI IN 1 only 500 mVrms Typical Impedance 47 kilohms PC Input see page 39 AUDIO OUT 500 mVrms typical DIGITAL AUDIO OUT OPTICAL PCM Dolby Digital optical signal PC IN D sub 15 pin analog RGB 0 7 Vp p 75 ohms positive See the PC Input Signal Reference Chart for PC and HDMI IN 1 2 3 on page 39 PC AUDIO INPUT Stereo mini jack 500 mVrms Typica...

Страница 47: ...8 I Info Banner 37 Infrared Receiver IR 20 INPUT button 19 20 Inputs 21 J JUMP button 19 L Label Channels 32 Label Video Inputs 37 Language 37 M MENU button 18 20 Movie Rating 34 MTS Audio 29 MUTING button 19 N Noise Reduction 28 P PC IN 7 PC Settings 31 Phase 31 Photo 22 38 PIC OFF TIMER LED 20 Picture 28 Picture Adjustments Lock 38 Picture Mode 28 PIP 25 Pitch 31 POWER button 19 20 POWER LED 20 ...

Страница 48: ...Printed in Mexico 4 133 465 11 1 On line Registration Available Be sure to register your TV United States http productregistration sony com Canada http www SonyStyle ca registration ...

Отзывы: