background image

Digital features

18 

The Main menu

The Main menu contains several features that allow you to customise the Digital side of the TV. The Main
menu is only available when watching Digital channels. To check if you are in Digital mode, press the 
button on the remote control.  An Info display appears on screen providing brief details of the current and
next programme.  If the display does not appear, press the DIGITAL/

 button. 

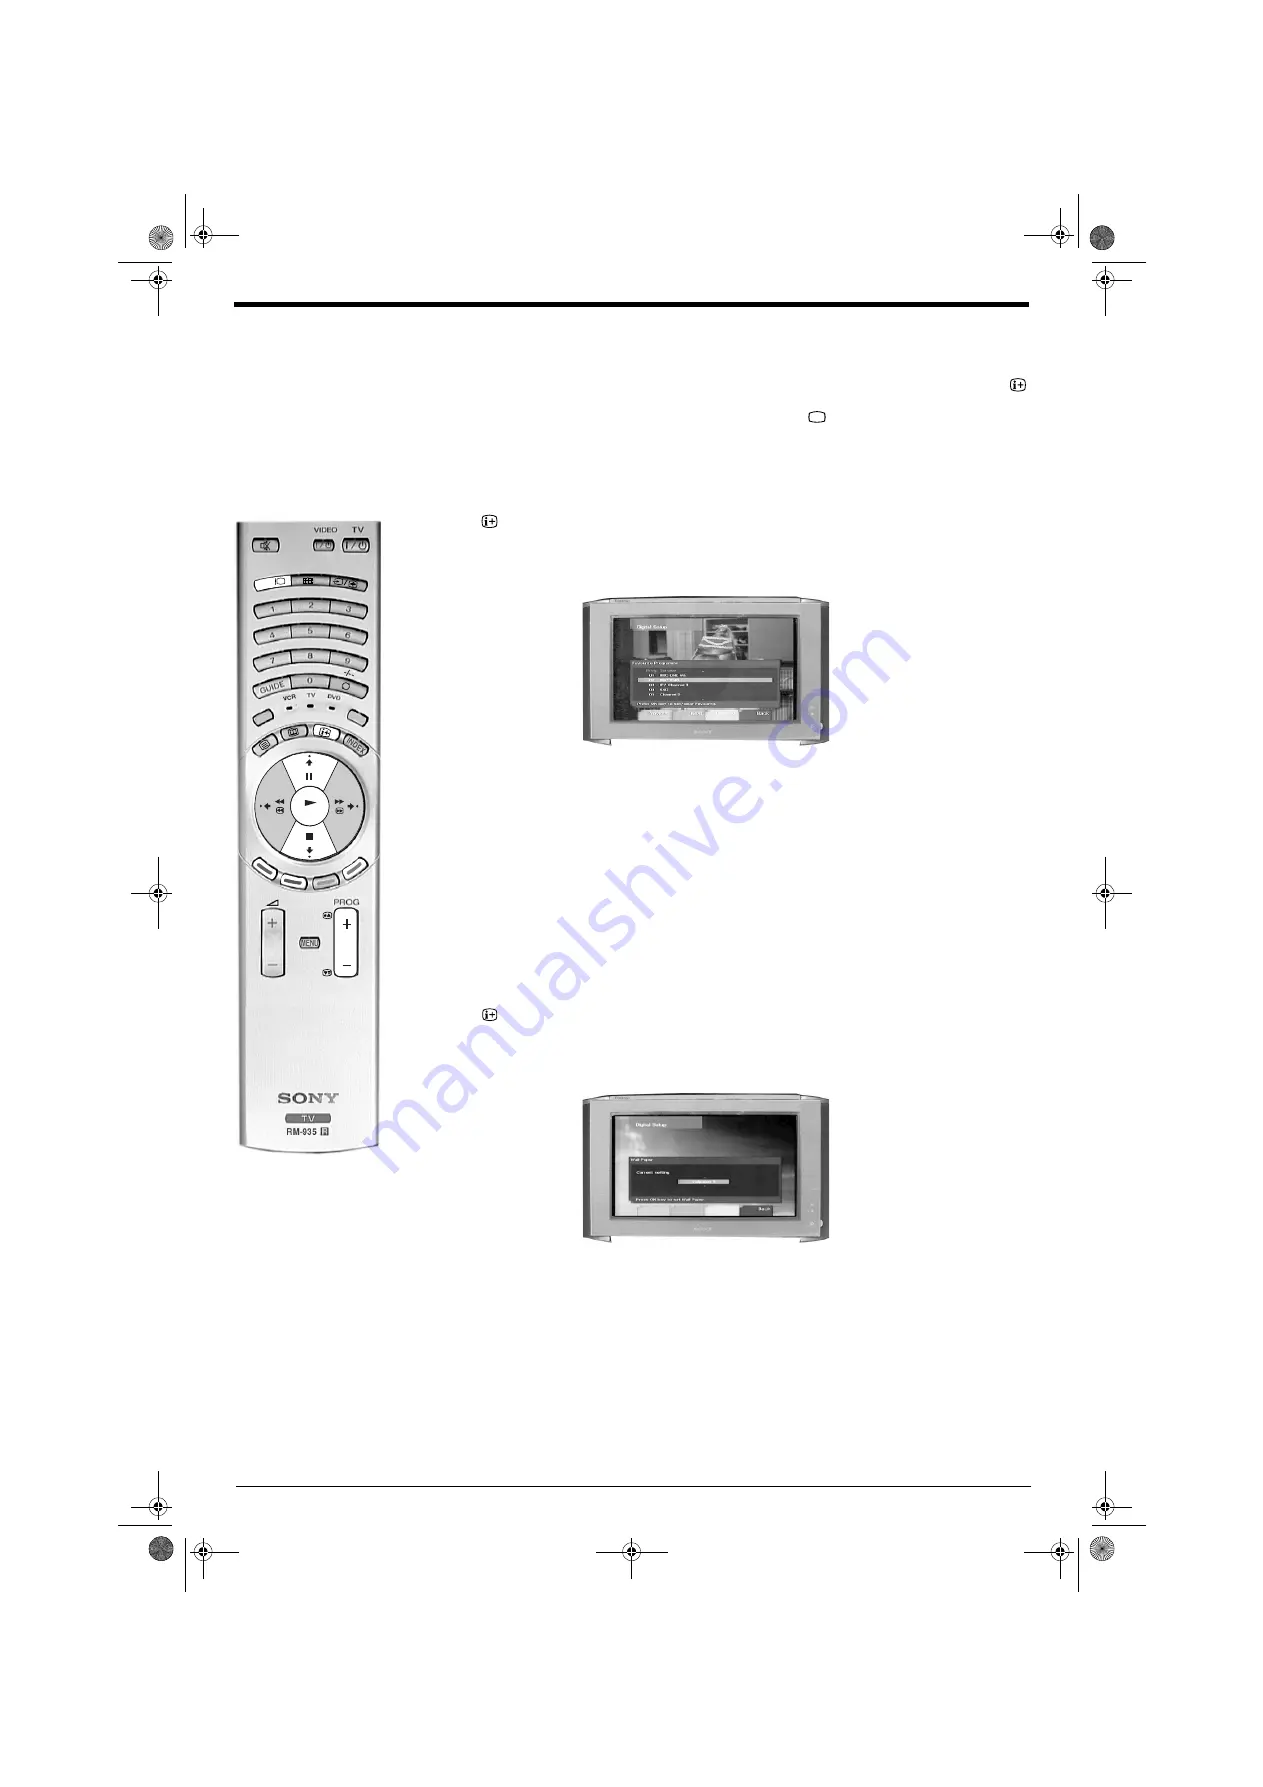
Favourite programme

This feature allows you to store your favourite channels in a list for quick access.

1. Press the 

 button on the remote control to obtain the Digital Info display. Press the BLUE button to

display the Main menu.

2. Press the 

V

 or 

v

 button to highlight ‘Favourite Programme’, then press the OK button to display the

Favourite Programme menu.

3. Press the 

V

 or 

v

 button to scroll through the list until the programme you wish to store as a favourite is

highlighted. If you do not wish to select any of the displayed programmes as a favourite, press the RED
or GREEN button to display the previous or next 5 programmes in the list.

4. When you have found and highlighted a programme you want to store as a favourite, press the OK

button. A tick appears alongside that programme in the display. If you wish to cancel your selection,
press the OK button again.

5. Repeat steps 3 and 4 to store other programmes as favourites, then press the BLUE button repeatedly

until all menus are removed from the screen.

Wallpaper

This feature allows you to customise the background pattern for all the Digital menus.

1. Press the 

 button on the remote control to obtain the Digital Info display. Press the BLUE button to

display the Main menu.

2. Press the 

V

 or 

v

 button to highlight ‘Wallpaper’ then press the OK button to display the Wallpaper

menu.

3. Press the 

V

 or 

v

 button to select your choice of wall paper then press the OK button to store.

4. Press the BLUE button repeatedly until all menus are removed from the screen.

DIGIT

AL

MODE

REC

DIGIT

AL

OK

NX 13-22.fm  Page 18  Wednesday, September 5, 2001  9:30 AM

Содержание KD-32NX100U

Страница 1: ...R 4 206 381 62 Trinitron Digital TV Operating Instructions GB KD 32NX100U 2001 by Sony Corporation Printed in UK 420638162 32nxcover fm Page 1 Wednesday September 5 2001 9 06 AM ...

Страница 2: ...in accordance with the following instructions The wires in this mains lead are coloured in accordance with the following code Blue Neutral Brown Live As the colours of the wires in the mains lead of this apparatus may not correspond with the coloured markings identifying the terminals in your plug proceed as follows The wire which is coloured blue must be connected to the terminal which is marked ...

Страница 3: ...ou must disconnect the securing strap on the rear of the TV see illustration below To gain access to the strap remove the door that conceals the rear sockets of the TV if you have already added it then remove the cover from the rear column of the stand Take care not to trap your fingers under the TV when placing the TV onto a flat surface Securing strap Moving the TV NX1 12 fm Page 1 Wednesday Sep...

Страница 4: ...he set Never place the TV in hot humid or excessively dusty places Do not install the TV where it may be exposed to mechanical vibrations Clean the TV with a soft lightly dampened cloth Do not use benzine thinner or any other chemicals to clean the TV Do not scratch the TV screen As a safety precaution unplug the TV before cleaning it Pull out the power lead by the plug Do not pull on the power le...

Страница 5: ... Naming a programme 26 Skipping a programme 26 Using the Further Programme Preset menu 27 Re arranging your channels 27 Adjusting the picture rotation 28 Setting your personal ID 28 Adjusting the picture geometry for an RGB source 29 Presetting and naming inputs from external equipment 29 Manually tuning analogue signals 30 Additional information Connecting additional equipment 31 Remote control c...

Страница 6: ...o install your TV and view the TV programmes Remote control handset Place a coin in the slot at the bottom of the remote control Turn anti clockwise to release the battery compartment Insert the batteries as indicated in battery compartment Replace the battery compartment and lock in place by twisting coin clockwise in slot RF Loopthrough cable DIGITAL MODE REC 5 0 NX1 12 fm Page 4 Wednesday Septe...

Страница 7: ...cket marked on the rear of the TV to the scart socket of your VCR refer to VCR instructions 5 Connect the VCR to the mains socket and switch on 6 Insert a pre recorded tape into the VCR and press the PLAY button This enables the TV to locate and store the video channel during the Automatically tuning the TV procedure s 3 3 4 Switching on the TV RF loopthrough cable supplied Scart lead not supplied...

Страница 8: ...n and displays the digital programme captured on programme number 1 Note If no digital signals are captured then the analogue programme stored on programme number 1 is displayed 3 To view programmes press the PROG button or the numbered buttons on the remote control Switching between digital and analogue programmes To check if you are watching a digital or analogue programme press the button on th...

Страница 9: ...ol buttons Press to increase or decrease the volume Video input button Press to select input signals from a VCR etc The TV buttons can be found on the right side of the TV An expanded view is shown below Reset button Press to return picture and sound levels to their factory settings NX1 12 fm Page 7 Wednesday September 5 2001 9 16 AM ...

Страница 10: ...ress this button to place your VCR into record mode MODE button This remote can operate not only Sony DVDs and VCRs but also those made by other manufacturers Press this button to select the type of equipment you want to control A green light appears momentarily to indicate the mode selected Note before operating your VCR or DVD you must enter the correct configuration code Please refer to the sec...

Страница 11: ... remote control If you do not know the channel number of a dedicated Digital text channel you can use the Channel Index menu to find one Please refer to the Channel index menu section of this manual 3 Once the text page is displayed follow the on screen instructions to obtain your required selection Note On some pages the TV programme may also be displayed on the text screen On screen instructions...

Страница 12: ...t service press the DIGITAL button to remove the text display from the screen How to use the text features Text Features How to select To select the next or preceding page Press the or button To select a sub page A text page can consist of several sub pages In this case an information box is displayed at the bottom of the screen showing the number of sub pages available Select the sub pages by pre...

Страница 13: ... the text service is searching for a page Once the page has been found a blue symbol appears in the top left corner of the screen Press the button to view the page Reveal Select this to reveal hidden information on the page such as answers to a quiz Time Page This feature allows a time coded text page such as an alarm page to be displayed at a set time When selected the Time Page sub menu is displ...

Страница 14: ...utton on the remote control you can choose from the 5 formats listed below Wide For 16 9 broadcasts For 4 3 broadcasts Zoom Imitation of wide screen effect for movies broadcast in cinemascopic letter box format 14 9 Compromise between the 4 3 and 16 9 format 4 3 Conventional screen format Smart Imitation of wide screen effect for 4 3 broadcasts NX1 12 fm Page 12 Wednesday September 5 2001 9 16 AM ...

Страница 15: ...me and duration of each programme contained in the list is also made available The current channel is previewed in the top right corner of the screen with its programme number and channel name displayed below it 3 Press the V or v buttons to move the cursor up or down the list to select the desired programme If you do not want to select a programme from the 6 channels listed press the GREEN button...

Страница 16: ...ies Contains all available channels Sports Contains all sport channels News Contains all news channels Film Contains all film channels Entertainment Contains all entertainment channels Lifestyle Contains all lifestyle channels Education Contains all education channels Kids Contains all kids channels Favourite Programmes This feature allows you to create a list of your favourite programmes To add a...

Страница 17: ...at the top left of the screen If you do not wish to select a programme from the 5 channels listed press the GREEN button to display the next 5 channels or RED button to display the previous 5 channels 4 If a programme you highlight is currently being broadcast you will be prompted to press the OK button to obtain a preview Note If an age limit for viewing has been set and the programme selected ex...

Страница 18: ... to display the Manual Timer Setup menu 2 Press the V or v buttons to select the correct date Press the b button to highlight the start time 3 Press the V or v buttons to select the start time Press the b button to highlight the stop time 4 Press the V or v buttons to select the stop time Press the b button to highlight the programme 5 Press the V or v buttons to select the channel Press the OK bu...

Страница 19: ...dio When a multi language broadcast is available this feature allows you listen to the broadcast in your selected language With the Digital Info display on screen press the GREEN button to access the Audio pop up menu Press the V or v button to highlight the language required then press OK to select REC Timer When you highlight a current programme the REC feature allows you to automatically set yo...

Страница 20: ...not wish to select any of the displayed programmes as a favourite press the RED or GREEN button to display the previous or next 5 programmes in the list 4 When you have found and highlighted a programme you want to store as a favourite press the OK button A tick appears alongside that programme in the display If you wish to cancel your selection press the OK button again 5 Repeat steps 3 and 4 to ...

Страница 21: ...elow Auto Tuning This feature allows you to automatically re tune all available Digital channels 1 Press the button on the remote control to obtain the Digital Info display Press the BLUE button to display the Main menu 2 Press the V or v button to highlight Auto Tuning then press the OK button to display the Auto Tuning menu 3 Press the RED button to begin tuning in all available Digital channels...

Страница 22: ...all services allocated to the selected channel have been found the service selection screen is displayed 8 Press the V or v button to find and highlight the service you wish to allocate to the programme number selected in Step 4 then press the OK button to store 9 Repeat Steps 4 to 8 if you wish to manually add more channels to your TV Press the BLUE button repeatedly to remove all menus from the ...

Страница 23: ... not wish to receive downloads set the Current Setting to Off 5 Press the OK button to confirm 6 Press the BLUE button repeatedly until all menus are removed from the screen System Information This is an information screen only It tells you the current version of the software in your TV together with the signal quality as indicated by the coloured bar in the display 1 Press the button on the remot...

Страница 24: ...oor that covers the rear sockets you will have to unscrew and remove this to gain access to the CAM socket 3 Insert your viewing card into the CAM 4 Connect the TV to the mains and switch on 5 Press the button on the remote control to obtain the Digital Info display 6 Press the BLUE button to display the Main menu 7 Press the V or v button to highlight CAM Setup then press the OK button to display...

Страница 25: ...ss and colour Contrast Brightness Colour Sharpness Press B or b button to increase or decrease the levels to suit personal taste You can only adjust the Colour Brightness and Sharpness if you have selected Personal in Picture Mode option Reset Resets picture to factory preset levels AI artificial intelligence Press V or v button to turn On or Off When set to On the TV will monitor the picture and ...

Страница 26: ...evel changes during adverts for example Dual Sound When receiving bilingual broadcasts Press V or v button to choose A to listen to the first language or B to listen to the second language When receiving Stereo broadcasts Press V or v button to choose Mono or Stereo Note When NICAM is broadcast the word NICAM appears in the menu Audio out Vol Press B or b button to increase or decrease the volume ...

Страница 27: ...elect Off or On Off When 4 3 and 14 9 broadcasts are received there will be dark areas visible at each side of the screen On Smart mode is automatically selected when 4 3 and 14 9 broadcasts are received thus eliminating the dark areas on each side of the screen Sleep Timer Press V or v button to select a period of time before the TV switches itself into standby mode This can be up to 90 minutes i...

Страница 28: ... channels if desired then press the MENU button to remove the menu from the screen This feature lets you to skip unwanted programmes when they are selected using the PROG button However the programme can still be selected using the numbered buttons on the remote control handset 1 Press the MENU button to display the main menu 2 Press the v button to highlight the icon then press the b button to hi...

Страница 29: ...e V or v button to adjust the tuning frequency over a range of 15 to 15 then press OK to store Repeat steps 5 and 6b for other programmes c DECODER Press the V or v button to select Off AV1 or AV2 for the programme number you have chosen then press OK button You can now attach a decoder to the selected socket and the unscrambled signal will appear on the chosen programme number Repeat steps 5 and ...

Страница 30: ...personal ID This feature allows you to enter a safety code to the TV which would help you to be traced if the TV is stolen and recovered This code can only be entered once so please make a note of it and keep it safe 1 Press the MENU button to display the main menu 2 Press the v button to highlight the icon then press the b button to highlight Auto Tuning 3 Press the v button to highlight Manual S...

Страница 31: ...remove menu from the screen 1 2 Use this feature to give a name to each piece of equipment connected to the Audio Video AV sockets on your TV These names will be displayed on screen briefly when the equipment is selected 1 Press the MENU button to display the main menu 2 Press the v button to highlight the icon then press the b button to highlight Auto Tuning 3 Press the V or v button to highlight...

Страница 32: ...rogramme number you require then press the b button to highlight the SKIP column 6 Press the V or v button to set to OFF then press the b button to highlight SYS column 7 Press the V or v button to select your system requirement For example choose I for theTV broadcasts or EXT if you wish to view signals from your VCR or other equipment you have connected to the scart sockets AV1 AV2 etc Press b b...

Страница 33: ...offers a direct link between the TV and VCR If you have a Smartlink VCR please refer to those instructions for further information Note To operate correctly your VCR must be connected to the C socket of the TV using a fully wired 21 pin scart lead Connecting to external audio equipment Plug in your Hi Fi system to socket D if you wish to amplify the sound from the TV The volume level can still be ...

Страница 34: ...low 2 Switch on your equipment to view the signal 3 Press the DIGITAL button when you wish to return to normal TV operation Note To avoid picture distortion do not connect equipment to the G and H sockets at the same time Connecting headphones Plug in your headphones to the headphone socket This can be found on the left side of the TV On screen symbol Usage For equipment connected to sockets G and...

Страница 35: ...get to select VCR or DVD using the MODE button every time you wish to operate that equipment with this remote control Note The brand codes you set may be lost if weak batteries are not replaced immediately Should this happen use the above procedure to reset the code A small label has been attached to the inside of the battery cover for you to make a note of your brand codes Not all brands and mode...

Страница 36: ...or CENELEC standard including audio video input RGB input TV audio video output AV3 socket 21 pin Euro connector CENELEC standard including audio video input S video input selectable audio video output socket RCA connectors variable output for audio signals socket Conditional Access Module Side terminals socket Video input phono jack socket S Video input 4pin DIN socket Audio inputs phono jacks so...

Страница 37: ...sions from the transmitter you are currently using Unsuitable aerial Weak signal Scrambled subscription only channel Programme information without picture or sound Fault Volume control Wrong external mode selected Colour level setting Plug in the TV Press the button on the front of the TV If the indicator is on press the button or a numbered button on the remote control Check the aerial connection...

Страница 38: ...ty regulations However should the glass become damaged at any time it is strongly recommended that a replacement is obtained from an authorised Sony dealer 1 Lift the glass and move toward the TV 2 3 Tilt the glass panel forwards at the top to engage all the locating pins then push forward firmly to secure 4 2 3 6 5 4 Supporting the glass panel tilt it away from the TV Carefully remove the glass p...

Страница 39: ...32nxcover fm Page 3 Wednesday September 5 2001 9 06 AM ...

Страница 40: ...s than two people Always assume the correct posture when lifting Standing at the side of the TV place one hand under the glass panel on the front of the TV as shown Lift and carry the TV to its required position Do not place the TV on an unstable surface 4 206 381 62 420638162 32nxcover fm Page 4 Friday September 7 2001 10 29 AM ...

Отзывы: