background image

48

GB

C:\Documents and 
Settings\pc13\Desktop\JC060000_2662263323DDW880_GB\2662263323\GB05AMP_HT-
DDW880-CEL.fm

masterpage: Left

HT-DDW880

2-662-263-

32

 (3

x

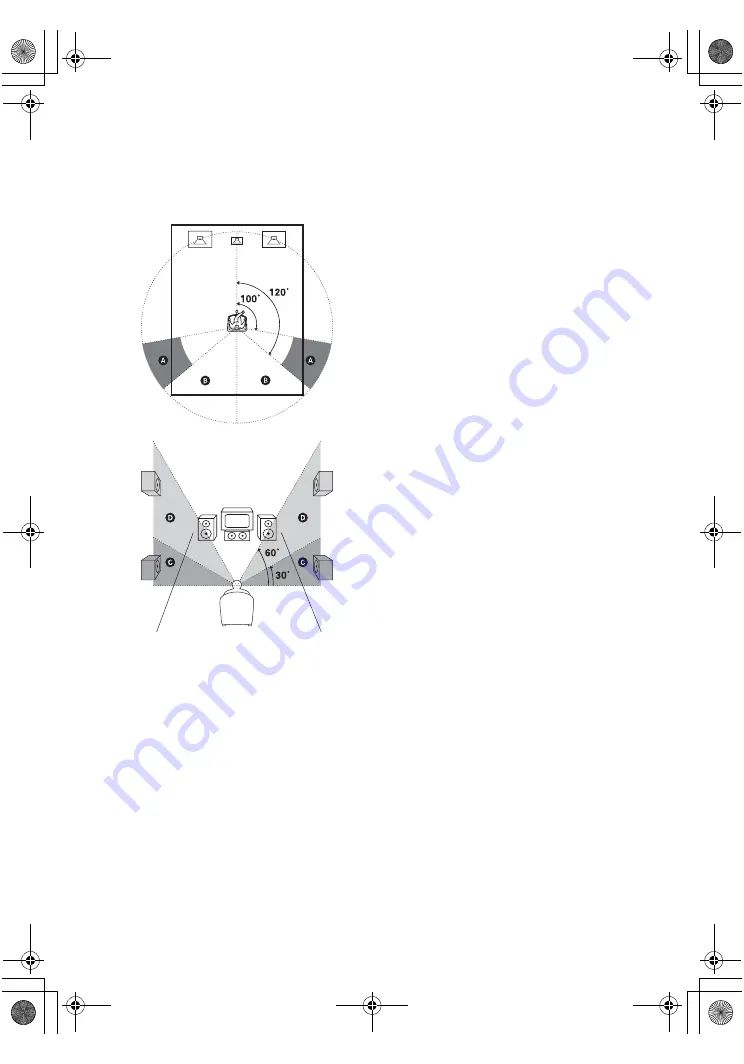
SUR POS.


(Surround speaker position)

Lets you specify the location of your surround 
speakers for proper implementation of the 
surround effects in the Cinema Studio EX 
modes (page 52).

• SIDE/LO

Select if the location of your surround 
speakers corresponds to sections 

A

 and 

C

.

• SIDE/HI

Select if the location of your surround 
speakers corresponds to sections 

A

 and 

D

.

• BEHD/LO

Select if the location of your surround 
speakers corresponds to sections 

B

 and 

C

.

• BEHD/HI

Select if the location of your surround 
speakers corresponds to sections 

B

 and 

D

.

Tip

Surround speaker position is designed specifically 
for implementation of the Cinema Studio EX modes. 
For other sound fields, speaker position is not so 
critical.
Those sound fields were designed under the premise 
that the surround speakers would be located behind 
the listening position, but presentation remains fairly 
consistent even with the surround speakers 
positioned at a rather wide angle. However, if the 
speakers are pointing toward the listener from the 
immediate left and right of the listening position, the 
surround effects become unclear unless set to 
“SIDE/LO” or “SIDE/HI”.
Nevertheless, each listening environment has many 
variables, such as wall reflections, and you may 
obtain better results using “BEHD/HI” if your 
speakers are located high above the listening 
position, even if they are located to the immediate 
left and right.
Therefore, although it may result in a setting 
contrary to the above explanation, we recommend 
that you playback multi channel surround encoded 
software and select the setting that provides a good 
sense of spaciousness and that best succeeds in 
forming a cohesive space between the surround 
sound from the surround speakers and the sound of 
the front speakers. If you are not sure which sounds 
best, select “BEHD/LO” or “BEHD/HI” and then 
use the speaker distance parameter and speaker level 
adjustments to obtain proper balance.

x

DIMMER (Brightness of the 
display)

Lets you adjust the brightness in 3 steps.

GB01COV_HT-DDW880-CEL.book  Page 48  Friday, July 21, 2006  11:37 AM

Содержание HT-DDW880

Страница 1: ...nd Settings pc13 Desktop JC060000_2662263323DDW880_GB 2662263323 GB01COV_HT DDW880 CEL fm masterpage Right 2006 Sony Corporation 2 662 263 32 3 Home Theatre System Operating Instructions HT DDW880 GB01COV_HT DDW880 CEL book Page 1 Friday July 21 2006 11 37 AM ...

Страница 2: ...er European countries with separate collection systems WARNING Do not install the appliance in a confined space such as a bookcase or built in cabinet This symbol on the product or on its packaging indicates that this product shall not be treated as household waste Instead it shall be handed over to the applicable collection point for the recycling of electrical and electronic equipment By ensurin...

Страница 3: ...nd Pro Logic Surround and the DTS Digital Surround System Manufactured under license from Dolby Laboratories Dolby Pro Logic Surround EX and the double D symbol are trademarks of Dolby Laboratories DTS DTS ES Neo 6 and DTS 96 24 are trademarks of Digital Theater Systems Inc This receiver incorporates High Definition Multimedia Interface HDMITM technology HDMI the HDMI logo and High Definition Mult...

Страница 4: ... VIDEO menu 46 Settings for the system SYSTEM menu 47 Calibrating the appropriate settings automatically A CAL menu 49 Enjoying Surround Sound Enjoying Dolby Digital and DTS Surround sound AUTO FORMAT DIRECT 49 Selecting a pre programmed sound field 51 Using only the front speakers and sub woofer 2CH STEREO 53 Resetting sound fields to the initial settings 54 Tuner Operations Listening to FM AM ra...

Страница 5: ...LE AV IN VIDEO L AUDIO R MEMORY ENTER TUNING MODE TUNING 2CH A F D MOVIE MUSIC MULTI CH IN MUTING DISPLAY INPUT MODE INPUT SELECTOR MASTER VOLUME 1 3 2 5 7 6 4 9 8 q qa qs ql qd qf qg qh qj PUSH qk Name Function A 1 Press to turn the receiver on or off page 29 37 38 54 56 77 B SPEAKERS OFF A B A B Press to select OFF A B A B of the front speakers page 30 C Display The current status of the selecte...

Страница 6: ... CH IN jacks page 35 J INPUT SELECTOR Turn to select the input source to playback page 35 37 38 55 58 61 63 65 K MOVIE MUSIC Press to select sound fields MOVIE MUSIC page 51 L A F D Press to select A F D mode page 49 M 2CH Press to select 2CH STEREO mode page 53 54 N TUNING Press to scan a station page 55 57 O TUNING MODE Press to select the tuning mode page 55 58 77 P MEMORY ENTER Press to store ...

Страница 7: ...gital format disc be sure that you have made digital connections and that INPUT MODE is not set to ANALOG page 61 Name Function E PRO LOGIC II IIx Lights up when the receiver applies Pro Logic processing to 2 channel signals in order to output the center and surround channel signals PRO LOGIC II lights up when the Pro Logic II Movie Music Game decoder is activated PRO LOGIC IIx lights up when the ...

Страница 8: ...s a digital signal being input through the COAXIAL jack or when INPUT MODE is set to COAX IN page 61 N OPT Lights up when INPUT MODE is set to AUTO and the source signal is a digital signal being input through the OPTICAL jack or when INPUT MODE is set to OPT IN page 61 O SLEEP Lights up when the sleep timer is activated page 64 Name Function P Playback channel indicators L R C SL SR S SB The lett...

Страница 9: ... DVD IN ASSIGNABLE VIDEO 2 IN MONITOR OUT A DIGITAL INPUT section OPTICAL IN jack Connects to a DVD player etc The COAXIAL jack provides a better quality of loud sound page 23 26 COAXIAL IN jack HDMI IN MONITOR OUT jacka b Connects to a DVD player or a satellite tuner The image and the sound are output to a TV or a projector page 25 B VIDEO AUDIO INPUT OUTPUT section AUDIO IN OUT jack Connects the...

Страница 10: ...eceiver page 28 AM ANTENNA Connects to the AM loop antenna supplied with this receiver page 28 White L Red R White L Red R Black Remote commander Name Function A AV 1 Press to turn on or off the audio video components that the remote is programmed to operate If you press 1 B at the same time it will turn off the receiver and other components SYSTEM STANDBY Note The function of the AV 1 switch chan...

Страница 11: ...r VCD player LD player DVD player MD deck DAT deck tape deck Blu ray disc recorder hard disc recorder or PSX Name Function J MUTING Press to mute the sound K MASTER VOL a Press to adjust the volume level of all speakers at the same time L AMP MENU Press to display the menu of the receiver Then use the control buttons to perform menu operations M TV VIDEO Press to select the input signal TV input o...

Страница 12: ...then press CLEAR to clear a mistake when you press the incorrect numeric button return to continuous playback etc of the CD player DVD player Blu ray disc recorder PSX or satellite tuner Name Function Z TUNING Press to scan a station Press to skip tracks of the VCR CD player VCD player LD player DVD player MD deck DAT deck tape deck Blu ray disc recorder hard disc recorder or PSX 2CH Press to sele...

Страница 13: ...lect track number 10 select channel numbers of the TV VCR satellite tuner Blu ray disc recorder hard disc recorder or PSX 10 11 Press ALT G and then press 10 11 to select track numbers over 10 of the CD player VCD player LD player MD deck tape deck TV VCR Blu ray disc recorder hard disc recorder PSX or satellite tuner wj Input buttons Press one of the buttons to select the component you want to us...

Страница 14: ...ecoding mode on page 44 Example of a 6 1 channel speaker system configuration AFront speaker L BFront speaker R CCenter speaker DSurround speaker L ESurround speaker R FSurround back speaker GSub woofer Tip Since the sub woofer does not emit highly directional signals you can place it wherever you want Before you install the speakers and sub woofer be sure to attach the supplied foot pads to preve...

Страница 15: ... for the wall material and strength As a plaster board wall is especially fragile attach the screws securely to a beam and fasten them to the wall Install the speakers on a vertical and flat wall where reinforcement is applied Contact a screw shop or installer regarding the wall material or screws to be used Sony is not responsible for accident or damage caused by improper installation insufficien...

Страница 16: ... b Use the long speaker cords to connect the surround and surround back speakers and the short speaker cords to connect the front and center speakers VIDEO 1 MULTI CH IN FRONT CENTER SUB WOOFER SURROUND VIDEO IN AUDIO IN VIDEO IN VIDEO OUT VIDEO 2 AUDIO IN MD TAPE SA CD CD L R L R L R L L R R OUT IN IN VIDEO IN DVD AUDIO IN AUDIO OUT VIDEO OUT DVD IN VIDEO 2 IN MONITOR OUT COMPONENT VIDEO Y ASSIGN...

Страница 17: ...ring to the speaker label on the rear panel of the speakers The center speaker and sub woofer do not have any character on the speaker label For details on the speaker type see page 3 Tip Use the supplied speakers to optimize the system s performance Character on speaker label Speaker type L Front left R Front right SL Surround left SR Surround right SB Surround back GB01COV_HT DDW880 CEL book Pag...

Страница 18: ... jacks etc This connection is used to output audio decoded by the component s internal multi channel decoder through this receiver b Model equipped only with AUDIO OUT L R jacks etc The sound quality depends on the connecting jack Refer to the illustration that follows Select the connection according to the jacks of your components How to hook up your components Component With Page Super Audio CD ...

Страница 19: ...nd sub woofer using the controls on the connected component Connecting components with multi channel output jacks DIGITAL OPTICAL VIDEO 1 IN VIDEO 2 IN DVD IN COAXIAL AM ANTENNA VIDEO 1 VIDEO IN AUDIO IN AUDIO OUT VIDEO IN VIDEO OUT VIDEO 2 AUDIO IN MD TAPE SA CD CD L R L R SUB WOOFER L L R R OUT IN IN VIDEO IN DVD AUDIO IN AUDIO OUT VIDEO OUT DVD IN VIDEO 2 IN MONITOR OUT COMPONENT VIDEO Y ASSIGN...

Страница 20: ... ANTENNA VIDEO 1 MULTI CH IN FRONT CENTER SUB WOOFER SURROUND VIDEO IN AUDIO IN AUDIO OUT VIDEO IN VIDEO OUT VIDEO 2 AUDIO IN L R L R SUB WOOFER L R VIDEO IN DVD AUDIO IN AUDIO OUT VIDEO OUT DVD IN VIDEO 2 IN MONITOR OUT COMPONENT VIDEO Y ASSIGNABLE PB CB B Y PR CR R Y MONITOR CENTER SURROUND BACK SURROUND FRONT A R R L L SPEAKERS HDMI DVD IN ASSIGNABLE VIDEO 2 IN MONITOR OUT R SA CD CD IN MD TAPE...

Страница 21: ...monitor or a projector to the MONITOR OUT jack on the receiver Turn on the receiver when the video and audio of a playback component are being output to a TV through the receiver If the power supply of the receiver is not on neither video nor audio is transmitted Reassigning video input signals to another input Component video input signals can be reassigned to another input page 61 You can also r...

Страница 22: ...and audio of a playback component are being output to a TV via the receiver If the power supply of the receiver is not turned on neither video nor audio is transmitted Hooking up a TV monitor DIGITAL OPTICAL VIDEO 1 IN VIDEO 2 IN DVD IN COAXIAL AM ANTENNA VIDEO 1 MULTI CH IN FRONT CENTER SUB WOOFER SURROUND VIDEO IN AUDIO IN AUDIO OUT VIDEO IN VIDEO 2 AUDIO IN MD TAPE SA CD CD L R L R L R SUB WOOF...

Страница 23: ... Do not bend or tie the optical digital cords Tip All the digital audio jacks are compatible with 32 kHz 44 1 kHz 48 kHz and 96 kHz sampling frequencies Hooking up a DVD player DVD recorder AM ANTENNA MULTI CH IN FRONT CENTER SUB WOOFER SURROUND VIDEO IN AUDIO OUT VIDEO IN VIDEO OUT VIDEO 2 AUDIO IN MD TAPE SA CD CD L R L R SUB WOOFER L L R R OUT IN IN VIDEO IN VIDEO OUT DVD IN VIDEO 2 IN MONITOR ...

Страница 24: ... display For details see Naming inputs page 63 DIGITAL OPTICAL VIDEO 1 IN VIDEO 2 IN DVD IN COAXIAL AM ANTENNA MULTI CH IN FRONT CENTER SUB WOOFER SURROUND AUDIO OUT VIDEO IN VIDEO OUT VIDEO 2 AUDIO IN MD TAPE SA CD CD L R L L R SUB WOOFER L L R R OUT IN IN VIDEO IN AUDIO IN MONITOR CENTER SURROUND BACK SURROUND FRONT A R R L L SPEAKERS HDMI DVD IN ASSIGNABLE VIDEO 2 IN MONITOR OUT R DVD DVD IN VI...

Страница 25: ...k component are being output to a TV via the receiver If the power supply of the receiver is not turned on neither video nor audio is transmitted Audio signals sampling frequency bit length etc transmitted from a HDMI jack may be restricted by the connected component Check the setup of the connected component if the image is poor or the sound does not come out of a component connected via the HDMI...

Страница 26: ...48 kHz and 96 kHz sampling frequencies Hooking up a satellite tuner AM ANTENNA VIDEO 1 MULTI CH IN FRONT CENTER SUB WOOFER SURROUND VIDEO IN AUDIO IN AUDIO OUT VIDEO IN VIDEO OUT MD TAPE SA CD CD L R L R L R SUB WOOFER L L R OUT IN IN VIDEO IN DVD AUDIO IN AUDIO OUT VIDEO OUT MONITOR CENTER SURROUND BACK SURROUND FRONT A R R L L SPEAKERS DVD IN MONITOR OUT DIGITAL OPTICAL VIDEO 1 IN VIDEO 2 IN DVD...

Страница 27: ...IN FRONT CENTER SUB WOOFER SURROUND VIDEO IN AUDIO OUT VIDEO OUT VIDEO 2 AUDIO IN MD TAPE SA CD CD L R L R SUB WOOFER L L R R OUT IN IN VIDEO IN DVD AUDIO IN DVD IN VIDEO 2 IN MONITOR OUT COMPONENT VIDEO Y ASSIGNABLE PB CB B Y PR CR R Y MONITOR CENTER SURROUND BACK SURROUND FRONT A R R L L SPEAKERS HDMI DVD IN ASSIGNABLE VIDEO 2 IN MONITOR OUT VIDEO 3 IN PORTABLE AV IN AUDIO IN VIDEO IN L R AUDIO ...

Страница 28: ... After connecting the FM wire antenna keep it as horizontal as possible DIGITAL OPTICAL VIDEO 1 IN VIDEO 2 IN DVD IN COAXIAL AM VIDEO 1 MULTI CH IN FRONT CENTER SUB WOOFER SURROUND VIDEO IN AUDIO IN AUDIO OUT VIDEO IN VIDEO OUT VIDEO 2 AUDIO IN MD TAPE SA CD CD L R L R L R SUB WOOFER L L R R OUT IN IN VIDEO IN DVD AUDIO IN AUDIO OUT VIDEO OUT DVD IN VIDEO 2 IN MONITOR OUT COMPONENT VIDEO Y ASSIGNA...

Страница 29: ...e receiver for this operation 1 Press 1 to turn off the receiver 2 Hold down 1 for 5 seconds PUSH and ENTER appears on the display alternately 3 Press MEMORY ENTER After CLEARING appears on the display for a while CLEARED appears The following items are reset to their factory settings All settings in the LEVEL TONE SUR TUNER AUDIO VIDEO and SYSTEM menus The sound field memorized for each input and...

Страница 30: ...es the receiver replace all the batteries with new ones 6 Selecting the speaker system You can select the front speakers you want to drive Be sure to use the buttons on the receiver for this operation Press SPEAKERS OFF A B A B repeatedly to select the front speaker system you want to drive To turn off the speaker output press SPEAKERS OFF A B A B repeatedly until the SP A and SP B indicators on t...

Страница 31: ...ace the tripod at your listening position Be sure to remove any obstacles in the path between the optimizer microphone and the speakers When you face the speaker towards the optimizer microphone you will get a more accurate measurement Press AUTO CAL The following appears on the display A CAL 5 t A CAL 4 t A CAL 3 t A CAL 2 t A CAL 1 Before you perform Auto Calibration 1 AUTO CAL MIC SPEAKERS OFF ...

Страница 32: ...ically after each measurement process as follows Error code t blank display t error code t blank display a t PUSH t blank display t ENTER a Appears when there are more than one error code To rectify the error 1 Record down the error code 2 Press the control button 3 Press 1 to turn off the receiver 4 Rectify the error For details see Error code and remedies below 5 Turn on the receiver and perform...

Страница 33: ...ing code Explanation Solution WARN 40 The environment is noisy Make sure the environment is quiet during Auto Calibration WARN 50 The center speaker is not connected Be sure to connect the center speaker WARN 51 The surround speakers are not connected Be sure to connect the surround speakers WARN 52 The surround back speaker is not connected Be sure to connect the surround back speaker WARN 60 The...

Страница 34: ... T TONE Y The test tone is output from each speaker in sequence as follows Front left t Center t Front right t Surround right t Surround back t Surround left t Sub woofer 6 Adjust the speaker levels and balance using the LEVEL menu so that the level of the test tone sounds the same from each speaker For details see Adjusting the level LEVEL menu page 42 Tips To adjust the level of all speakers at ...

Страница 35: ...rease the volume Turn off the receiver Playback H X m M VIDEO1 VIDEO2 SYSTEM STANDBY SLEEP VIDEO3 DVD MD TAPE SA CD CD TUNER AUX MULTI CH TOP MENU GUIDE AV MENU MUTING MASTER VOL DISPLAY RETURN EXIT D TUNING DISC ALT ANT CLEAR SEARCH MODE 2CH A F D 1 2 3 4 5 6 7 8 9 0 10 10 11 12 MOVIE SUBTITLE MEMORY ENTER MUSIC AUDIO ANGLE TUNING JUMP TIME PRESET CH D SKIP FM MODE DUAL MONO x O f F G g 1 3 MUTIN...

Страница 36: ...evel To listen to the sub woofer Be sure to use the buttons on the sub woofer for this operation 1 Press POWER The POWER indicator lights up 2 Turn LEVEL to adjust the volume Set the volume level to suit your preference according to the selected input as slight adjustments may enhance the sound Note Do not set the volume of the sub woofer to maximum as extraneous noise may be heard GB01COV_HT DDW8...

Страница 37: ...E MUSIC MULTI CH IN MUTING DISPLAY INPUT MODE INPUT SELECTOR MASTER VOLUME 1 5 5 3 2 3 Notes The operation is described for a Sony Super Audio CD player Refer to the operating instructions supplied with the Super Audio CD player or CD player Tips You can select the sound field to suit the music Refer to page 51 for details Recommended sound fields Classical HALL Jazz JAZZ Live concert CONCERT You ...

Страница 38: ...tions supplied with the TV and DVD player Check the following if you cannot listen to multi channel sound Be sure the sound source corresponds to the multi channel format Be sure this receiver is connected to the DVD player via a digital connection Be sure the digital audio output of the DVD player is set up properly Tips Select the sound format of the disc to be played if necessary You can select...

Страница 39: ... button V v repeatedly to select the parameter you want to adjust 5 Press the control button or control button b to enter the parameter 6 Press control button V v repeatedly to select the setting you want The setting is entered automatically To return to the previous display Press control button B To exit the menu Press AMP MENU Note Some parameters and settings may appear dimmed on the display Th...

Страница 40: ...rround back speaker level SB LVL SB 10 dB to SB 10 dB 1 dB step SB 0 dB Sub woofer level SW LVL SW 10 dB to SW 10 dB 1 dB step SW 0 dB Dynamic range compressora D RANGE COMP OFF COMP STD COMP MAX COMP OFF TONE 43 2 TONE Front speaker bass level BASS LVL BASS 6 dB to BASS 6 dB 1 dB step BASS 0 dB Front speaker treble level TRE LVL TRE 6 dB to TRE 6 dB 1 dB step TRE 0 dB SUR 43 3 SUR Sound field sel...

Страница 41: ...igna b HDMI A DVD VD1 DVD VD3 DVD DVD DVD MD DVD CD VD2 VD1 VD2 VD2 VD2 VD3 VD2 MD VD2 CD DVD DVD for DVD VD2 VD2 for VIDEO 2 Naming inputsa NAME IN SYSTEM 47 7 SYSTEM Front speaker distancea FRT DIST DIST 1 0 m to DIST 7 0 m 0 1 m step DIST 3 0 m Center speaker distancea CNT DIST DIST xx m between front speaker distance and 1 5 m 0 1 m step DIST 3 0 m Surround left speaker distancea SL DIST DIST ...

Страница 42: ...x SR LVL Surround right speaker level x SB LVL Surround back speaker level x SW LVL Sub woofer level x D RANGE Dynamic range compressor Lets you compress the dynamic range of the sound track This may be useful when you want to watch movies at low volumes late at night Dynamic range compression is possible with Dolby Digital sources only COMP OFF The dynamic range is not compressed COMP STD The dyn...

Страница 43: ...eters see Navigating through menus page 39 and Overview of the menus page 40 SUR menu parameters x S F SELCT Sound field selection Lets you select the sound field you want For details see Enjoying Surround Sound page 49 Note The receiver lets you apply the last selected sound field to an input whenever it is selected Sound Field Link For example if you select HALL for the SA CD CD input then chang...

Страница 44: ...oded with both 5 1 channel signals and an extension stream designed for returning those signals to 6 1 discrete channels Discrete 6 1 channel signals are DVD specific signals not used in movie theaters Notes There may be no sound from the surround back speaker in Dolby Digital EX mode Some discs have no Dolby Digital Surround EX flag even though the packages have Dolby Digital EX logos In this cas...

Страница 45: ...f preset stations For details see Naming preset stations page 58 Settings for the audio AUDIO menu You can use the AUDIO menu to make settings for the audio to suit your preference Select 5 AUDIO in the amplifier menus For details on adjusting the parameters see Navigating through menus page 39 and Overview of the menus page 40 AUDIO menu parameters x DEC PRI Digital audio input decoding priority ...

Страница 46: ...a monitor or a projector This parameter is valid only when you use a sound field selected with the 2CH or A F D buttons This parameter is not valid when PCM 96 kHz DTS 96 24 or DTS 2048 signals are input the receiver performing DTS ES Matrix 6 1 decoding MULTI CH IN function is selected x NAME IN Naming inputs Lets you set the name of inputs For details see Naming inputs page 63 Settings for the v...

Страница 47: ...the front speaker distance A to a distance 4 5 meters closer to your listening position D x SB DIST Surround back speaker distance Lets you set the distance from your listening position to the surround back speaker Surround back speaker distance should be set from a distance equal to the front speaker distance A to a distance 4 5 meters closer to your listening position E Tip The receiver lets you...

Страница 48: ...remains fairly consistent even with the surround speakers positioned at a rather wide angle However if the speakers are pointing toward the listener from the immediate left and right of the listening position the surround effects become unclear unless set to SIDE LO or SIDE HI Nevertheless each listening environment has many variables such as wall reflections and you may obtain better results usin...

Страница 49: ...LIBRATION page 31 Enjoying Dolby Digital and DTS Surround sound AUTO FORMAT DIRECT The Auto Format Direct A F D mode allows you to listen to higher fidelity sound and select the decoding mode for listening to a 2 channel stereo sound as multi channel sound Press A F D repeatedly to select the sound field you want For details see Types of A F D mode page 50 Enjoying Surround Sound 2CH A F D 1 2 3 4...

Страница 50: ...verdubbed or old movies PRO LOGIC II MUSIC PLII MS 5 channel Performs Dolby Pro Logic II Music mode decoding This setting is ideal for normal stereo sources such as CDs PRO LOGIC II GAME PLII GM 5 channel Performs Dolby Pro Logic II Game mode decoding This setting is ideal for game softwares Dolby Pro Logic IIx PRO LOGIC IIx MOVIE PLIIX MV 6 channel Performs Dolby Pro Logic IIx Movie mode decoding...

Страница 51: ... When you select decoding modes other than Dolby Pro Logic IIx multi channel sound being encoded is output Selecting a pre programmed sound field You can take advantage of surround sound simply by selecting one of the receiver s pre programmed sound fields They bring the exciting and powerful sound of movie theaters and concert halls into your home Press MOVIE repeatedly to select a sound field fo...

Страница 52: ...mode is ideal for watching science fiction or action movies with lots of sound effects CINEMA STUDIO EX C DCS C ST EX C Reproduces the sound characteristics of the Sony Pictures Entertainment scoring stage This mode is ideal for watching musicals or films where orchestra music is featured in the soundtrack Music HALL HALL Reproduces the acoustics of a classical concert hall JAZZ CLUB JAZZ Reproduc...

Страница 53: ...t be able to hear any sound coming directly from the surround speakers This function does not work in the following cases MULTI CH IN is selected For signals with a sampling frequency of more than 48 kHz The surround back decoding mode does not function when a sound field for movie or music is selected page 44 Tip You can identify the encoding format of DVD software etc by looking at the logo on t...

Страница 54: ...adcasts through the built in tuner Before operation make sure you have connected the FM and AM antennas to the receiver page 28 Tip The tuning scale for direct tuning differs depending on the area code as shown in the following table For details on area codes see page 3 The AM tuning scale can be changed page 76 AUTO CAL MIC SPEAKERS OFF A B A B PHONES VIDEO 3 IN PORTABLE AV IN VIDEO L AUDIO R MEM...

Страница 55: ...numeric buttons 1 Press TUNER repeatedly to select the FM or AM band You can also use INPUT SELECTOR on the receiver 2 Press D TUNING 3 Press the numeric buttons to enter the frequency Example 1 FM 102 50 MHz Select 1 b 0 b 2 b 5 b 0 Example 2 AM 1 350 kHz Select 1 b 3 b 5 b 0 If you have tuned in an AM station adjust the direction of the AM loop antenna for optimum reception 4 Press ENTER You can...

Страница 56: ...earest signal The selected RDS stations are sorted alphabetically by their Program Service name then assigned a 2 character preset code For more details on RDS see page 59 Regular FM stations are assigned 2 character preset codes and stored after the RDS stations When this process is finished FINISH appears on the display momentarily and the receiver returns to normal operation Notes Do not press ...

Страница 57: ...up for a few seconds Perform steps 4 and 5 before MEMORY goes out 4 Press ALT and then press the numeric buttons to select a preset number You can also press TUNING or TUNING to select a preset number If MEMORY goes outbefore you select the preset number start again from step 3 5 Press ENTER You can also use MEMORY ENTER on the receiver The station is stored as the selected preset number If MEMORY...

Страница 58: ...iver 2 Tune in the preset station you want to create an index name for page 58 3 Press AMP MENU 1 LEVEL appears on the display 4 Press control button V v repeatedly to select 4 TUNER 5 Press the control button or control button b to enter the menu Tuning to preset stations H X m M MD TAPE SA CD CD TUNER AUX MULTI CH D TUNING DISC ALT ANT CLEAR SEARCH MODE 2CH A F D 1 2 3 4 5 6 7 8 9 0 10 10 11 12 ...

Страница 59: ...rea code CEL CEK only When you name an RDS station and tune in that station the Program Service name appears instead of the name you entered You cannot change the Program Service name The name you entered will be overwritten by the Program Service name Using the Radio Data System RDS Models of area code CEL CEK only This receiver also allows you to use RDS Radio Data System which enables radio sta...

Страница 60: ...how to and advice programs DRAMA Radio plays and serials CULTURE Programs about national or regional culture such as language and social concerns SCIENCE Programs about the natural sciences and technology VARIED Other types of programs such as celebrity interviews panel games and comedy POP M Popular music programs ROCK M Rock music programs EASY M Easy Listening LIGHT M Instrumental vocal and cho...

Страница 61: ... COAX IN Specifies the digital audio signals input to the DIGITAL COAXIAL jack OPT IN Specifies the digital audio signals input to the DIGITAL OPTICAL jack ANALOG Specifies the analog audio signals input to the AUDIO IN L R jacks Note Some audio input modes may not be set up depending on the input Watching component images from other inputs COMPONENT VIDEO ASSIGN You can reassign a component video...

Страница 62: ... video input as the original input when it has been reassigned to another input Watching HDMI images from other inputs HDMI ASSIGN Except for models of area code E51 You can reassign a HDMI input to another input 1 Press AMP MENU 1 LEVEL appears on the display 2 Press control button V v repeatedly to select 6 VIDEO 3 Press the control button or control button b to enter the menu 4 Press control bu...

Страница 63: ...reassigned to another input Naming inputs You can enter a name of up to 8 characters for inputs and display it on the receiver s display This is convenient for labeling the jacks with the names of the connected components 1 Press the input button to select the input you want to create an index name for You can also use INPUT SELECTOR on the receiver 2 Press AMP MENU 1 LEVEL appears on the display ...

Страница 64: ...b t Sound field currently applied a Index name appears only when you have assigned one to the input or preset station page 58 63 Index name does not appear when only blank spaces have been entered or it is the same as the input name b During RDS reception only models of area code CEL CEK only page 59 Using the Sleep Timer You can set the receiver to turn off automatically at a specified time Press...

Страница 65: ...en MULTI CH IN is selected The analog audio signals of the current or previously used input are output You can record from a video component using the receiver See the operating instructions supplied with your recording component 1 Press one of the input buttons to select the playback component You can also use INPUT SELECTOR on the receiver 2 Prepare the playback component for playing For example...

Страница 66: ...Press ENTER Once the numeric code has been verified the indicator slowly flashes twice and the remote automatically exits the programming mode 5 Repeat steps 1 to 4 to control other components To cancel programming Press RM SET UP during any step The remote automatically exits the programming mode To activate the input after programming Press the programmed button to activate the input you want If...

Страница 67: ... There is a chance however that your component will not respond to some or all of the codes All of the input buttons on this remote may not be available when used with your particular component To control a CD player To control a DAT deck To control an MD deck To control a tape deck To control an LD player To control a video CD player Maker Code s SONY 101 102 103 DENON 104 123 JVC 105 106 107 KEN...

Страница 68: ...PS 729 730 731 PIONEER 729 RCA PROSCAN 722 729 730 731 741 747 SAMSUNG 742 743 744 745 SANYO 717 720 746 SHARP 748 749 TELEFUNKEN 751 752 TOSHIBA 747 755 756 ZENITH 754 Maker Code s SONY 401 402 403 PANASONIC 406 408 PHILIPS 407 PIONEER 409 TOSHIBA 404 DENON 405 Maker Code s SONY 403 Maker Code s SONY 501 502 DAEWOO 504 505 506 507 515 544 FISHER 508 GOLDSTAR LG 503 511 512 515 534 544 GRUNDIG 517...

Страница 69: ...d together x Dolby Digital Digital audio encoding decoding technology developed by Dolby Laboratories Inc It consists of front left right center surround left right and sub woofer channels It is a designated audio standard for DVD video and also known as 5 1ch surround Since surround information is recorded and reproduced in stereo more realistic sound with fuller presence is delivered than with D...

Страница 70: ...x DTS Neo 6 This technology converts 2ch stereo recorded audio for 6 1ch playback There are two modes to select according to the playback source or your preference CINEMA for movies and MUSIC for stereo sources such as music x DTS Digital Surround Digital audio encoding decoding technology for theaters developed by Digital Theater Systems Inc It compresses audio less than Dolby Digital delivering ...

Страница 71: ...tion to prevent heat buildup and prolong the life of the receiver Do not place the receiver near heat sources or in a place subject to direct sunlight excessive dust or mechanical shock Do not place anything on top of the cabinet that might block the ventilation holes and cause malfunctions Do not place the receiver near equipment such as a television VCR or tape deck If the receiver is being used...

Страница 72: ...ou remedy the problem There is no sound no matter which component is selected or only a very low level sound is heard Check that the speakers and components are connected securely Check that both the receiver and all components are turned on Check that MASTER VOLUME is not set to VOL MIN Check that the SPEAKERS OFF A B A B is not set to OFF Check that headphone is not connected Press MUTING to can...

Страница 73: ...m the OPTICAL input jack or to OPT IN for the sources from the COAXIAL input jack Check that the MULTI CH IN function is not selected Except for models of area code E51 The source sound input to the HDMI jack on the receiver is not output from the TV speaker Check the HDMI connection You cannot listen to the Super Audio CD by connecting HDMI Depending on the playback component you may need to set ...

Страница 74: ...g To prevent a gas explosion do not connect the ground wire to a gas pipe Radio stations cannot be tuned in Check that the antennas are connected securely Adjust the antennas and connect an external antenna if necessary The signal strength of the stations is too weak when tuning in with automatic tuning Use direct tuning Make sure you set the tuning interval correctly when tuning in AM stations wi...

Страница 75: ... the system by the message Refer to the following table to solve the problem If any problem persists consult your nearest Sony dealer If an error message appears while you perform Auto Calibration see Error and warning codes page 32 to solve the problem DEC EROR Appears when a signal the receiver cannot decode ex DTS CD is input and DEC PRI on the AUDIO menu is set to DEC PCM Set it to DEC AUTO pa...

Страница 76: ... there may be no sound output Inputs Analog Inputs Digital Outputs Analog Reproduction frequency range 28 20 000 Hz Tone FM tuner section Tuning range 87 5 108 0 MHz Antenna FM wire antenna Antenna terminals 75 ohms unbalanced Intermediate frequency 10 7 MHz AM tuner section Tuning range Models of area code E51 With 10 kHz tuning scale 530 1 610 kHz3 With 9 kHz tuning scale 531 1 602 kHz3 Models o...

Страница 77: ...ront center speakers Full range magnetically shielded Surround surround back speakers Full range Speaker units 80 mm cone type Enclosure type Bass reflex Rated Impedance 6 ohms Dimension w h d Approx Front speakers 130 211 136 mm Center speaker 245 109 136 mm Surround surround back speakers 115 169 141 mm Mass Approx Front speakers 1 4 kg Center speaker 1 3 kg Surround surround back speakers 1 0 k...

Страница 78: ...dio cord 1 Speaker cords Long 3 Short 3 Coaxial digital cord 1 Footpads Speakers 24 Sub woofer 4 Remote commander RM AAP013 1 R6 size AA batteries 2 Optimizer microphone ECM AC2 1 Speakers Front speakers 2 Center speaker 1 Surround speakers 2 Surround back speaker 1 Sub woofer 1 Design and specifications are subject to change without notice For details on the area code of the component you are usi...

Страница 79: ...MI ASSIGN 62 I Initial setup 29 INPUT MODE 61 M MD deck connecting 18 Menu A CAL 49 AUDIO 45 LEVEL 42 SUR 43 SYSTEM 47 TONE 43 TUNER 45 VIDEO 46 Muting 35 N Naming 58 63 R RDS 59 Recording onto a MiniDisc or audio tape 65 onto a recording media 65 S Satellite tuner hooking up 21 Selecting component 35 sound field 51 speaker system 30 Sleep Timer 64 Sound fields resetting 54 selecting 51 Speakers c...

Страница 80: ...nts and Settings pc13 Desktop JC060000_2662263323DDW880_GB 2662263323 GB08BKC_HT DDW880 CEL fm Sony Corporation Printed in Malaysia model name1 STR DG500 2 662 263 32 3 GB01COV_HT DDW880 CEL book Page 80 Friday July 21 2006 11 37 AM ...

Отзывы: