

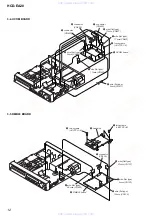
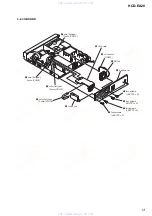


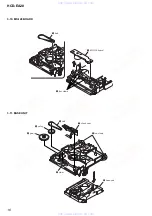
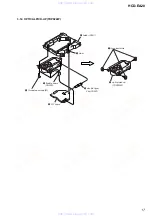


24
HCD-EA20
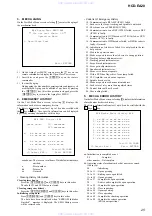
2-7. Disc Check Memory
Disc Check Memory
1. SL Disc check
2. CD Disc check
3. DL Disc check
Exit: RETURN
On this screen, measure the mirror time of chucked disc, and write
to the EEPROM.
2-8. Error Rate Display
Error Rate Display
UC
CR
Address
PI1 Err
Now xx xxxx xxxxxxxx
Max xx xxxx xxxxxxxx
Avg xx xxxx
PI2 Err
Now xx xxxx xxxxxxxx
Max xx xxxx xxxxxxxx
Avg xx xxxx
PO Err
Now xx xxxx xxxxxxxx
Max xx xxxx xxxxxxxx
Avg xx xxxx
Start:ENTER
Exit: RETURN
On this screen, measure and display the error rate.
UC : Incorrect value
CR : Correct value
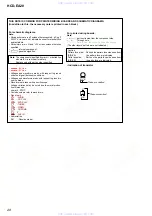
2-9. SACD Water Mark Check (Not used)
SACD Water Mark Check
PSP AMP
PSN
Start: ENTER
Exit: RETURN
On this screen, measure the PSP AMP value and PSN value of SACD
water mark.
2-5. EEPROM Write Adjust
EEPROM Write Adjust
1. Focus
Offset
2. Focus
Gain
3. Trk.
Offset Coarse
4. ——————
5. Trk.
Gain
6. EQ
Boost
0.All Servo Off
Exit: RETURN
On this screen, each item can be adjusted automatically. Select the
desired number
[1]
to
[10/0]
from the remote commander, and
selected item is adjusted automatically.
[1]
Focus Offset : Adjusts focus offset.
[2]
Focus Gain : Adjusts focus gain.
[3]
TRK. Offset : Adjusts tracking offset of the RF amp
(IC001) side.
[5]
TRK. Gain : Adjusts track gain.
[6]
EQ Boost
: Adjusts amount of boost of equalizer.
[10/0]
: All servo off.
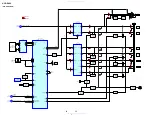
2-6. Memory Check
Display images are shown as follows, and all two screens are able
to switch by the
O
key (UP) or
o
key (DW).
EEPROM Data 1/2
CD
SL
L0
L1
Focus
Gain
xx
xx
xx
xx
Trk.
Gain
xx
xx
xx
xx
Focus
Offset
xx
xx
xx
xx
Trk.
Offset
xx
xx
xx
xx
EQ.
Boost
xx
xx
xx
xx
PI
Level
xx
xx
--
--
Fcs. Balance
--
xx
--
--
Jitter
xx
xx
xx
xx
Mirror Time
xx
xx
xx
--
FE Level
--
xx
--
--
Traverse Lv1.
--
xx
--
--
CDRW DVDRW
xx
xx
xx
xx
xx
Prev:UP Default:CLR
Exit:RET
On this screen, current servo adjusted data stored in the EEPROM
are displayed. The adjusted data are initialized by pressing the
[CLEAR]
key, but be careful that they are not recoverable after
initialization.
Before clearing the adjusted data, make a note of the set data. This
screen will also appear if
[0]
-All is selected in the Drive Auto
Adjustment. In this case, default setting cannot be made.
www. xiaoyu163. com
QQ 376315150
9
9
2
8
9
4
2
9
8
TEL 13942296513
9
9
2
8
9
4
2
9
8
0
5
1
5
1
3
6
7
3
Q
Q
TEL 13942296513 QQ 376315150 892498299
TEL 13942296513 QQ 376315150 892498299


