


19
HCD-EA20
[COLOR SYSTEM SELECTION]
* Color system can be changed to PAL or NTSC.
Procedure:
1.
Set the FUNCTION to DVD.
2.
Turn off the main power.
3.
Press two buttons
.
PREV and POWER simultaneously.
4.
The color system is changed to PAL or NTSC.
[DISC TRAY LOCK]
The disc tray lock function for the antitheft of an demonstration
disc in the store is equipped.
Setting Procedure :
1.
Press the POWER button to turn the set on.
2.
Press two buttons of
x
and
A
simultaneously for five seconds.
3.
The message “LOCKED” is displayed and the tray is locked.
Releasing Procedure :
1.
Press two buttons of
x
and
A
simultaneously for five seconds
again.
2.
The message “UNLOCKED” is displayed and the tray is
unlocked.
Note:
When “LOCKED” is displayed, the tray lock is not released
by turning power on/off with the POWER button.
[DVD SERVICE MODE (OSD)]
Procedure:
1.
Press the POWER button on the main unit or the
?/1
button
on the remote commander to turn the set on.
2.
Set the FUNCTION to DVD.
3.
While pressing two buttons of
x
and
A
, turn the VOLUME
knob clockwise to enter the test mode.
4.
The message “SERVICE IN” is displayed on the display. The
Test Mode Menu is displayed on the TV screen.
5.
To execute each function, select the number on the remote
commander.
6.
See the following section for explanation in detail.
7.
To exit from this mode, press the POWER button.
[INTERLACE FORCED SETTING MODE]
* The video signal format is forced to set to interlace.
Procedure:
1.
Set the FUNCTION to DVD.
2.
Press three buttons of
x
,
.
PREV and FUNCTION
simultaneously.
3.
The video signal format is forced to set to interlace.
[GENERAL DESCRIPTION]
The Test Mode allows you to make diagnosis and adjustment easily
using the remote commander and monitor TV. The instructions,
diagnostic results, etc. are given on the on-screen display (OSD).
[TEST DISC LIST]
Use the following test disc on test mode.
TDV-520CSO (DVD-SL): PART No. J-2501-236-A
LUV-P01 (CD):
PART No. 4-999-032-01
TDV-540C (DVD-DL):
PART No. J-2501-235-A
Note:
Do not use exiting test disc for DVD.
[STARTING TEST MODE]
1.
Press the POWER button to turn the power on, and set the
function to DVD.
2.
While pressing the
x
and
A
button, turn the VOLUME
knob clockwise to enter the test mode.
3.
It displays “SERVICE IN” on the fluorescent indicator tube,
and displays the Test Mode Menu on the monitor screen as
follows. (At the bottom of the menu screen, the model name
and revision number are displayed)
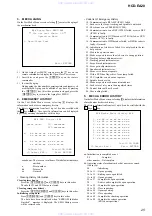
Test Mode Menu
0. Syscon Diagnosis
1. Drive Auto Adjustment
2. Drive Manual Operation
3. Mecha Aging
4. Emergency History
5. Mecha Error History
6. Version Information
7. Video Level Adjustment
Exit: POWER Key
Model :DAV-EA20
xx
Revision :x.xx
4.
To execute each function, select the desired menu and press its
number on the remote commander (RM-SS200).
5.
To release from test mode, press the POWER button and turn
the power off.
[OPERATING TEST MODE]
0.
SYSCON DIAGNOSIS
The same contents as board detail check by serial interface can be
checked from the remote commander operation.
On the Test Mode Menu screen, press
[10/0]
key on the remote
commander, and the following Check Menu will be displayed.
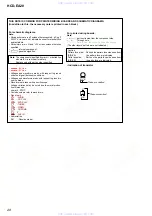
### Syscon Diagnosis ###
Check Menu
0. Quit
1. All
2. Version
3. EEPROM
4. GPIO
5. SD Bus
6. Video
0-0. Quit
Quit the Syscon Diagnosis and return to the Test Mode Menu.
www. xiaoyu163. com
QQ 376315150
9
9
2
8
9
4
2
9
8
TEL 13942296513
9
9
2
8
9
4
2
9
8
0
5
1
5
1
3
6
7
3
Q
Q
TEL 13942296513 QQ 376315150 892498299
TEL 13942296513 QQ 376315150 892498299


