background image

81

Additional Information

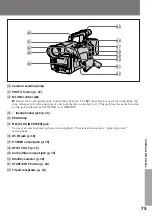
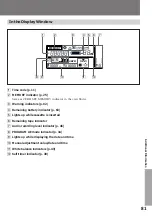
In the Display Window

1

Time code (p. 11)

2

MEMORY indicator (p. 25)

Same as ZERO SET MEMORY indicator in the viewfinder.

3

Warning indicators (p. 82)

4

Remaining battery indicator (p. 63)

5

Lights up while cassette is inserted

6

Remaining tape indicator

7

Audio recording level indicator (p. 46)

8

PROGRAM AE mode indicator (p. 34)

9

Lights up while displaying the date and time

Manual adjustment value/date and time

White balance indicators (p. 43)

!™

Self-timer indicator (p. 30)

{

§

v

e

ˇ

ı

t

AS

88.88

dB

88.888

18.

88

MEMORY

AMPM

min

1

4

3

5 6 7

2

8 9

!™

Содержание Handycam DCR-VX1000

Страница 1: ...and retain it for future reference Owner s Record The model and serial numbers are located on the bottom Record the serial number in the space provided below Refer to these numbers whenever you call upon your Sony dealer regarding this product Model No DCR VX1000 Model No AC V615 Serial No Serial No Digital Video Camera Recorder ...

Страница 2: ... are cautioned that any changes or modifications not expressly approved in this manual could void your authority to operate this equipment The shielded interface cable recommended in this manual must be used with the equipment in order to comply with the limits for a digital device pursuant to Subpart B of Part 15 of FCC Rules For customers in CANADA CAUTION TO PREVENT ELECTRIC SHOCK DO NOT USE TH...

Страница 3: ... Manual Adjustment 31 Focusing Manually 32 Using the PROGRAM AE Function 34 Adjusting the Exposure 38 Adjusting the Shutter Speed 40 Using the ND Filter 41 Using with the Zebra Pattern 42 Adjusting the White Balance 43 Adjusting the Recording Sound 46 Releasing the Steady Shot Function 48 Presetting the Adjustment for Picture Quality 49 for Playback Editing Searching the Recorded Picture 51 Checki...

Страница 4: ...Do not let the camcorder get wet Keep the camcorder from rain or sea water It may cause a malfunction and sometimes the malfunction cannot be repaired a Do not let sand get into the camcorder When you use the camcorder on a sandy beach or dusty place protect it from the sand or dust Sand or dust may cause the unit to malfunction and sometimes the malfunction cannot be repaired b Never leave the ca...

Страница 5: ... Wireless Remote Commander 1 p 76 2 NP 720 F730 Battery Pack 1 p 6 3 AC V615 AC power adaptor and DK 715 connecting cord 1 p 6 4 A V connecting cable 1 p 15 5 S video connecting cable 1 p 15 6 Shoulder strap 1 p 76 7 R6 size AA batteries for Remote Commander 2 p 77 8 Eyecup 1 p 11 9 Mini DV cassette 1 p 9 Before You Begin ...

Страница 6: ...utter of the AC power adaptor Then fit and slide the battery pack in the direction of the arrow The CHARGE lamp orange lights up Charging begins When charging is completed the CHARGE lamp goes out Unplug the unit from the wall outlet then remove the battery pack and install it on the camcorder 1 2 Charging Time Approximate minutes to charge an empty pack using the supplied AC power adaptor Lower t...

Страница 7: ...his is normal If the POWER lamp does not light disconnect the AC power cord After about one minute reconnect the AC power cord again You cannot operate the camcorder using the AC power adaptor while charging the battery pack When a fully charged battery pack is installed the CHARGE lamps will light once then go out Inserting the Battery Pack 1 Slide OPEN and open the battery cover 2 Insert the bat...

Страница 8: ...8 Charging and Inserting the Battery Pack To Remove the Battery Pack Slide the RELEASE knob leftward RELEASE Note on battery pack You cannot use NP 520 500H F750 battery pack ...

Страница 9: ...ks and are trademarks 4 3 EJECT To Eject the Cassette Slide EJECT After the cassette compartment opens take out the cassette You cannot eject the cassette while C MEMORY appears in the viewfinder because the camcorder is still writing information to the mini DV cassette mounted cassette memory p 83 In this case the cassette compartment automatically lifts up and opens after C MEMORY disappears To ...

Страница 10: ...NDBY PHOTOSTANDBY Basic Operations Camera Recording Make sure that a power source and a cassette are inserted You can hear the beep sound indicated with in the illustrations which confirms your operation Before you record one time events you may want to make a trial recording to make sure that you are using the camcorder correctly 1 Remove the hood cap and attach it to the grip strap 2 While press...

Страница 11: ...ondition is too bright Use the supplied large eyecup Fit it onto the camcorder by stretching the corners a little a If you wear glasses or you cannot view the corners Fold back the eyecup to see better b Note on beep sound As indicated with in the illustrations a beep sounds when you turn the power on or when you start recording and two beeps sound when you stop recording confirming the operation ...

Страница 12: ...You can shoot a subject that is at least about 2 6 feet 80 cm in the telephoto position 0 5 inch 1 cm in the wide position away from the lens surface Notes on Digital Zoom More than 10x zoom is performed digitally and the picture quality deteriorates as you go toward the T side If you do not want to use the digital zoom set the D ZOOM function to OFF in the menu system p 20 The horizontal bar in t...

Страница 13: ...e Lift the viewfinder up to record from a low position you can turn it up to about 80 degrees b In this case it s useful to use REC START STOP located under the carrying handle Cautions on the viewfinder Do not pick up the camcorder by the viewfinder c Do not place the camcorder so as to point the viewfinder toward the sun The inside of the viewfinder may be deformed Be careful in placing the camc...

Страница 14: ...phones not supplied Hold down the side of EDITSEARCH until the camcorder goes back to the scene you want The last recorded portion is played back To go forward hold down the side Editsearch Checking the Recorded Picture EDITSEARCH EDITSEARCH EDITSEARCH CAM E R A V TR POWER OFF LOCK STANDBY PHOTOSTANDBY 1 2 3 To begin rerecording Press START STOP Provided you do not eject the cassette the transitio...

Страница 15: ... video plug of the A V connecting cable b Connections for Playback Signal flow AUDIO IN AUDIO OUT S VIDEO OUT a S VIDEO IN TV VIDEO OUT b VIDEO IN If a VCR is connected to the TV Connect the camcorder to LINE IN on the VCR by using the supplied connecting cable Set the input selector on the VCR to LINE Set the TV VCR selector to VCR on the TV Signal flow TV VCR VIDEO AUDIO IN S VIDEO IN AUDIO OUT ...

Страница 16: ...The tape rewinds to the position you want 0 00 00 and stops Various Playback Modes To view a still picture playback pause Press P during playback To resume playback press P or When still picture mode lasts for 5 minutes or more the camcorder automatically enters stop mode To playback again press again To locate a scene Picture Search Keep pressing 0 or during playback To resume normal playback rel...

Страница 17: ...ress during playback Notes on playback The sound is muted in the various playback modes The previous scene may appear like mosaic noise during slow playback or playback pause This is not a malfunction To display the indicators Press DISPLAY p 76 Tape counter remaining battery indicator and other indicators appear on the connected TV screen To erase the indicators press DISPLAY again ...

Страница 18: ...happens restore the power supply again immediately Using the House Current To use the supplied AC power adaptor 1 Connect the AC power cord to a wall outlet 2 Connect the camcorder and the AC power adaptor using the supplied connecting cord Place Indoors Outdoor In a car Power source House current Battery pack 12 V or 24 V car battery You can charge the battery inserted in the camcorder by connect...

Страница 19: ...inal inside the shutter at the rear of the camcorder Notes on the POWER lamp The POWER lamp will remain lit for a while even if the unit is unplugged after use This is normal If the POWER lamp does not light disconnect the AC power cord After about one minute try again Using a Car Battery Use the DC V515 V700 pack not supplied Connect the cord of the DC pack to the cigarette lighter socket of a ca...

Страница 20: ...v to select the desired item then press EXECUTE 4 Press V or v to select the desired mode then press EXECUTE If you want to change the other modes repeat steps 3 and 4 5 Press MENU to erase the menu display Changing the Mode Settings To display the menu on the TV screen Connect the camcorder to your TV page 15 and press MENU Note on the menu system You may need to repeat step 3 before you select t...

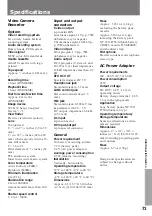
Страница 21: ...FF Select ON for cut recording When you remove the power source the setting becomes OFF INT REC SET INTERVAL REC TIME Normally select OFF Select ON to make interval recording Select INTERVAL to set or change the waiting time for interval recording Select REC TIME to set or change the recording time for interval recording When you remove the power source the setting becomes OFF but the waiting time...

Страница 22: ...d picture is searched without cassette memory function When DIGITAL MODE is set to OVERLAP You cannot set D ZOOM to ON Once you set DIGITAL MODE to OVERLAP D ZOOM settings are changed to OFF automatically About FRAME REC and INT REC setting Both settings are automatically set to off when Power switch is set to OFF or VTR Power source is disconnected PHOTO button is pressed Other settings retains a...

Страница 23: ...radually fades in over a still picture of the last scene recorded Using the Fader and Overlap Function When Fading in a 1 While the camcorder is in Standby mode press FADER OVERLAP The fade indicator starts flashing 2 Press START STOP to start recording The fade indicator stops flashing fading in and recording starts When Fading out b 1 During recording press FADER OVERLAP The fade indicator start...

Страница 24: ...t recorded scene OVERLAP To Cancel the Fade in Fade out Function Before pressing START STOP press FADER OVERLAP until the fade indicator disappears To use the fading function repeatedly Start from step 1 each time Notes on the fading and overlap function You cannot fade in fade out or use the overlap function while you record with interval recording cut recording or photo recording The last scene ...

Страница 25: ...til the camcorder goes to the point where you want to end the insertion b The camcorder enters Standby mode again 3 Press ZERO SET MEMORY The counter is reset to 0 00 00 ZERO SET MEMORY flashes and the ending point is stored in memory 4 Hold down the side of EDITSEARCH until the camcorder goes back to the point where you want to start the insertion a The camcorder enters Standby mode again 5 Press...

Страница 26: ...o set memory may not function when there is a blank portion between pictures on a tape You can re record without using the zero set memory Skip steps 2 and 3 Press START STOP to stop recording To use the insert recording repeatedly Start from step 1 each time Re recording a Picture in the Middle of a Recorded Tape ...

Страница 27: ...her positions while recording this operation is performed after recording 1 2 3 LOCK STANDBY PHOTOSTANDBY START STOP PHOTO Note on using self timer recording When you use self timer recording with photo recording you cannot select the picture In this case once you press PHOTO self timer recording starts and the still picture at the point the self timer starts is recorded When using the video print...

Страница 28: ...XECUTE 4 Press or to select INTERVAL then press EXECUTE 5 Press or to select the desired waiting time then press EXECUTE The time 30SEC 1MIN 5MIN 10MIN 6 Press or to select REC TIME then press EXECUTE 7 Press or to select the desired recording time then press EXECUTE The time 0 2SEC 0 5SEC 1SEC 2SEC 8 Press MENU to erase the menu display 9 Press START STOP to start interval recording 1 9 1 2 7 8 T...

Страница 29: ... REC then press EXECUTE 3 Press V or v to select ON then press EXECUTE 4 Press MENU to erase the menu display 5 Press START STOP on the camcorder or the Remote Commander to start cut recording The camcorder records about 6 frames then enters in recording standby mode 6 Move the subject and repeat step 5 1 1 4 2 3 5 To cancel the cut recording Set the FRAME REC mode to OFF in the menu system Turn S...

Страница 30: ...LF TIMER so that disappears from the viewfinder while the camcorder is in Standby mode Self timer recording mode is canceled when Self timer recording is finished Power switch is set to OFF or VTR Standby selector is set to LOCK Interval recording starts Cut recording starts To change the time for self timer recording Set it at the SELFTIMER mode in the menu system page 20 To use photo recording w...

Страница 31: ...l adjustment S Select You can select automatic or manual to adjust focusing at any mode Using Automatic Mode Set HOLD AUTO LOCK selector to AUTO LOCK In automatic mode the camcorder adjusts the exposure shutter speed white balance and recording level automatically The focus can be adjusted automatically by setting the FOCUS switch to AUTO When the A SHUTTER mode in the menu system page 20 is set t...

Страница 32: ... Too much brightness behind the subject c Horizontal stripes d Bright subject or subject reflecting light Shooting a stationary subject when using a tripod Focusing Manually When focusing manually first focus in telephoto before recording and then reset the shot length 1 Set FOCUS to MANUAL while the camcorder is recording or in Standby mode f appears in the viewfinder 2 Keep pressing the T teleph...

Страница 33: ...iewfinder Shooting in relatively dark places Shoot in wide angle after focusing in telephoto Shooting a scene with lots of movement in bright light Set the zoom button fully to the wide angle position Close ups Macro Set the zoom button fully to the wide angle position Focusing to Infinity Focus to infinity when the camcorder focuses on a nearby subject while you want on focus to a distant subject...

Страница 34: ...iority to Iris AEA A You can select the exposure iris to determine the desired depth of field Gain and the shutter speed are automatically set in combination with the exposure iris value to maintain appropriate exposure Turn the CONTROL dial to select the desired exposure iris value As you turn the dial the F value changes between F1 6 and F11 For a smaller exposure iris select a higher value Gain...

Страница 35: ...rs a smaller depth of field while the depth of field in wide angle position is greater Giving Priority to Shutter Speed AES S You can select the shutter speed between 1 60 and 1 10000 When you select a faster shutter speed movement appears clearer with less shaking when the tape is played back in still or slow mode This mode is most effective in the following cases A golf swing or a tennis match i...

Страница 36: ... Å appears in the display while the camcorder is in Standby mode or recording To return to automatic mode Set HOLD AUTO LOCK selector to AUTO LOCK or press PROGRAM AE repeatedly until AEA AES or Å disappears from the display About twilight mode setting The shutter speed is locked at 1 60 and to prevent the increase of noise the gain is adjusted Using the PROGRAM AE Function Example A golf swing or...

Страница 37: ...UTO LOCK selector to HOLD The EXPOSURE SHUTTER SPEED WHT BAL REC LEVEL PROGRAM AE buttons and CONTROL EXPOSURE dials do not function About the previous settings The lithium battery must be installed to temporarily save manual settings if you detach the battery The settings are saved for five minutes ...

Страница 38: ...tion while the camcorder is in Standby mode 2 Press EXPOSURE The exposure is locked at the value which was selected automatically at that time 3 Turn EXPOSURE dial to select the desired exposure value As you turn the dial the exposure iris value changes between OPEN and CLOSE and the exposure value changes between 0 3 dB and 18dB while the iris value is set to OPEN To increase the exposure to brig...

Страница 39: ... resumed Notes on exposure level When you select an exposure level that is too high the picture may be distorted To select 3dB select CUSTOM and set GAINSHIFT to 3dB in the menu system Note on iris gain value indicator The information of the EXPOSURE dial does not appear even if you press EXPOSURE while the camcorder is in PROGRAM AE mode AEA AES or Å Notes on while adjusting the exposure CONTROL ...

Страница 40: ...alue indicator in the viewfinder To lock the manual settings Set HOLD AUTO LOCK to HOLD after making the settings The EXPOSURE SHUTTER SPEED WHT BAL PROGRAM AE and REC LEVEL buttons the CONTROL and EXPOSURE dials do not function To return to automatic mode Set HOLD AUTO LOCK selector to AUTO LOCK To change the setting Repeat steps 1 to 4 above To cancel the setting Press the SHUTTER SPEED button a...

Страница 41: ...th the quantity of light you can record a picture clearly preventing the picture from going out of focus under bright conditions When ND ON flashes in the viewfinder a Set ND FILTER to ON When ND OFF flashes in the viewfinder b Set ND FILTER to OFF ND FILTER ON OFF ND FILTER ON OFF b a ...

Страница 42: ...ern Use the zebra pattern as a guide for adjusting the exposure iris and shutter speed so that you can get the desired picture Before you start recording set ZEBRA to ON in the menu system 1 Slide OPEN and open the battery cover while the camcorder is in Standby mode 2 Press MENU to display the menu in the viewfinder 3 Press or to select ZEBRA then press EXECUTE 4 Press or to select ON then press ...

Страница 43: ...tion changes quickly a Too bright place such as photography studios Under sodium lamps or mercury lamps w Outdoor mode Under a color matching fluorescent lamp Recording a sunset sunrise just after sunset just before sunrise b neon signs or fireworks c Setting the White Balance 1 Set HOLD AUTO LOCK selector to the center auto lock release position while the camcorder is in Standby mode 2 Press WHT ...

Страница 44: ...ttery are detached if the lithium battery is inserted You can achieve recording with natural colors without being affected by ambient light 1 Set HOLD AUTO LOCK selector to the center auto lock release position 2 Press WHT BAL twice to display in the viewfinder 3 Shoot a white object such as paper fully in the viewfinder 4 Press The indicator flashes rapidly When the white balance has been adjuste...

Страница 45: ...shoot with fluorescent lighting use automatic white balance mode If you use the e mode white balance may not be adjusted appropriately Shooting when the lighting condition changes When the lighting condition has changed readjust the white balance with the button while the camcorder is in Standby mode This button does not function during recording When you adjust the exposure iris and shutter speed...

Страница 46: ... 1 Set HOLD AUTO LOCK selector to the center position 2 Press REC LEVEL to display in the viewfinder 3 Turn CONTROL dial to adjust the sound level so that the PEAK indicator does not light up It is recommended to use headphones not supplied to monitor the sound when you adjust As you turn the dial the sound level changes between 0 no sound and 10 in 0 5 steps To lock the setting Set HOLD AUTO LOCK...

Страница 47: ...adjust the sound level To adjust press REC LEVEL again to display in the viewfinder Though the DV recording system records two stereo sounds to stereo 1 and 2 this camcorder records the sound to stereo 1 only You can adjust the play back sound balance between stereo 1 and 2 p 22 Sound level also appears at the lower right in the display window For example when 7 0 appears in the viewfinder 7 appea...

Страница 48: ...n Set STEADY SHOT to ON to display the Ó indicator Notes on the Steady Shot function The Steady Shot function will not correct excessive camera shake The Steady Shot function becomes less effective when using a teleconversion lens not supplied or wide teleconversion lens not supplied The Steady Shot function detects and compensates for camera shake You can turn off the Steady Shot function if you ...

Страница 49: ...ess or to select the desired item then press EXECUTE 7 Press or to adjust the selected mode then press EXECUTE 8 Press MENU to erase the menu display Item COLOR LV SHARPNESS WB SHIFT AE SHIFT GAINSHIFT Function to adjust the color intensity sharpness white balance brightness gain shift Adjustment value Decreases color intensity Increases color intensity Softer Sharper Bluish Reddish Darker Brighte...

Страница 50: ...XECUTE 4 Press to select RESET then press EXECUTE CP goes off in the viewfinder Checking the Custom Preset Setting You can display and check the custom preset setting in the viewfinder while recording Press CP CHECK located on the top of the camcorder while the camcorder is in Standby mode or recording Custom preset setting appears in the viewfinder About the gain shift setting Use the gain shift ...

Страница 51: ...NU to display the menu in the viewfinder 4 Set SEARCH to C MEMORY in the menu system 5 Press MENU to erase the menu display 6 Press SEARCH SELECT on the Remote Commander to select date search search with the date or photo search search the photo recorded pictures only 7 Press for upward or for downward on the Remote Commander to select the desired picture Cassette memory search starts About the ca...

Страница 52: ...Commander to select the desired picture Each time you press or the camcorder searches for the next scene 2 1 3 5 6 7 To stop searching Press πSTOP When you use a recorded tape which has blank portions between pictures The camcorder may not search for the recorded picture or data may not be stored Notes on searching Be sure to install the lithium battery when you use the cassette with cassette memo...

Страница 53: ...ess DATA CODE on the Remote Commander while playing back Each time you press the button the indicator changes recorded date and time various settings No indication cyclically in the viewfinder Press DATA CODE again to erase the display DATA CODE appears when the camcorder cannot read the data code because of a damaged tape or noise the tape was recorded without setting the date and time ...

Страница 54: ...e VCR using the supplied A V connecting cable page 15 or the DV connecting cable not supplied Use this camcorder as a player Using the A V connecting cable Set the input selector on the VCR to LINE Using the DV connecting cable Simply connect the DV connecting cable to DV IN OUT and DV products to DV IN About DV connecting cable You can record picture sound and system data at the same time on the ...

Страница 55: ...ite plug for audio on both the camcorder and the VCR With this connection the sound is monaural For fine synchro editing function You can edit precisely by connecting a control cable to the LANC jack of this camcorder and other video equipment having fine synchro editing function using this camcorder as a player Notes on editing when using the DV connecting cable You can connect one VCR only When ...

Страница 56: ...here you want to start editing then set the camcorder to recording pause mode 6 Press P on the camcorder and the VCR simultaneously to start editing The editing starts and new scene is inserted on the recorded tape The editing stops automatically near the counter zero point 0 00 00 00 1 4 3 5 6 To change the end point Press ZERO SET MEMORY after step 5 to go off the ZERO SET MEMORY indicator then ...

Страница 57: ... playback picture on a TV it must be an NTSC system based TV Check the following alphabetical list NTSC system countries Bahama Islands Bolivia Canada Central America Chile Colombia Ecuador Jamaica Japan Korea Mexico Peru Surinam Taiwan the Philippines the U S A Venezuela etc PAL system countries Australia Austria Belgium China Denmark Finland Germany Great Britain Holland Hong Kong Italy Kuwait M...

Страница 58: ...on The lithium battery installed at the factory may not last 1 year Notes on Lithium Battery Note that the lithium battery has a positive and a negative terminals as illustrated Be sure to install the lithium battery so that terminals on the battery match the terminals on the camcorder To avoid a poor connection clean the battery with a dry cloth before using it C R2025 C R2025 WARNING The battery...

Страница 59: ...p the battery pack or other power source attached Otherwise you will need to reset the date and time 1 Slide OPEN and open the battery cover 2 Push the battery down once and pull it out from the holder 3 Install the lithium battery with the positive side facing out Close the battery cover 1 2 3 ...

Страница 60: ...TE MENU EXECUTE JAN 1 19 9 5 JUL 4 19 9 6 EXECUTE EXECUTE EXECUTE B E E P E V F M O D E AM AM 1 9 9 6 JAN 1 AM AM PM PM You can reset the date or time in the menu system 1 Slide OPEN and open the battery cover 2 Press MENU to display the menu in the viewfinder 3 Select CLOCK SET then press EXECUTE 4 Press V or v to adjust the year and then press EXECUTE 5 Using V v and EXECUTE as step 4 adjust the...

Страница 61: ...ds When You Record You cannot use this camcorder and the DV connecting cable to copy a tape that has recorded the copyright control signals for copyright protection of software COPY INHIBIT appears on the TV or in the viewfinder if the play back signal of such a tape is input to this camcorder Audio mode The camcorder records sound in stereo 1 only in 12 bit mode 32 kHz but can play back sound rec...

Страница 62: ...ith the swab once every ten times you eject a cassette a To prevent accidental erasure Slide out the protect tab on the cassette so that the red portion is visible b When affixing a label on the mini DV cassette Be sure to affix a label on only the location as illustrated below so as not to cause malfunction of the camcorder c After using the mini DV cassette Rewind the tape to the beginning put t...

Страница 63: ...king at the viewfinder the lens moves automatically and the battery is used The battery is also used when a cassette is inserted or removed When to Replace the Battery Pack While you are using your camcorder the remaining battery indicator decreases gradually as battery power is used up Tips for Using the Battery Pack Notes on the Rechargeable Battery Pack Caution Never leave the battery pack unde...

Страница 64: ...d c The Life of the Battery Pack If the i indicator flashes rapidly just after turning on the camcordrer with a fully charged battery pack the battery pack should be replaced with a new fully charged one Charging Temperature You should charge batteries at temperatures from 50 F to 86 F from 10 C to 30 C Lower temperatures require a longer charging time Notes on Charging A Brand new Battery A brand...

Страница 65: ...can use the camcorder again On the Surface of the Tape If there is moisture on the surface of the tape when you insert cassette and press a tape transport button PLAY etc the 6 indicator flashes in the viewfinder If this happens none of the functions except cassette ejection will work Eject the cassette and leave it for about 1 hour If the 6 indicator does not light up when you insert the cassette...

Страница 66: ... viewfinder or mosaic noise appears on the playback picture or part of the picture remains the video heads may be dirty a b a Slight contamination b Critical contamination If this happens clean the video heads with the Sony DVM12CL cleaning cassette not supplied After checking the picture if it is still noisy repeat the cleaning Do not repeat cleaning more than 5 times Caution Do not use a commerc...

Страница 67: ...cloth or a soft cloth lightly moistened with a mild detergent solution Do not use any type of solvent which may damage the finish AC Power Adaptor Charging Use only a lithium ion type battery Charge the battery on a flat place without vibration The battery will get hot during charging However this is normal Others Unplug the unit from the wall outlet when not in use for a long time To disconnect t...

Страница 68: ...us manually p 32 Cause and or Corrective Actions Insert the battery pack p 7 The battery is dead m Use a charged battery pack p 6 Connect the AC power adaptor to a wall outlet p 18 While being operated in CAMERA mode the camcorder has been in the Standby mode for more than 5 minutes m Turn STANDBY down once and turn it up again p 11 The battery is dead m Use a charged battery pack p 6 The ambient ...

Страница 69: ...d Remote Commander does not work Cause and or Corrective Actions Adjust the viewfinder lens p 11 Select the channel or input for the camcorder correctly on the TV p 15 The contrast between the subject and background is too high The camcorder is not malfunctioning m Change locations The video heads may be dirty m Clean the heads using the Sony DVM12CL not supplied cleaning cassette p 66 The video h...

Страница 70: ... status shown by the CHARGE lamp proceeds within 1 hour there is no problem When the CHARGE lamp flashes again The problem is with the AC power adaptor Please contact your nearest Sony dealer in connection with the product with the problem 4 4 4 4 4 When the CHARGE lamp does not flash again If the charging status shown by the CHARGE lamp proceeds within 1 hour the problem is with the battery pack ...

Страница 71: ... than 2 2 kΩ RFU DC OUT Special mini jack DC 5 V Headphones jack Stereomini jack ø 3 5 mm LANC control jack Stereomini mini jack ø 2 5 mm MIC jack Stereomini jack 0 388 mV low impedance with 2 5 3 V DC output impedance 6 8 kΩ ø 3 5 mm DC input 4 pin connector DV input output 4 pin special connector General Power requirement On battery mounting surface 7 2 V battery pack 8 4 V AC power adaptor Aver...

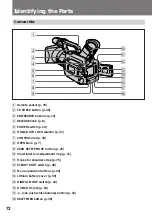
Страница 72: ... LOCK selector p 31 7 CONTROL dial p 34 8 OPEN knob p 7 9 ZERO SET MEMORY button p 25 0 Viewfinder lens adjustment ring p 11 Hooks for shoulder strap p 76 STEADY SHOT switch p 48 Menu operation buttons p 20 Lithium battery cover p 59 DIGITAL MODE switch p 24 DV IN OUT jack p 54 one push white balance button p 43 SELF TIMER button p 30 1 3 2 4 5 6 8 7 9 º ...

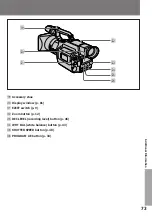
Страница 73: ...al Information ª Accessory shoe º Display window p 81 EJECT switch p 9 Zoom button p 12 REC LEVEL recording level button p 46 WHT BAL white balance button p 43 SHUTTER SPEED button p 40 PROGRAM AE button p 34 º ª ...

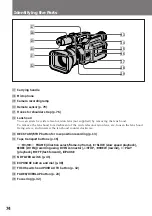
Страница 74: ...n the lens hood fixing screw and unscrew the lens hood counterclockwise REC START STOP button for low position recording p 13 Tape transport buttons p 16 7 FRAME direction select frame by frame SLOW slow speed playback rREC DV IN recording using DV IN connector πSTOP 0REW rewind PLAY playback FF fast forward PPAUSE ND FILTER switch p 41 EXPOSURE button and dial p 38 FOCUS switch and PUSH AUTO butt...

Страница 75: ...ment and peripherals connected to it This jack has the same function as the jack indicated as CONTROL L or REMOTE 2 headphones jack p 16 PEAK lamp MIC PLUG IN POWER jack Connect an external microphone not supplied This jack also accepts a plug in power microphone DC IN jack p 18 S VIDEO output jack p 15 RFU DC OUT p 15 ª Audio Video output jack p 15 º Standby selector p 10 START STOP button p 10 T...

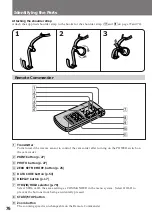
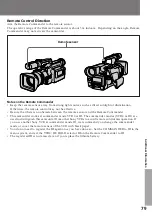
Страница 76: ...ter turning on the POWER switch on the camcorder 2 PRINT button p 27 3 PHOTO button p 27 4 ZERO SET MEMORY button p 25 5 DATA CODE button p 53 6 DISPLAY button p 17 7 VTR4 ID HOLD selector p 78 Select VTR4 or ID the same setting as COMMANDER in the menu system Select HOLD to prevent the buttons from being accidentally pressed 8 START STOP button 9 Zoom button The zooming speed is unchangeable on t...

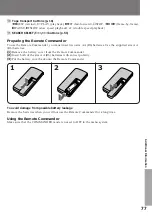
Страница 77: ...t insert two size AA R6 batteries Use the supplied size AA R6 batteries 1 Remove the battery cover from the Remote Commander 2 Insert both of the size AA R6 batteries with correct polarity 3 Put the battery cover back onto the Remote Commander 2 3 1 To avoid damage from possible battery leakage Remove the batteries when you will not use the Remote Commander for a long time Using the Remote Command...

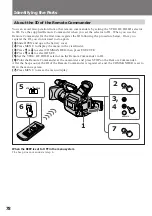
Страница 78: ...ain 1 Slide OPEN and open the battery cover 2 Press MENU to display the menu in the viewfinder 3 Press or to select COMMANDER then press EXECUTE 4 Press or to select ID SET 5 Set the VTR4 ID HOLD selector on the Remote Commander to ID 6 Point the Remote Commander at the camcorder and press STOP on the Remote Commander After the beep sound the ID of the Remote Commander is registered and the COMMAN...

Страница 79: ...e is no obstacle between the remote sensor and the Remote Commander This camcorder works at commander mode VTR 4 or ID The commander modes VTR 4 or ID are used to distinguish this camcorder from other Sony VCRs to avoid remote control misoperation If you use another Sony VCR at commander mode ID we recommend you change the commander mode or cover the remote sensor of the VCR with black paper You d...

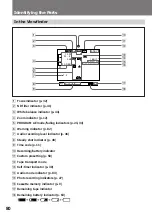
Страница 80: ...M AE mode fading indicators p 23 34 6 Warning indicator p 82 7 Audio recording level indicator p 46 8 Steady shot indicator p 48 9 Time code p 11 º Recording battery indicator Custom presetting p 50 Tape transport mode Self timer indicator p 30 Audio mode indicator p 83 Photo recording indicators p 27 Cassette memory indicator p 9 Remaining tape indicator Remaining battery indicator p 63 1 3 2 4 7...

Страница 81: ...ing battery indicator p 63 5 Lights up while cassette is inserted 6 Remaining tape indicator 7 Audio recording level indicator p 46 8 PROGRAM AE mode indicator p 34 9 Lights up while displaying the date and time º Manual adjustment value date and time White balance indicators p 43 Self timer indicator p 30 v e ˇ ı tAS 88 88dB 88 888 18 88 MEMORY AMPM min 1 4 3 5 6 7 2 8 9 º ...

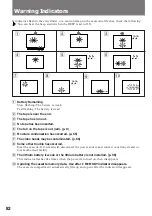
Страница 82: ...tab on the tape is out red p 9 6 Moisture condensation has occurred p 65 7 The video heads may be contaminated p 66 8 Some other trouble has occurred Eject the cassette If it remains lit disconnect the power source and contact your Sony dealer or local authorized facility 9 The lithium battery is weak or the lithium battery is not installed p 58 This indicator flashes five times when the power is ...

Страница 83: ...ignal to provide copyright protection in an analog connection Iris p 35 Same as lens diaphragm Adjustable lens opening mechanism ND filter p 41 Optical filter for decreasing the quantity of light without adjusting iris or shutter speed This camcorder has a built in ND filter and turns the filter on off is switchable NTSC system p 57 TV color system standard used in USA Canada and other parts of th...

Страница 84: ...cond and frame As the picture and counter reading are identical you can locate a desired scene precisely with the counter This camcorder uses the drop frame mode which adjusts the difference between the logical time code running at 30 frames s and real NTSC system time code running at 29 97 frames s so that the two are in sync White balance p 43 Adjusts the color balance so that white subjects loo...

Страница 85: ...85 Additional Information ...

Страница 86: ...86 ...

Страница 87: ...87 Additional Information ...

Страница 88: ...Frame by frame 17 Gain shift 49 H I J K L M Headphone 16 ID number 78 ID system 78 Iris 35 LANC 75 Lithium battery 58 Menu system 20 MIC microphone jack 11 N O P Q ND filter 41 One push white balance 44 Overlap 24 PEAK lamp 75 Playback on TV 16 Playback pause 16 Power sources 18 PROGRAM AE 34 R Recording lamp 74 Recording sound level 46 Rec Review 14 Remote Commander 76 Rewind 16 RFU adaptor 15 S ...

Отзывы: