background image

22

Me

n

u

s

Using the Channel Setup 

 Menu

Favorite 
Channels

Quick access 
to favorite
channels

Press 

g

 to open the Favorite Channels menu:

1

Use the 

F

 or 

f

 buttons to select the position (1-5) where you want to set 

a favorite channel, then press 

.

2

Using the 

F

 or 

f

 button, select the desired channel.

3

Press 

 to change to the channel selected.

4

Press 

G

 to return to the Channel Setup menu or press 

 to exit.

Cable

On:


Select if you are receiving cable channels with a CATV 
cable.

Off:


Select if you are using a TV antenna

.

Channel Fix

2-6:


Select when you want to control all channel selection 
through a cable box or VCR. Select the appropriate 
channel (usually 3 or 4) and use the cable box’s or VCR’s 
remote control for channel selection.

Video 1:

Select from available video inputs when you have 
connected video equipment (e.g. satellite receiver) and 
you want your TV fixed to it.

Off:


Channel Fix is not set.

Auto Program

Press 

g

 to perform Auto Program.

The TV will scan through all available channels and program receivable 
channels.

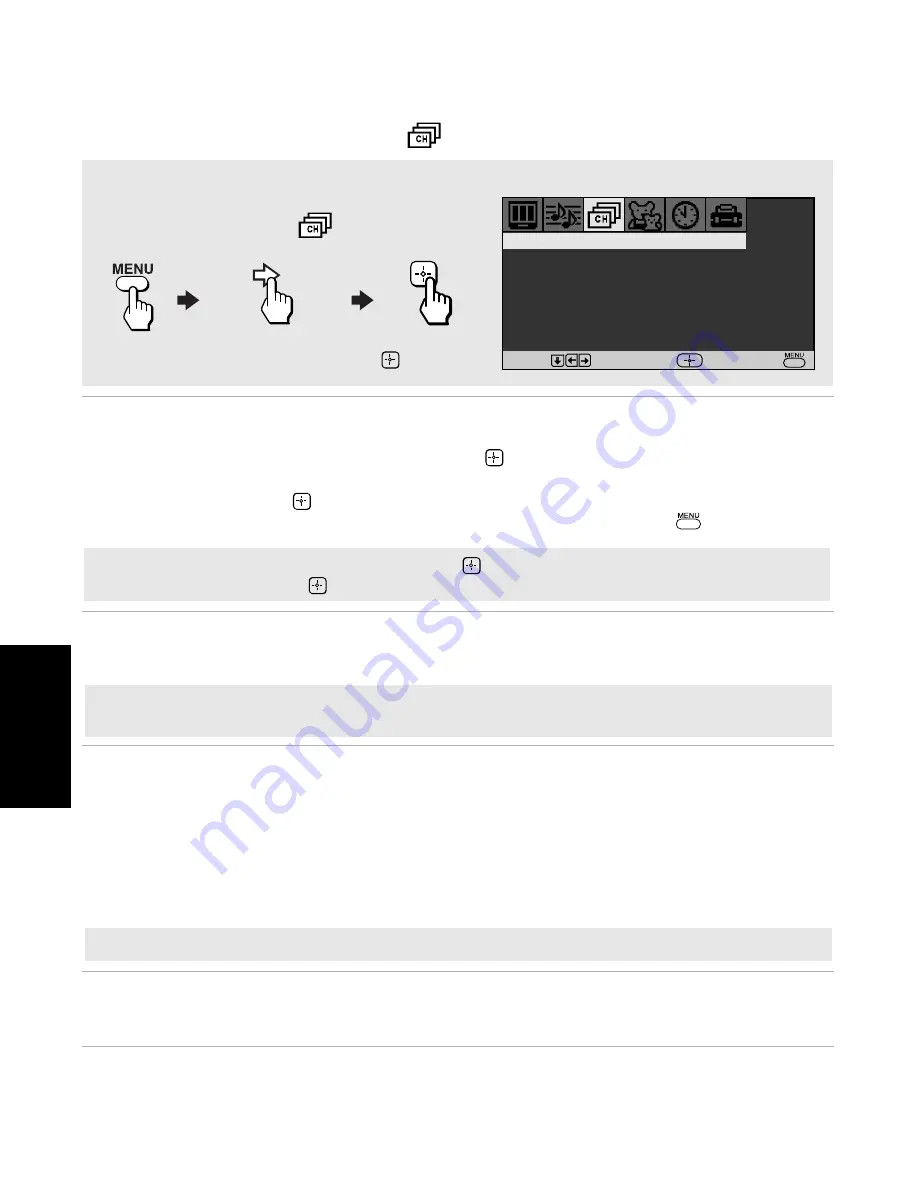
To access the Channel Setup menu, refer to the following steps:

Press 

f

 to highlight an option, then 

.

To Display

To Highlight 

To Select

Channel Setup

Favorite Channels
Cable : On
Channel Fix : Off

Auto Program
Channel Skip/Add
Channel Label

Move

Select

End

To use Favorite Channels: Exit all menus and press


. Press 

F

 or 

f


to move the cursor to the desired 

channel number and press


After changing your cable settings, you will need to perform Auto Program. When Channel Fix is set, you 
will not be able to use your Cable settings.

You cannot use Favorite Channels, Channels Skip/Add, or Channel Cable with Channel Fix is set.

Содержание FD TRINITON WEGA KV-24FS120

Страница 1: ...Connecting Additional Equipment 4 101 452 21 KV 20FS120 KV 24FS120 2004 by Sony Corporation Operating Instructions ...

Страница 2: ...User Guide ...

Страница 3: ...h the instructions may cause harmful interference with radio communications However there is no guarantee that interference will not occur in a particular installation If this equipment does cause harmful interference to radio or television reception which can be determined by turning the equipment off and on the user is encouraged to try to correct the interference by one or more of the following...

Страница 4: ...nattended and unused for long periods of time unplug it from the wall outlet as a precaution against the possibility of an internal malfunction that could create a fire hazard Do not disconnect the antenna or the power cord during a heavy storm Lightning may strike while you are holding the cable or cord causing serious injury Turn off your TV and wait for the weather to improve Object and Liquid ...

Страница 5: ... during a lightning storm or when it is left unattended and unused for long periods of time unplug it from the wall outlet and disconnect the antenna This will prevent damage to the receiver due to lightning and power line surges Service Damage Requiring Service Unplug the set from the wall outlet and refer servicing to qualified service personnel under the following conditions When the power cord...

Страница 6: ...User Guide ...

Страница 7: ...c Connections 6 Connecting Additional Equipment 7 Using Basic Functions Quick Start to the Menus 16 Using the Menus How to Access Menus 19 Using the Video Menu 20 Using the Audio Menu 21 Using the Channel Setup Menu 22 Using the Parental Control Menu 24 Parental Control 25 United States Selecting Custom Rating Options 27 Canada Selecting Custom Rating Options 29 Using the Timer Menu 30 Using the S...

Страница 8: ...User Guide ...

Страница 9: ...VD Y PB PR Inputs A component video input connection for a superior picture quality Parental Control V Chip A tool to help parents monitor what their children watch on TV by establishing rating limits Favorite Channels Instant access to your favorite channels with the touch of a button Energy Star A recognized symbol of energy efficiency Direct MTS Allows direct access for changing your Multi Chan...

Страница 10: ...ccess the menu without the remote control Press to display the on screen menu Use the and buttons on the front Audio Video panel instead of the F and f buttons on the remote control Use the button on the front Audio Video panel instead of the G g and buttons on the remote control Press again when the setting or adjustment is complete Under normal conditions batteries will last up to six months If ...

Страница 11: ... Simulated Surround Off 8 Moves the cursor in the on screen menus Press the arrow buttons to move the cursor then press the center button to select or access an option 9 RESET Press to return to factory settings while in an on screen menu q POWER Press when you want to turn the TV on or off qa TV VIDEO Cycles through available video inputs qs and ENTER Change the channels directly Press buttons to...

Страница 12: ......

Страница 13: ...udio cables must still be connected 2 VHF UHF Connects to your VHF UHF antenna or cable 3 Video Audio L Mono R Connects to the AUDIO and VIDEO output jacks on your VCR or other video equipment A second video input jack VIDEO 2 is located on the front panel of the TV These AUDIO VIDEO input jacks provide better picture quality than the VHF UHF jack 4 Y PB PR L R Connects to the component video Y PB...

Страница 14: ... below If you are connecting to an indoor or outdoor antenna you may need to adjust the orientation of the antenna for best reception Use this to connect the TV to a cable system or an antenna with a 75 ohms cable usually built into newer homes Use this to connect the TV to a dipole antenna also known as rabbit ears antenna usually found in to older homes ...

Страница 15: ...ting Audio Video cables not supplied from AUDIO and VIDEO OUT on your VCR to AUDIO VIDEO IN on your TV For better picture quality use S VIDEO instead of the yellow Audio Video cable S VIDEO does not provide sound the audio cables must still be connected To watch video programs from your VCR tune your TV to channel 3 or 4 as set on the rear of your VCR S VIDEO is only for KV 24FS120 model You can u...

Страница 16: ...he TV Optional Connection To view channels from your cable box tune your TV to channel 3 or 4 as set on the rear panel of your cable box and use the cable box s remote control to change channels If you will be controlling all channel selection through your cable box you should consider using the Channel Fix feature by setting your TV to channnel 3 or 4 see page 22 1 From cable 2 Coaxial Cable Cabl...

Страница 17: ...ing Audio Video cables not supplied from Audio and Video OUT on your VCR to Audio Video IN on your TV For better picture quality use S VIDEO instead of the yellow Audio Video cable S VIDEO does not provide sound the audio cables must still be connected If you will be controlling all channel selection through your cable box you should consider using the Channel Fix feature by setting your TV to cha...

Страница 18: ...iver to AUDIO and VIDEO IN on your TV Optional Connection For better picture quality use S VIDEO instead of the yellow audio video cable S VIDEO does not provide sound the audio cables must still be connected To watch video programs from your Satellite receiver tune your TV to channel 3 or 4 S VIDEO is only for KV 24FS120 model You can use the button to switch between the VHF UHF and VIDEO inputs ...

Страница 19: ...g audio video cables not supplied connect AUDIO and VIDEO OUT on your satellite receiver to AUDIO and VIDEO IN on your VCR 5 Using audio video cables not supplied connect AUDIO and VIDEO OUT on your VCR to AUDIO and VIDEO IN on your TV Optional Connection To view from the satellite receiver or VCR select the video input to which your satellite receiver or VCR is connected by pressing on the remote...

Страница 20: ... your DVD player is equipped with component video outputs Y PB PR L R you can improve the picture quality by using component video cables 480i only 1 Using component video cables not supplied connect the Y PB PR OUT on your DVD player to Y PB PR IN on your TV 2 Connect AUDIO OUT on your DVD player to AUDIO IN on your TV The Y PB PR outputs on your DVD player are sometimes labeled Y CB and CR or Y ...

Страница 21: ...k on the front of your TV Headphone jack is STEREO Connecting a Camcorder Using audio video cables not supplied connect AUDIO and VIDEO OUT on your camcorder to AUDIO and VIDEO IN on your TV Front A V Panel Front A V Panel A V output Audio R red Audio L white Video yellow ...

Страница 22: ...our first VCR to AUDIO VIDEO IN on your second VCR b Using audio video cables not supplied connect the AUDIO VIDEO OUT on your Camcorder to the AUDIO VIDEO IN on your second VCR 2 Using audio video cables not supplied connect AUDIO VIDEO OUT on the second VCR to the AUDIO VIDEO IN on your TV Camcorder for playback A V output VCR for playback VCR for recording Rear of TV Video yellow Audio L white ...

Страница 23: ...4 Press F or f to highlight On or Off according to how you connected your TV Press to select 5 Press f to highlight Auto Program Press to search for channels 6 After Auto Program finishes press to exit To reset the TV to factory settings 1 Turn the TV on 2 Hold down on the remote control 3 Press and release the POWER button on the TV front panel The TV will turn itself off then back on 4 Release W...

Страница 24: ...imits on your TV based on a program s rating or content Picture Controls Mode Vivid Color Temp Cool VM High Move Select End Video Video Vivid Brightness Color Hue Sharpness Picture Return Select End Audio MTS Stereo Effect Off Steady Sound Off Balance Treble Bass Move Select End Channel Setup Favorite Channels Cable On Channel Fix Off Auto Program Channel Skip Add Channel Label Move Select End Par...

Страница 25: ... Timer 2 Select closed captioning options label video inputs adjust tilt correction select menu languages or run a demo of the menus Timer Timer 1 Set Timer 2 Set Current Time Move Select End Tilt Correction Language English Setup Caption Vision Off 16 9 Enhanced Off Video Label Info Banner Off Move Select End ...

Страница 26: ......

Страница 27: ...cess Menus To Access a Menu 1 Press to display the on screen menu 2 Use the G or g buttons to highlight the desired menu icon Press to select it 3 Use the F or f buttons to scroll up and down through the features 4 Follow the instructions on the screen 5 For instructions on using a specific menu see the page in this section that talks about that menu 6 Press to exit the menu Press once to display ...

Страница 28: ... the red tones Press g to increase the green tones Sharpness Press G to soften the picture Press g to sharpen the picture Color Temp White color tint adjustment Use the F or f buttons to select from one of the following options Cool Gives the white colors a blue tint Neutral Gives the white colors a neutral tint Warm Gives the white colors a red tint VM Velocity Modulation Sharpens picture definit...

Страница 29: ...ter quality sound for stereo programs Off Provides normal stereo or mono reception MTS Multi Channel TV Sound Use the F or f buttons to highlight one of the following options then press to select it Stereo Select when viewing a broadcast in stereo Auto SAP Select to have the TV automatically switch to a Second Audio Program SAP when a signal is received Mono Select to reduce noise in areas of poor...

Страница 30: ... selection Video 1 Select from available video inputs when you have connected video equipment e g satellite receiver and you want your TV fixed to it Off Channel Fix is not set Auto Program Press g to perform Auto Program The TV will scan through all available channels and program receivable channels To access the Channel Setup menu refer to the following steps Press f to highlight an option then ...

Страница 31: ...e Channel Setup menu or press to exit Channel Label Label up to 40 channels with their call letters Press g to open the Channel Label menu 1 Press then press F or f until you reach the desired channel number Press to activate the channel 2 Press then use the F or f button to display the first call letter or number of the caption then press to select it When finished press to activate Pressing CH o...

Страница 32: ...rd is set correctly the next Parental Control menu appears For future access to this menu use your password A password is needed every time you want to access Parental Control menu Keep this manual in a safe place If you forget your password see page 33 Parental Control Password Use 0 9 buttons to enter new password Move Select End To access the Parental Control menu refer to the following steps P...

Страница 33: ...ental Control Menu on page 24 Information for Parents To view a program that exceeds the TV rating Press then use the buttons to enter your password Rating TV will allow a maximum rating of Child TV Y TV G G U S models only G Canadian models only Youth TV PG PG U S models only PG Canadian models only Young Adult TV 14 PG 13 U S models only 14 Canadian models only Custom Select to set more restrict...

Страница 34: ...available rating systems Follow the instructions on the screen to make your custom settings Select the country desired for your TV s rating limit See page 27 for U S models and page 29 for Canadian models for more information Once you have blocked a rating or content all higher ratings or content will be automatically blocked ...

Страница 35: ...rating is divided into two groups age based and content based Custom Rating Press to set Movie rating Movie Rating TV Rating Unrated Allow Return Select End Movie Rating G PG PG 13 R NC 17 X Press to block rating Return Select End Rating Defined as G General audience PG Parental guidance suggested PG 13 Parents strongly cautioned R Restricted NC 17 No one 17 and under admitted X Adult audience onl...

Страница 36: ...wing programs may be blocked emergency broadcasts political programs pro news public service announcements religious programs and weather Age Defined as TV Y All children TV Y7 Directed to older children TV G General audience TV PG Parental guidance suggested TV 14 Parents strongly cautioned TV MA Mature audience only Content Defined as FV Fantasy violence D Suggestive dialogue L Strong language S...

Страница 37: ... from the United States see TV Rating on page 27 English Rating Press to set English C C8 G PG 14 18 Return Select End Rating Defined as C Children C8 Children 8 years and older G General programming PG Parental guidance 14 Viewers 14 and older 18 Adult programming Rating Defined as G General 8 ans Not recommended for younger children 13 ans Not recommended for children under age 13 16 ans Not rec...

Страница 38: ...ay time duration and channel then press The Timer status should be On when the Timer has been set 3 Press to exit the menu When you perform Auto Program Timer 1 and Timer 2 settings will be cleared Also in the event of any loss of power Current Time and Timer 1 and Timer 2 settings will be cleared To access the Timer menu refer to the following steps Press f to highlight an option then press To Di...

Страница 39: ...e TV VHS DVD etc When you press TV VIDEO to switch inputs the Video Label will display on screen Press g to open the Video Label menu 1 Press F or f to access the input you want to label and press 2 Press F or f to choose a label and press Tilt Correction Press g to open Tilt Correction Press F or f to correct any tilt of the picture from 5 to 5 then press to activate and return to the Setup menu ...

Страница 40: ......

Страница 41: ...After using the master password you must create a new password You cannot use the master to unlock currently blocked channels There is a black box on the screen You have selected a text option in the Setup menu page 31 and no text is available To turn off this feature select Off in the Caption Vision option If you were trying to select closed captioning select CC1 4 instead of Text1 4 There was a ...

Страница 42: ...t is flashing on the front of your TV for more than a few minutes disconnect and reconnect the power cord If the problem continues call your local service center Check the TV VIDEO setting when watching TV set it to TV when watching video equipment set it to VIDEO 1 2 or 3 page 3 Try another channel to rule out station trouble Poor or no picture good sound Adjust the Picture setting in the Video m...

Страница 43: ...ppears from the screen page 3 Check your Audio settings Your TV may be set to Auto SAP in the MTS feature page 21 Adjust your TV s volume Low or no audio TV and Cable box Some cables boxes have volume level controls Check and see if your cable box or cable box remote has a volume control Problem Possible Remedies I cannot receive higher number channels UHF when using an antenna Make sure Cable is ...

Страница 44: ...ize 21 inches 533 4 mm measured diagonally Inputs Outputs 1 video 1 audio front 1 video 1 audio back 1 Y PB PR 1 audio back 1 headphone jack front Speaker output 10 W x 2 Power Consumption 140 W in use Less than 1 W in standby Dimensions W H D 631 x 468 x 490 5 mm 247 8 x 183 8 x 191 4 in Mass 25 2 kg 55 lbs 9 oz KV 24FS120 Screen size Visible screen size 24 inches 598 mm measured diagonally Actua...

Страница 45: ...nels 22 Front A V Panel see TV Front Panel 2 H Hue 20 L Language 31 M Menus 19 Audio 21 Channel Setup 22 Parental Control 24 Setup Menu 31 Timer 30 Video 20 MTS Auto SAP 21 Mono 21 Stereo 21 P Parental Control 24 Parental Control Menu 24 Picture 20 Picture Control 20 Picture Controls Brightness 20 Color 20 Hue 20 Picture 20 Sharpness 20 R Ratings English Rating 29 French Rating 29 Movie Rating 27 ...

Страница 46: ......

Страница 47: ......

Страница 48: ...User Guide Sony Corporation http www sony net Printed in U S A ...

Отзывы: